So, you want to make animation, huh? Well, you’ve come to an okay place to learn! ( Not necessarily the right place, but it’s a start)
(Sorry for the lack of updates recently. I’ve been going through a lot in my personal life, but I’m back!)
Update Log
This is where I will post all of the updates for this guide, along with new art additions!
Credits to @Wumpus for the idea to add an update log
11/16/23: Guide created, added motivational messages so that it’s a little useful, and started the Triggers section.
[UPDATE 1] 11/19/23: Added Update Log, Finished |Step 1: Triggers|
[UPDATE 2] 11/20/23: Started |Step 2: The Library of Art| Section, Opened The Library, And added |TIP 1: SHADOW GIMS|
**[UPDATE 3]**11/22/23: Started |Step 3: ![]()
![]()
![]()
![]() CHOOSE YOUR DIFFICULTY!!!
CHOOSE YOUR DIFFICULTY!!!![]()
![]()
![]() | Section, Started
| Section, Started ![]() Difficulty.
Difficulty.
[UPDATE 4] 11/24/23: Completed formatting for choosing difficulty steps, working on ![]() Difficulty!
Difficulty!
[UPDATE 5] 11/27/23: Finished |⬜: The Shield Throw|, Started ’ “Animation” Base Setup. "
[UPDATE 6] 12/5/23: Working on |“Animation” Base Setup: ![]() "|, Finished Step 1 and 2.
"|, Finished Step 1 and 2.
[UPDATE 7] 12/8/23: Finished |“Animation” Base Setup: ![]() "|, Starting |🟦: The Looping Flamethrower!|
"|, Starting |🟦: The Looping Flamethrower!|
[UPDATE 8] 12/9/23: Finished |🟦: The Looping Flamethrower!|, entering “lock-in” mode to finish my guide.
WARNING
I am very new to the forums and am only decently skilled at Creative. All of the information in this tutorial is highly based on my knowledge of the game and browsing through the forums. Some of this information may be completely wrong! I’m making this tutorial for other people like me who wanted to see this cool thing added to the game but didn’t know how. I’m not a master at Creative, but I do know this:
If you want to be the first to discover a new Creative mechanic, create a legendary game, or even just succeed, inside or outside of Gimkit, all you have to do is put in the effort and TRY.
With that out of the way, on to the TUTORIAL!
Step 1: Triggers
Trigger warning
VERY LONG (but IMPORTANT) (but MATHY) NOTE:
You don’t need to have as many triggers as I do because this animation will be 5 FPS for 10 seconds. TIP: If you want to know exactly how many to have, multiply the FPS you want to have by the length of your animation in seconds. For example, my animation is going to be 5 FPS for 10 seconds, so I use 50 triggers because 5 x 10 = 50. TIP #2: To find out how much delay to set on your animation, divide 1 by the FPS and set that as the delay. For example, for a 5 FPS animation, you would do 1 / 5 = 0.2, so 0.2 will be the delay on the trigger when we get to the part where we set that up.
But why triggers, you may ask?
I’ll show you!
Triggers can:
- Use channels for the animation. (already better than wire repeaters.)
- Fairly cheap memory cost for short or low FPS animations. (It can use only 80 memory to make a looping animation compared to The Cheesian Looping Animation system’s 1000 minimum because of 2 repeaters.)
- Some frames can be slowed down or can even freeze in place. (better than Anythinger’s technique because it always has to be at the same speed or some frames will have to overlap, which is a NIGHTMARE for bug fixing, + doesn’t require much knowledge of channels AND cheaper memory.)
(This was mostly just a rant on how this method is better than everyone else’s lol)
Now that you know why triggers are better AND how to use them, let us move on to
THE ART OF YOUR ANIMATION!!!
Step 2: The Library of Art
This section is dedicated to teaching you how to make art for your games, frames for your animation, and MAKING THE ART FOR YOU!
The Library
This section is for the newest or least skilled users to ask how to make things. If you leave a reply down below on what you need, I’ll try to make it for you! (always make sure to check the forums in general for art, too!)
If you haven’t seen your idea in the library, or want to DIY it, I have a couple of important tips. There will be more tips as time goes on, so check the Update Log to see if anything was added to the section you still have questions about.
ART TIP 1: SHADOW GIMS
The most important technique for art in my opinion is the SHADOW TECHNIQUE
This technique uses the tint feature in props (color feature for barriers) to make the prop completely black.
Why may this be useful, you may ask?
2 pictures, the same props with no movement, only adjusted tint.
BEFORE Tint
AFTER Tint
This is insanely helpful for animations that would usually be impossible with non-tinted props, + it feels cooler because of the Shadow Fight vibe.
Now… It’s finally time… to start BUILDING!!!
Step 3: ⬜🟦🟩🟨 CHOOSE YOUR DIFFICULTY!!!🟧🟥🟪
This section will be dedicated to the step-by-step process of going from nothing to a fully completed animation. The harder the difficulty, the more Tips, Frames, Art, and FPS will be used.
NOTE (about difficulty):
Just because it has a higher difficulty rating doesn’t mean that it will necessarily be harder/easier. I feel as though a guide’s difficulty rating should be based on how well they explained it. The guide could be rated a difficulty of ![]() or
or ![]() , but if the person making the guide explains it poorly, It could make it a lot harder to understand. My difficulty ranking will be on how complex they are, not how hard they are to understand. Hopefully all of them will be equally easy to understand.
, but if the person making the guide explains it poorly, It could make it a lot harder to understand. My difficulty ranking will be on how complex they are, not how hard they are to understand. Hopefully all of them will be equally easy to understand.
SUPER IMPORTANT NOTE (very important!)
I 1000% recommend reading the tips section in The Library of Art. In some of these easier guides, I won’t be using all of the building techniques, but you should still always use them to make even simple animations or just art in general.
"Animation" Base Setup: 🟨
This is the absolute minimum necessary setup to make a true “animation” type animation, where the screen is in full view and you can’t move.
This is more necessary for the animations (including:yellow_square:) below ![]() , as all of the animations above
, as all of the animations above ![]() will have this built into it. You should still have this, just in case you want to start with a base.
will have this built into it. You should still have this, just in case you want to start with a base.
Time to start!
STEP 1
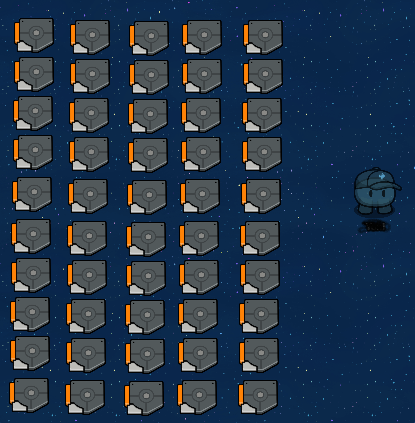
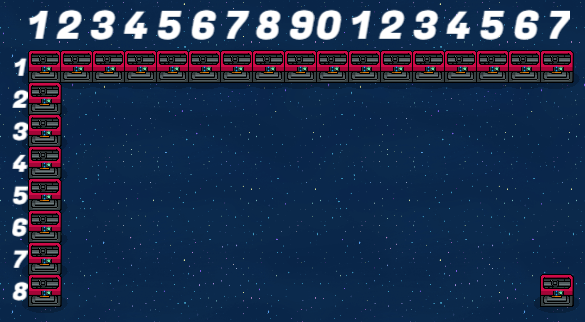
Firstly, go to the Options in the bottom-left corner, or the Gear icon ![]() . go to Editing Options and set the Grid snap to 32. Get the 3D printer prop and make a 17x8 grid, as shown:
. go to Editing Options and set the Grid snap to 32. Get the 3D printer prop and make a 17x8 grid, as shown:
|
You won’t need all of the ones on the edge or the text, mainly the corners are what’s important.
STEP 2
Get a Camera View and set it off to the side. copy 3 3D Printers. Place one touching the farthest top right corner, move another halfway above but still inside it, and move the last one on the same vertical area (or y-axis) as the other 2, but 32 studs below the bottom-right most printer, and add the camera view inside the original area but at the height of the other 2. You can delete them after you have the camera view down, but I recommend moving it to the side. Look at the picture for a better understanding.
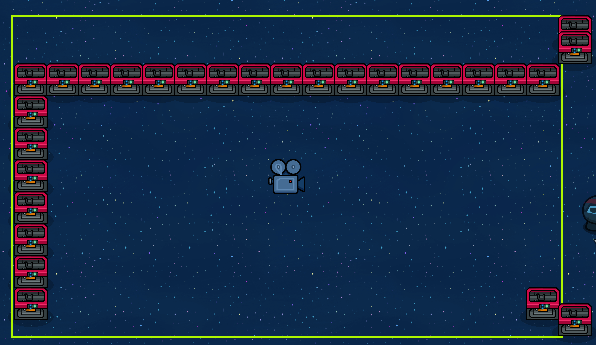
|
STEP 3
Get a teleporter and a barrier that’s invisible to the player in-game. surround the teleporter as tightly as you can without leaving room for movement. Get a long metal pole and line it up diagonally with the top left and bottom right printers. Put the teleporter box in the middle, using the camera view for the vertical middle.
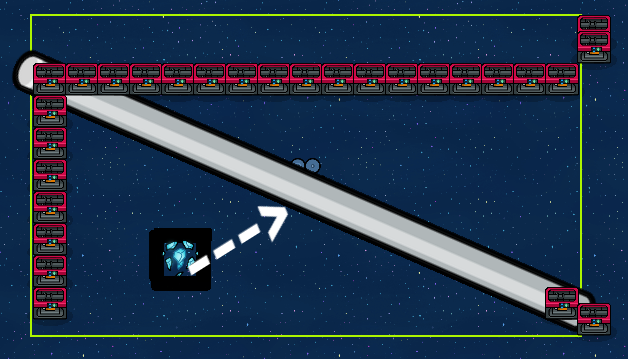
|
This position gives the best ratio view, and it’s small enough for even tiny props to take up half of the screen. It also stops big camera movements if you have a weapon, too.
STEP 4
Place a barrier like shown in the image below. Make sure that EVERY PROP IN THE ANIMATION, INCLUDING THIS BARRIER, IS ON THE ABOVE LAYER. Make sure that the barrier is the lowest item on the above layer so that you won’t be able to see the player.
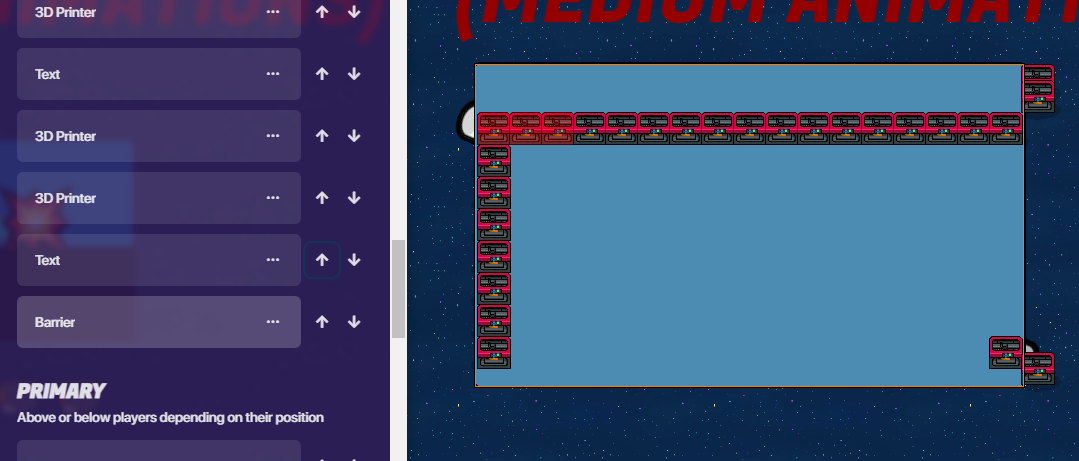
|
STEP 5
You’re done! everything inside the image below is what the player will see, so the barrier is now your canvas! What will you create? Keep in mind that you can’t copy camera views, so make sure you have a replica off to the side if you ever want to use this template multiple times. (Remember to hide the printers, and sorry about the handwriting, it’s hard on PC!)
|
And now you have a great base for some harder animations! You’re halfway through the difficulties, so DON’T QUIT NOW!
Now, onto the DIFFICULTIES!
⬜: The Shield Throw
The easiest possible system, and a good place to start, albeit the bare minimum
Recommended for:
- 5 total frames
- 1 fps
- 1 prop per frame
- completely new to gimkit, or just confused about this system.
It is recommended that you read the “Animation” Base Setup if you want your animation to take up the whole screen and for the player to be locked in place.
STEP 1
Find an open space to build your animation. Find the prop you want to use and get the frames set up, something like the image below. Make sure that they are all set to not be visible on game start, the first option in the “Availability” tab when you select the object.

|
STEP 2
Since this has so few props AND FPS, we will be using wire repeaters to save memory on triggers. Get 6 wire repeaters and a trigger, and wire them in a line formation, connecting them with wires.
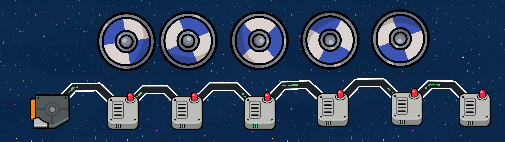
|
STEP 3
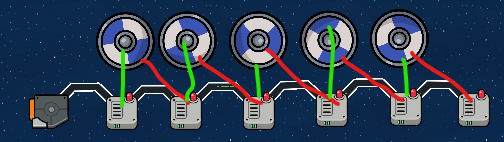
Look at the image below.
Set all of the green wires to show the prop.
Set all of the red wires to hide the prop.
|
STEP 4
Set the wire repeaters to however fast you want, as long as they are all the same.
STEP 5
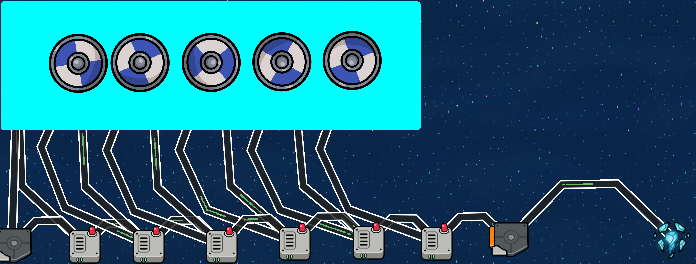
Set up the first trigger (or whatever you used to start it) to a teleporter on top of the animation, preferably with a barrier box around it so the player can’t leave. I added a barrier to make the background, and set everything above the player in layers so that you won’t be visible when its playing. For more info on the base, read ’ “Animation” Base Setup. ’ It should look something like this:
And now you have a basic wire animation! Ready to take it up a notch?
🟦: The Looping Flamethrower!
A good guide for people wanting to have a looping animation, or for people who like flamethrowers!
Recommended for:
- 2 looping frames
- any fps
- any # of props per frame
- understands a little, but still doesn’t know how to make a loop.
STEP 1
Meet the Pyro!
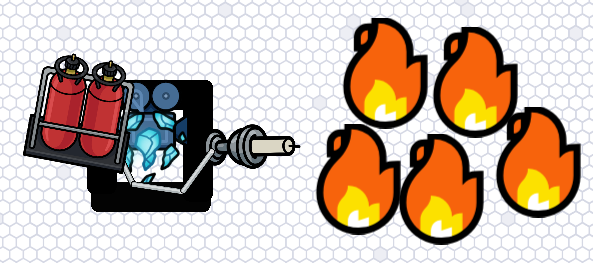
|
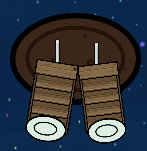
Set up a flamethrower as shown. More detail on the barriers, teleporter, and camera view in the animation setup. The props are a Gas Tank, 3 short metal poles, and a candle. The fire is a Text device with this → emoji set to 100 size font. ![]() ← Copypaste this if you don’t know how to get emojis.
← Copypaste this if you don’t know how to get emojis.
STEP 3
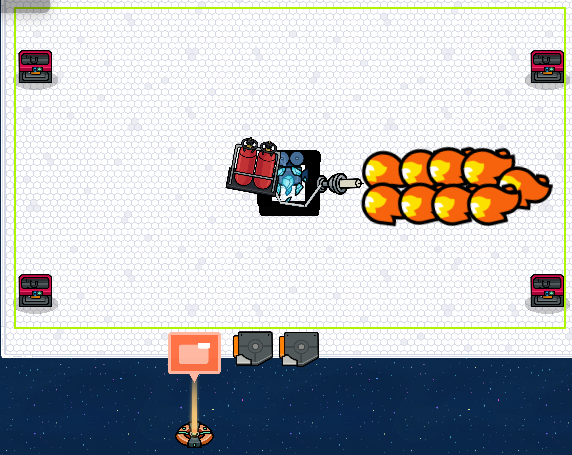
Get 1 Game Overlay set to Button Type and 2 triggers, setting the Overlay to be invisible on game start. Get another trigger that will be stepped on to teleport you to the animation and show the pop-up. Make that trigger transmit on “flamethrowerstart” Make sure you have everything like the image below
|
STEP 4
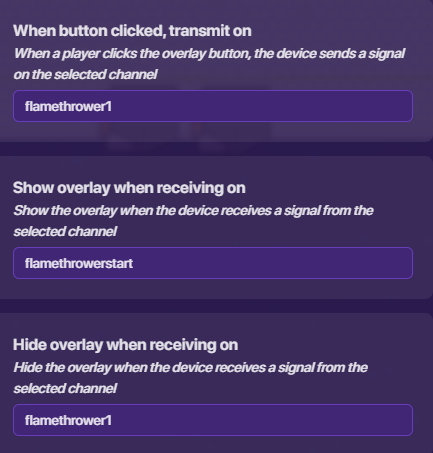
Set the popup to these settings, making sure it’s still invisible on start. Make the teleporter teleport you to it when receiving on “flamethrowerstart”
|
STEP 5
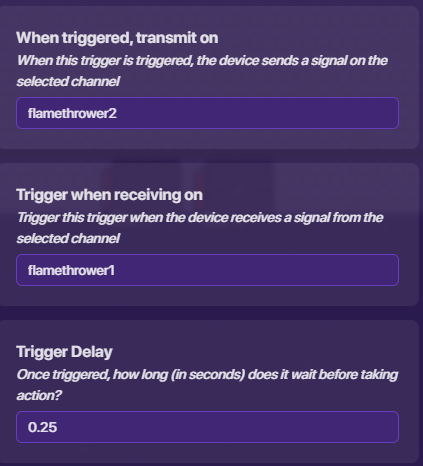
Make the 1st trigger have these settings and the other one have 1 and 2 switched around so that they loop with each other.
|
STEP 6
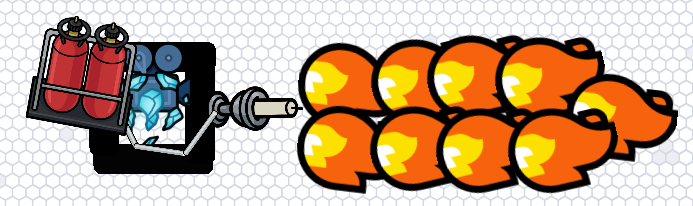
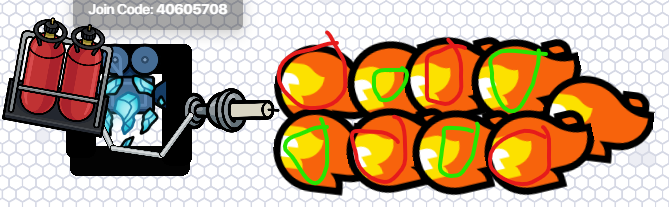
Time for the complex part.
Set all of the green circled ones to show when receiving on flamethower1 and to hide when receiving on flamethrower2. for the ones circled in red, flip the numbers around. Set the one on the tip to show when receiving on flamethrower1 but to not hide. You can adjust the speed of the triggers as long as they’re balanced, too!
|
Enjoy the Arson charges!

secret tip: use the shadow gim method to make it you like your enemies turned to ash!
Now you know how to loop your animation AND your first trigger animation! Starting to feel the burn? get it? BURN???
🟩
not started
STEP 1
COMING SOON
STEP 2
COMING SOON
STEP 3
COMING SOON
STEP 4
COMING SOON
STEP 5
COMING SOON
STEP 6
COMING SOON
And now you have a starter animation! Ready to take it up a notch?
🟨
not finished
STEP 1
COMING SOON
STEP 2
COMING SOON
STEP 3
COMING SOON
STEP 4
COMING SOON
STEP 5
COMING SOON
STEP 6
COMING SOON
And now you have a starter animation! Ready to take it up a notch?
🟧
not finished
STEP 1
COMING SOON
STEP 2
COMING SOON
STEP 3
COMING SOON
STEP 4
COMING SOON
STEP 5
COMING SOON
STEP 6
COMING SOON
And now you have a starter animation! Ready to take it up a notch?
🟥
not finished
STEP 1
COMING SOON
STEP 2
COMING SOON
STEP 3
COMING SOON
STEP 4
COMING SOON
STEP 5
COMING SOON
STEP 6
COMING SOON
And now you have a starter animation! Ready to take it up a notch?
🟪
not finished
STEP 1
COMING SOON
STEP 2
COMING SOON
STEP 3
COMING SOON
STEP 4
COMING SOON
STEP 5
COMING SOON
STEP 6
COMING SOON
And now you have a starter animation! Ready to take it up a notch?
you shouldn’t be here.
You’ve mastered every difficulty of animation, great job! Now try and develop it even more on your own! [STORY MODE COMPLETE: FREE PLAY UNLOCKED!]
END OF TUTORIAL
if you’re reading this even a few months before this was created, this guide will most likely not be finished. Honestly, I don’t even truly know why I’m doing this. The main thing you should take away from this guide is to always put in the effort, even if it isn’t something you love to do because putting in the effort is one of the most important skills you need to succeed.
THE END
for now