Welcome to Code Quest - 
A guide to learning how to use block code in Gimkit Creative!
This Guide is a work in progress
Want to help contribute to this guide? Simply send your part in the comments, I’ll edit it a little bit and put it into this topic with credit to you!
Updates:
Version 1.1 - Added Part 1 (chapters 1-3) - @Wumpus
Version 1.2 - Added Chapter 4 - @VALUEX
Version 1.3 - Set Up Code Quests
Version 1.4 - More Possible Chapters Listed
Version 1.5 - Added Chapter 5 - @VALUEX
Version 1.6 - Fixed Chapter Numbering Issues
Version 1.7 - Made text bigger & edited some images
Version 1.8 - Added a bit more content to chapter 3
Version 2.8 - Added the first quest - @Wumpus
Version 2.9 - Added Chapter 6 - @VALUEX
Version 2.10 - Added the “What is my name?” Quest - @Wumpus
Version 2.11 - Condensed Chapters

These tutorials teach users how to properly use and configure block code in gimkit creative through a series of chapters and sections, not all of these are complete
 Part 1 - The Beginning
So, you want to learn how to Code in Gimkit Creative? Lucky for you, this guide is a multi-part series featuring in depth explanations on how to start coding from the ground up. It doesn’t matter if you have never even seen the coding feature in GC, this guide will (hopefully) be able to teach you it all.
Chapter 1 - What is block code?
Chapter 1
Coding is a way to make different machines and functions follow specific instructions, for example imagine you have a small robot that you want to move around your room in order to clean it for you. You could program it to move forwards, however it hits a wall after a few seconds of travel. To fix this you could make it so that the robot turns once it hits a wall, moving to another part of your room until it hits another wall, congrats your robot now will travel along the entire perimeter of your room, cleaning anything in its path!
While this is an incredibly simplified example, its good to start at the absolute basics.
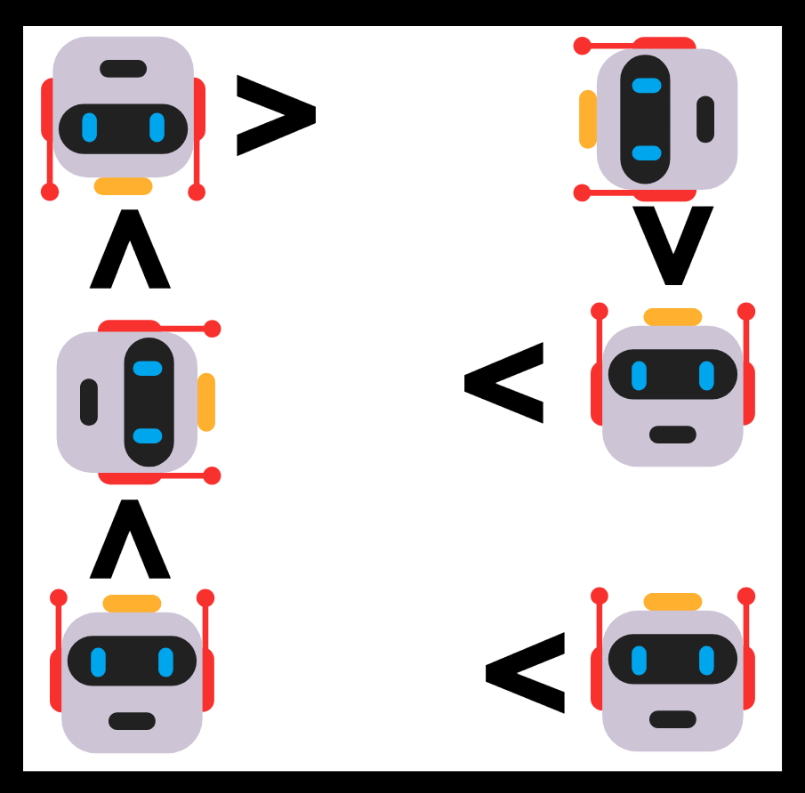
Picture of the robot (the square) doing the program above
End of Chapter 1
Chapter 2 - “Hello World”
Chapter 2
Now the first thing you will almost always program when first learning a programming language is printing the words “Hello World”. To do this in gimkit creative is quite simple. I’ll take you through the basic steps:
-
Add a lifecycle and text device to your gimkit creative world.
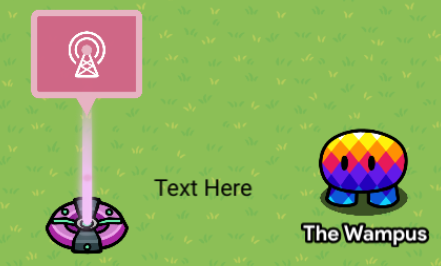
-
Have the lifecycle device listen for the “Game Start” event, and broadcast “Start”.
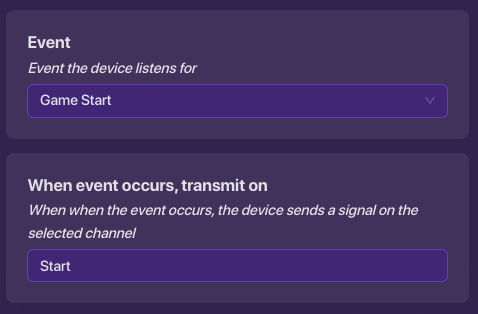
-
Add a code block to the text device, and have it run the block when “start” is broadcasted.
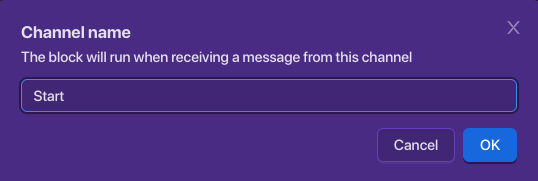
-
Add two blocks, the “Set Text” block and the “Text” block, put the words “Hello World” in the text block.
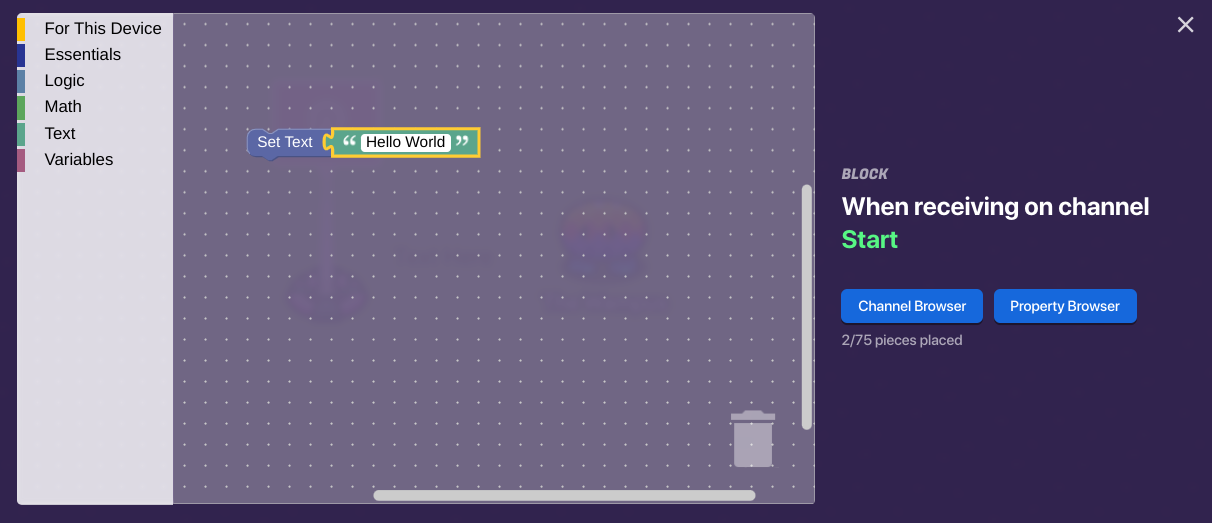
🌟 - New Block Discovered - Set Text
The Set Text block is specific to the Text device, it allows users to change a text device to whatever they want while the game is running!
🌟 - New Block Discovered - Text
The text block can be used to input different text into variables, properties and other blocks!
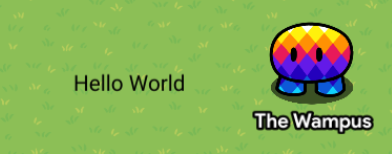
Now when you start the game, you should see the text change to “Hello World”! If you don’t see this happen, try asking for help in the comments, or look over the tutorial again!
End of Chapter 2
Chapter 3 - Intro to If-Statements
Chapter 3
If statements are incredibly useful for checking properties, math equations, and more! Lets get into how exactly we use them, and what sort of things we can make!
To see how we can use If-Statements to our advantage, follow these instructions:
-
With the Lifecycle and Text device we used earlier, go into the block code of the text device.
-
In the block code, add an “If-Statement”, “Equals” Block, “Text Block”, and a “Triggering Player’s Name”.
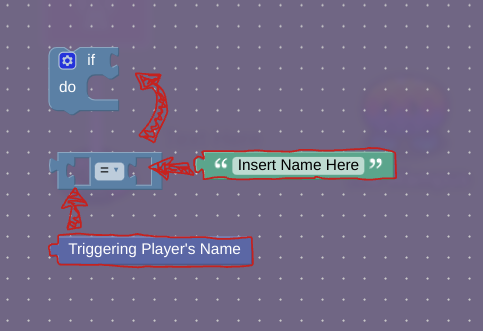
🌟 - New Block Discovered - If-Statement
If-Statement blocks are essential for almost every game where you need to compare values of properties, text, and more!
🌟 - New Block Discovered - Equals
The Equals, or comparative block is used for multiple things like checking True/False values!
🌟 - New Block Discovered - Triggering Player's Name
This is a super cool block that is used in If-Statements, it is often used to see if specific people have joined a game!
- Now that we have a functioning If-Statement we can use the code from earlier in the tutorial to make “Hello World” be shown!
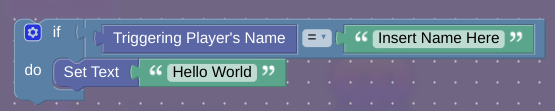
Now what this code is essentially doing, is first checking if the player’s name is equal to whatever you put in the text box, and then if that is true it changes its text to “hello World”.
End of Chapter 3
 Part 2 - Operations and Advancement
This is an upcoming section of Code Quest which will most likely be here in a week or two. This section will add a few more chapters which introduce new interesting mechanics and blocks that you can learn!
Chapter 4 - What are variables? (Created By @VALUEX)
Chapter 4
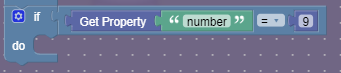
Variables are one of the most important blocks. Why do we use variables if we can just use properties? Well variables may not always be ideal, but can save block code. For example, if I wanted to check if a property equals something, using if statements, I would just use the get property block and find my property and put it every time into each check, easy right? Well what if we have a lot of if statements, and sense there is a 75 block limit we might surpass it. How do we avoid this? Well that’s where variables are used!
🌟 - New Block Discovered - Get Property
The Get property block is essential to using a property inside of block code!
Add a new device called “trigger” and wire the lifecycle to it, just like you did for the "text"device, but instead of a channel it will be “when triggered” and done(ish)!
This is a example of how the get property block can be a disadvantage (sometimes).
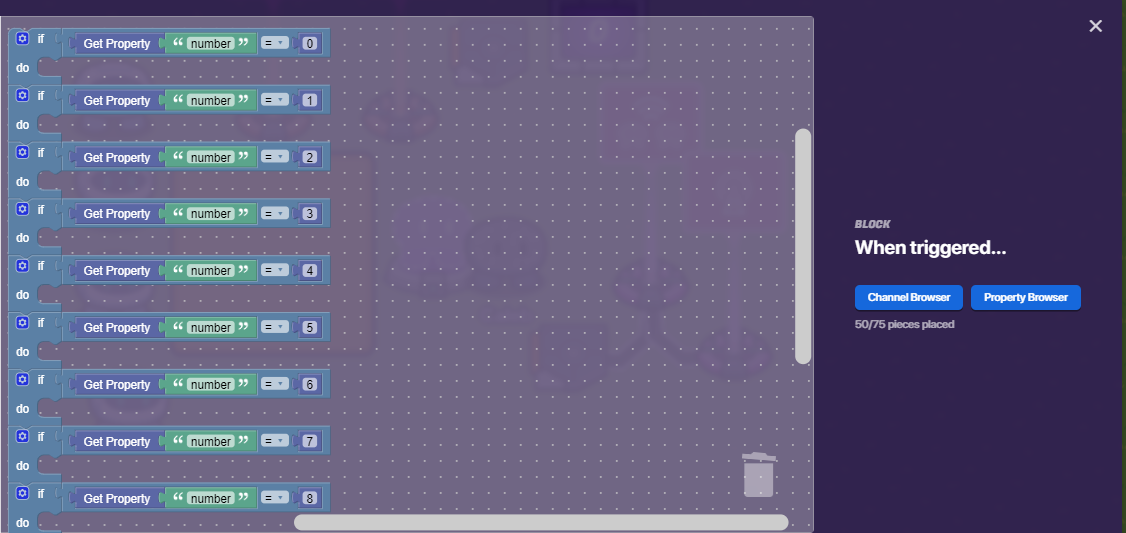
🌟 - New Block Discovered - Zero
**The Zero block is used probably the most! It can help you check if something equals a certain number and it can help set certain things to that number to! **
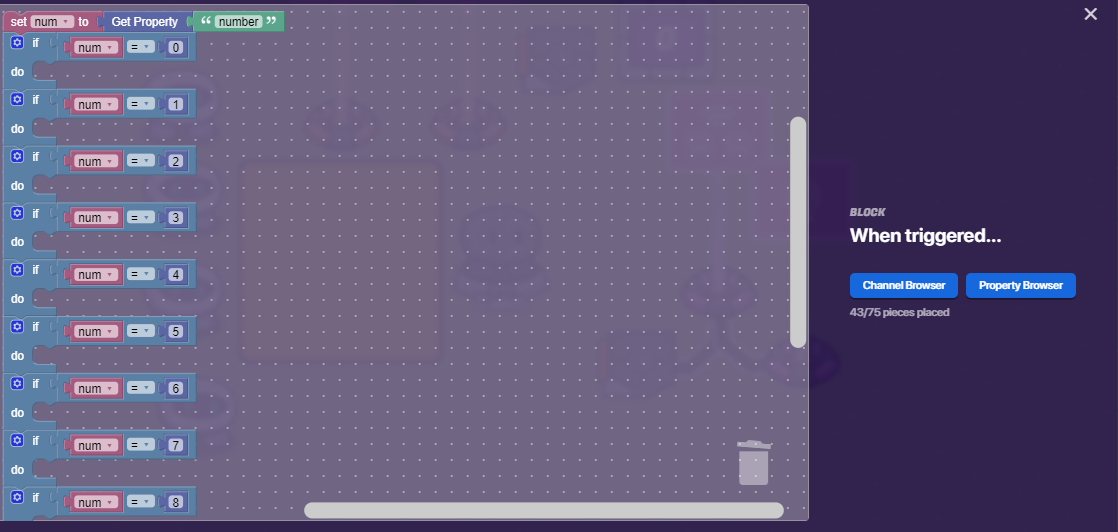
There are three ways to shorten this block code, but we will only use one of those, the second will later on be introduced in another chapter. Head on over to the variable category and hit the “Create variable…” button and it should show a overlay for you to type in and type the name of your variable. Call it “num” which is mainly used in programming as a shorter way of saying “number”, and finally click submit. It should show you three new blocks! We’ll only use two of those for now.
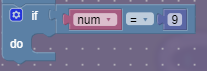
Add the set num to get property number then instead of get property number = 0 replace the get property number block with the num block in the variable category.
WARNING
Variable values DON’T carry over to other devices, which is why properties are ideal in that sense.
🌟 - New Block Discovered - Set Variable
The Set variable block enables us to set any variable we have made within a device to whatever we want!
🌟 - New Block Discovered - Variable
The Variable block is used for logic gates and to set certain things to a value of a variable!
What happens if we want to change the value in each of those if statements above? Well that’s where the change variable by 1 block comes in!
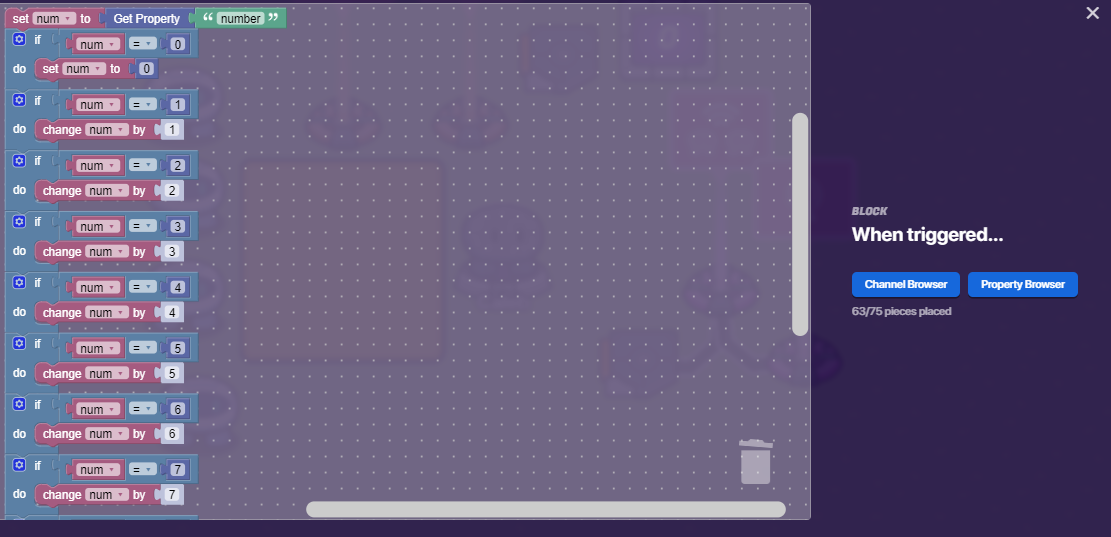
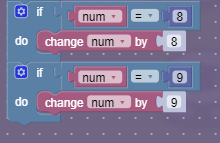
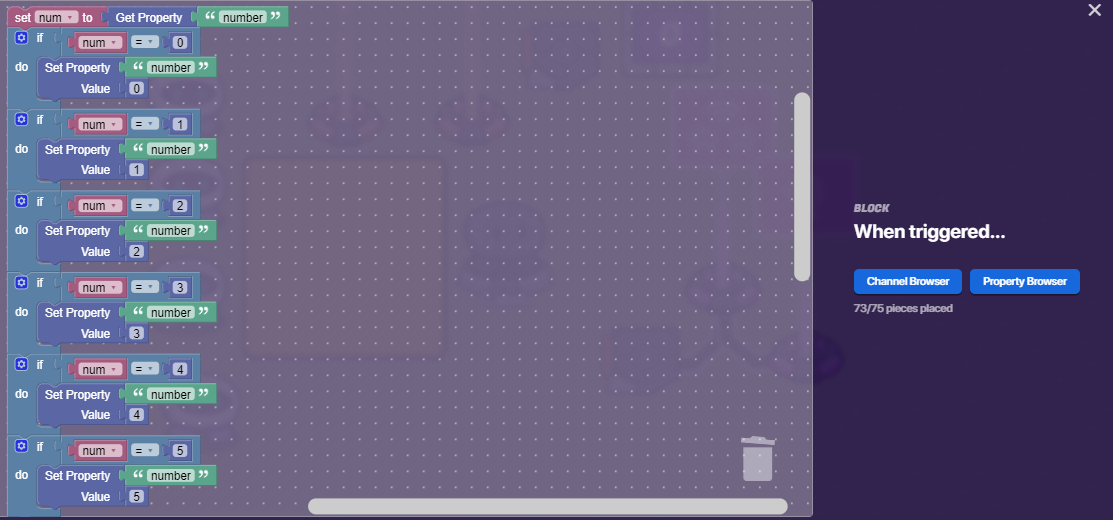
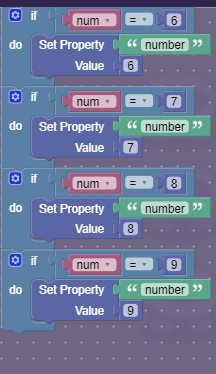
73! Crazy, right? However there is a major problem with this. This system doesn’t change the property by the value, it sets it to the number it already is, and if we wanted to still continue with this system we would have to use the + operator block in the math category, but it would take up too much space. So that’s why we need to use the variable way. So then how do we set the property to that variable number??? Erase all these blocks and replace them with the variable way and add these following blocks at the end:
![]()
🌟 - New Block Discovered - Set Property
The Set property block enables you to set a property to whatever you want, and well, it is one of the three ways to do so!
End of Chapter 4
Chapter 5 - How properties work (Created By @VALUEX)
Chapter 5
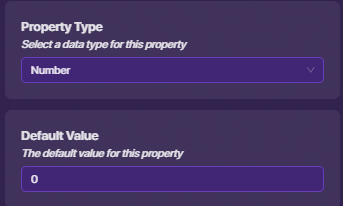
In the previous chapter we learned how variables work, and we also learned a bit about properties. One thing though, if you decided to send an activity feed at the end of the example I had made for the variables chapter, you probably didn’t get anything…why? Well, it was because the property wasn’t actually made yet. What do I mean wasn’t actually made yet? What I mean is that just like variables we need to make properties, but instead with a device called the…Property.
There it’s, but doesn’t it seem a bit plain? Well if you go inside we can set the name!
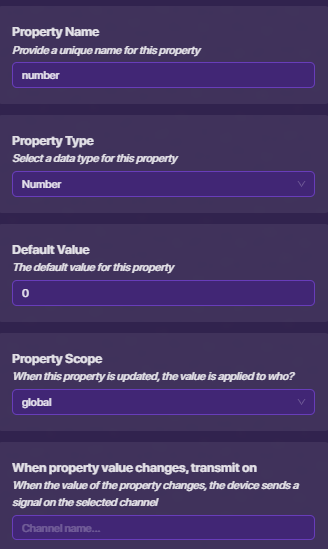
Above are the settings for my property.
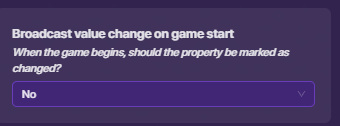
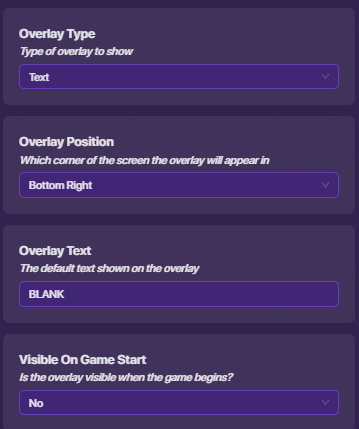
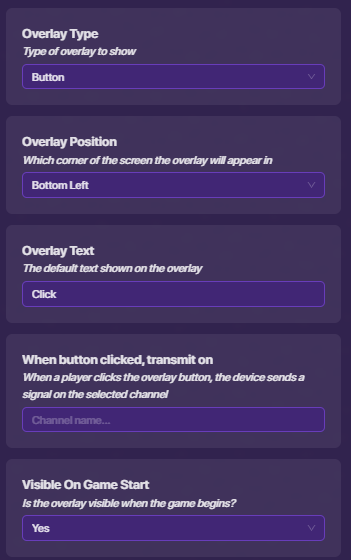
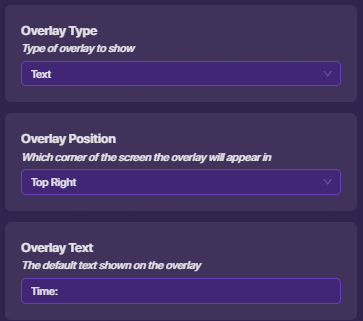
The settings above is only used in certain things and as you can see in its description it’s for when you want to send a message on a channel and consider the first value of the property as a change. Head on over to the device tab and add a game overlay! Set it to these settings(make sure the lifecycle is wired to it!):
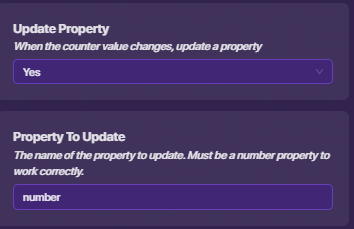
Now head on over to the property and change the last option in its settings to “Yes” and add this:
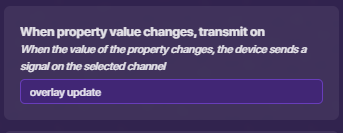
Then, go to the overlay and add a block that is “When receiving on channel…” and set the channel to “overlay update” and add these blocks:
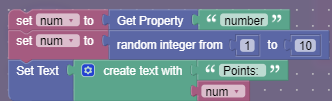
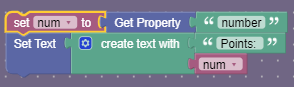
Now you’re probably like “Whoa! Valuex what is going on here??!!” And it’s ok, after all, this is to learn and no to throw you into a firepit to work on this all without an explanation. First, we set the variable num to the property number. Afterwards, we set the variable num to a random number between 1 and 10 and lastly, we set the text of the game overlay to "Points: " + the random number.
🌟 - New Block Discovered - Random integer from number to number
This block enables us to set different variables, properties and other things, to a random number between the given numbers!
🌟 - New Block Discovered - Create text with
This block combines different types of things and creates a text with it, that is a straight line, so the given example would give the output as: Points: [insert random number]!
When we combine different types of values using the Create text with block is called: concatenation. Which is ideal to most games that use block code. Now that was cool and all, but this is about properties not this random and concatenation stuff. Well, that’s what we’re about to do! Sure the overlay shows a random number, but it doesnt really show us true point values, instead it is just random. So let’s get points! Add another overlay, but with these settings:
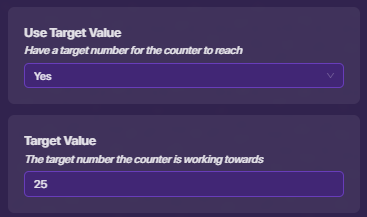
And add a counter with these settings:
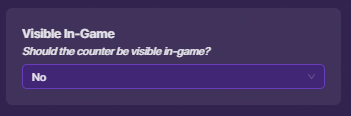
Wire the overlay to the counter like so: Button pressed —> Increment counter. Now, run it and see what happens! You pressed the button and…the same old thing happened. Why? Well in our block code for the point overlay is updating with a random number, and not by the true value of the property. Remove the random block along with that entire thing there and leave this:
And there you go it works! You may have noticed that the target value we put for the counter isn’t doing anything, why? Well we forgot that we need it to do something through a wire or a channel, so let’s do that! Wire the counter to the overlay like so: Target reached —> Hide overlay. Then, add a end game device and wire the counter to it like so: Target reached —> End game. Cool, we have a simple game that works! Try messing around with the values and stuff and see what you can make! Oh and for next time I will show you how to make a special addition to this game, so make sure to not delete it! (Unless you feel like rebuilding it all over again…)
End of Chapter 5
Chapter 6 - If-Statements + (Created by @VALUEX )
Chapter 6
Previously, you learned how properties work, and even made a small game with block code! Now, we will add even more updates to that small game! How? If statements! Yes, the kings of logic they’re indeed. In Chapter 3, you learned the basics of If-Statements, but now we will go in depth of what they can really do.
Go ahead and add a new overlay and add these settings:
Then add a new counter with these settings:
Afterwards, add a repeater with these settings(make sure to wire the lifecycle to it):
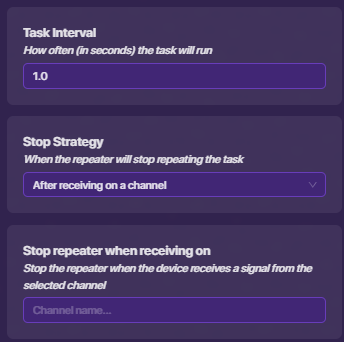
When something is repeated constantly, neverendlessly, it is called a infinite loop.
Nice! If you press play the same thing happens, right? Well, we need to add some block code!
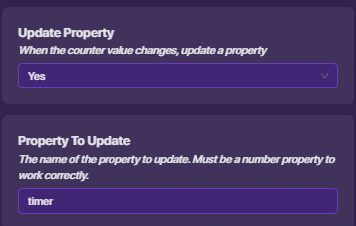
Add a property called timer, with these settings:
Now, add a block of code for the new overlay and make it the same channel we used for the property. Next, add this code to the overlay:
And run the game! You see the overlay updating! That’s great! You may notice if the time surpasses 60s it just keep going up and up and up, but that isn’t how time works, right? So add these blocks:
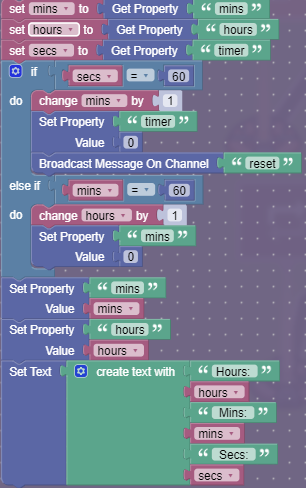
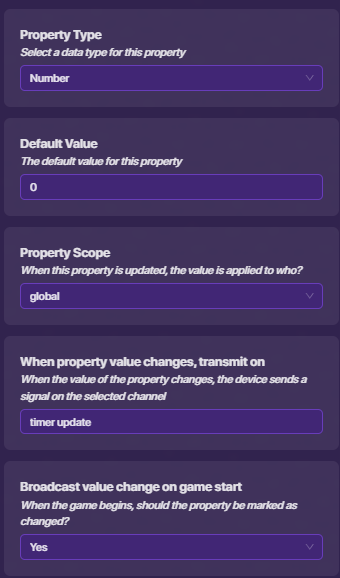
There you have it! A fully functional system for converting time and showing it! There is a lot to take in here, so let me explain it all, one step at a time! All that is happening is that it is converting the number of seconds to minutes, once it surpasses 60 seconds, and if the minutes surpass 60, then the hours increase by 1. This is a timer, but advanced, and you can edit it if you want! Make sure to have added the two properties minutes, and hours, with these settings:
You may also notice that in the logic gate(if statement) it has something conected called the
else if block. In order to add it, click on the gear button next to “if” in the if statement and it should show up this: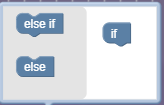
Drag the else if block onto the if statement and done! You can see that there is a block called
else which we will get to in the next part of this chapter.
We start off by declaring our variables(most programmers do so) then we add our logic gate(if statement). If you remeber Chapter 3 - Intro to If-Statements, we learned how if statements work, but not how else if works, so let me explain it. An else if statement is a very important part of logic gates, why? It allows us to add more if statements, without using another if statement block. This shortens code, but does the same thing as an if statement. So in reality the code where it says: else if (mins == 60) do: chage mins by 1, set property "timer" to 0, broadcast message on channel "reset" it really is just saying: if (mins == 60) do: change mins by 1, set property "timer" to 0, broadcast message on channel "reset"
🌟 - New Block Discovered - else if
The else if block is just a if statement, but inside of the if statement. When multiple ones are threaded with the same check for a certain value of something, it will go checking down one by one, until it finds the one that does pass the check. It can also save space! In order to use it tap on the gear button next to the if block!
That’s great! We learned something new and our small game is coming together! In part 2 of this chapter I will show you how to use the else block and work with more math blocks!
End of Chapter 6
*Chapter 7 - Merging Block Code & Devices
Coming Soon
 Part 3 - Mastery, and Advanced Topics
This is an upcoming chapter which will teach users advanced ways of using block code, adding multiple different chapters that once completed, suggest mastery of block code in gimkit creative… at least for now.
Chapter 8 - Advanced Property Calling
Coming Soon
Chapter 9 - Recursion
Coming Soon
Chapter 10 -
Coming Soon

Code Quests are a feature specific to this guide where users can attempt different coding “quests” that allow them to improve their skills with coding in Gimkit Creative!
![]() - Beginner Quests
- Beginner Quests
These quests prioritize the learning of basic coding skills, and don’t introduce too many vague concepts
Quest - The Trophy (![]() )
)
Difficulty Level: ★☆☆☆☆
Reward: (![]() ) Code Quest Medal
) Code Quest Medal
Items Needed
1 - Text Device
1 - Trigger Device
1 - Wire repeater
2 - Wires
Quest Details
Using only a few devices, try and create a system that whenever a player knocks out a specific number of people, a text device is changed to a trophy, or special message!
Quest - What is my name? (![]() )
)
Difficulty Level: ★★☆☆☆
Reward: (![]() ) Code Quest Medal
) Code Quest Medal
Items Needed
1 - Button
1 - Notification Device (+ Block Code)
Quest Details
With only two devices, try and make a system that sends a little notification stating your nickname whenever you press a button!
![]() - Advanced Quests
- Advanced Quests
These quests dive a little deeper into advanced coding knowledge, and are only recommended if you have mastered the beginner quests
Coming Soon
![]() - Mastery Quests
- Mastery Quests
These quests are the hardest coding challenges so far, they use Gimkit Creative knowledge from far and wide, and are only recommended for users who have mastered the advanced Quests
Coming Soon