NOTICE!
THIS GUIDE IS A WIP! MORE WILL BE ADDED SOON!!
DO NOT CHANGE ANYTHING IN THIS WIKI UNLESS YOU HAVE PERMISSION!
Update log: V.1.0.20
This is for all the things that change in the wiki.
V.1.0.0: Original guide was created.
V.1.0.1: @surprised.Patrick Added a poll.
V.1.0.2: @surprised.Patrick Gave credits to @Txme_Lxss
V.1.0.3: Messed up edit.
V.1.0.4: @Blackhole927 Created this as a wiki.
V.1.0.5: @Slim Changed the links to oneboxes.
V.1.0.6: @surprised.Patrick Added: DO NOT CHANGE ANYTHING IN THIS WIKI UNLESS YOU HAVE PERMISSION!
V.1.0.7: @surprised.Patrick Separated all big paragraphs into shorter paragraphs.
V.1.0.8: Messed up edit.
V.1.0.9: Messed up edit.
V.1.0.10: @Slim Added the tags tug, tycoon.
V.1.0.11: Messed up edit.
V.1.0.12: Messed up edit.
V.1.0.13: @surprised.Patrick Removed poll and added part of step 4.
V.1.0.14: Messed up edit.
V.1.0.15: @surprised.Patrick Nearly finished step 4.
V.1.0.16: Messed up edit.
V.1.0.17: @surprised.Patrick Finished step 4 and created the update log.
V.1.0.18: Messed up edit.
V.1.0.19: @surprised.Patrick Created and finished step 5.
V.1.0.20: Messed up edit.
Hello, and welcome to my Tycoon TUG! Today, we will be going over the things you need to create a tycoon! Whether you are making a wizard tycoon, to a tycoon about the number 7, this guide will help you the whole way through! I would like to give credits to @Shdwy, @DriftUknown_YT, @Txme_Lxss, and @WolfTechnology for creating these guides:
(Go check those guides out!) This will be a more advanced version of all their guides, but combined. It will also have more things you can add.
Anyways, enough of my yappin let’s get into the guide!
Step 1: The Base.
You can change your base to look different than mine, but here’s the end result of the base:
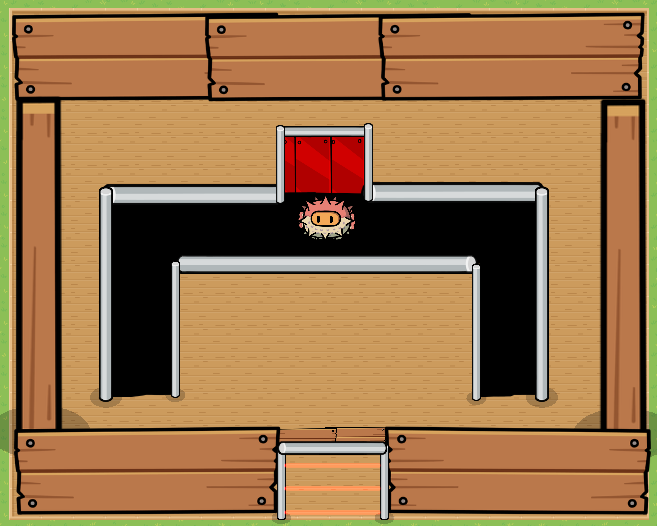
To start off, build a 20x16 grid floor out of BOARDWALK.
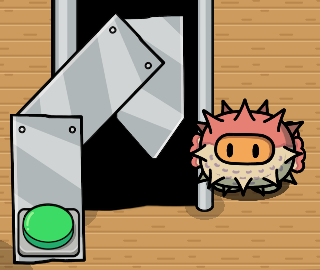
Next, create a laser door by placing two metal poles at the bottom (front) of the building. Then, add another metal pole, rotate it 90 degrees, and put it to the top of the poles. Lastly, add 3 laser beams at the top, middle, and bottom of the door, and then, you’re finished with your laser door!
Remember to put everything in this step as ‘Visible on Game Start’ to NO! EXCEPT THE CONVEYOR! When finished, it should look like this:

Next up are the walls! First, get a dark wooden sign, and size it to fit the front and back walls, getting it above the laser door as well. Once done, get 2 dark wooden poles, and place them on the left and right of the floor. The finished product should look as so:

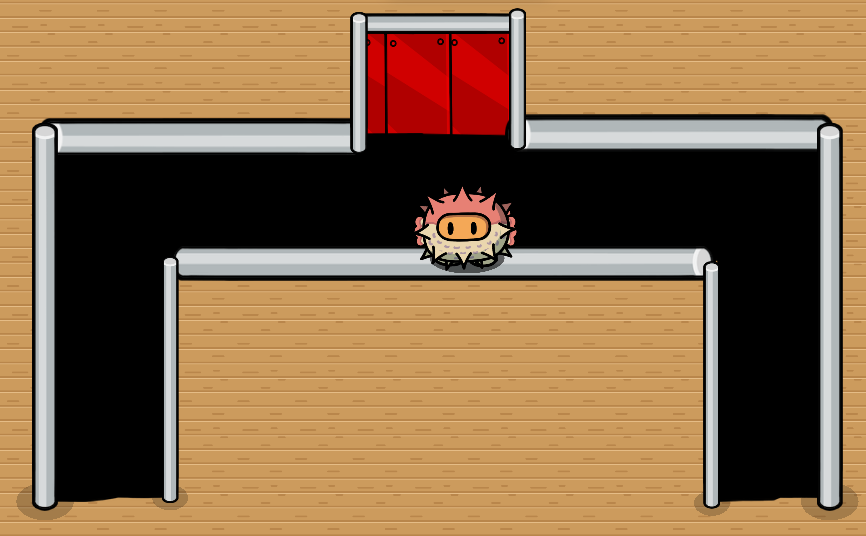
Next up is the conveyor!!!
To create this, get a metal sign, and tint it pitch black. Now, just to get things straight, you can create any conveyor style you want, but I will be going with the classic three-row-meet-in-the-middle-type conveyor. To resume, get metal poles and place it on the left, right, and top of the sign.
Next, add a metal sign (again pitch black) to connect both metal signs. Add a metal pole at the bottom of the metal sign we just added. Finally, add a final metal sign tinted to any color you like to create the drop section. Box this out with metal poles, and you have finally finished step one! Here’s what it looks like when it’s completed:
Great job so far! Time for step two.
Step 2: The Click Dropper.
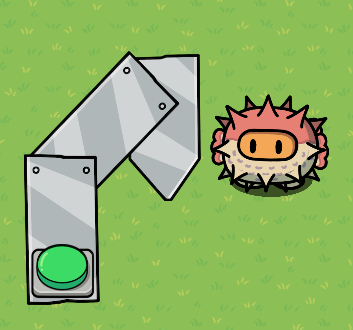
Welcome to the first Dropper! The first thing to create is the design of the Dropper. First, create a metal pole, and rotate it 90 degrees.
Next, add another one, and tilt it to a 45 degree angle. Lastly, get a metal sign that looks like an arrow, and make the arrow face down. I’m not the best at art, so you can upgrade your Dropper.
Then, add a button inside the Dropper. The Dropper should look like this right now:
Next, create an item granter, granting 1 Cash, and wire the button to the item granter like so: Button Pressed → Grant Item. Lastly, position the Dropper to the conveyor as shown:
This step was easy, and the next step won’t be as easy. (By the way, I moved the item granter out of the picture.)
Step 3: The Auto Dropper.
To warn you, this step will not be as easy, so good luck.
To start off, use the design you had for our Click Dropper, but this time move the button a little to the left, and an optional choice is to create a button activation loop.
Also, set all metal signs to ‘Visible on Game Start’ to NO! Lastly, set ‘Show Prop’ on auto1 for all metal signs.
For this Dropper we’ll need to create a vending machine, and set it to item required: Cash, and Amount: (Changeable). Set the ‘When Item Purchased Transmit On’ to auto1.
You now have your automatic system, but now we have to make it able to add cash. This part takes a long time, and will always be this way until I find a new way to do this.
For the cash, create an item granter, and a LOT of wire repeaters. Wire the button to the wire repeater as Button Pressed → Grant item. Next wire the Button to your first wire repeater, with 1 second delay.
Wire the wire repeater to the item granter to grant the item. Copy what you did for the wire repeater, but each time you add a new wire repeater, add another second of delay to the wire delay. Move the whole system to the conveyor as shown:

Good job on step three, see you in step four!
Step 4: Purchasable Walls.
This step is not hard at all.
So first, create a vending machine, and set “Visible In Game” or something like that… to no. Also, set the Required Item to Cash, and the amount of how expensive the walls should be. Lastly, set the stock amount to 1.
Next, create a button, and wire it to the vending machine as Button Pressed → Attempt To Purchase.
Now, if you did Step 1 right, the walls shouldn’t be visible on game start. Because of this, you wire the vending machine to the front wall as “Item Purchased → Show Prop”.
Then, do the same thing, but only wire the vending machine to the left and right walls.
Finally, do the exact same thing you have been doing, but wire the vending machine to the back wall.
I told you this step would be easy. See you next step at the laser door step!
Step 5: Laser Door.
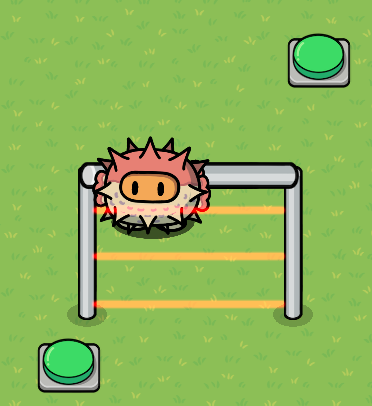
To start off, move the laser door we created earlier to somewhere that fits for you.
Next, add TWO buttons that are not active on game start. Place them as shown:
Great! Now, we will use the same system as step 4.
First, add a button. This will be the button to purchase the laser door. We will call this the purchaseButton.
Now for the main part. First, wire the purchaseButton to a vending machine with the required Item as cash, the required amount is the price you want the laser door to cost. Make the wire be “Button pressed → Attempt to Purchase”, and wire the vending machine to the poles as “Item Purchased → Show Prop”. And that’s basically the quick recap of how to do that.
Next up is the lasers. This is pretty simple in my opinion, so let’s do it!
Wire the button that will be inside the base to the lasers to activate the lasers.
Lastly, wire the button that will be outside to the lasers deactivating them.
Now, you’re done with the Laser Door! See you on Step 6: Floor Two.
Thank you for reading this far! More stuff will be added over time, but this is all I have for now. I hope you enjoyed my guide for today, and again, huge credits to all the people I mentioned before. Please note that this took me 3 hours to make, so please don’t go like “oh there’s already a guide on this”, because I know, and credited them, but I added more stuff than other tycoon guides. Step 6 will be out soon, so again, thanks for reading, and see you all next guide.
-surprised.Patrick