No one edit this but Grey_Stone.
If you are facing a challenge while creating a calculator or a keyboard chat system, you might have realized that you cannot add a backspace button. However, nothing is impossible and I am here to help you if you have any issues. Also, do not be afraid to point out any bugs or glitches in the system. I have produced an idea that involves storing each number in a property and removing them when you press the button. This method works well for creating a calculator. My system allows you to remove up to six digits before pausing and sends you a notification to alert you that you need to enter other digits for it to work. In this guide, I will show an early example of my calculator, which will be my next guide. I apologize if you have read all this, but Gimai suggested that I add introductions to my guides. So, let us dive right in and get started!
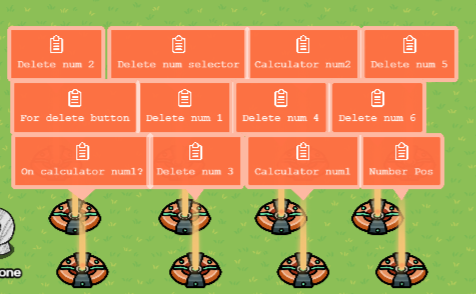
Once you have finished the guide, it should look something like this (Ignore most of the wires):

Components for an any-digit backspace:
12 properties, (Only thing that can change)
7 triggers,
2 wire repeaters,
1 notification,
1 counter, and
1 button.
Part 1, The properties.
All these properties’ scope is set to global. For a guide on scope, look here.
First, let us make a number property called “Calculator num1” with a default of 0. This is the first number you will be doing math with. Next, make a number property called “Calculator num2” with a default of 0. This is the second number you will be doing math with. Then, make a number property called “For delete button” with a default of 0. Whenever you set a new number, you will also change this. This MUST be changed for the button to work. Next, make a true/false property called “Number Pos” with a default of true. Whenever you have a number in the negatives, you want to set this to false for the button to work. Finally, add a true/false property called “On calculator num1?” with a default of 0. This decides whether you are backspacing “Calculator num1” or “Calculator num2”. If you are adding this to another build, these 5 properties are the only ones you are going to change. Next, make a number property called “Delete num selector” with a default of 1. This property when changed broadcasts on “Updated num selector”. It is not marked changed at the start of the game. Now make six (Or however many digits you want your backspace to go. Note, as you increase the number of digits deletable, your memory goes up.) number properties, called “Delete num1” and “Delete num2” and “Delete num3”. You get the idea. Just do that 6 times. ![]() You are now done with part one!
You are now done with part one! ![]() By the way, this is what it should look like:
By the way, this is what it should look like:
Part 2, The other things (Not including code. Yet.)
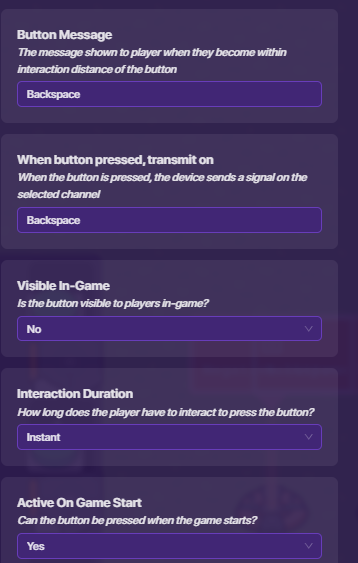
First, you are going to need a button. Set the settings to this:
Wire that button to a counter. Button pressed>Increment counter. Here are the counter’s settings:

These are the only ones you need to set. Set the target value to however many digits you want to be able to delete. Then, wire that to a notification. Target reached>Send notification. My notification says: Title “Hey!” Content “Just so you know, you can only backspace 6 numbers at a time before having to add new ones.” Change 6 to however many digits you want to be able to delete. Notification type “Info.” I have found that these allow your notification to be informative without sounding rude. Now, add a wire repeater near the counter. Wire it to the counter. Pass the signal on>reset counter. Do this same thing with another wire repeater. Wire all of your digit setting buttons to these wire repeaters. Whenever someone presses a button on your calculator, it will reset the counter.

Section 3, The code
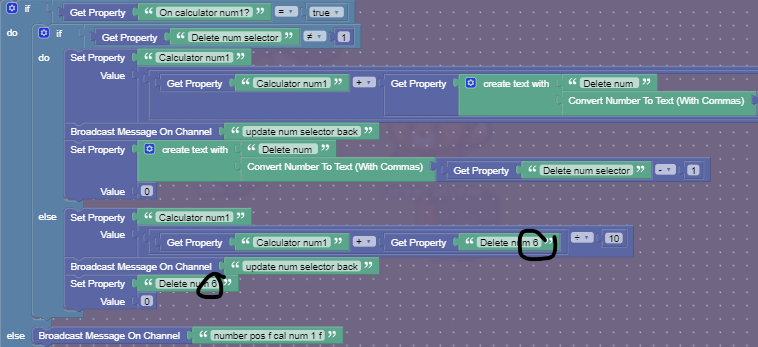
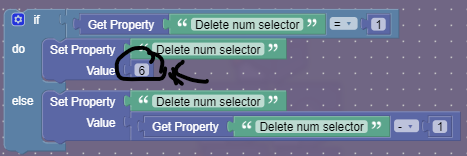
If you’ve been reading this entire thing, I know you are like “There’s still MORE?” It is a long guide, But you are on the final stretch (Kind of). All of the triggers will be visible in-game and triggerable by collision set to off. This is VERY important. You don’t want people walking around and messing everything up. First, place a trigger that triggers when receiving on “Delete”. In the block code, put this in:
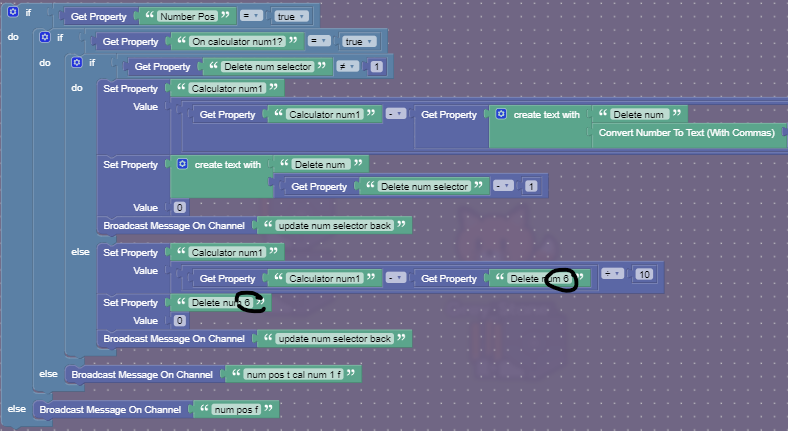

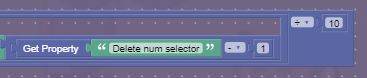
(If you are using a number greater or less than 6 for your number of digits deletable then just put that number into the places where the arrows are pointing. If you see black arrows anywhere, remember this.) Next, put a trigger down. It triggers on “num pos t cal num 1 f”. The block code for this trigger:
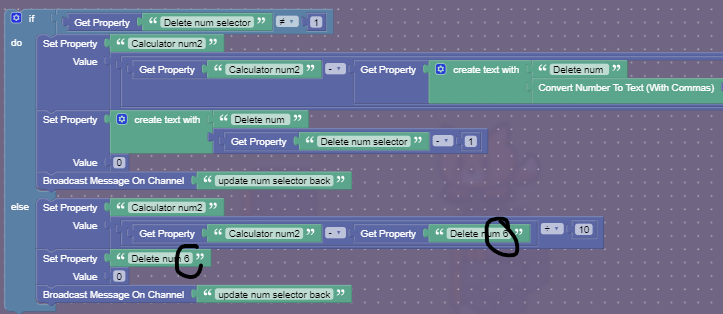

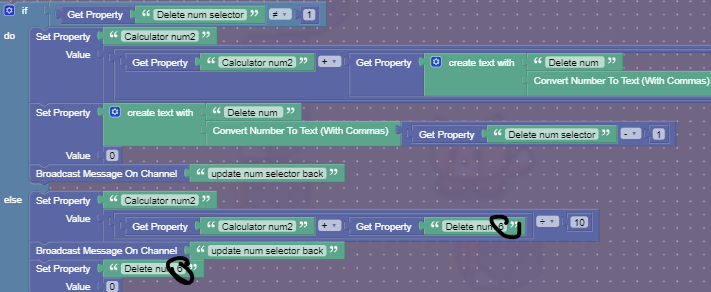
Now, put another trigger down. It triggers on “num pos f”. Put this in the block code:
Next, put down a trigger. It triggers on “number pos f cal num 1 f”. Put this in the block code:

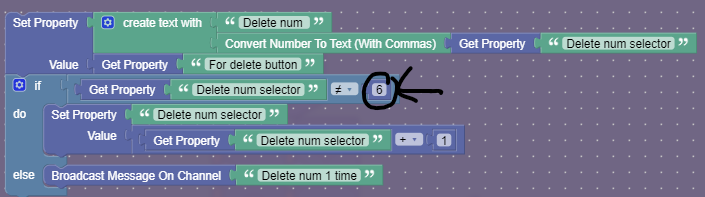
There! Now you are done with the long part. Only 3 triggers left! First, put down a trigger. It triggers on “Update delete num”. In the block code, put this:
Now place down a trigger that receives on “update num selector back”. Put in this block code:
Finally, place down a trigger receiving on “Middle text update”. Put this in the blocks:

You are done!
Thanks for sticking with me!![]() I should have a calculator guide out within ∞ weeks. I will then show you how to properly integrate the delete key into a calculator.
I should have a calculator guide out within ∞ weeks. I will then show you how to properly integrate the delete key into a calculator.
Please be reasonable, I don’t want any 1/10s.
- 1/10 -

- 2/10 -

- 3/10 -
- 4/10 -

- 5/10 -
- 6/10 -

- 7/10 -
- 8/10 -

- 9/10 -
- 10/10 -

- 11/10 -
