Welcome to another Baldi’s Basics guide! This series of guides will be teaching you how to make a Baldi’s Basics game in Gimkit Creative and perhaps even more, including art, functions, and more! ![]() (Yes, this is something else that will be brilliant!) Since this guide is an art guide, you’ll only need two things: Gimkit and your creativity!
(Yes, this is something else that will be brilliant!) Since this guide is an art guide, you’ll only need two things: Gimkit and your creativity! ![]() Let’s get started!
Let’s get started!
![]() OTHER GUIDES
OTHER GUIDES
Other Guides
Baldi’s Basics Guides— How to Make A Classroom [Difficulty: ![]() ]
]
Baldi’s Basics Guides- Classroom & Notebooks (PART 2)– [Difficulty: ![]() ]
]
Baldi’s Basics Guides— Hallways & Doors [Difficulty: ![]() ]
]
Baldi’s Basics Guides— Characters: Playtime [Difficulty: ![]() ]
]
Now without further ado, let’s get started! Here are all of the steps!
 SUGGESTION: Zoom out of your screen so you can edit and see many different details at once; it helped me with this guide!
 TIP: I recommend not using barrier outlines so you can have it look cleaner! You can if you choose, or if you’re a better artist than I am!
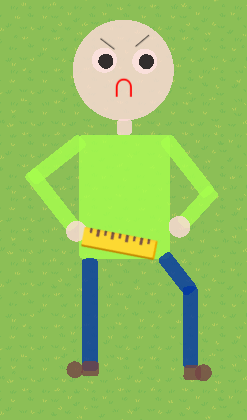
Finished Product
Step 1
Use a square-shaped barrier for the body, and color it green ![]() , for Baldi’s shirt. Then copy the body and resize
, for Baldi’s shirt. Then copy the body and resize ![]() it looks like Baldi’s skinny and scarily thin arms. Do this four times for his arms.
it looks like Baldi’s skinny and scarily thin arms. Do this four times for his arms.
Step 2
Then, using two circle ![]() barriers, color them the shade of Baldi’s skin and place them adjacent to the arms. Ta-da! Now his arms! Go to the next step!
barriers, color them the shade of Baldi’s skin and place them adjacent to the arms. Ta-da! Now his arms! Go to the next step!
Step 3
Using two rectangular barriers for his legs, color them blue ![]() for his pants. You can make them straight or use another extra one for detail. Then, using two small square barriers and two circle barriers, color them all brown
for his pants. You can make them straight or use another extra one for detail. Then, using two small square barriers and two circle barriers, color them all brown ![]() for Baldi’s shoes.
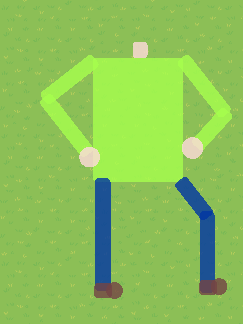
for Baldi’s shoes. ![]() Place the square one first and then the circle one in front. Now you have his shoes! Once done, go on to the next step; It should look something like this:
Place the square one first and then the circle one in front. Now you have his shoes! Once done, go on to the next step; It should look something like this:
Step 4
Next, let’s make his head using a circle barrier! Color it the same as his hands. Using a text box, make an “upside down U”, (which is a curved n) and color it red for his lipstick-smacked frown. Then, using four circle barriers, color two them white ![]() (larger than the others) and two more black
(larger than the others) and two more black ![]() (smaller than the others) and layer the black ones on top of each white one! Those are his eyes!
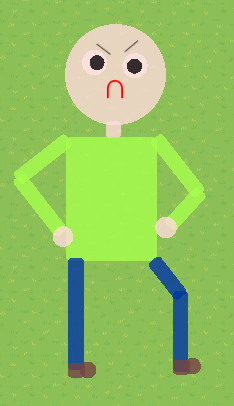
(smaller than the others) and layer the black ones on top of each white one! Those are his eyes! ![]() Now, don’t forget to use a square barrier for his small yet visible neck! (This is funny!) Now you’re done; go to the next step and it should look something like this:
Now, don’t forget to use a square barrier for his small yet visible neck! (This is funny!) Now you’re done; go to the next step and it should look something like this:
Step 5
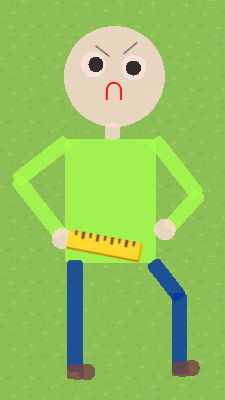
Add some special details for the character! Add some slanted eyebrows to imply anger, add a text box and use a RULER emoji and place it on his hands for the cool chasing effect! ![]() You can add anything else you’d like; but you’re done! Enjoy this amazing yet easy guide! (Now your worse fears won’t just be him chasing you; it’s just looking at him!)
You can add anything else you’d like; but you’re done! Enjoy this amazing yet easy guide! (Now your worse fears won’t just be him chasing you; it’s just looking at him!)
![]() And that’s all for this guide! Hopefully, you have created your own gigantic Baldi! The game is going to be released soon, (no promises), and I look forward to seeing Gimkit Creators making their original 'Basics art! More guides are coming soon!
And that’s all for this guide! Hopefully, you have created your own gigantic Baldi! The game is going to be released soon, (no promises), and I look forward to seeing Gimkit Creators making their original 'Basics art! More guides are coming soon!![]()
Happy Gimkitting! ![]()
Love’s out!
