Introduction
Hello again! I haven’t been too active on guide making, as I have been busy recently making a name for myself as the guy to go to for thumbnails. Sometimes, it’s a little hard to keep up with the demand I’ve been receiving, and lots of people have been asking about my methods, so here I am, revealing my secrets if you will.
!!! Important !!!
The gimkit forums have recently been cluttered with thumbnail requests. I tried to combat the clutter by showing everyone how to make their own, but I totally understand if you don’t want to do it. I’m happy to do it over email for anyone (check bio), but that’s just me. If you want to poll or get multiple inputs, please use the Padlet, as the clutter has led to a lot of OGs on the forums abandoning it, and it suppresses actual calls for help and guides.
Padlet Link
I also have my own padlet specifically for my thumbnail requests:
Padlet Link (Personal)
Software
For my thumbnails, I use Pixlr E, which is a free online tool. Of course, with it being online AND free, it’s gonna have its limitation, which is the export limit of 3 daily. This has been a problem for me, as y’all will know. Also, this will not be identical, as there are way to many parameters for this to be a 1 to 1 guide for what you need, but it’s a good starting point.
Drafting
To begin working on your thumbnail, create a list or sketch of what you want. Mostly just think of what weapons or tools the gims will use, what gims you will put on the thumbnail, and the name/logo.
Another thing to take into account is the layout. You have to think, “Where are the gims gonna be”, “What are they doing” and things like that. It’s important to think, not only about what is there. but what they are doing as well.
Getting Started
To get started, create a new 720p canvas, or thumbnail as it is referred to by Pixlr. You may wonder, why not 1080p? Most assets aren’t gonna scale up to 1080p, so they are just gonna look low quality. That, and most people playing will not have a 1440p monitor, or even a 1080p monitor. Most people playing your map will be on Chromebooks. The website doesn’t scale thumbnails up to full resolution either, so it’s a waste.
To begin, find a background layer. Something you can use in the background. If it is 3d, you can use Remove.bg to remove the background of the background, so you can have a separate foreground for layering.
These are the 2 assets I had for my Gimnite thumbnail:


The foreground will be blurred, and will only be used as an alpha/mask to any gim/object you want to be in the middle ground.
Adding Gims
To begin adding gims, search for the gims you have pre-allocated, and find a transparent version of them. Most of the time, you can find transparent versions from the fandom wiki, but you can also sort by transparent:
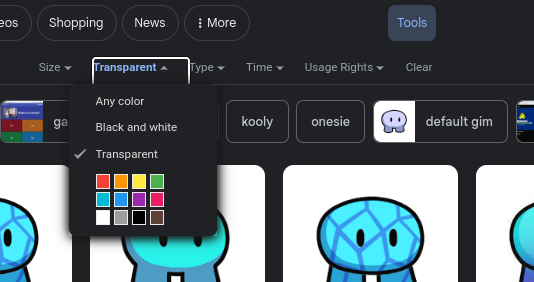
The best way to tell if an image is transparent is to check if it shows up with a white background on the Google grid view but has the icon checkboard when clicked on in the left-side preview. If the image you want is not transparent, you can Remove.bg.
If you want them to be holding weapons, do the same process to find transparent versions of those, and add them in a place where it looks like the gims are holding them.
Creating a Logo
For the logo of your game, it’s best to use Pixlr’s textboxes, as they have tones of customizability. Tweak them until it suits you.
Post Production/Effects (Literally my specialty lol)
To top of the image, we need to add post-production. Add vignettes to all the gims, so they appear 3d. You can also add shadows. If the sun is visible in a setting position, you can duplicate the image of your gim (ctrl+d) and then distort it using transform to match the sun (ctrl+k). Find the brightness/contrast option, and use that until the shadow gim is black. Then blur it, and either tweak the opacity and/or change the blending mode.
To tweak all the colors under the filters drop down until all the images look clean. You can then right-click on one of the elements, and flatten the image. When flattened, tweak the filters until it looks perfect.
Bonus: bloom (my iconic glowy look)
The best way to make a bloom filter is the way that actual Triple-A game devs do it. Pixlr’s bloom is not good in the slightest unless you want more white.
Duplicate the fully flattened image, and then on the top layer, begin tweaking the colors. Change the glamour, bloom (yes, we want more white), and contrast/brightness until dark spots are black and bright spots and super saturated and bright. Then use opacity/screen blending to make it look glowy. Here is an example:
Bloom layer:

Final product:

Conclusion
Thanks for reading my guide! This one was huge, and took a really long time to write. I love helping people out, and making thumbnails is one of my favorite things to do. Of course, if you like my work and want to support me, I have a website (https://beansite.vercel.app) where I want to get ads set up soon. I really love making these, and I don’t have many responsibilities right now, but I want to save up my money to help my parents with the bills, even if it’s not that much. I really do love gimkit.
~M1dnight out