Welcome to “Everything You Need To Know About Creative”
This is a topic created to be a giant tutorial course for users looking to learn how to use Gimkit Creative
If you would like to contribute to this guide send your tutorial in this topic, and I might just add it.
Update Log
-Version 0.0.1 - Released The Beginner Creator Section
-Version 0.0.2 - Released the first two chapters of the Advanced Creator Section
-Version 0.0.3 - Added two chapters for the Other Tutorials Section
-Version 0.1.3 - Released The "Everything You Need To Know About Creative guide
-Version 0.1.4 - Added the Recursion Chapter for the Mastery Section (Made by @CringeKarlScott )
-Version 0.1.5 - Added the AUO Chapter for Mastery (Made by @shdwy )
-Version 0.1.6 - Added the Publishing Chapter for the Other Tutorials section
-Version 0.1.7 - Added the Never Use Repeaters chapter for the Other Tutorials section
Credits
-Thanks to @VALUEX for some of the tutorials from Code Quest
 Beginner Creator
As a beginner you’ll learn the complete basics of using creative
Chapter 1 - The Interface
In order to actually use gimkit creative, you’ll need to understand what each button does in the editor. To begin, lets go over each button and section:
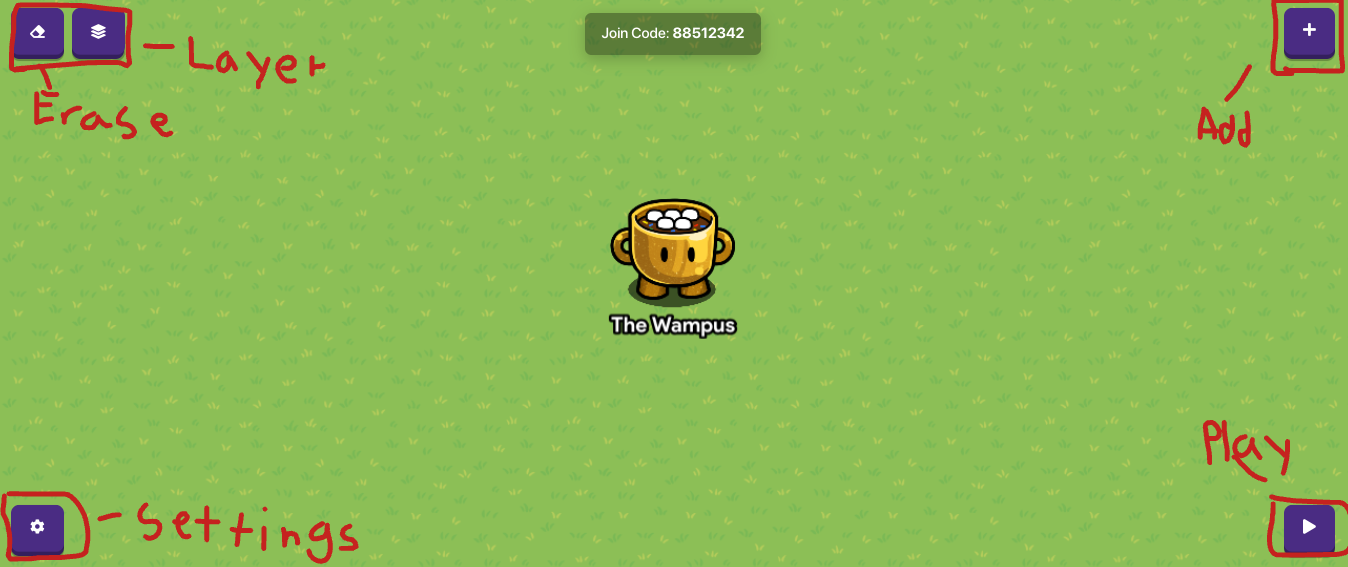
This screenshot shows in red all of the different buttons in the editor
The Add Button
When pressed this button shows four different things you can add to your world in order to make it unique :
- Terrain - Basically a way to change the environment under the player
- Props - The decorations for your creative map
- Devices - How you make the world function in different ways
- Wires - A way to connect your devices and props to make different outcomes
The Eraser
This is mostly self explanatory, however with the eraser you can remove all sorts of objects from the world.
Settings
The settings menu allows you to change numerous things about the world.
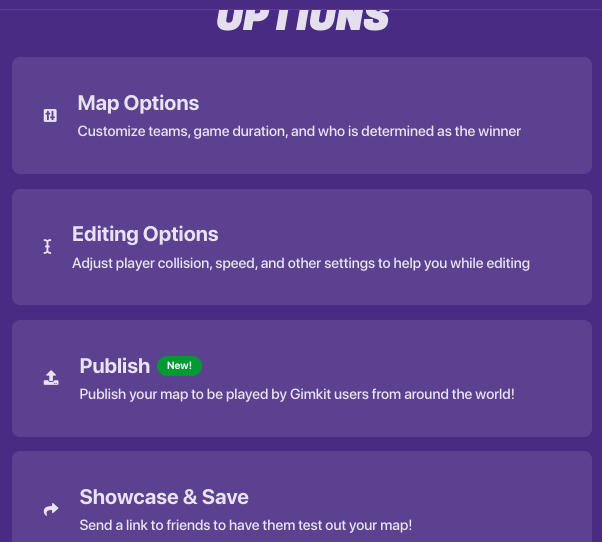
A screenshot of some of the options in the settings menu
- Map Options - Allows you to change things like music, teams, and player health
- Editing Options - Makes editing in creative more accessible by adjusting speed, field of view, and collisions
- Publishing - The place where you can put your game on the gimkit website, see an in depth tutorial on how to get your game published later in the guide
- Showcase & Save - Allows you to save your gimkit map and give a temporary publish link to others
Layering
This button makes it so you can change which props and devices are shown over each other, this is helpful when you want props to be shown above or below the player, or when you are making a piece of art.
If you want a more in depth guide on layering , go to chapter 3 of the Beginner Creator Section!
Play Button
This is how you are able to test your game, press it to go into play mode where all of your devices will be active and ready to use!
Keybinds
Press E to open the add menu.
Press Q to open the eraser.
Press Z to place a wire.
Press C while hovering over a device to duplicate it.
Press M while hovering over a device to move it.
- While moving a device, hold H to lock the prop’s movement horizontally, and hold V to lock its movement vertically.
Press E while in the eraser to start placing whatever terrain you last used.
Whilst selecting devices/props, press Backspace to delete them.
In device options:
Tab, Up arrow, and Down arrow help to navigate through a list of options in a setting.
Press Enter to select whatever option you have navigated to.
In the size changer:
Hold Shift to snap angle while rotating.
End of Chapter 1
Chapter 2 - How Terrain Works
Terrain is a useful decoration tool in gimkit creative which is mainly used for creating floors and walls in your maps!

Screenshot of the terrain section
In order to create a map that looks nice, you’ll want to put some terrain in the area, but how do we use it? Well once you select a terrain that fits with your map, you’ll want to select if you want the terrain to act as a floor or a wall.
Floor
Floor is a type of terrain that doesn’t have any collisions, this means that your character can walk on top of it.
Wall
Wall is another type of terrain that has collisions, which means that the player can’t walk on it, and must go around.
Layering Terrain
Finally once you select a floor or wall, you’ll need to choose the layer of the terrain. The higher layer selected, the higher it will appear. This mean that terrain with a layer of one will be shown below terrain of layer two.
Tips for Placing Terrain
- Shift to switch between wall and floor.
- Space to hide the hud, space again to show it.
- 1, 2, 3, or 4 to switch brush size.
End of Chapter 2
Chapter 3 - Props and Layering
In gimkit, props are the primary way to make your games look detailed and visually interesting, so lets go over a few tips and tricks to make your maps look good!
-
Don’t use too many props - Often times in games I notice a huge amount of props being used to decorate games, making it feel overwhelming for players at times. Additionally you don’t want to use too few or the game will feel empty.
-
Layer your props - In the layering tab we showed in chapter one, we talked a bit about how layering worked with props and terrain, however we can go a bit more in depth. When you place down a prop, it will usually be put in the Primary Section.
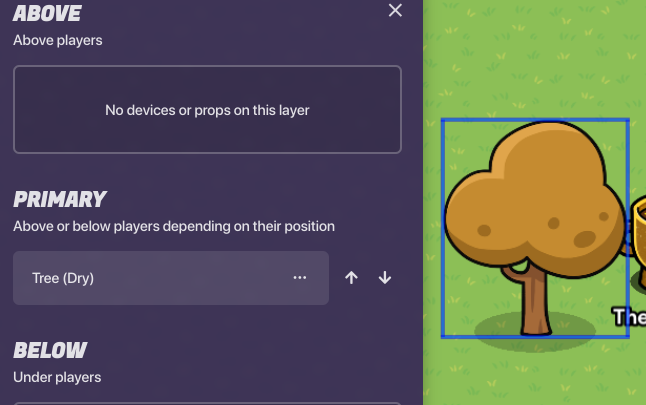
Screenshot of layering a tree
Primary Layer
The primary layer means that depending on the player position, the object (in this case a tree) will be put above or behind them.
Above Layer
The above Layer always puts the object infront of the player.
Bellow Layer
This layer always puts the object below the player.
Additional Tips
-
By selecting multiple props, you can change the laying to only be using those props instead of those on your screen.
-
If you click on the three dots next to a prop you need to layer, you can instantly send it to any layer without having to mash the up and down buttons
![]()
Screenshot of the three dots
End of Chapter 3
Chapter 4 - Object Settings
Object settings are a vial part of any creative map because they allow the player to customize props and devices to their hearts content! To show you what exactly I mean, try clicking on a prop or device!
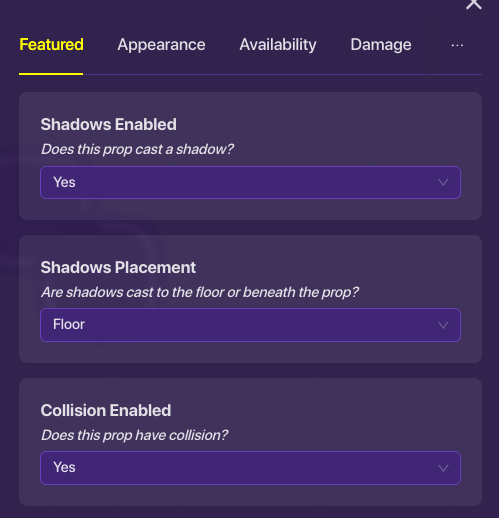
Screenshot of the settings for a tree prop
Every prop, device, and wire has this menu when you click on them, which allows you to change its settings. Most props have the same menu, however devices have drastically different ones. Let’s go through the basic settings categories for props:
Featured
This category appears for every single object, however it often has different content.
Appearance
Most props have an appearance category that can change their colors and opacity.
Availability
The availability category allows you to hide or show props when they get activated by a channel or wire.
End of Chapter 4
Chapter 5 - Essential Devices
Some essential devices you’ll most likely need to use in your maps are the following:
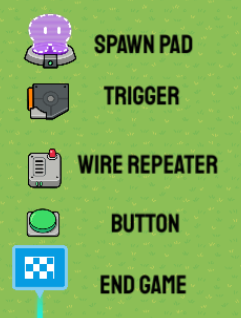
Let’s take a look at what exactly these devices do, and how you can use them.
Spawn Pad
The spawn Pad is a device which dictates where the player will spawn in three key settings:
- In the lobby phase, when the game hasn’t started yet
- When the game starts
- When the player is knocked out
Trigger
The trigger is one of the most valuable devices which can be used for almost any situation. A few examples of its usefulness are as follows:
- Can detect when the player steps on it
- Creates a variety of operation gates by activating and deactivating
- Can hold block code
- Delay
Wire Repeater
A useful device that can make delay or loops.
Button
It’s a button, with it you can make a simple input that activates other devices.
End Game
Ends the game.
End of Chapter 5
Chapter 6 - Channels & Wires
Wires and channels are incredibly important due to their ability to activate other devices, without these tools you wouldn’t really be able to create anything in creative.
Wires
For new creative users, its recommended that you use wires due to their visual style and easy connections. To place a wire simply press “Z” or find it in the add Button section, then click on two devices that you want to connect. Once this is done a prompt will show with a few options on what you can do for the devices, for example a button could be wired to a end game device to end the game when you press a button!
Channels
Channels in general are better than wires due to using less memory, however they aren’t recommended for new players because they aren’t very visual, and you can’t connect multiple to one device. To connect two devices with channels go to the settings for the devices and there should be a few prompts that allow you to input a channel name, do the same for both devices and your requested action should activate.
End of Chapter 6
 Advanced Creator
As an advanced Creator you can make mechanically diverse projects with creative
Chapter 1 - Intro to Block Code
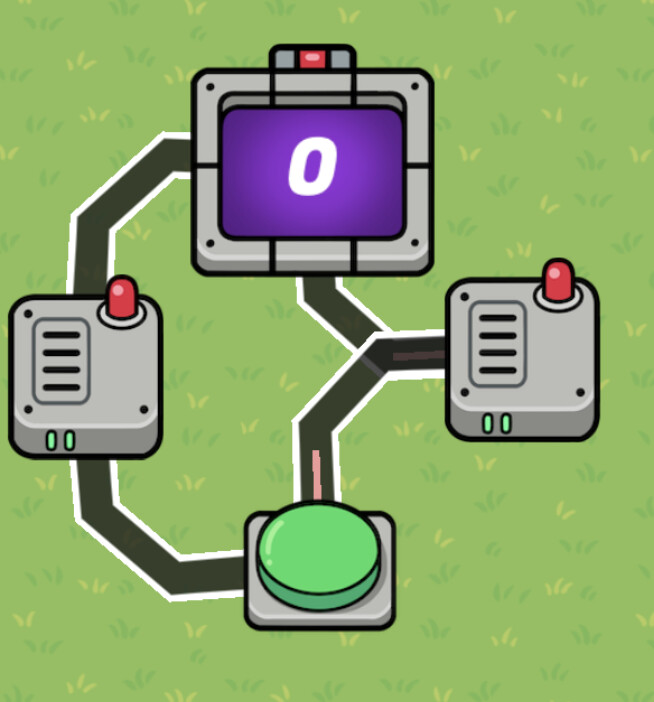
Coding is a way to make different machines and functions follow specific instructions, for example imagine you have a small robot that you want to move around your room in order to clean it for you. You could program it to move forwards, however it hits a wall after a few seconds of travel. To fix this you could make it so that the robot turns once it hits a wall, moving to another part of your room until it hits another wall, congrats your robot now will travel along the entire perimeter of your room, cleaning anything in its path!
While this is an incredibly simplified example, its good to start at the absolute basics.
Picture of the robot (the square) doing the program above
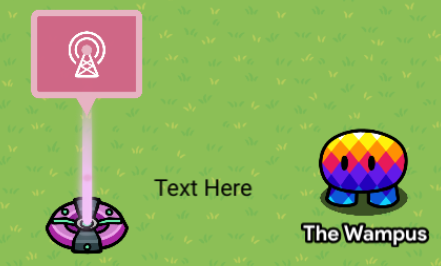
Now the first thing you will almost always program when first learning a programming language is printing the words “Hello World”. To do this in gimkit creative is quite simple. I’ll take you through the basic steps:
-
Add a lifecycle and text device to your gimkit creative world.
-
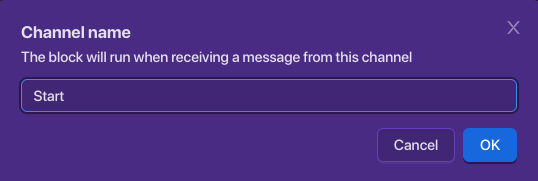
Have the lifecycle device listen for the “Game Start” event, and broadcast “Start”.
-
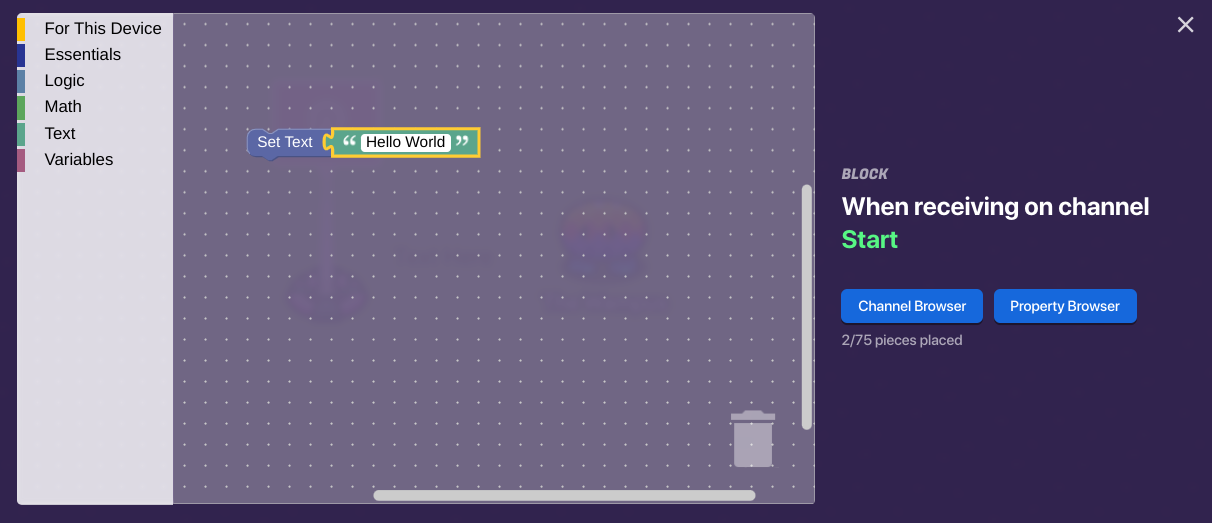
Add a code block to the text device, and have it run the block when “start” is broadcasted.
-
Add two blocks, the “Set Text” block and the “Text” block, put the words “Hello World” in the text block.
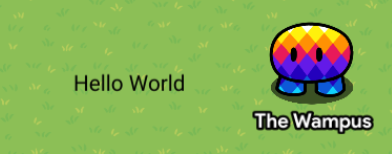
Now when you start the game, you should see the text change to “Hello World”! If you don’t see this happen, try asking for help in the comments, or look over the tutorial again!
If statements are incredibly useful for checking properties, math equations, and more! Lets get into how exactly we use them, and what sort of things we can make!
To see how we can use If-Statements to our advantage, follow these instructions:
-
With the Lifecycle and Text device we used earlier, go into the block code of the text device.
-
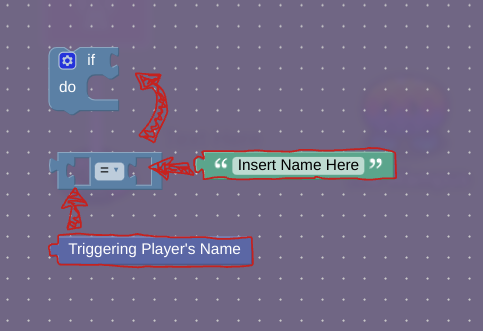
In the block code, add an “If-Statement”, “Equals” Block, “Text Block”, and a “Triggering Player’s Name”.
This is a super cool block that is used in If-Statements, it is often used to see if specific people have joined a game!
- Now that we have a functioning If-Statement we can use the code from earlier in the tutorial to make “Hello World” be shown!
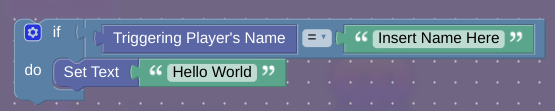
Now what this code is essentially doing, is first checking if the player’s name is equal to whatever you put in the text box, and then if that is true it changes its text to “hello World”.
Want an even more in depth tutorial on the basics of block code? Visit this topic: -= 📜 Code Quest - v2.11 =- - #70 by vqnillaxx
End of Chapter 1
Chapter 2 - Intro to properties & Variables
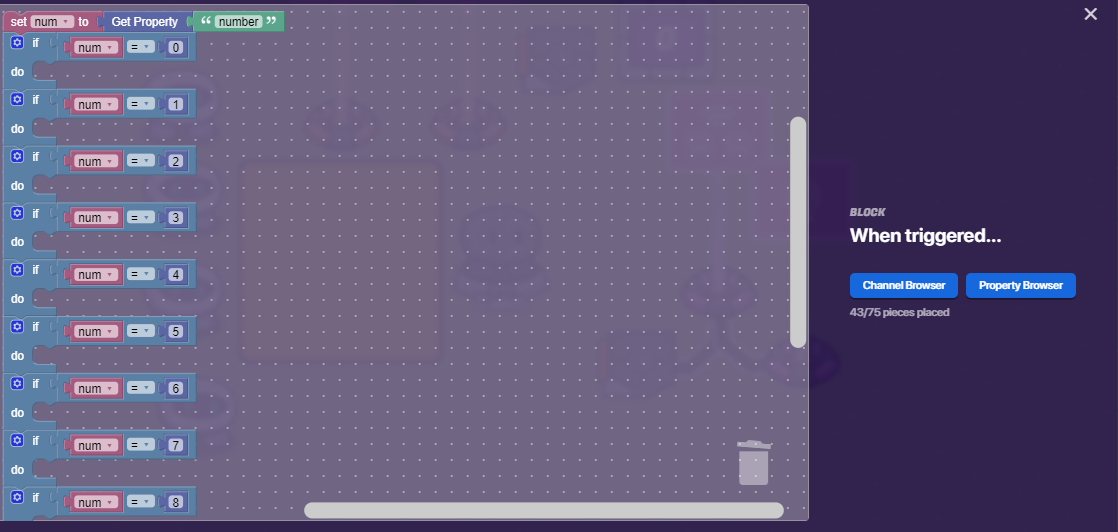
Variables are one of the most important blocks. Why do we use variables if we can just use properties? Well variables may not always be ideal, but can save block code. For example, if I wanted to check if a property equals something, using if statements, I would just use the get property block and find my property and put it every time into each check, easy right? Well what if we have a lot of if statements, and sense there is a 75 block limit we might surpass it. How do we avoid this? Well that’s where variables are used!
Add a new device called “trigger” and wire the lifecycle to it, just like you did for the "text"device, but instead of a channel it will be “when triggered” and done(ish)!
This is a example of how the get property block can be a disadvantage (sometimes).
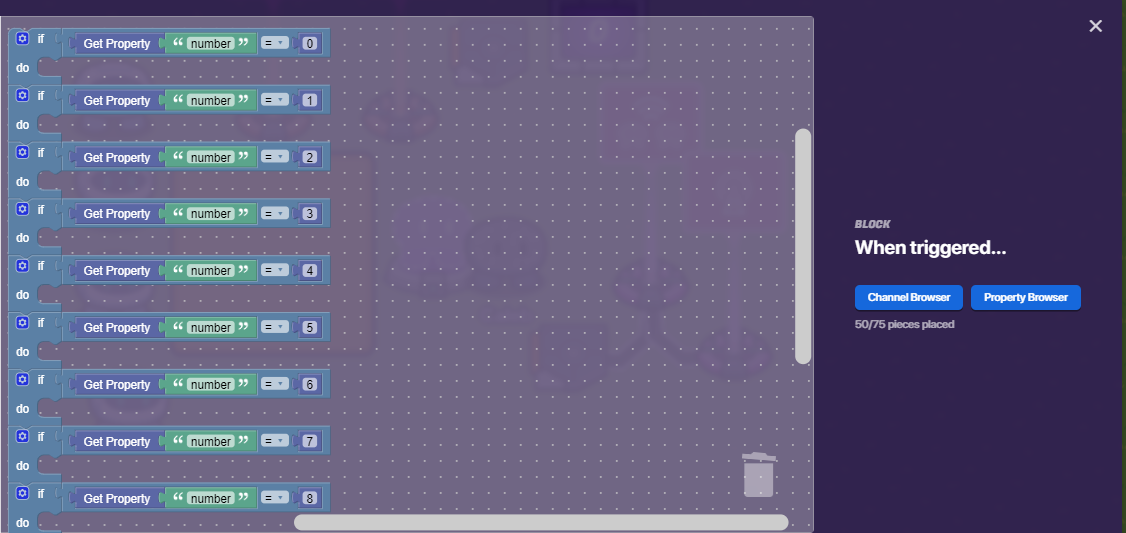
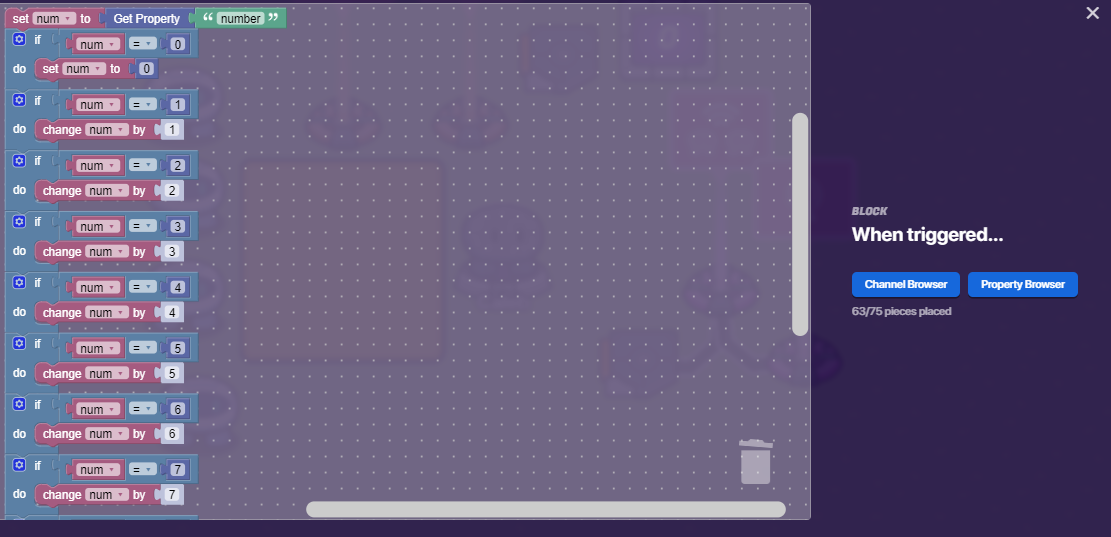
There are three ways to shorten this block code, but we will only use one of those, the second will later on be introduced in another chapter. Head on over to the variable category and hit the “Create variable…” button and it should show a overlay for you to type in and type the name of your variable. Call it “num” which is mainly used in programming as a shorter way of saying “number”, and finally click submit. It should show you three new blocks! We’ll only use two of those for now.
Add the set num to get property number then instead of get property number = 0 replace the get property number block with the num block in the variable category.
WARNING
Variable values DON’T carry over to other devices, which is why properties are ideal in that sense.
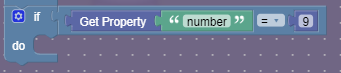
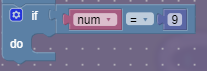
What happens if we want to change the value in each of those if statements above? Well that’s where the change variable by 1 block comes in!
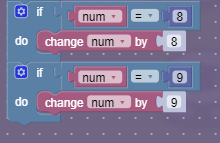
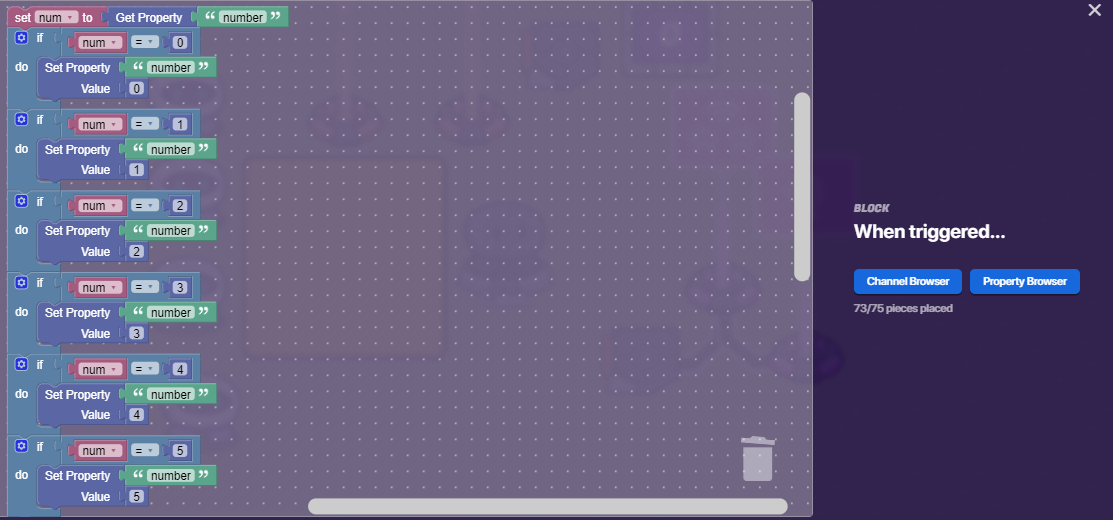
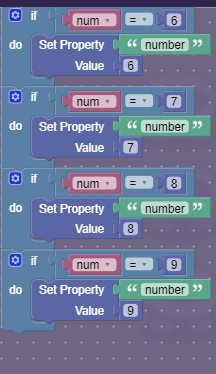
73! Crazy, right? However there is a major problem with this. This system doesn’t change the property by the value, it sets it to the number it already is, and if we wanted to still continue with this system we would have to use the + operator block in the math category, but it would take up too much space. So that’s why we need to use the variable way. So then how do we set the property to that variable number??? Erase all these blocks and replace them with the variable way and add these following blocks at the end:
![]()
One thing though, if you decided to send an activity feed at the end of the example I had made for the variables chapter, you probably didn’t get anything…why? Well, it was because the property wasn’t actually made yet. What do I mean wasn’t actually made yet? What I mean is that just like variables we need to make properties, but instead with a device called the…Property.
There it’s, but doesn’t it seem a bit plain? Well if you go inside we can set the name!
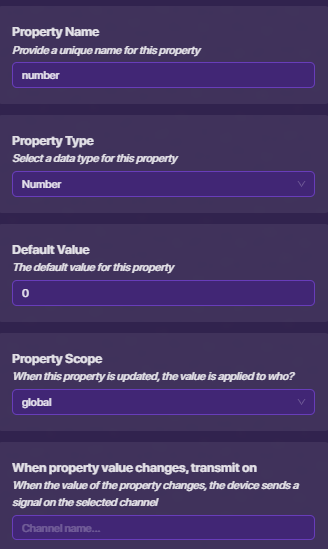
Above are the settings for my property.
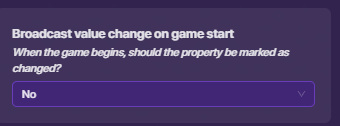
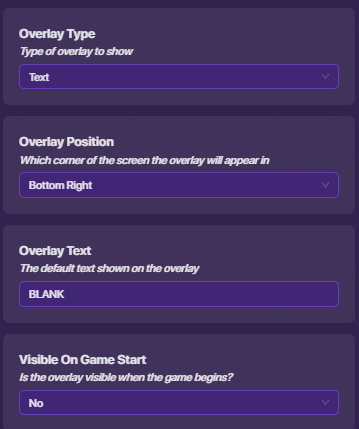
The settings above is only used in certain things and as you can see in its description it’s for when you want to send a message on a channel and consider the first value of the property as a change. Head on over to the device tab and add a game overlay! Set it to these settings(make sure the lifecycle is wired to it!):
Now head on over to the property and change the last option in its settings to “Yes” and add this:
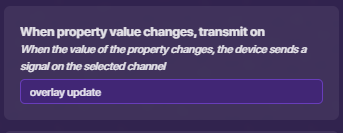
Then, go to the overlay and add a block that is “When receiving on channel…” and set the channel to “overlay update” and add these blocks:
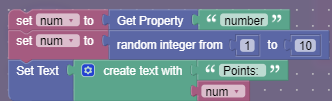
Now you’re probably like “Whoa! Valuex what is going on here??!!” And it’s ok, after all, this is to learn and no to throw you into a firepit to work on this all without an explanation. First, we set the variable num to the property number. Afterwards, we set the variable num to a random number between 1 and 10 and lastly, we set the text of the game overlay to "Points: " + the random number.
Chapter 3 - How to use checkers
Coming Soon
Chapter 4 - Advanced Devices
Coming Soon
 Master Creator
The most prestigious ranking of creator, showing true mastery of gimkit
Chapter 1 - Mastery of Counters
Coming Soon
Chapter 2 - Recursion
Made by @CringeKarlScott
Recursion is the main reason that repeaters are completely useless. It’s an essential in every programming language, and for good reason.
By dictionary definition, recursion is simply:
the repeated application of a recursive [1] procedure or definition.
In coding (and Gimkit Creative), recursion is a function calling itself. It’s a script that triggers itself somewhere in it, creating an infinite loop containing everything that occurs before it calls itself.
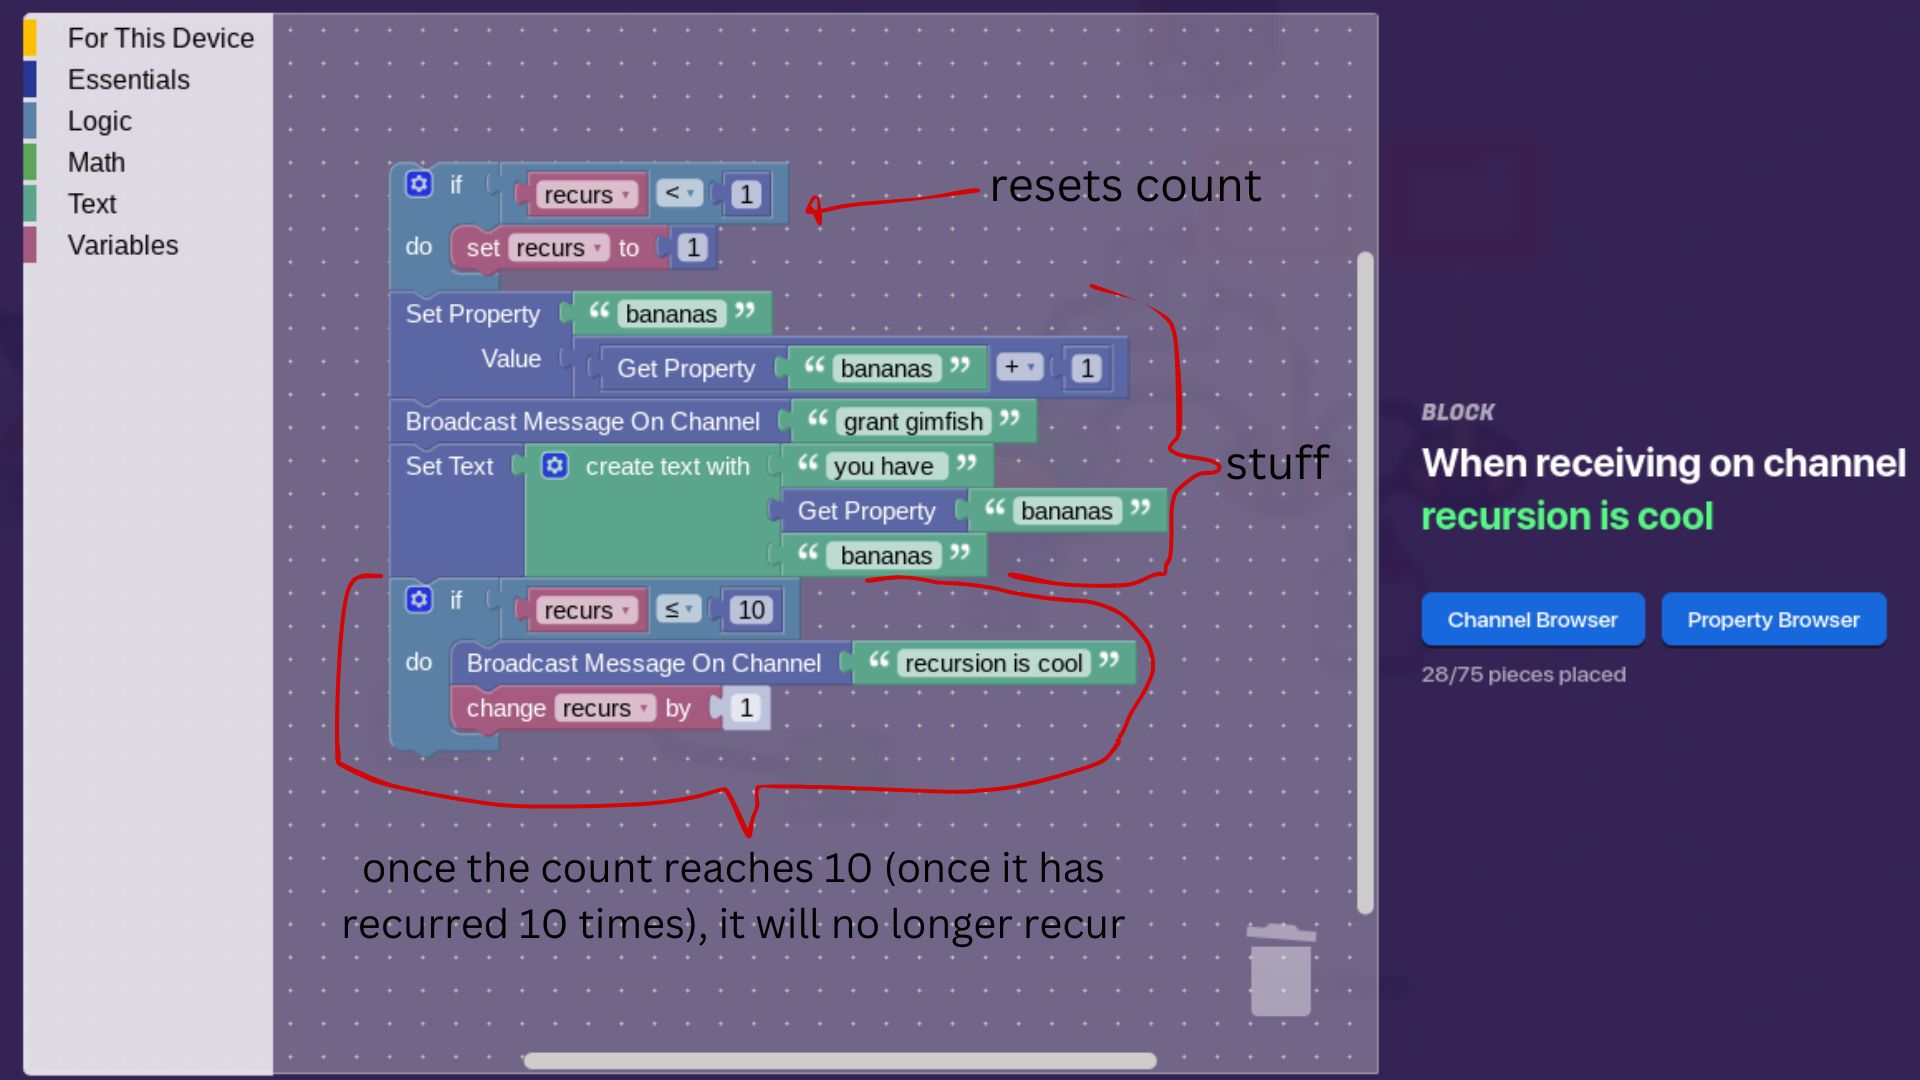
If you still don’t understand, here’s an example of recursion in block code:
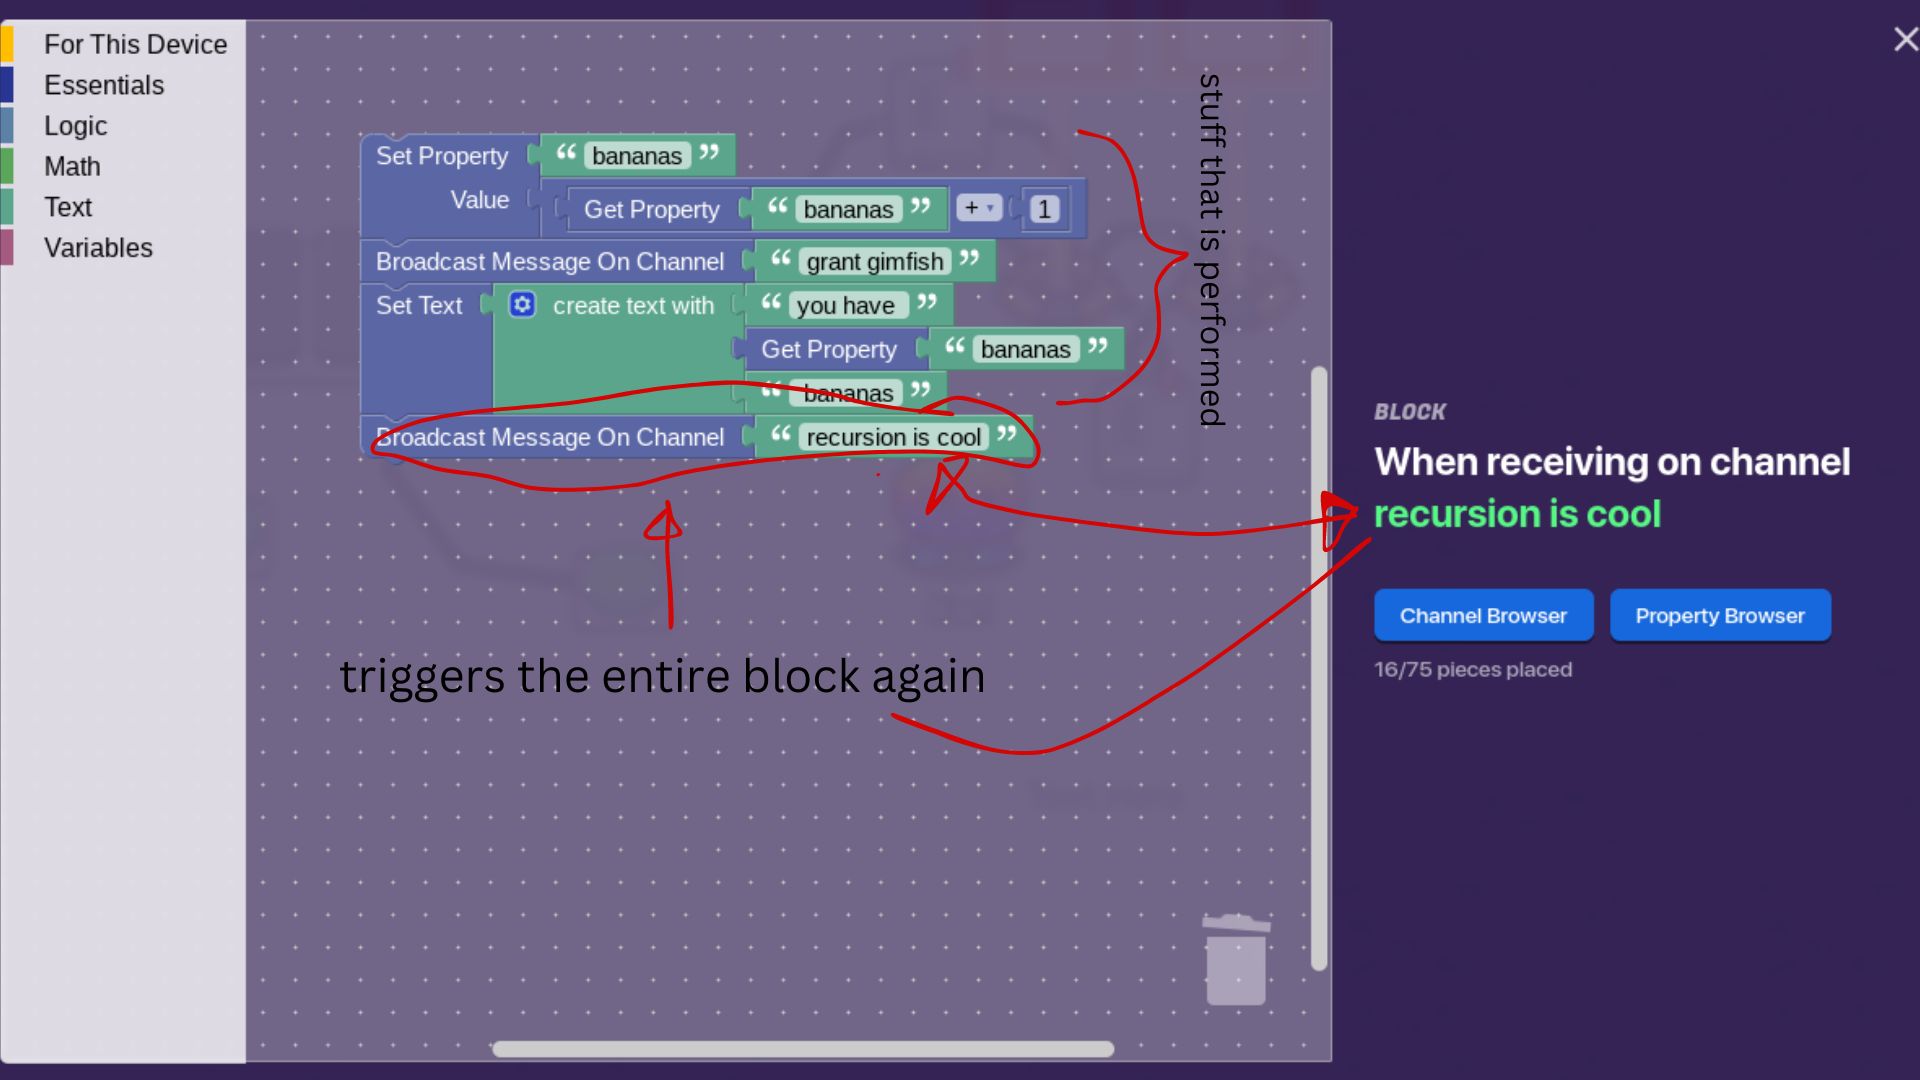
However, in the image shown above, the actions will recurse infinitely. Most of the time, you don’t want this to happen, so you need finite recursion.
Finite Recursion
Finite recursion is recursion that doesn’t recurse infinitely. This is achieved by having something in the recursed section of the code that checks how many times it has already recursed, and if it has already recursed enough, it stops recursing. Here’s what that looks like in block code:
And that’s recursion!
End of Chapter 2
Chapter 3 - Advanced Block Code
Coming Soon
Chapter 4 - Resolution
Created by @Shdwy
Let’s say you have two wires that trigger a counter at the same time. One increments the counter, and one resets it.
How do you know which one runs first? Well, we use something called AUO, or Advanced Update Order. Basically, this is a rule that says the first device placed is the first to run.
This is because devices in Gimkit, when updated, are appended to a list. That means they’re added to the end of it. Then, when the game goes through figuring out what to do, it starts from the beginning of the list.
This is an incredibly important debugging tool, and also sometimes useful when building a mechanism. However, sometimes it can be hard to remember what goes first, or you can accidentally touch something and mess it up.
An easy way to get around this is just using wires vs channels. Channels always resolve before wires, so if you have one mechanism triggered via channel and one via wire, the channel always runs first. This can be super useful and help you get around a problem you might not understand.
Resolution, more broadly, is about more than just the order that devices resolve. It has to do with anything that resolves. Here’s an example.
Let’s say you have a counter. It increments on channel X and decrements on channel X and resets on channel X. The counter starts at 2, and then you broadcast on channel X. What will the counter’s value be? Well, it’ll be 0, because the reset is the last setting to broadcast. While it’s not completely tested, the current hypothesis is that the last setting listed is the last one to run.
If you find something that hasn’t been tested already, you can always run a quick test to figure it out. Testing is one of the most important things in the game-making process, especially in GKC. If in doubt, try it yourself.
 Other Tutorials
Tutorials that don’t have a specific category
Tutorial 1 - Publishing Games
Publishing your game is an excellent way to get people to see what you are working on, however it can be confusing at times to figure out how exactly it works. Let’s take a look at the systems and details of publishing games on gimkit.
Publishing Games

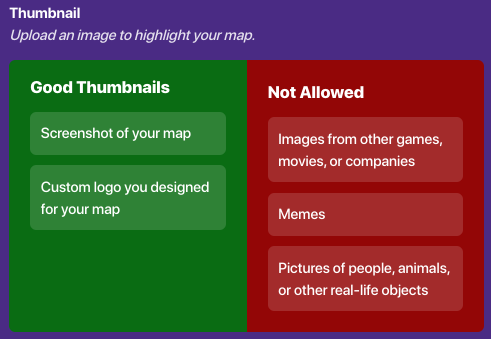
To publish your game for the first time, go to the settings menu of your world and click on publish. You will then be sent to a menu which will tell you a bit about the requirements you’ll need to be able to publish your game, such as having level 50+, and 1,000 gimbucks.
If you meet the requirements you can write down an interesting title, description, icon, and tag for your game! Its important that you follow the thumbnail requirements, as shown below:
Finally all you need to do now is click the fancy publish button at the bottom of the screen! Congrats you published your game!
Tutorial 2 - Never use Repeaters
Repeaters if you don’t know use 500 memory, when almost all of their functions can be recreated with other devices for less memory. This means that if you need to conserve memory and add the most amount of features for your game, you’ll need to take Repeaters out of the equation.
As a substitute you can chain delayed triggers using wires or channels to recreate most of the essential functions of repeaters (additionally triggers have a delay setting which you can set to decimal values unlike Repeaters).
If you want to see a more in depth guide on this, I highly recommend @Shdwy 's guide:
Please Never Use Repeaters (and a guide on looping)
Tutorial 3 - What are Showcase Links?
Showcase Links are free versions of publish links that only last about a week, after exceeding the time limit they will become inactive and it wont give access to players.
Tutorial 4 - Conserving Memory
To conserve memory efficiently you’ll need to be decent at problem solving and optimization, however even without those skills you can decrease memory with a few simple tricks:
-
Use counters to increase properties - Counters can be used as a memory saving alternative for increasing properties instead of wasting it on block code, simply make it so that when the counter updates, so does a property (its a setting in the counter).
-
Use channels instead of wires (when possible) - Mostly self explanatory, however you should try using channels more than wires because channels don’t use any memory.
-
Set the background of your game to your most used terrain
Did this teach you something new?
- Yes
- Kinda
- No