This is a wiki primarily for @harharharhar83.
Before editing, make sure to read the rules.
![]() Author’s Note:
Author’s Note:
Thanks to @California_Love for making this!
So, without further ado I proudly announce:
[ ] The Ultimate Guide to Poppy Playtime
The Final Verdict: Huggy Wuggy has been replaced: Captain Buck!
Hello everyone! If you want to edit this, please into comments and ask to edit! Then, you can check that I am editing box and make sure to follow the editing rules!
Intro:
I have always wanted to make a TUG that was original. Long ago when I was young and naive (about a week ago ![]() ) I tried to make Among Us TUG wiki. Needless to say it was already a thing and I was thoroughly disappointed. I had a whole notebook of channels, wires, and blockcode that I had figured out all myself! So, I search for a original TUG that I could make. I found myself either doing Minecraft or Poppy Playtime. I was surprised that neither of these had a TUG already because of the amount of them in Gimkit Discovery. My love of Indie horror games eventually won over and I chose Poppy Playtime.
) I tried to make Among Us TUG wiki. Needless to say it was already a thing and I was thoroughly disappointed. I had a whole notebook of channels, wires, and blockcode that I had figured out all myself! So, I search for a original TUG that I could make. I found myself either doing Minecraft or Poppy Playtime. I was surprised that neither of these had a TUG already because of the amount of them in Gimkit Discovery. My love of Indie horror games eventually won over and I chose Poppy Playtime.
Make sure to read this!
DISCLAIMER!
This guide uses blockcode, scope, and channels. If you don’t know how to use them, click on the links to some guides, I found helpful when I was starting out! I may or may not also be coming out with scope/blockcode/channel guide soon! ![]()
This is a Table of Contents:
Chapter 1 - A Tight Squeeze
Part 1 - Gameplay Desc.
Part 2 - Basic Functions (Running)
Part 3 - Room Designs
Part 4 - Buidling Mechanics
Part 5 - VHS Tapes
Part 6 - Intro Puzzle
Part 7- The Blue-Handed Grabpack
Part 8 - Power Puzzle
Part 9 - The Battery Puzzle
Part 10 - The Dual-Handed Grabpack
Part 11 - Make-A-Friend Puzzle
Part 12 - Huggy Wuggy Chase
Part 13 - Saving
Chapter 1 - A Tight Squeeze
Part 1: Gameplay
This is just going to be a description of the gameplay of Poppy Playtime Chapter 1 just so you can get an idea of what we are trying to achieve here. This isn’t necessary to read and you can skip it if you want.
Intro
It all starts with a short description: “As an ex-employee of Playtime Co., you finally return to the factory many years after everybody within disappeared.” After this we are show a quick intro video (in the form of a old VHS) describing Playtime Co.'s namesake, Poppy Playtime, a doll that will actually interact with your kids! It goes on to explain all her features and offer factory tours. After this you receive a note that says: “Find the flower!”
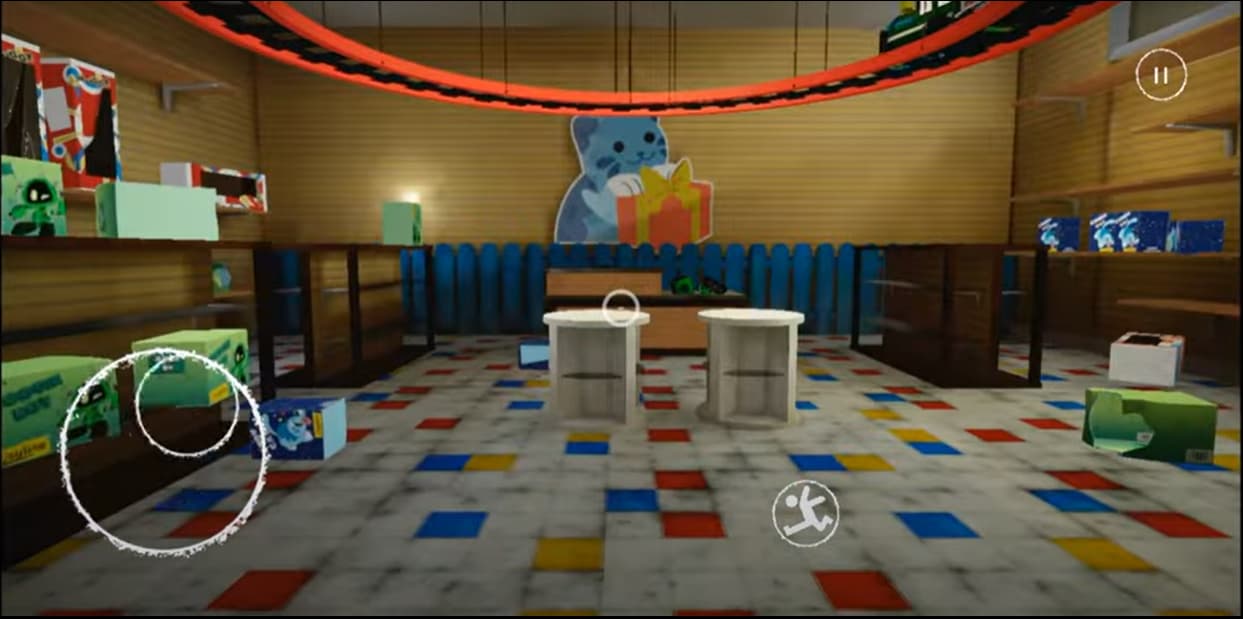
Gift Shop Puzzle
Next you are launched into the primary gameplay. It starts with you at the front of the facility. There are two rooms branching off of this room. The Gift Shop and Security Room. Solving the solving a code puzzle from Gift Shop unlocks the Security Room. In there you can watch a VHS tape to gain a Grabpack. This is a blue-hand x grapple sort of thing. Using this you can open a big metal door and proceed into the next area.
Power Puzzle
This is a big showcase room with a Huggy Wuggy statue front and center. Attempting to use the Grabpack to unlock the next area short-circuits the power. Taking a key from Huggy Wuggy’s hand you unlock the power room and using your Grabpack you can reroute and restore the power (can I mention that the mechanics for this game are EPIC). When you come back out Huggy is gone.
Battery Puzzle
Going down the new path you see Huggy’s hand snake down the hall. Going through here unlocks a new puzzle where you must place the correct color batteries in their spot to unlock the red hand for your Grabpack. Then you can enter the vent.
Make-A-Friend
The next puzzle is a Power puzzle again, this one in a claustrophobic vent. Now the second vent door is open, and you can enter the Make-A-Friend area. Here is another Power puzzle on the catwalks. This one is slightly more complicated.
RUNNNNNNNNN
Now you can make a friend. After you have made your friend, you can enter another vent. This time as you are crawling through it you are chased by Huggy Wuggy. Dropping out of the confusing vents you can hop onto come catwalks and drop a heavy box onto the catwalks making him fall onto the pipes and get gravely injured. (sort of?).
Found the Flower
Following the catwalks you can enter a doorway in the middle of the flower. Down through this area is a glass case with a Poppy Playtime doll inside. Open it and the lights flicker and she say: “You opened my case?”
–
Part 2 -Basic Functions (Sprinting)
Now this guide will explain how to make the basic function of any game: Sprinting. It will also include a guide to adding stamina at the end.
Sprinting
This super simple guide enables a player to easily click a button to start running or to start walking. It can be a little glitchy at times but, hey! No one is perfect!
Devices
- 2x Speed Modifier
- 2x Game Overlay
**Device 1:** Game Overlay
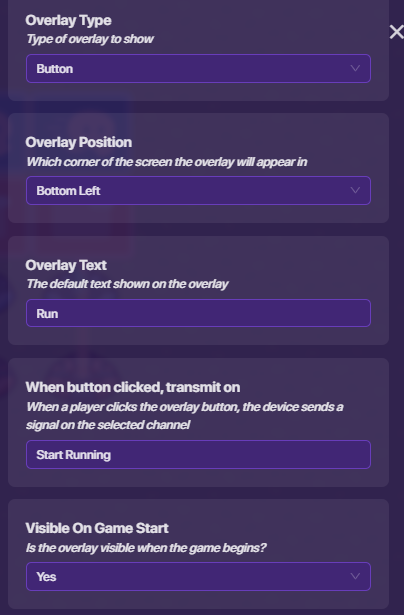
Now first you want to place the Game Overlay. Make it a Button Overlay named Run
It should be visible on game start.

Now, When button clicked, transmit on: Start Running
The Run Overlay (This one) should go away when you click on it. So, Hide Overlay when receiving on: Start Running
This Overlay needs to APPEAR when players stop running. So, Show Overlay when receiving on: Stop Running

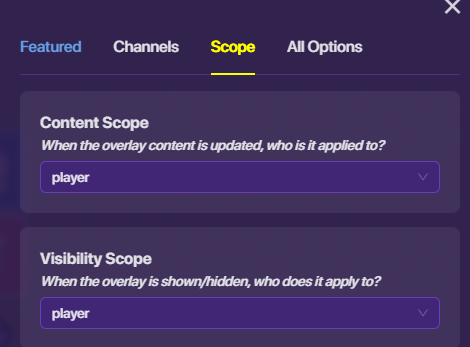
Finally, both the Content and Visibility Scope should be set to player.
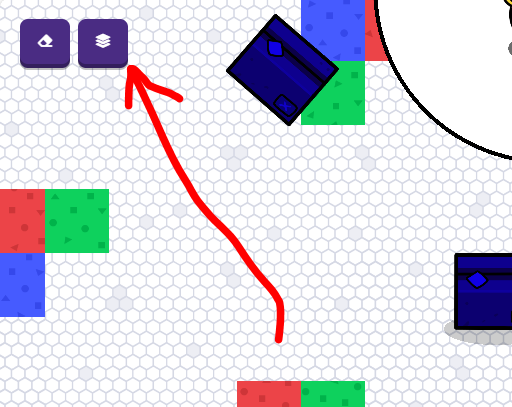
To make the future workspace less cluttered we can rename this device. Open the device’s editing options and click on it’s name.

(I love how straight that arrows is ![]() )
)
Now you can rename it! I renamed mine: Start Running.
I know that my explanations are confusing sometimes so you will often see this:
Quick Reference: Start Running (Game Overlay)
Overlay Type: Button
Overlay Position: Bottom Left
Overlay Text Run
When button clicked, transmit on: Start Running
Show Overlay when receiving on: Stop Running
Hide Overlay when receiving on: Start Running
Content Scope: player
Visibility Scope: player
This just shows all the parts I changed of the device.
**Device 2:** Game Overlay (Stop Running)
The name in the () is what I renamed the Game Overlay to in the name of ORGANIZATION!
So, this should be nearly identical the last Game Overlay you did.
The type should be Button and it should be called Walk. THIS ONE CANNOT BE VISIBLE ON GAME START!!! Place it in the same position in as the Start Running Overlay (Bottom Left). When they player clicks it, it should broadcast on: Stop Running.
If you remember from the last Overlay, Run shows up when it receives on that channel.
Now set the Show Overlay when receiving on Start Running. The Overlay should hide when receiving on Stop Running.
Finally, make sure both scopes are set to player.
Quick Reference: Stop Running (Game Overlay)
Overlay Type: Button
Overlay Position: Bottom Left
Overlay Text: Walk
When button clicked, transmit on: Stop Running
Visible On Game Start: No
Show Overlay when receiving on: Start Running
Hide Overlay when receiving on: Stop Running
Content Scope: player
Visibility Scope: player
Now if you start the game and test this it should be a button the changes when you click it. On game start is should say “Run”. After you click that button, it should say “Walk”.
**Device 3:** Speed Modifier (Running)
This is the actual meat of the Sprinting part. It will be the device that (you are not ready for this) MODIFIES SPEED!
Now this Speed Modifier will be the Running speed (hence why it’s called Running). I find 2.25 speed is the best if your base speed is 1.00.
Set Speed to 2.25
Then have it set to this speed when receiving on: Start Running
Quick Reference: Running (Speed Modifier)
Speed: 2.25
Set player to configured speed when receiving on: Start Running
**Device 4:** Speed Modifier (Walking)
So this device will reset the player to walking or “base” speed. Set the Speed to 1.00 and have it set to this speed when receiving on Stop Running
Quick Reference: Walking (Speed Modifier)
Speed: 1.00
Set player to configured speed when receiving on: Stop Running
Stamina (Optional)
This part of the guide will be finished after the rest because it is less important to the main objective of the game.
–
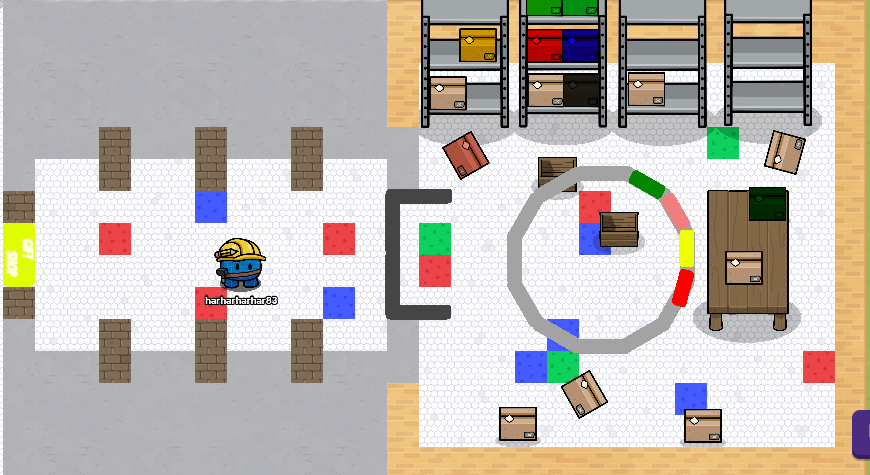
Part 3: Room Designs
- Some of the room designs are hard to show because GKC is at a Bird’s Eye View and Poppy Playtime is from a first-person view.
- A general rule of thumb in creating these areas is to remember this place is abandoned and broken glass or random boxes can allude to that.
There are four features that are pretty repetitive in this guide. Signs, Doors, Grabpack Doors, and Captain Buck. These things have their own separate guide here:
Signs
This guide will show you how to make signs that are above your head which are featured a lot in the Poppy Playtime universe.
Devices
- 1x Barrier
- 1x Text
**Device 1:** Barrier
First choose the Color that you want this barrier to be. Next you need to set the Collision to Off. This makes it so that the players can run through this barrier.
**Device 2:** Text
After searching through the fonts I found that the best font for this game is Staatliches. So, now you want to set the Font to Staatliches and set the Color to whatever you want it to be (white usually looks the best).
After this you need to go into Layers. (It’s the three squares stacked on top of each other in the top left corner)
Set both the text and the barrier to the Above layer and make sure the text in above the barrier.
Bam! You’re done! Easy as pie ![]() !
!
There are some signs that take a little more work to create and are different from the basic model shown above. Here are
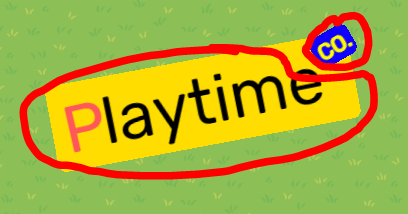
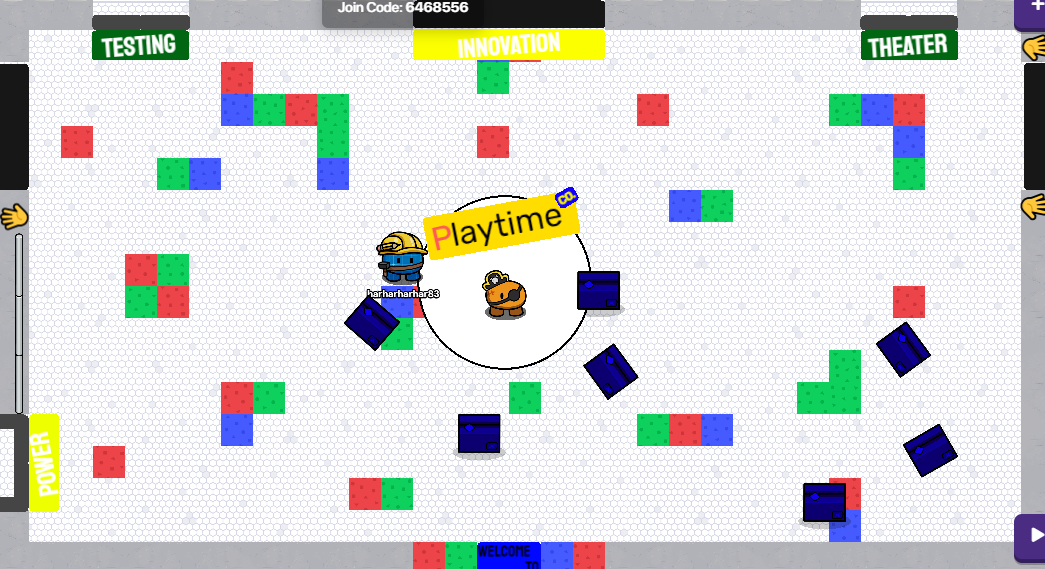
Playtime Co. Sign
This sign is really just two signs put together as shown below.
Devices
- 3x Text
- 2x Barrier
**Device 1:** Barrier
For the “Playtime” part of the sign make a barrier with Collision set to Off. Also set the Color to Yellow.
**Device 2:** Text
For the ‘P’ in “Playtime” we want to set the Font to the basic font, Rubik. Set the Color to `Pink.
**Device 3:** Text
Now we want to write out the rest of “Playtime” (‘laytime’). As before leave, the Font to Rubik. However, this time set the Color to Black.
It should look like this now:

So, that’s all for the Playtime part
**Device 4:** Barrier
This part of the sign will be the barrier for the “CO.” part of the sign. Make sure to set Collision to Off, you know the drill! Next set the Color to Blue.
**Device 5:** Text
You want to write it in all caps just because it looks better: CO. Guess what the Font is? Rubik, the basic font! Set the Color of the text to Yellow.
It should look like this:

That’s all for the CO. part.
Now, you can set all of these devices to the above layer and adjust them for the text to be over the barrier. Rotate them to them slightly to the left and it will end like this:
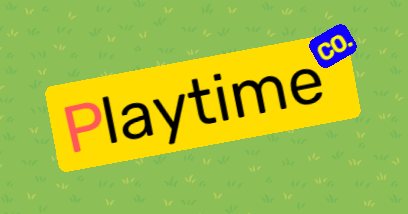
That’s it! All done!
I think that’s all… Wait no… Uh last one I swear:
Make A Friend Sign
The Make-a-Friend sign is really just a circular sign.
Was that still easy as easy as ![]() . Wait no maybe easy as
. Wait no maybe easy as ![]() . No!
. No! ![]() ! I’m a little hungry…
! I’m a little hungry…
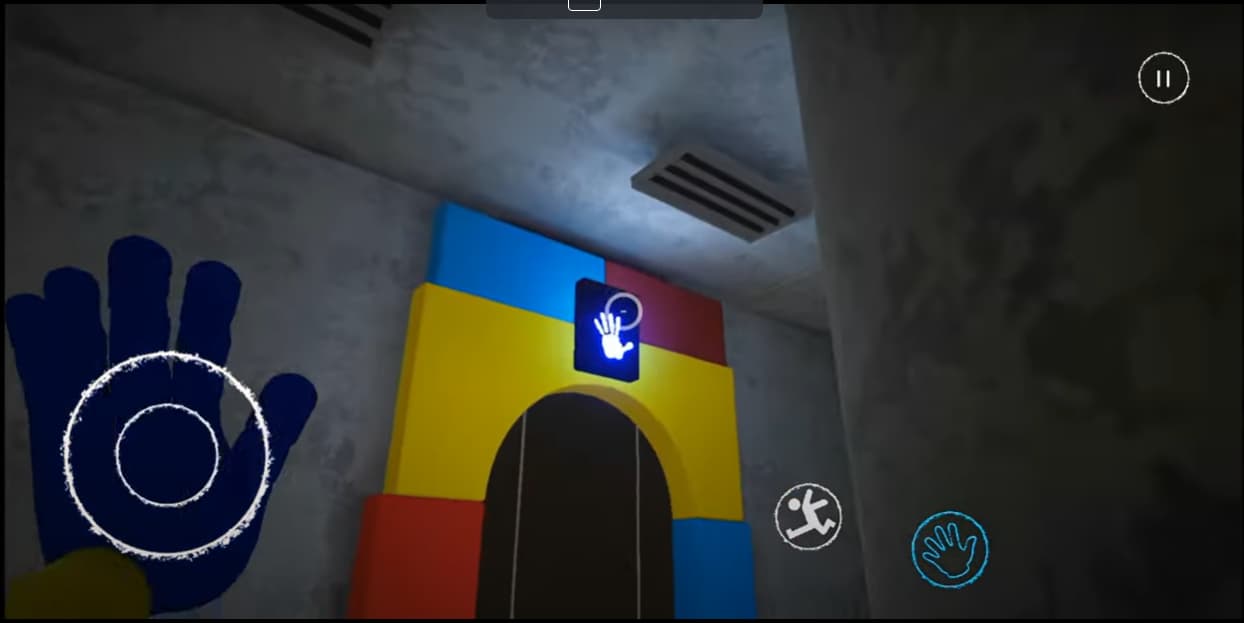
Doors
Grabpack Doors
Captain Buck
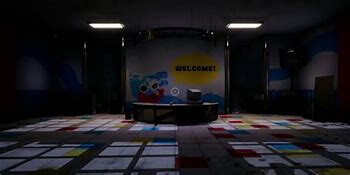
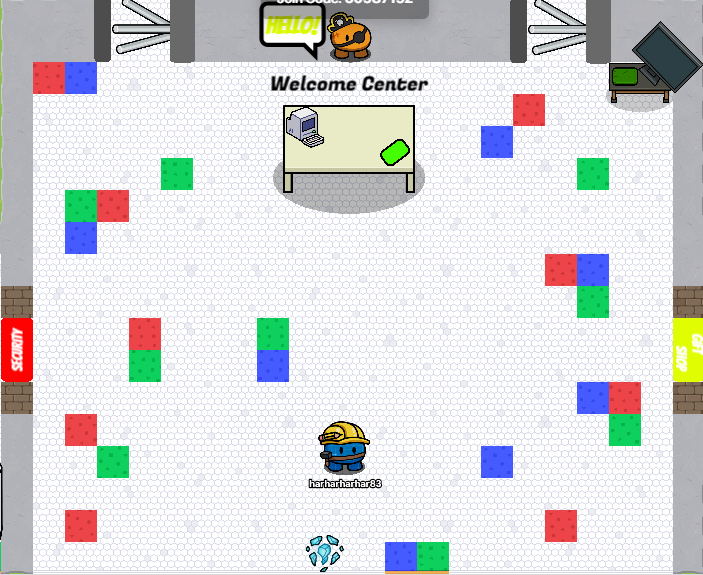
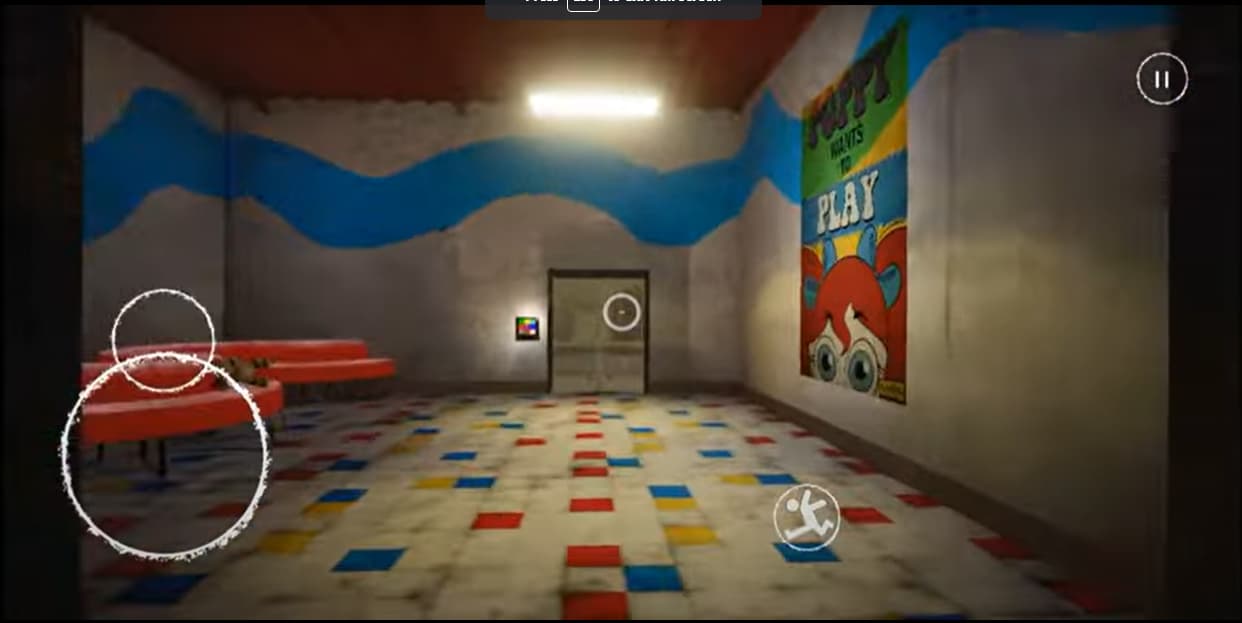
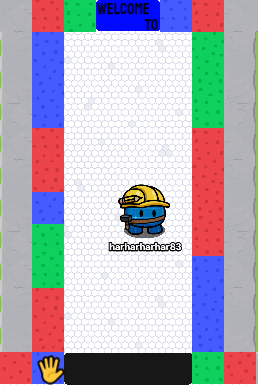
Spawn Room:
Gift Shop:
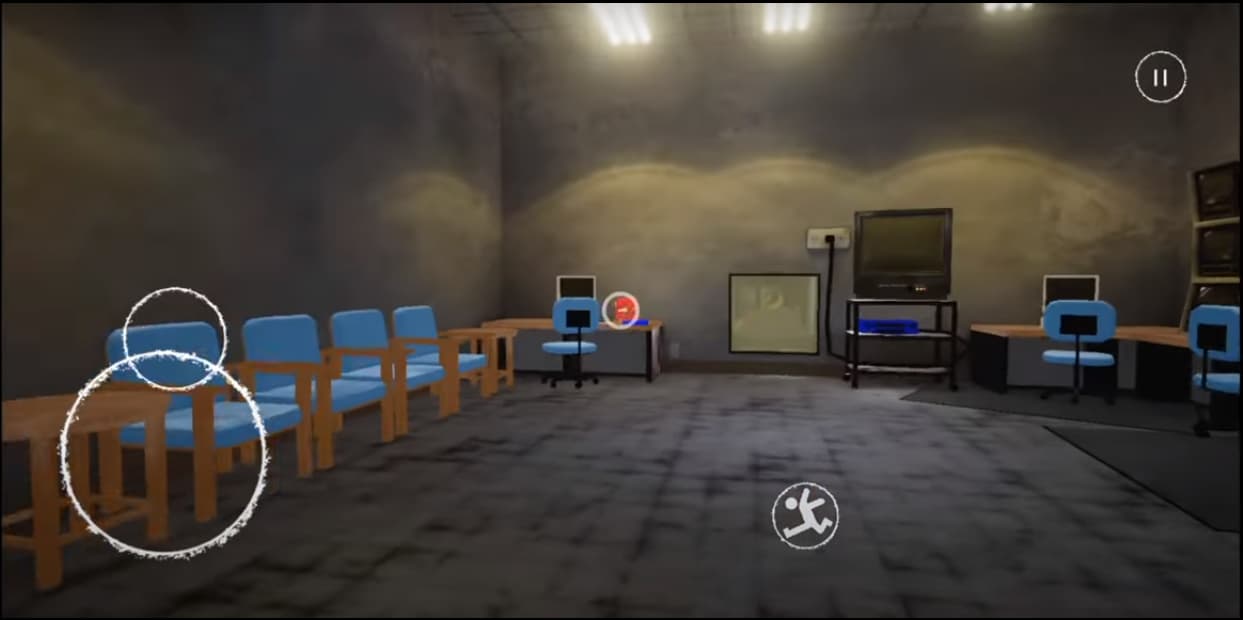
Security Hall & Room:
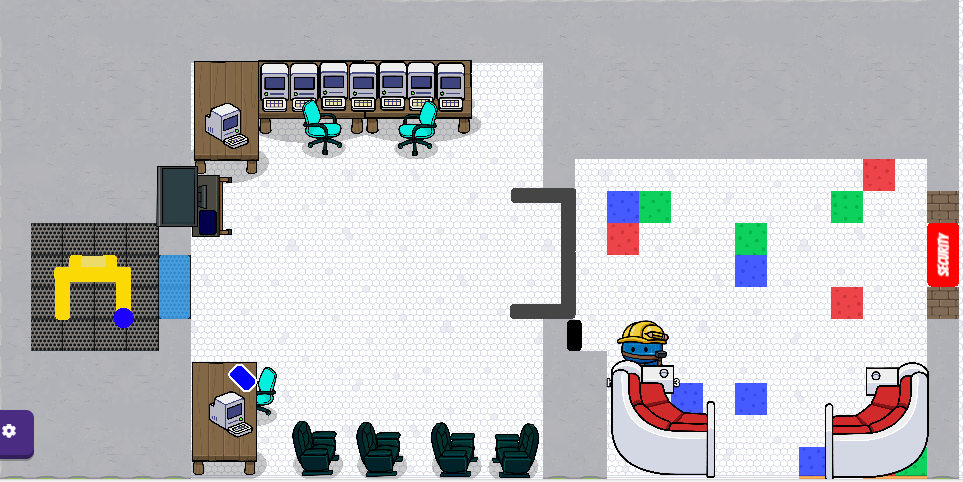
Grabpack Entrance:

Entrance Hall:

Main Atrium:

Power Room:
It was impossible to show the layout of this room in game because of the way the walls are set up. If you want to get an idea of what this looks like you should watch a play through.
Make-a-Friend Hallway:
Coming Soon
Bay 2 Hall
Coming Soon
Bay 2
Coming Soon
Vent 1
It was impossible to show the layout of this room in game because of the way the narrow vents are set up. If you want to get an idea of what this looks like you should watch a play through.
Coming Soon
Make-a-Friend Room
Coming Soon
Make-a-Friend Catwalks
Coming Soon
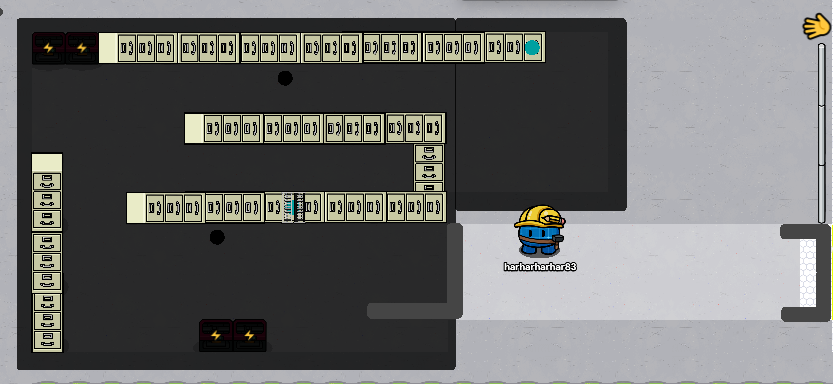
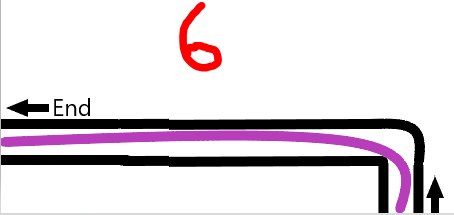
Vent 2 (Chase Vent)
It was impossible to show the layout of this room in game because of the way the narrow vents are so windy. If you want to get an idea of what this looks like you, I did a map here. The red line is the line you follow, and the blue line is the line Huggy follows. The purple line means he is directly behind you, followinh you. The light blue is windows and the black are walls.
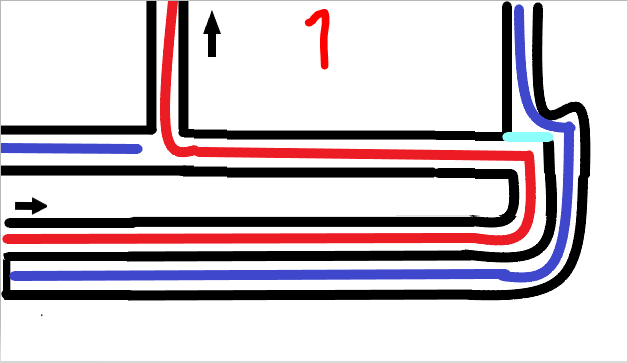
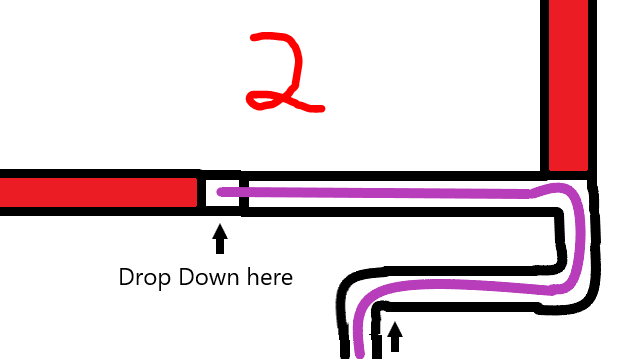

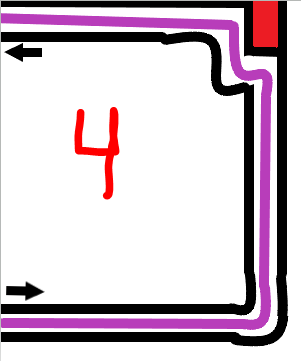

Coming Soon
Resources Section
If you want to link your own guides, put it here ![]()
📝 Update Log
Update Log:
- 2/22/24 - Added Intro
- 2/22/24 - Added Update Log
- 2/22/24 - Reformatted A Tight Squeeze TOC
- 2/22/24 - Finished Part 1: Gameplay of A Tight Squeeze
- 2/23/24 - Added Credits
- 2/26/24 - Finished Sprinting (Part 2) of A Tight Squeeze
- 2/27/24 - Reformatted to make it easier to understand
- 3/1/24 - Removed
ConfusionPoll- 3/1/24 - Removed the Jumping and Crouching section because it took up too much space and memory for how useless it really is. The Crouching section may or may not be added back for future chapters where it plays a more prominent role.
- 3/8/24 - Room Designs section additions: 1/1 introductions, 0/4 starting guides, 10/21 pictures, 1/10 room guides.
- 3/16/24 - Worked on Fly in the Web Table of Contents
-3/16/24 - Reformatted Update Log
-3/18/24 - Updated Fly in a Web TOC
-3/18/24 - Room Designs section additions: 5/16 images
-4/16/24- Removed Chapters 2+3
Editing Status
Is somebody editing?
If your name isn’t in the credits, please ask in the comments to edit!
Do not check this for fun
That includes checking and unchecking. If you do that, that will cause a notification to show up to people that are watching this topic.
![]() When checked, somebody is editing this post. Use the pencil menu to check who is editing. Please do not push the checkmark while someone is editing or it will cause edit conflict (happens when a user edits a wiki while you are editing and your changes cannot be saved)
When checked, somebody is editing this post. Use the pencil menu to check who is editing. Please do not push the checkmark while someone is editing or it will cause edit conflict (happens when a user edits a wiki while you are editing and your changes cannot be saved)
Credits
Wiki Editing Rules
Only post your guides or edits in the Resources Section unless you are @harharharhar83
Please don’t make any of the edits violate the TOS or FAQ, remember, anyone can see who edits a wiki and what part they edit.
Please be responsible.
Everyone, please don’t edit when it is being edited.
You can politely ask in the replies.
Please don’t change the name when it has one, and remove it when you are done.
If you aren’t in the credits, please ask and say what you are doing before editing. This helps keep the document clean.