Disclaimer:
This is an exponential function graphing calculator. @Blackhole927’s graphing calculator graphs Linear and Quadratic functions.
This guide is also guided toward medium-advanced gims.
Introduction:
This guide is not a very useful guide, because it just teaches you how to make an exponential function graphing calculator. But if you were interested in @Blackhole927’s graphing calculator and wanted to know how to recreate a variation of it, then this guide is great for you. I suggest you NOT implement this into your games, but simply just create a new game with it because my system takes up 58% of my total memory.
Credits:
@Blackhole927 (for the graphing calculator idea)
@WhoAmI (for playtesting)
@Here_to_help (for being cool and awesome and here to help)
@ClicClac (for making fun and advanced games and game mechanics)
@Anythinger (for liking my posts a lot)
@NavyCatZ (for helping way too much)
@Zypheir (for subscribing to the green fish diet)
@Vortex-Mist (for helping me with my maps)
@Im_Pretty_Cool (for being the best snake ever)
@RandomKid (for inspiring me to create a map)
The Finished Build:
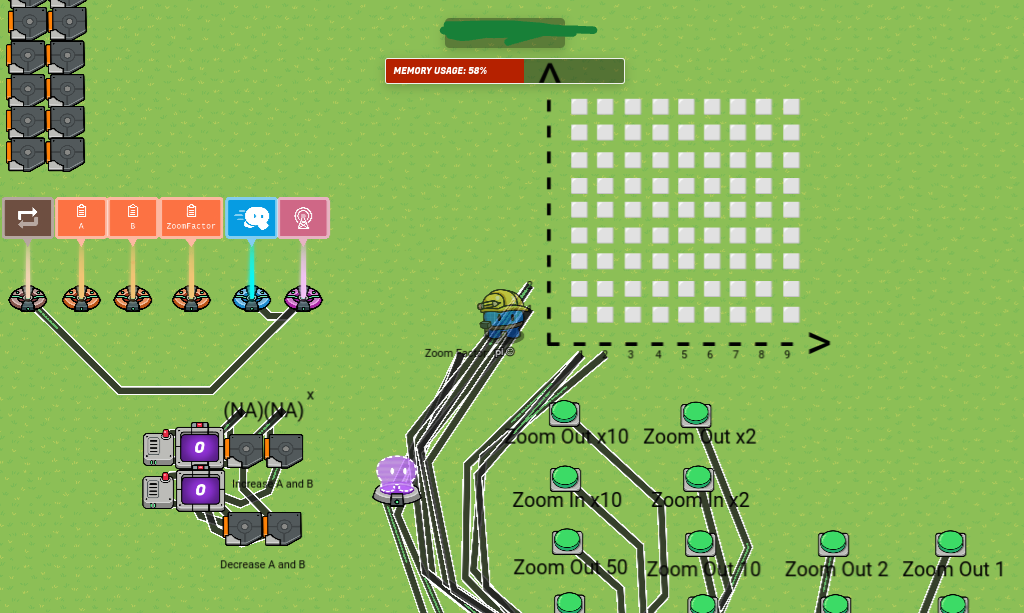
What Devices Are Required For This Guide:
Trigger x16
Spawn Pad x1
Counter x2
Wire Repeater x2
Property x3
Repeater x1
Text x110+ (A lot is optional)
Button x12+
Lifecycle x1 (Optional)
Speed Modifier x1 (Optional)
Part 1: Adjusting the Function
When we create our graphing calculator, we’ll first want to make it so that the player using our exponential graphing calculator can actually adjust the function to whatever they want (but with limits of course, we’ll get to that soon).
The standard form of an exponential function is f(x) = a • bˣ. For my graphing calculator, players were only allowed to adjust a and b to prevent large values, but you can do whatever you want.
So, there’s actually a really cool feature that’ll allow you to add 1 to a and b, and subtract 1 from a and b. Triggers! That’s right! There’s an option that allows the trigger to trigger itself when a player steps on it that we can use to add to our function. Of course, we could also buttons or game overlay buttons but in this case, the fastest and easiest choice is to use triggers.
So, let’s place down 4 triggers to add and subtract from a and b.
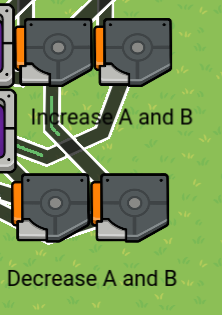
The 4 triggers that will increase and decrease the values of A and B
Ignore the wires for now, we’ll need them later though.
Next, what we want to do is create property values for a and b in order for us to easily plug in values to our function later on in the graphing section. So we’re just going to place down two numerical properties with a default value of 0 titled “A” and “B”.

Properties A and B
Next, to actually change the values of the properties, let’s place down two counters! The first counter will change A, and the second one will change B.
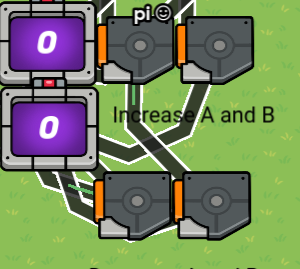
The two counters and triggers. Properties A and B are higher on the map.
Take the first two triggers and wire them to the counter like this:
Triggered → Increment Counter

When the trigger is stepped on, the counter’s value or the value of A/B is increased by one.
Triggered → Decrement Counter

When the trigger is stepped on, the counter’s value or the value of A/B is decreased by one.
Now, we have two options. Display the values of a and b with text, or display the values of a and b with counters. If you want to display the values of a and b with counters, continue to the next part. If not, expand the hidden text.
Display the values of a and b using the text device
So, let’s wire every single trigger to two pieces of text, like this:
Triggered → Run Wire Pulse Block
Work in progress
Exit Poll:
Please complete this poll before exiting:
- 0/10 or

- 1/10 or

- 2/10 or

- 3/10 or
- 4/10 or

- 5/10 or
- 6/10 or

- 7/10 or
- 8/10 or

- 9/10 or
- 10/10 or

- 11/10 or
 /
/
Conclusion:
This was my guide of all time. I spent a really long time making the guide and the graphing calculator. Remember, Gimkit is turing complete.
pi/mysz out.