Introduction
What is fall damage? In real life, if you jump from a 10 feet tall place, you would receive a lot of physical injuries. Now, if you put this concept into games, it makes sense right? In a game, it isn’t logically right if you fall from an insanely high place and land with no injuries right? Today, I’m gonna show how to create fall damage in Gimkit Platforming!
Oh and by the way, credits to this post for inspiring this entire guide!
Materials & Memory Usage
Here are the supplies needed for this guide. Check over this really quickly and make sure you have enough available devices and memory. It would be really annoying if you followed this guide halfway then realized you hit the device limit or memory limit.
Lifecycle (+50 Memory)
Property (+10 Memory) x5
Counter (+25 Memory)
Damager (+30 Memory)
Player Coordinates (+3500 Memory)
Trigger (+40 Memory) x2
Wire Repeater (+5 Memory) x2
Blocks (+500 Memory) x3
Wires (+10 Memory) x6
Total: 5305 Memory
Map Percentage: 5.305%
Step 1: Setting up some stuff
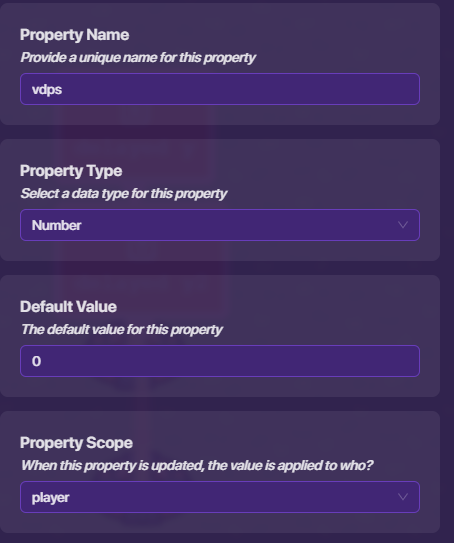
Get a property
Name it “vdps” (Vertical Distance Per Second)
This property will store exactly how much distance you fall per second.
Set the “Property Scope” to “Player”
Set the “Property Type” to “Number”
Break time! (Also some explaining time)
Before we rush into the real building part, let me first tell you about what we’re gonna make.
Basic Structure
With some block code, we’re gonna calculate how much distance the player falls every second (with block code that runs every second). In addition, it calculates the time it took to fall.
Then, the same block checks if the fps (fall per second) equals zero.

If it does equal zero, that would mean the player stopped falling, since they are falling 0 “distance” per second.
When the fps reaches zero, a damager will deal a variable amount of damage based on the time fallen.
Minor Problem
The Problem: You would take damage every time you jump, since every time you land it deals damage.
Relatively Simple Solution: We will create a block code that checks if the delayed fps property has a value lower than the gim’s “maximum shock capacity” (Humans can survive a fall of 1 feet, so gims would have something similar to this). If it is smaller than their shock capacity, then the block code simply doesn’t activate the damager device.
Another (not so minor) Problem
The Problem: You would take damage every time you walk down a slope, even if it isn’t steep.
Relatively Complex Solution: We will create a block code that checks the vdps rate. This will determine if the player is walking a slope or falling. Because falling/walking down a slope is slower than vertical falling, we can easily determine whether the player is sloping (I invented a new word yay) or falling. Might involve some heavy math and/or testing (for me, not you).
Step 2: More setup
How was the break?
Anyways, I wasted enough time writing all that. Let’s move to the parts where we actually do something.
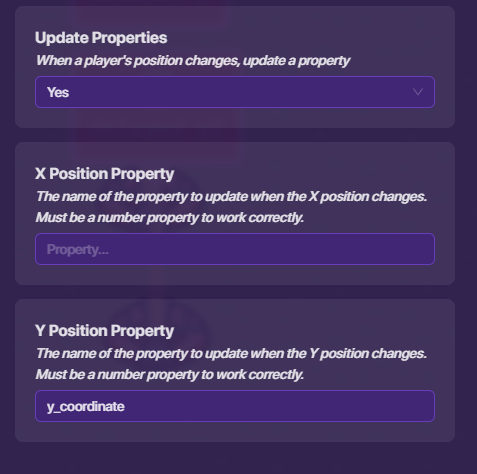
Place a Player Coordinates
Set “Update a Property” to “Yes”
Set “Y Position Property” to “y_coordinate”
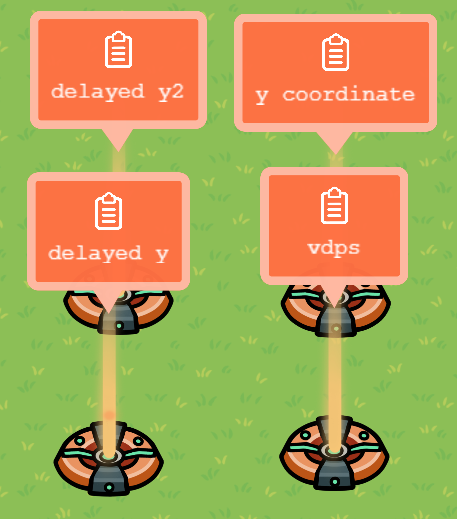
Copy the “vdps” property
Rename it to “y_coordinate”
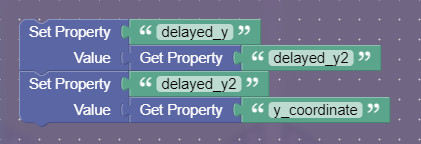
Copy the “y_coordinate” property
Rename it to “delayed_y”
This property will store the exact same value as the previous property, but it stores a delayed version of the previous property. Think of it as a time machine that travels to the past. You will understand the use of this property later.
Copy the “y_coordinate” property
Rename it to “delayed_y2”
This property is going to be part of the system that allows the delayed property to actually be delayed.
Here are the properties you should have:
Step 3: Infinite loops yay!
Get a trigger
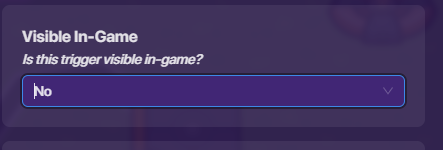
Set “Visible In-Game” to “No”
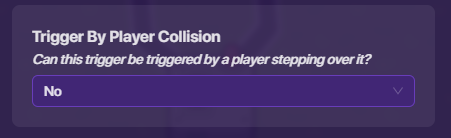
Set “Trigger by Player Collision” to “No”
Get a lifecycle
Get a wire repeater
Set the “Delay” to “0.1”

Wiring Time!
Wire Lifecycle to Trigger
(Event Occurs) → (Trigger)
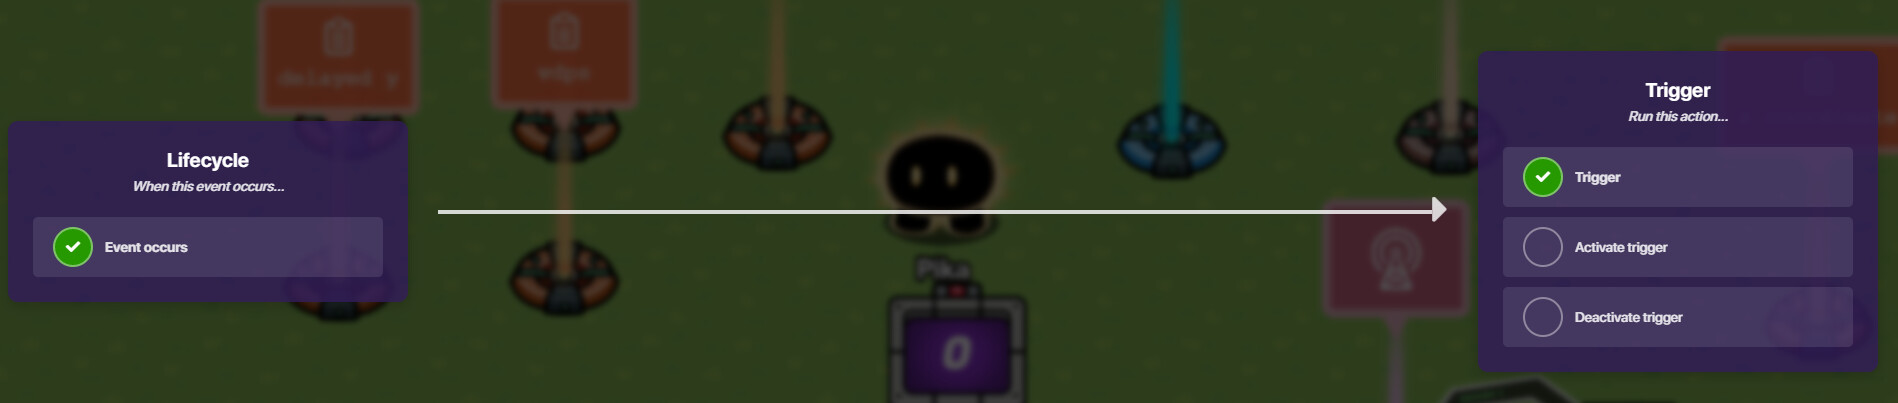
Wire Trigger to Wire Repeater
(Triggered) → (Repeat Wire Pulse)

Wire Wire Repeater to Trigger
(Wire Pulse Received) → (Trigger)

Yay! You just created an infinite loop!
Step 4: Fall Detection
Block Code Warning! This step involves block code.
Copy the trigger in the infinite loop.
I’ll be calling this copied trigger: Infinite Loop Trigger #2
The previous one would be called: Infinite Loop Trigger #1
Go to the Infinite Loop Trigger #2
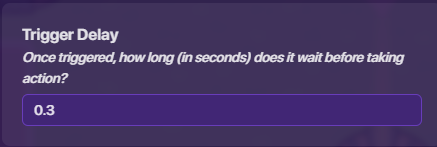
Set “Trigger Delay” to “0.3”
Place a wire repeater
I call this Wire Repeater #2

(admire this wire repeater. waow amazing!)
Wire Lifecycle to Infinite Loop Trigger #2
(Event Occurs) → (Trigger)
Wire Infinite Loop Trigger #2 to Wire Repeater #2
(Triggered) → (Repeat Wire Pulse)
Wire Wire Repeater #2 to Infinite Loop Trigger #2
(Wire Pulse Received) → (Trigger)
This is what the infinite loops should somewhat look like:

In Infinite Loop Trigger #2, create a block for “When Triggered”
Block code:
Note: The order MATTERS! Place the block code in the exact order it is shown.
Now create a block code for “When Triggered” in Infinite Loop Trigger #1
Block code:
First create a variable called: “pos/neg”
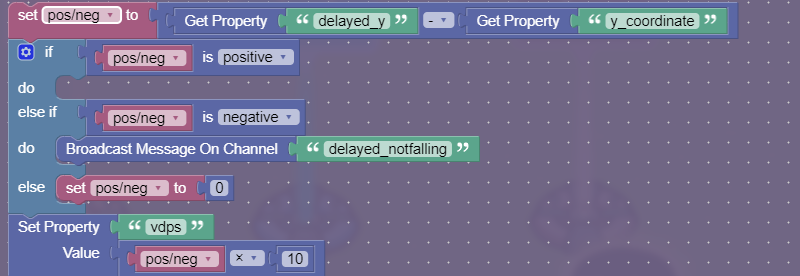
Explanation:
The pos/neg variable is set to the amount of the delayed_y (a.k.a previous position) - y_coordinate (a.k.a. current position) to find the difference in y between them.
The if statement checks for the different values of y. If pos/neg is negative, then that means the current y is higher than the previous y, which means the player jumped. We then broadcast on the channel: delayed_notfalling. This will make sense later on. If pos/neg is positive, that means the player fell, so we keep the value, since it calculates the fall distance. If pos/neg is neither positive nor negative, that means it is 0, so we set the value to 0.
In the end, we multiply pos/neg by 10 because the trigger is running this code every 0.1 seconds, so to get the fall per second, we multiply by 10.
But wait! We’re not finished with this block of code. We need to add more.
Add the following block code to the code you already have.
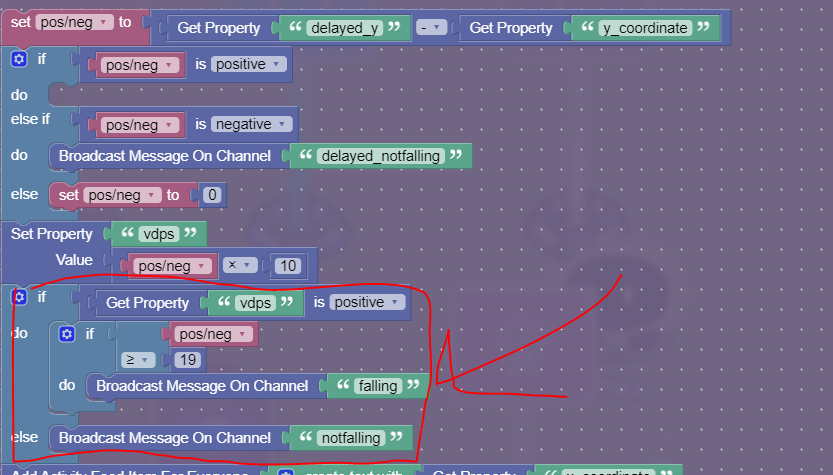
This block code just checks if the player is running down a slope or falling down.
Doing the damage
Finally. Last step.
Copy the “vdps” property
Rename it to “fall_time”

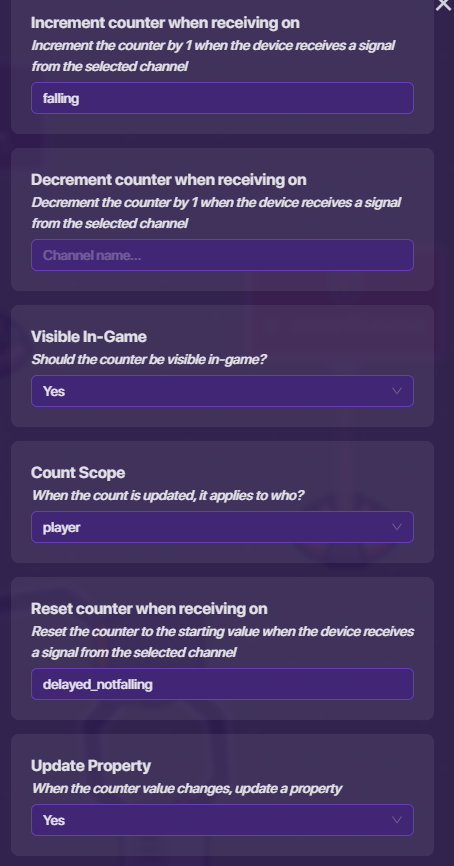
Add a counter.
Set “Visible In-Game” to “No”
Set “Count Scope” to “Player”
Set “Reset Counter when Receiving on” to “delayed_notfalling”
Set “Increment Counter when Receiving on” to “falling”
Set “Update a Property” to “Yes”
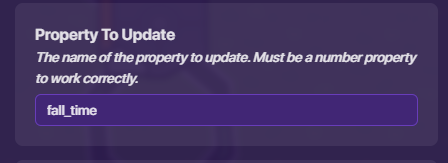
Set “Property to Update” to “fall_time”
Add a damager.
Add a block for “When Receiving on” and set the channel to “notfalling”
Block code:
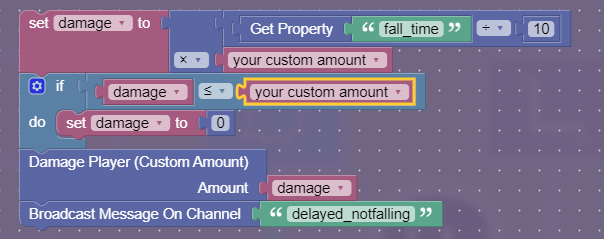
Now, let me explain this block code. The damage variable just deals damage based on fall_time. However, there is also a custom multiplier that YOU can choose! Choose a number to help balance the game. For example, if the vdps is 20, and you fall for 3 seconds, and your players have a max health of 100, consider setting the custom amount to 0.3 or something relatively small, because if you set it to 5 or something big, you would get insta-shotted by a pretty small drop.
The fall time is divided by 10 because the counter is incrementing 10 times per second.
The second “custom amount variable” quantifies the shock amount. For example, if you don’t want players to get damaged by a 1 tile drop, consider setting the shock amount to about 1 or 2. You may need to experiment with this value a little, because it’s a little hard to calculate and with a couple of guess and checks, you could balance it out.
Capabilities of this Guide
- Detects if the player is falling, jumping, or walking/falling on a slope.
- Deals damage based on fall time.
- Creates a lot more stunts and strategies (will elaborate on this in next section.)
The Strategies
Stunt: “Water Bucket Clutch”
You let yourself fall, then use your double jump at the last moment. This will basically cancel out all the fall damage you would take.
Strategy: “Single Jumps”
Since you now take damage when you jump, it would be better to just single jump, or even not jump at all.
Strategy: “Slope Climbers”
As said before, landing deals damage. So take advantage of slopes to slide around the map. You can also climb steep slopes using the slope climbing bug.
The End
Thank you so much for reading my guide!
Do I have enough pictures?
- Yes
- No
Also another poll here
-
Very Ez 0/10

-
Ez 1/10
-
Somewhat Ez 2/10
-
Medium Ez 3/10
-
True Medium 4/10
-
Medium Hard 5/10
-
Kinda Hard 6/10
-
Hard 7/10
-
Very Hard 8/10
-
Veri Veri Hard 9/10
-
Impossible? 10/10
-
This guide is not that hard… 11/10
