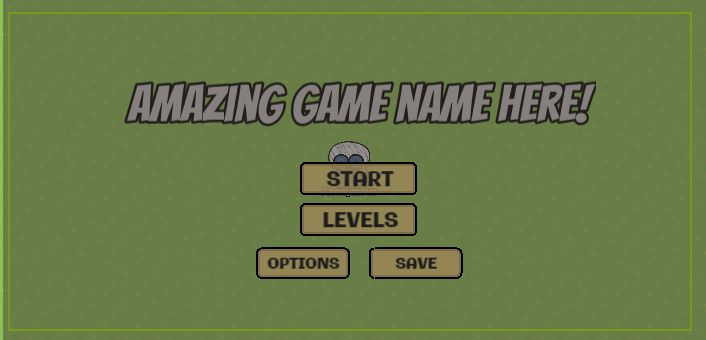
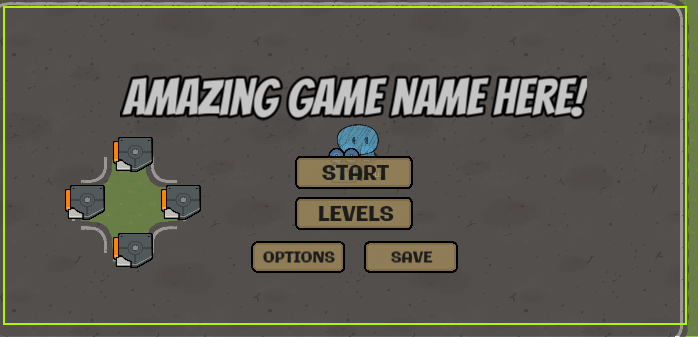
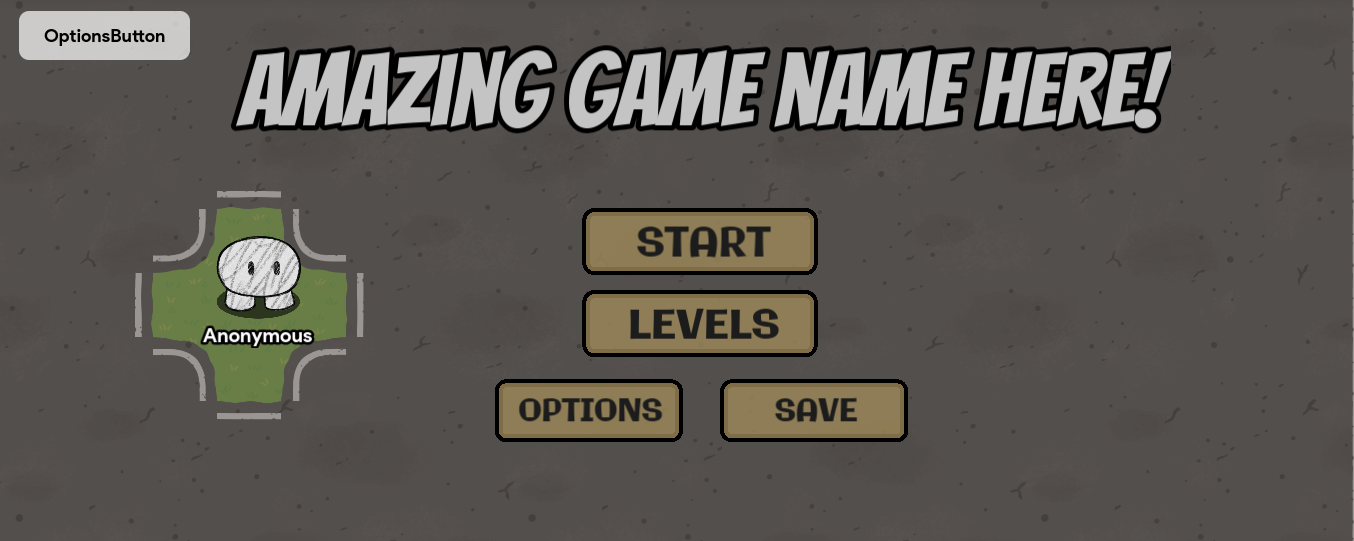
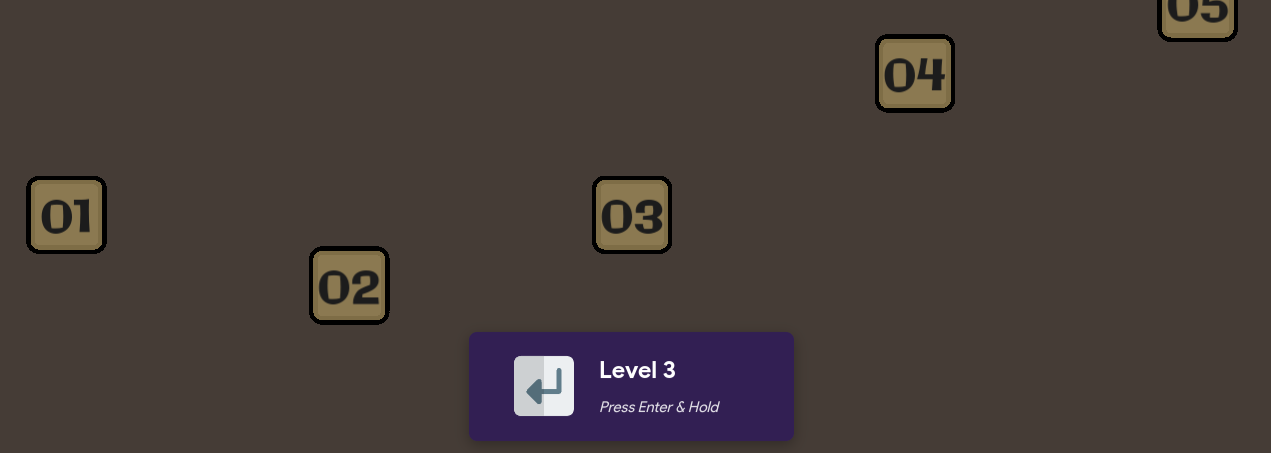
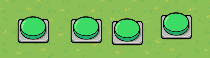
What’s a video game without a menu? This guide will teach you how to make a fully functioning and customizable menu, like the one below:

DISCLAIMER: This guide is not for the faint of heart. The process of creating a menu is not simple, as Gimkit Creative provides few to no utilities to do so. Don’t expect to have a finished menu in ten minutes.
Making a menu is not necessarily difficult, just tedious.
Creating the GUI
In video games, the GUI refers to the graphic user interface. For this project, it means our menu.
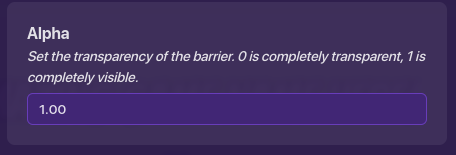
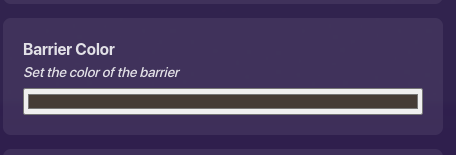
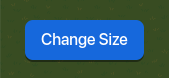
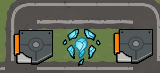
First off, create the background. In order to cover the player, the background HAS to be a prop or device, as terrain can’t cover the player. For this example, I chose to use a resized barrier. If you want to do something similar, make sure that you:
- change the opacity to 1:
- change the color (if you’d like):
- change the size so that it covers your ENTIRE menu:
And it should end up looking like this:
Make sure that your background has no collision, then move it to the top layer. After doing that, your gim should completely disappear:

Next, create the menu as you see fit. Make sure all text and props (or whatever you’re using for the menu) are ABOVE the background or else they will not be visible. They should also have no collision. My example is shown below:

Afterwards, stand in the middle of your menu and place a camera zone in it. Resize the camera zone so that it covers the entire menu area (usually the entire screen):
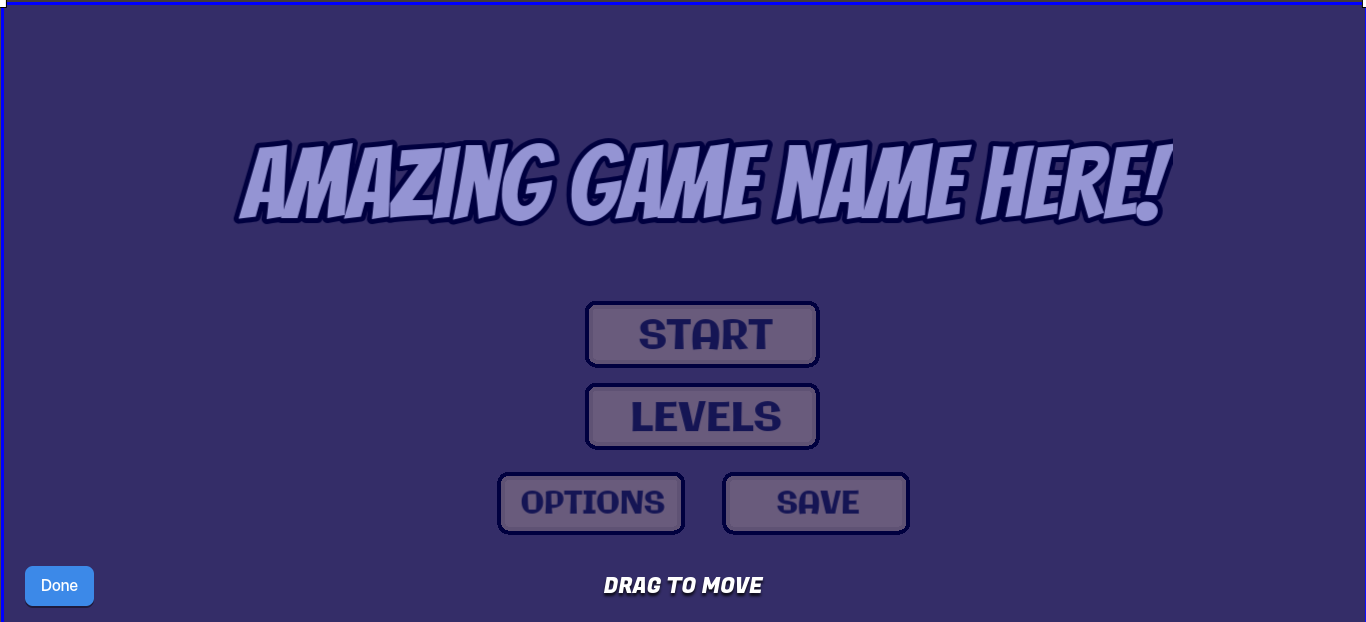
Anndd now the menu looks like a menu! Try it ingame (while placing a spawner near it first, of course). If you enter the camera zone, the camera should suddenly snap to the menu, and would stay like that no matter where you move, unless you moved out of the camera zone.
The GUI is done! ![]()
Adding navigation to the menu
If you haven’t seen Creating the GUI, I highly recommend you check that out. Much of the setup stated in there is required to make the menu work.
Assuming you have, let’s continue!
| More Information
In Gimkit, there is (sadly) no way to interact with objects by clicking them outside of the actual Gimkit GUI (buttons, pop-ups, etc.). However, this is similar to many platforms that only allow the user to control the menu with a joystick. In a similar fashion, we can make a menu that can be controlled with arrow keys.
To do this, I have narrowed down the possibilities to two options that should be used depending on the circumstances: Teleport Style Navigation (TSN) and Joystick Style Navigation (JSN). For this tutorial, we will be using both.
(yes I made these terms up)
| Teleport Style Navigation
Teleport Style Navigation (TSN) is, in general, highly unrecommended. However, TSN is better than Joystick Style Navigation (JSN) in certain cases. TSN is, first and foremost, simpler and easier to understand than JSN. However, this comes at a huge size cost, taking up both a lot of space and a sizable chunk of memory. Pretty much the only reason why you would use it is because of one of its the largest benefits: being able to use it with long or scrolling menus.
How it works
Basically, we will use triggers to detect what direction the user moves, and then, based on the direction, we will teleport them to the button in that direction.
Say, for example, the player is currently on the “Start” button. If they move down, they’ll trigger a teleport to the position of the “Levels” button.
To ensure the player always touches the trigger even if they just tap the down button, we’ll use a speed modifier to make them very quick. To ensure the player doesn’t escape the menu, we’ll use cages. We also need to make the player slow down so that they don’t teleport on top of a trigger (which is likely a bug with teleporters).
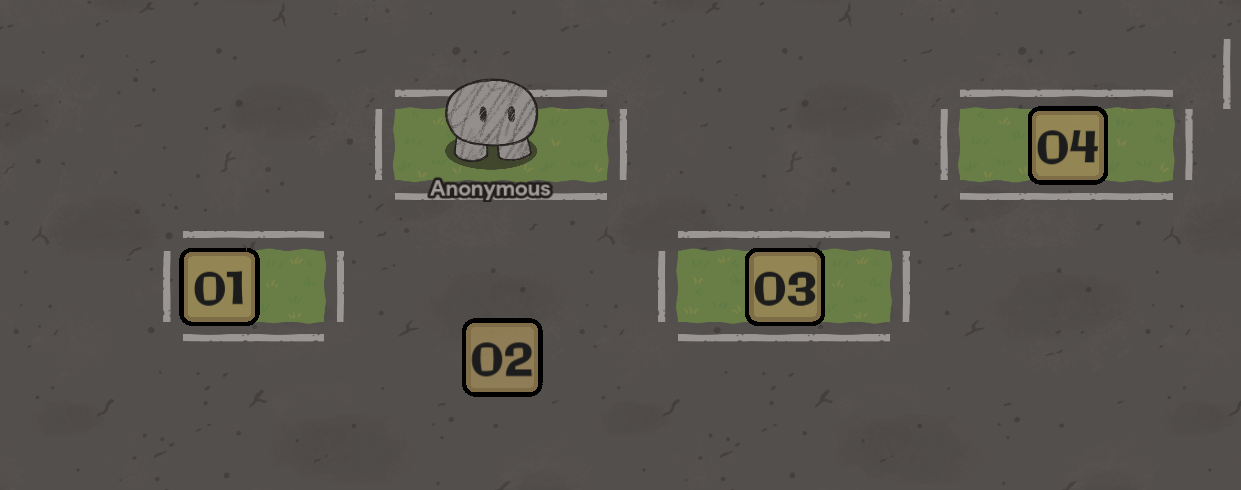
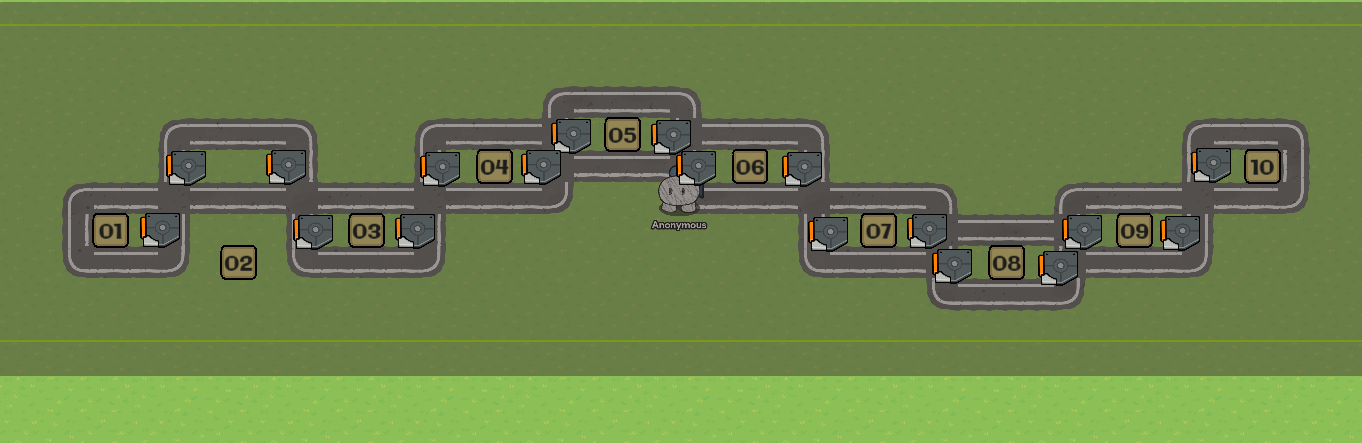
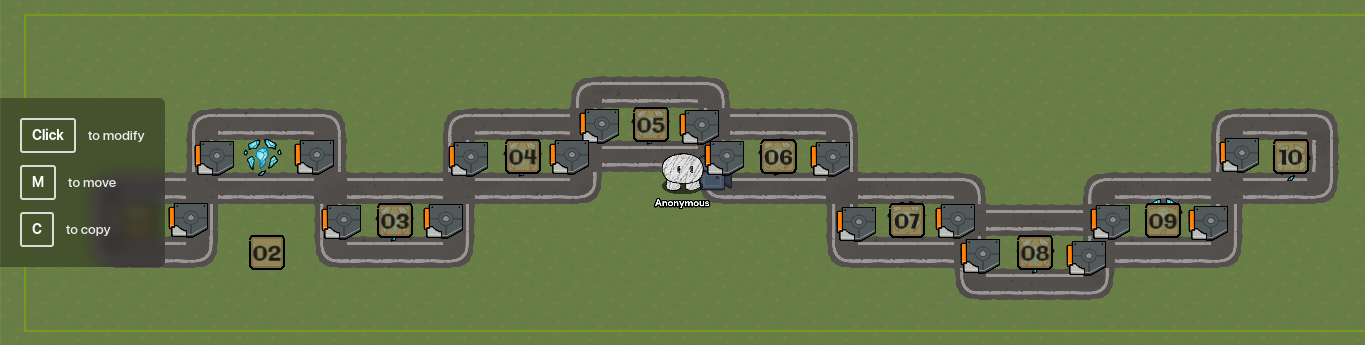
For TSN, I will use a level menu:
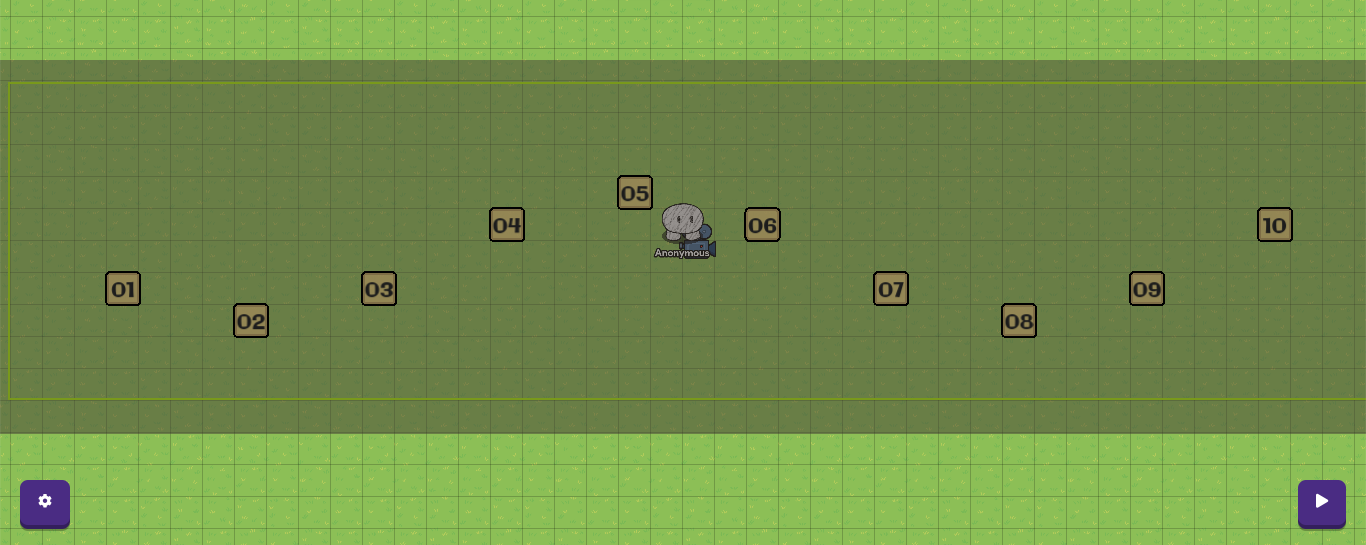
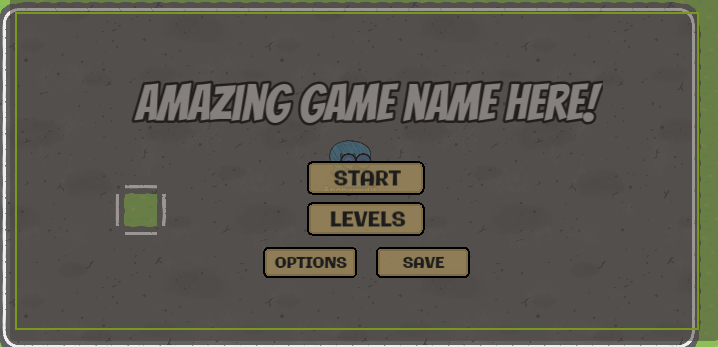
Note: For the purpose of visibility, I turned my background semi-transparent. I also zoomed out, so normally, this menu would be longer than the screen.
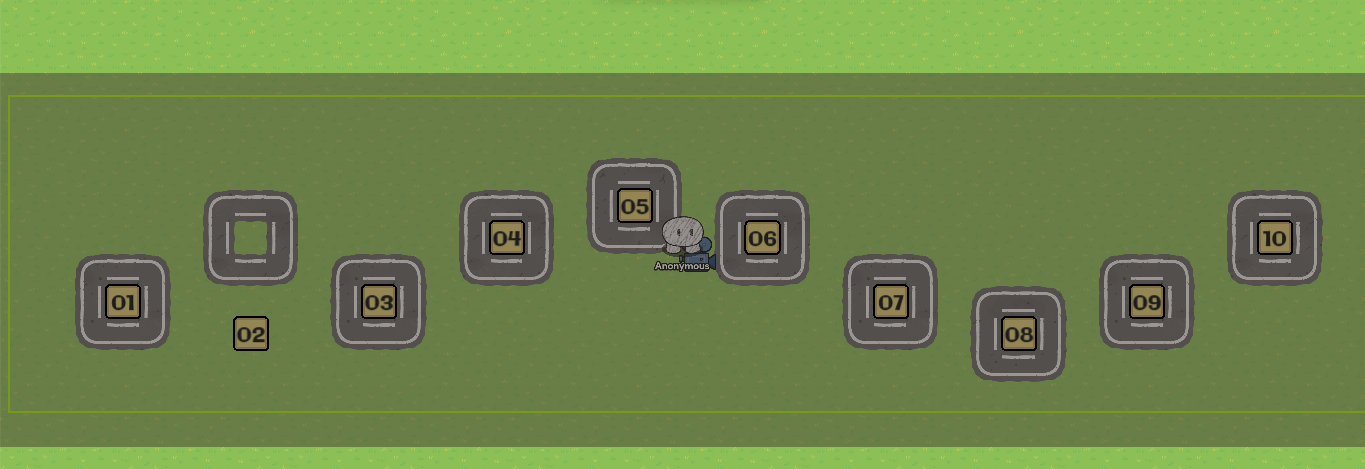
| | Create cages
First, create some cages. By cages, I mean 8 wall tiles surrounding a floor or empty tile (the tile type doesn’t matter). For reasons, we are going to call the empty tile the center of each cage. The number of cages should correspond with the number of buttons. The cages should have at least 1 block of space between other cages. If possible, position them on the middle of the button, but if your buttons are too close to do so, at least keep the cages aligned to the button in the opposite way that the menu is intended to scroll.
For example, my menu is supposed to scroll horizontally, so I have to make sure that the cages are aligned to my buttons vertically. My example is shown below with number 2 representing how you should place the cages if the menu buttons are too close to allow a 1 block gap:
To allow player movement, each cage will have an extension in the direction of allowed movement. For my menu, players can move left or right, so it ends up looking something like this:
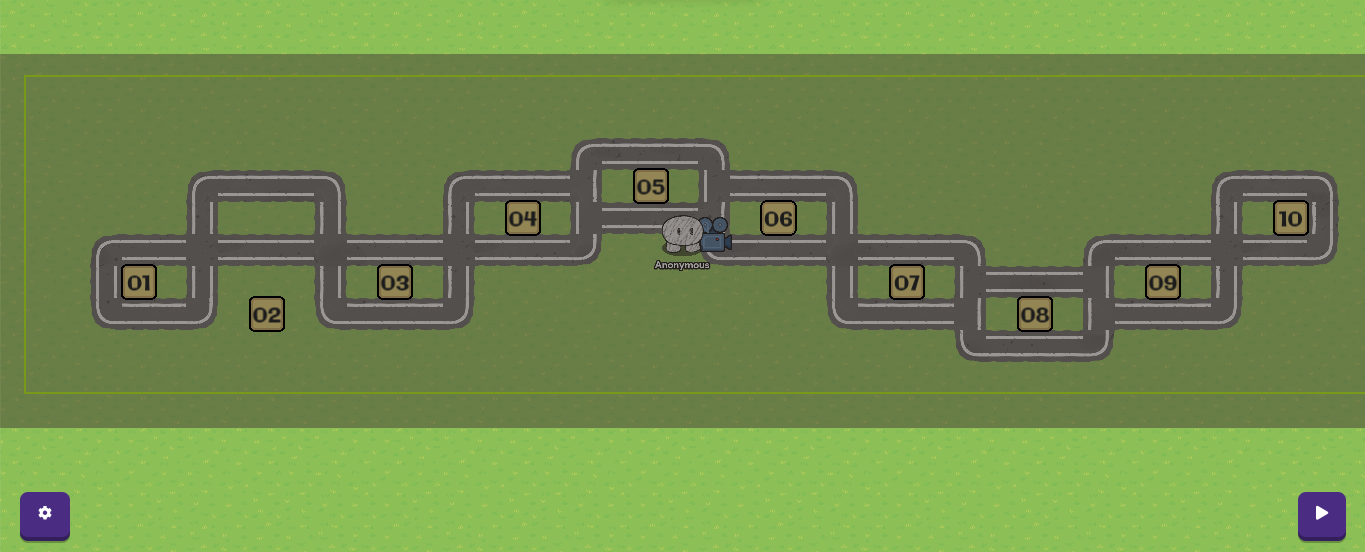
See how I have an empty space to the left and right of the original positions of each cage (except for button 1 and button 10 because they are at the ends of the selection)? This is pretty much what each cage should look like, but add vertical movement if needed. We’re going to be calling these spaces extensions.
So uhhh… after some testing, at 4x speed (more about this later), the gim can actually PHASE THROUGH THE CAGES??? so I recommend you make them have three blocks of width (or just fill the entire menu like me):
The cages are built! ![]()
| | Adding devices
Next, we need to add the devices needed to make the menu work.
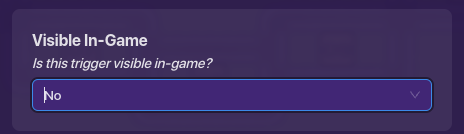
First off, we need triggers to detect movement. To make things easier, we’re going to set up one trigger first and then copy it to create the rest. First off, the triggers need to be invisible:
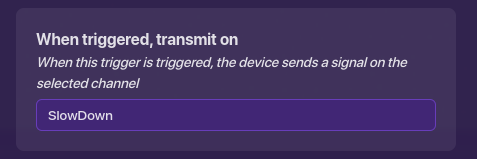
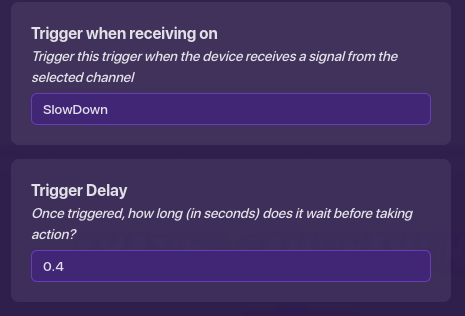
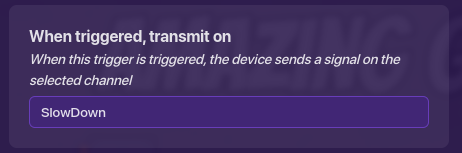
We need to copy that trigger, as each extension will have two triggers. After copying that trigger once, we’ll have one of them broadcast to SlowDown on trigger, like this:
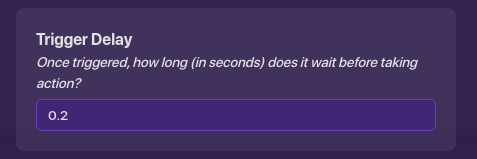
For the other trigger, set its trigger delay to 0.2:
The two triggers should then be stacked and copied into each extension in a way that they are not touching the center, like below:
All in all, your build should look like this:
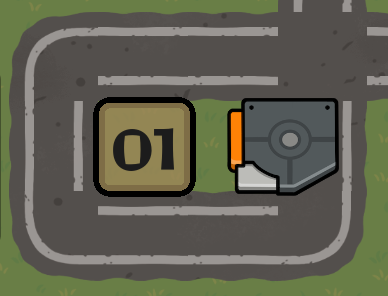
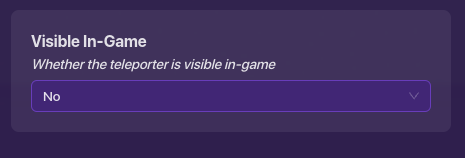
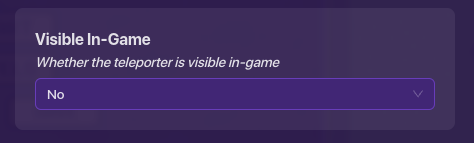
Next up, teleporters! This will be what allows your gim to traverse between button selections. First, our teleporters need to be invisible:
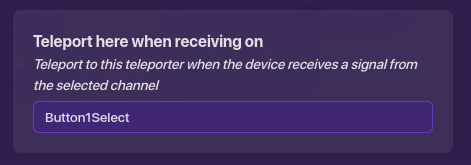
After that, copy the teleporter so that you have an equal number of buttons and teleporters. Go to the Channels tab and make sure to add a channel in Teleport here when receiving on, like below:
Name the channels of the teleporters different names. You should probably name them based on the button they are going to represent (and if you’d like, you can add “select” to the end of the channel names, which will probably make your life easier in the long term).
Then, place them in the center of each cage:
(This is very important: make sure that it is perfectly in the center and is able to move in all directions without hitting with a corner of the cage! Otherwise, there may be minor issues with the controls.)
So far, this is what your menu should look like:
Almost there! We also need every trigger that has a delay of 0.2 to transmit to a channel when triggered:
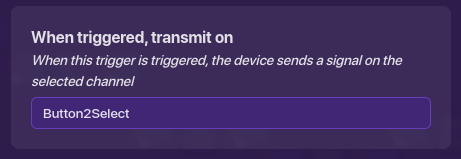
The channel should be based on both the direction and the current location that the trigger represents. For example, if a trigger is in the Level 01 button and it is in the right extension, I would have it transmit to Button2Select (rename this to match your own buttons). This way, when the trigger is triggered, it will move you to the button that is to the right of the current button.
Lastly, add these devices outside of the menu:
- x2 Speed Modifiers
- x1 Trigger
- x1 Button
One of the speed modifiers should be set to the following settings:
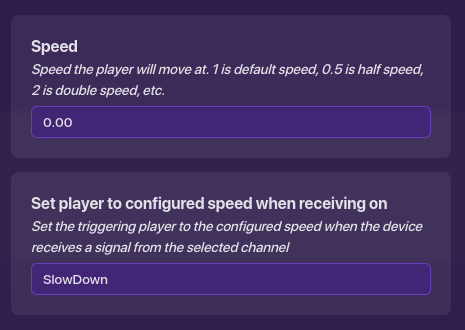
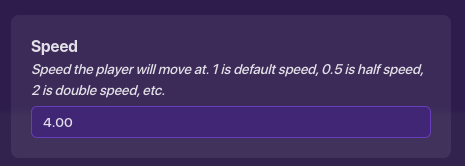
Set the speed of the other one to 4:
And the trigger should have settings like this:
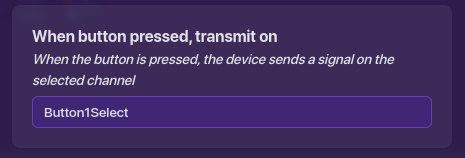
The button is for debugging purposes, so the button should be next to your spawn. It should transmit to the channel of any teleporter in your menu, your choice. For mine, I chose the Level 1 button:
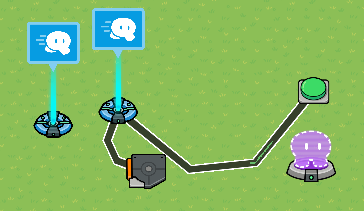
The trigger should be connected to the 4x speed modifier with a wire, and the button should also be connected to the 4x speed modifier. The devices outside of the menu should look like this:
After that, test your menu! Click on the button to take you to the menu. Every time you click a movement button, the camera view should snap to the next button in that direction, if any:
The TSN is done! ![]()
| Joystick Style Navigation
In general, Joystick Style Navigation (JSN) trumps Teleport Style Navigation (TSN) by being quite a bit easier to sort and taking up a lot less space. However, unlike TSN, you will likely have to use a lot of block coding. Also, JSN does not work with long menus like TSN because the player’s gim stays in one place.
Also, if you know how to (cause this guide is already going to be too long), you can use JSN as a movement detector for things besides menus e.g. RPGs.
How it works
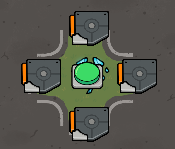
JSN is, in a way, similar to TSN. However, the main difference is that the operating space has an extension in all four directions, so we’ll call that the joystick.
Whenever the player triggers a trigger in any of the directions, they teleport back to the middle of the joystick. Then, blocks will decide what needs to be done in terms of changing what button is currently chosen. This makes it much more space efficient than TSN.
For JSN, I will use my original menu:
| | Creating the joystick
To create the joystick, we’ll use a process similar to the way we made each cage.
Just like when we made a cage, create an empty space and fill the rest of the menu with wall tiles. However, unlike cages, the joystick does not have a specific position requirement; just make sure that it isn’t too close to the edge that players can phase out of the joystick. An example is below:
The joystick also needs an extension (space) in all four directions. Your joystick should look like this so far:

The joystick outline is done! ![]()
| | Adding devices
We need two triggers in each extension to detect the direction of movement in the menu. These two triggers are going to be slightly different.
First, both triggers need to be invisible:
The first trigger needs to transmit to the SlowDown channel when triggered:
(Remind you of anything? These two triggers are going to be almost the same as the ones in TSN; you can just copy them to the side if you have done TSN. Still though, follow along with the guide as there are some minor differences)
The second trigger needs to have a delay of 0.2 seconds:
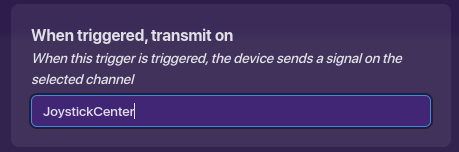
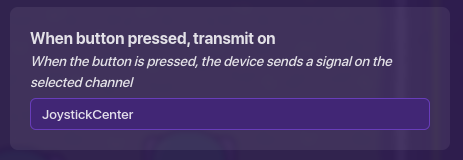
It also needs to transmit to the JoystickCenter channel when triggered:
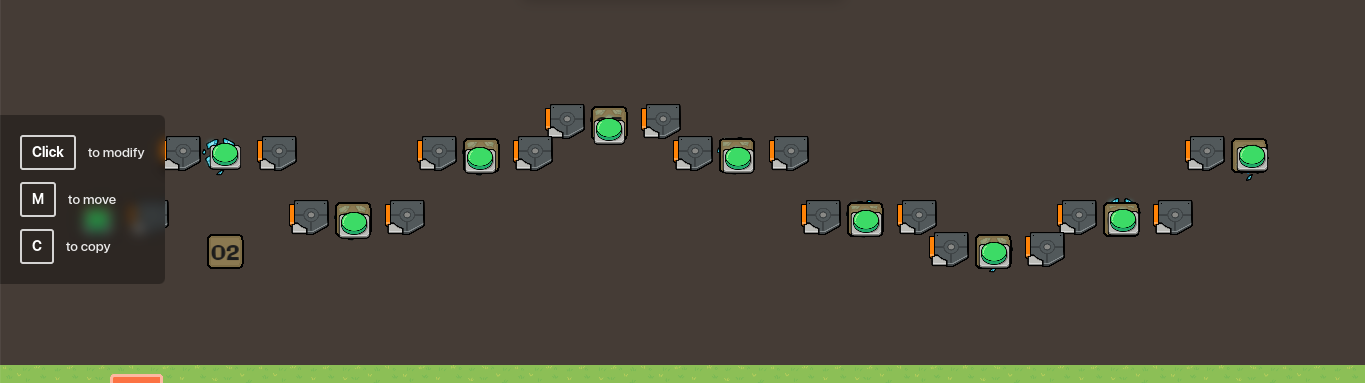
Stack the two triggers, then copy them into each extension of the joystick. The end result should look like this:
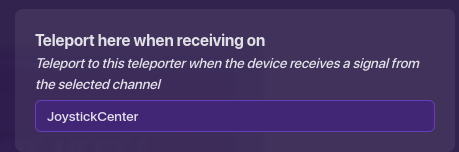
Then, we are going to add a teleporter. It will need to be invisible. Also, set the Teleport here when receiving on channel to JoystickCenter:
Place the teleporter in the center of the joystick, like so:
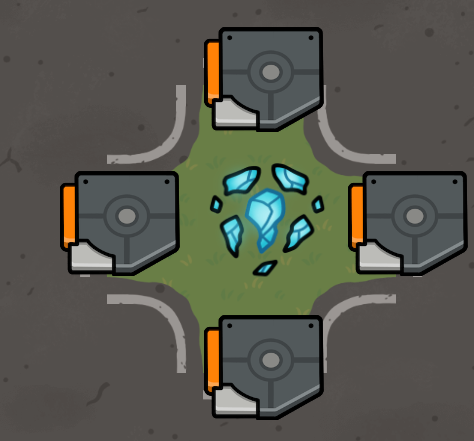
(This is very important: make sure that it is perfectly in the center and is able to move in all four directions without hitting with a corner of the joystick! Otherwise, there may be minor issues with the joystick controls.)
This should make it so that when you trigger the trigger, you should be teleported back to the teleporter.
Lastly, add these devices outside of the menu:
- x2 Speed Modifiers
- x1 Trigger
- x1 Button
(If you have done this in TSN, you only need to add a button.)
One of the speed modifiers should be set to the following settings:
Set the speed of the other one to 4:
And the trigger should have settings like this:
The button is for debugging purposes, so the button should be next to your spawn. It should transmit to the channel of the center teleporter in your joystick:
The trigger should be connected to the 4x speed modifier with a wire, and the button should also be connected to the 4x speed modifier. The devices outside of the menu should look like this:
After that, set your background to semi-transparent and test your menu. Click on the button you placed to take you to the menu. You should be able to see your gim. Any direction you move should teleport you back to the center, and the camera view shouldn’t shift at all.

The devices are done! ![]()
| | Adding the blocks
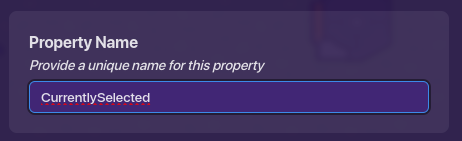
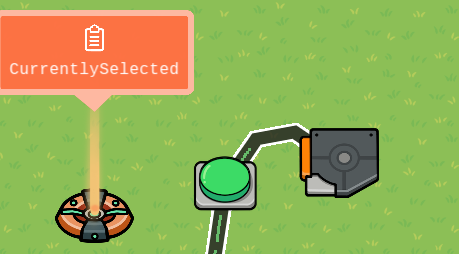
To prepare for the blocks, we need a property. Add a property device and name it CurrentlySelected:
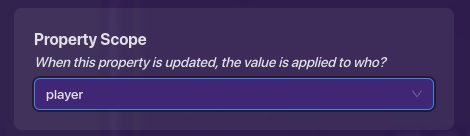
Set its scope to Player:
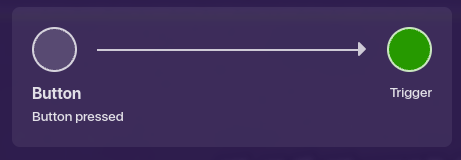
Then, add a trigger and go into the blocks tab. Add the following blocks:

Replace the “value” with the name of the default button, the one you should start on when entering the menu (for me, it’s the start button). After that, link the trigger and the button that would take you to the menu with a wire:
The setup should look like this:
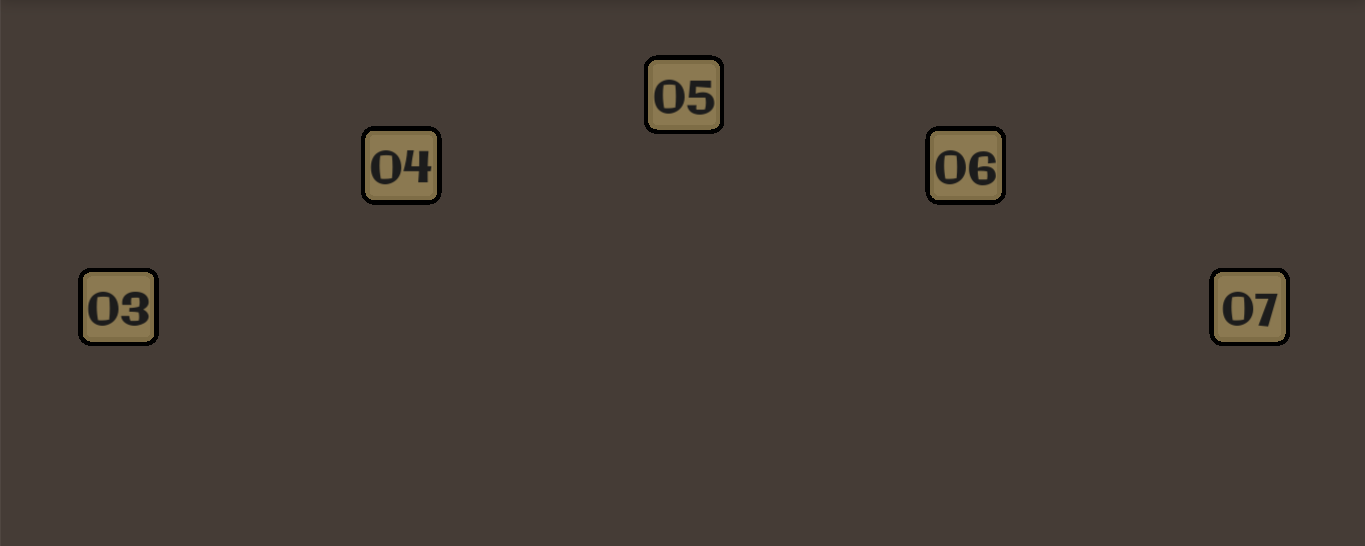
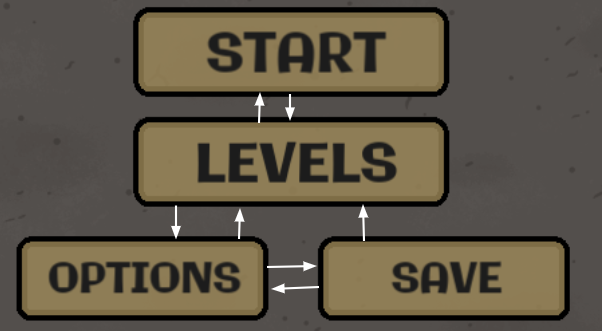
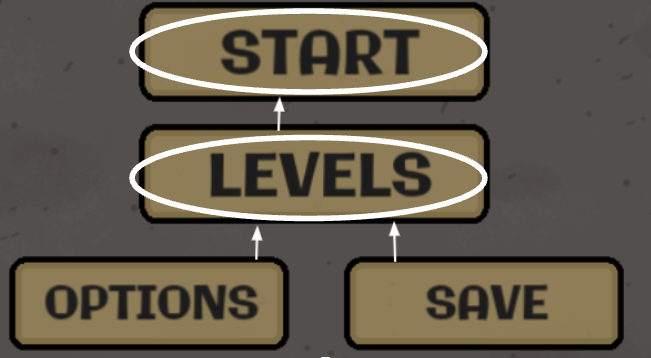
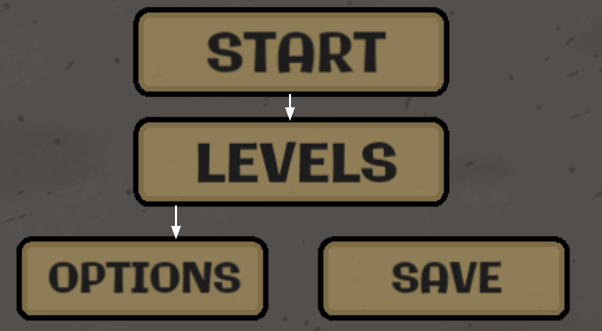
Before we add the blocks, make sure you know what directions each button on your menu can move in. My example is below:
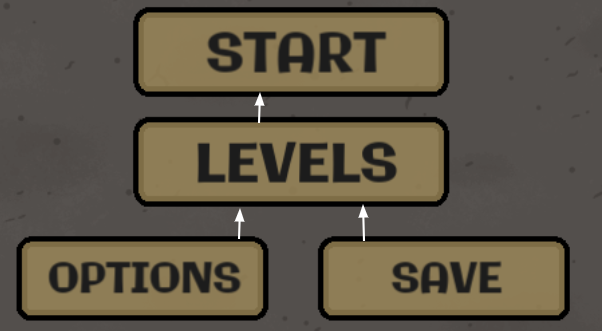
Each pair of triggers in the joystick corresponds to one direction. We’ll be working on the up trigger first. The image below shows which buttons can go up in my menu:
To do this, we’ll add blocks to one of the triggers above the center of the joystick:
MAKE SURE THAT YOU SELECT THE RIGHT TRIGGER! This is the trigger that should broadcast to SlowDown:
After ENSURING THAT YOU PICKED THE RIGHT TRIGGER, go to the blocks tab and create a new one:
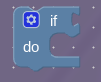
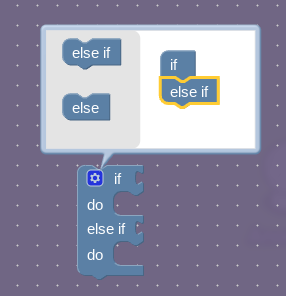
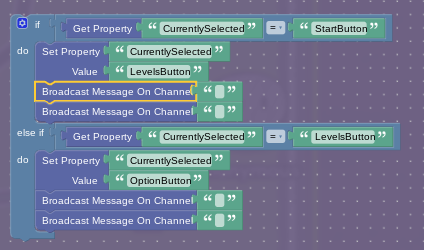
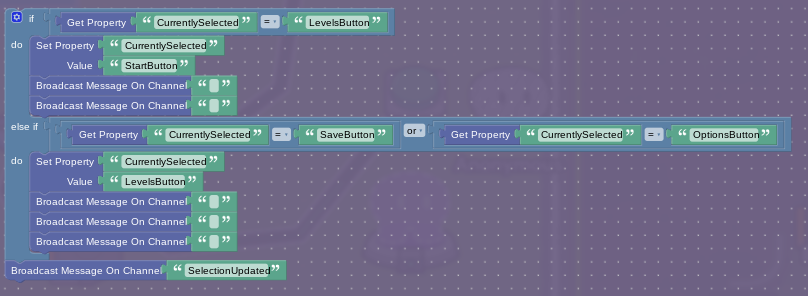
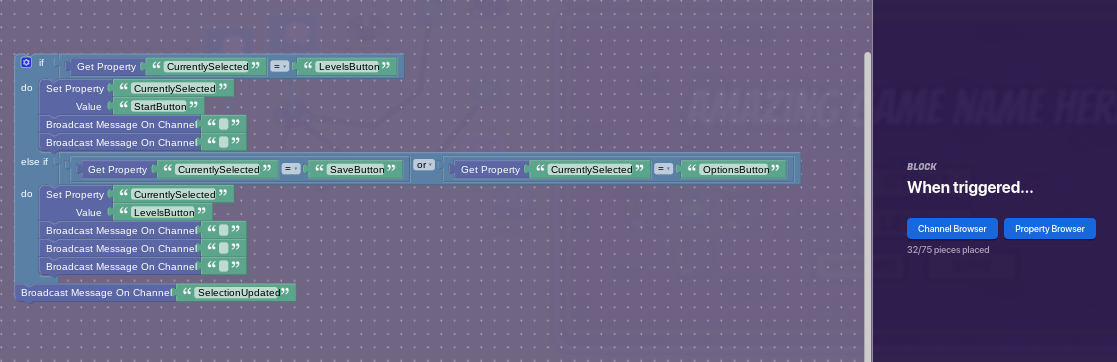
Add an If block:
Click on the settings icon. Then, count the number of buttons in your menu that you can move up to.
For example, in my case, you can use move up from either the Options button or the Save button to get to the Levels button, so that’s one. Then, you can move up from the Levels button to the Start button, so that’s two:
Depending on the number of buttons that fit that requirement, add ElseIf blocks to the end of the If block in the settings equal to the number of buttons minus one. So, for me, I had two buttons, so I add one ElseIf block:
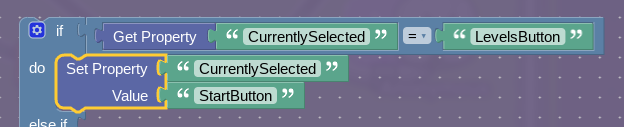
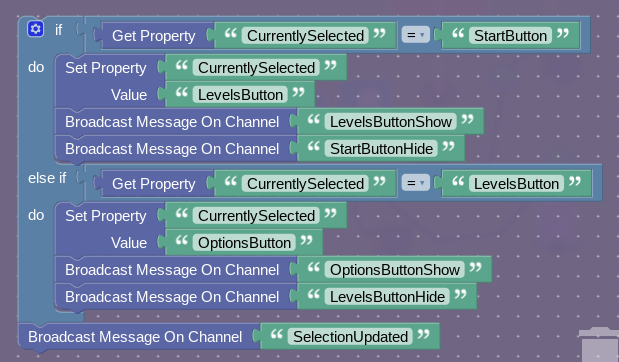
Each “If” condition represents one button. If you go up from the Levels button in my menu, you’ll reach the Start button. To detect whether the player is currently selecting the Levels button, I’ll use the following code:

To set the player’s selected button to the Start button, I’ll use the following code:

Obviously, alter this according to your own menu and buttons. Then, place the blocks into the “If” block like so:
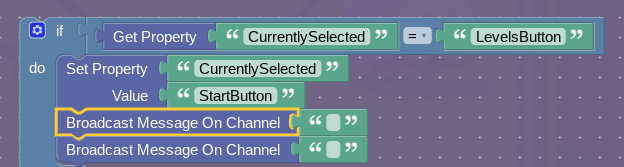
Afterwards, add two “Broadcast” blocks:
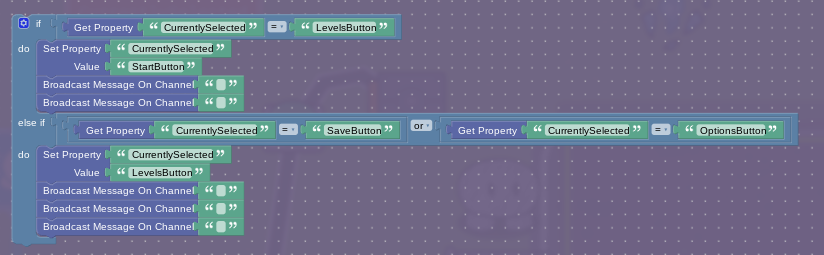
Then rinse and repeat for each “Else If” section.
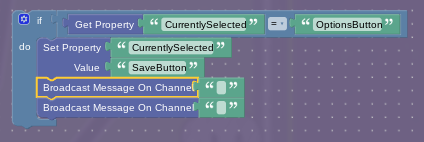
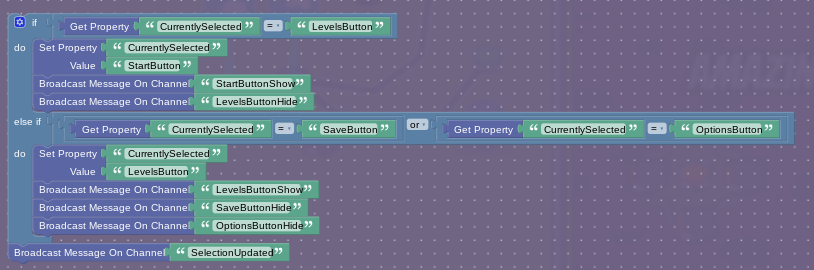
If there are two buttons that can go up into the same button, then use two conditions combined with an OR block. For example, if you go up from the Options button in my menu or the Save button in my menu, you’ll reach the Levels button. To detect whether the player is on the Options or Save button, I use the following block:

Because I have two conditions that allow the player to travel to the Levels button, I need to add three broadcast blocks. The number of broadcast blocks at the end should equal the number of conditions plus one:

Your final If block should look similar to this:
The up trigger is done! ![]()
This is the process we’re going to repeat for every direction.
Right:

Down:
Left:

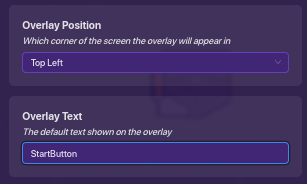
After that, we’ll do some debugging. Add a game overlay:
Set its text to the name of your default button on your menu (and edit the position if you’d like):
Go into blocks and add a new block based on the channel SelectionUpdated:
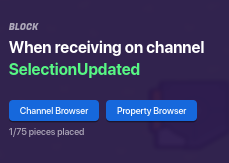
Add the following block:
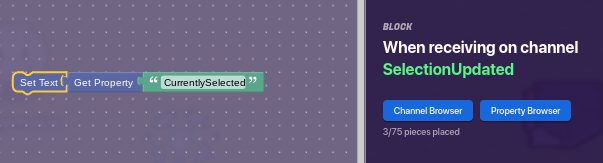
Then, go into each trigger’s blocks that you just added and insert this Broadcast block at the end:
![]()
Now test your menu! The text in the top left should correspond to the button that you should be on:
The triggers should only change the selected button if there is a button in the direction that each trigger represents. If something doesn’t seem right, check the code and fix any issues. Some issues I have encountered include:
- Names don’t match (e.g. I used OptionButton in one trigger and OptionsButton in another)
- Code isn’t set up properly
After that, you can delete the overlay you added for debugging purposes.
The blocks are done! ![]()
Adding interaction to the menu
Now that the game knows which button the player is selecting, it’s time to make the buttons do something! There are two main ways to do this: with buttons and with a game overlay. I think that a game overlay would be better, as it’s harder duh you will not see this:
But hey, you do you.
| Button Mode
Button mode is actually really easy to make, so I mean if you are lazy and can’t be bothered to use overlays think it works just fine then again, you do you.
| | TSN
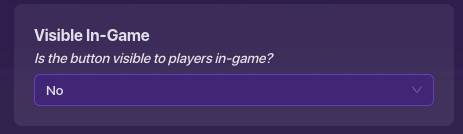
For TSN, button mode is fairly easy. Set a button to be invisible:
And copy it into the center of each cage:
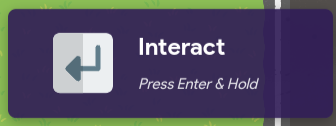
That’s it. Customize each button to your liking (setting the interact time, the button message, making them do things, etc.), and test it:
The button interactions are done! ![]()
| | JSN
For JSN, button mode will be slightly more complex. Remember those empty broadcast blocks we had before? Yeah, we’re using them for this (and something else).
First, we need to edit our setup (Remember? The one we made before doing the blocks?).
Find the trigger that you added and make it transmit to a channel when triggered:
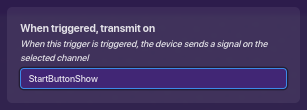
This channel should be based on your default button’s name with the word “Show” at the end.
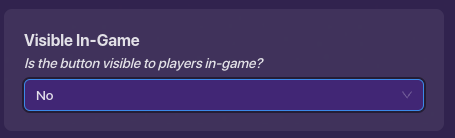
Then, we need buttons. You need them to be invisible:
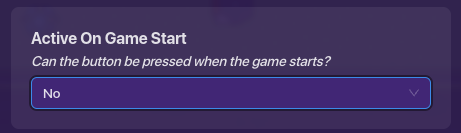
They should also be deactivated on game start:
And then copy them so that you have an equal number of buttons and buttons in your menu (so for me, four):
Then, set each button’s settings to something like this:
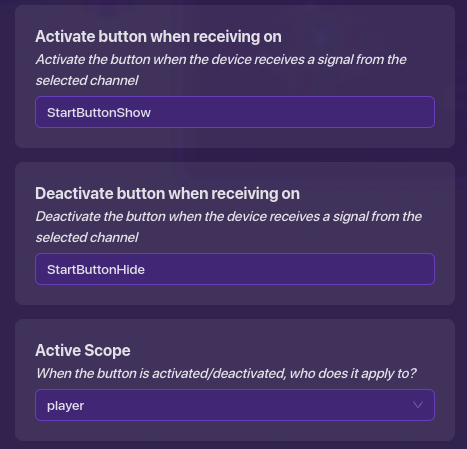
The Activate button when receiving on and Deactivate button when receiving on should be named after the button in your menu that that button represents, so since this button I used as an example represents the Start button, I’ll use StartButtonShow and StartButtonHide. The scope should be set to Player.
After that, customize them any way you want (setting the interact time, the button message, making them do things, etc.) and then stack them:
![]()
Then, place them into the center of your joystick:
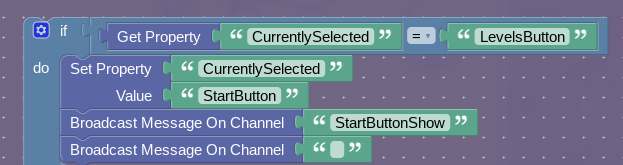
After that, edit the blocks you had in the triggers. I’ll be editing the up trigger first:
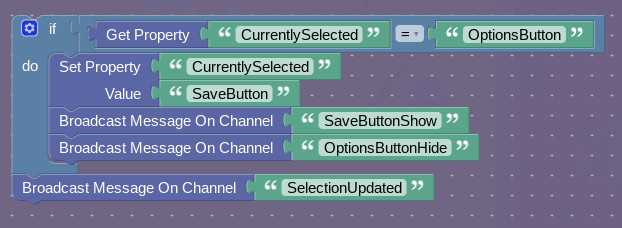
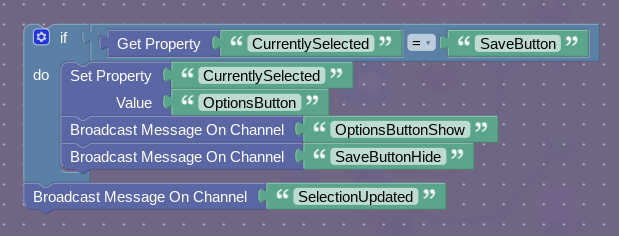
The first broadcast block should transmit to [insert button name]Show. The button used should be dependent on the button that the specific If section takes you to. For example, the following If section takes me to the Start button, so I use StartButtonShow:
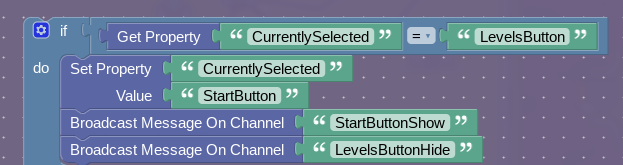
Then, use [insert button name]Hide for every condition that can take you to the button stated in the If statement. For example, the Levels button takes me to the Start button, so I use the following:
And repeat this for every trigger and If section.
Up:
Right:
Down:
Left:
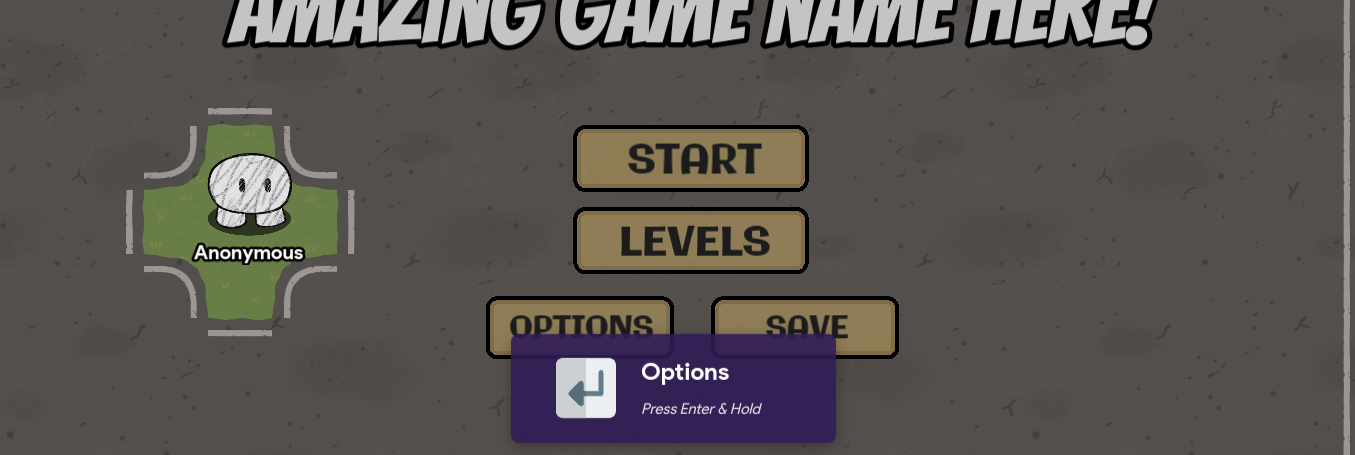
Now test it! You should be able to interact with different buttons depending on which button in your menu is selected:
The button interactions are done! ![]()
| Overlay Mode
This is generally the best way to add interactions to your menu (unless there is some other interaction method I missed). Basically, we’ll use a property to store which button the user is currently selecting and the Game Overlay (button form) to do things based on the currently selected button.
WIP
Implementing your menu
WIP
If you have read everything, then congratulations! You have completed the test and proven you are NOT a human.
Jokes aside, this took a long, long time, and I wrote a LOT (like seriously, it’s about twenty pages in raw form and it’s not even done yet), so I don’t expect you to read it all (if I did, what’s the point of organizing everything and bolding important phrases?).
Please, please, PLEASE, let me know if I didn’t explain anything clearly or missed something or if something doesn’t work (as I probably missed something); it would greatly help me improve this guide (grammar/spelling fixes are appreciated too).
Also, I am aware that I am going through, quite literally, one step at a time. This is not like most complicated guides because of that. I do this since making a menu is something a lot of people will likely want to do once they know that it’s possible, and I try to make it simple enough for them to understand.
Anyways, I haven’t decided on a difficulty yet so vote below:
 : 1/10
 : 2-3/10
 : 4-5/10
 : 6-7/10
 : 8-9/10
 : 10/10
 : 11/10
I decided to post this as a WIP, as I no longer am sure if I’ll finish it. Also, not being able to post other topics kinda sucks.
Welp, guess I reached the character limit (any way to bypass this maybe?).
