Intro: Okay so you’re new here! Congrats! This place is an excellent community and have some great guides, and I’m sure you’ll add your own guides soon enough! If you’re not new here and your like “Didn’t he make this before???” Well it mysteriously vanished and was replaced with this better one[1]. Also, yes I know there are guides like this! However, mine presents the info differently, has different information, differently and gives more sections like the Examples and Quizzes. I gave credit to the two similar guides at the bottom.
A Guide for GKC Beginners
Now right away you might be says WOAH! What is GKC??? It is Gimkit Creative! So the way this guide is structured is each topic I talk about is separated in 3 parts: The Information[2], The Example[3], and The Quiz[4]! Okay let’s start!
Chapter I: The Tutorial
If you haven’t done the tutorial already, I would recommend doing it because it highlights some things you will have to do later. If you have already done the you can move onto chapter 2, if you haven’t then read this chapter.
[details = Information: The UI (User Interface)]

A: Options
Click on this on screen button brings up a series of settings with a little synopsis of what each one does:
- Map Options: Customize teams, game duration, and who is determined as winner
I would suggest going through these settings and just messing around a bit, learning what each one does because it is very helpful. - Editing Options: Adjust player speed, collision, and other settings while editing
As with before I would suggest messing around with them and remember, these only apply when you are editing, not playing. - Publish: Publish your map to be played by Gimkit users around the world!
Using this your map will be published to Discovery! - Showcase & Save: Send a link to your friend to have the test out your map!
The showcase link is a link that you can copy and share with people, but it only lasts for 7 days. Save is the button you click to save your map. You should always save before leaving
 - Permissions: Control who can make changes when editing collaboratively
When you edit in a group you don’t want some troller deleting your whole map. Here you can decide is people can delete, edit, or add stuff. - Documentation & Help: Get help building your map!
These section has links Forums and the Help Docs!
B: Start Game
Click this button to start the game and test out your map!
C: Add
You can click this to access the Add Menu where you can add the following items:
- Terrain: The floors and walls of the map
- Props: Objects and decorations
- Devices: Create game mechanics!
- Wires: Connect devices together
In the next few section will cover these things. This stuff is the bulk of your game!
Hotkeys:
- E to quickly open the Add Menu
D: Join Code
By clicking the Join Code you can open it up to look like a normal Gimkit Lobby:
E: Layers
Layers show the order in which devices and props are stacked. If the device/prop is above the other prop/device on list it will be displayed above with
The Above layer is above the player.
F: Eraser
The eraser is what you use to delete items! In the eraser you can change the Eraser Mode to any of the following:
- Everything: When deleting you can delete everything
- Terrain: Allows you to only delete terrain. Allows you to choose what Layer how want to delete and change the Eraser Size from 1-3.
- Props & Devices: Allows you to delete props & devices.
- Wires: Allows you to only delete wires.
Hotkeys:
Q to quickly open the eraser
[/details]
[details = Information: Terrain]
When you open the terrain menu you first select any terrain you want from the list or search for one.
After you select a terrain is opens the Terrain menu:

A: Layers
Not to be confused with Layers, this terrain version of layers applies strictly to terrain. Layering terrain gives a look to your map and in the wise words of Cellofive:
[Meme]
Something to note is that no matter what terrain layer, walls will always be above floors.
B: Brush Size
Allows you to adjust the size of terrain you place to 1x1, 2x2, 3x3, or 4x4. You can Click & Drag to quickly add terrain.
C: Terrain Type
The two terrain types are Walls and Floors. Walls have have collision meaning players will stop when they run into them. Floors do not have collision, meaning players run right over them.
Hotkeys:
1 sets Brush Size to 1x1
2 sets Brush Size to 2x2
3 sets Brush Size to 3x3
4 sets Brush Size to 4x4
Shift changes the Terrain Type
Space hides/shows the Terrain Menu while placing terrain
[/details]
[details =Information: Devices]
When you open the Device Menu you can select from A TON of devices that range from Barriers to Zones! In the next chapter we will start discussing some basic devices and their uses.
[/details]
[details = Information: Props]
When you open the Prop Menu you can select from A TON of props that range from 3D Printers to Yellow Sofas! By clicking on a prop you can access it’s settings. In the settings of the props you can find:
-
Featured Settings
-
Shadows Enabled: Turns the shadow of the prop on or off.
Off:
On: -
Shadow Placement: You can choose to have the shadow under the prop or on the floor this is helpful when stacking props. For example with Moss & Groundbreaking Plants:
Floor:
Underneath Prop: -
Collisions Enabled: Like with the collisions we discussed with walls & floors, disabling collision allows a player to run through it, while collision on makes the player stop when it hits the prop
-
-
Appearance
-
Tint: Adds a tint of a color to a prop.The more white in a color, the less tint it has. Like shown with red below.

-
Alpha: This is transparency, the less alpha it has the more see through it is

-
-
Availability
- Visibility Scope: I will discuss Scope in Chapter 3.
- Show/Hide prop when receiving on: I will discuss Channels in Chapter 3.
-
Damage
- When prop destroyed, transmit on: I will discuss Channels in Chapter 3.
- Adaptive Health: For each player in the game, it will increase the Prop’s health by that amount
You may notice that there are some settings I left out, that is because stuff like turning Shadows on and off is pretty self-explanatory
[/details]
[details = Information: Wires]
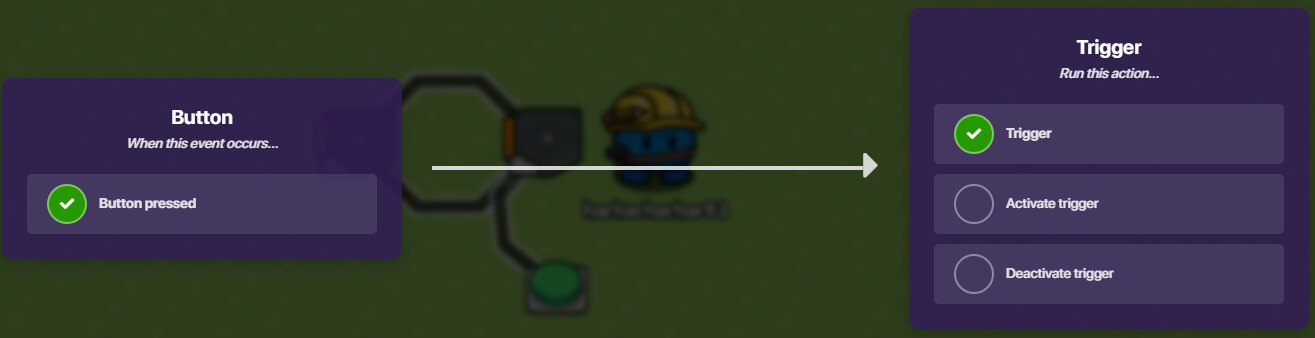
Wires are what are used to connect devices together and get them to interact with each other.
After clicking on the Wires button it brings you back to your map where you can select two devices/props to link together using Inputs and Outputs. The first device/prop Inputs a signal and the second device/prop Outputs an action.
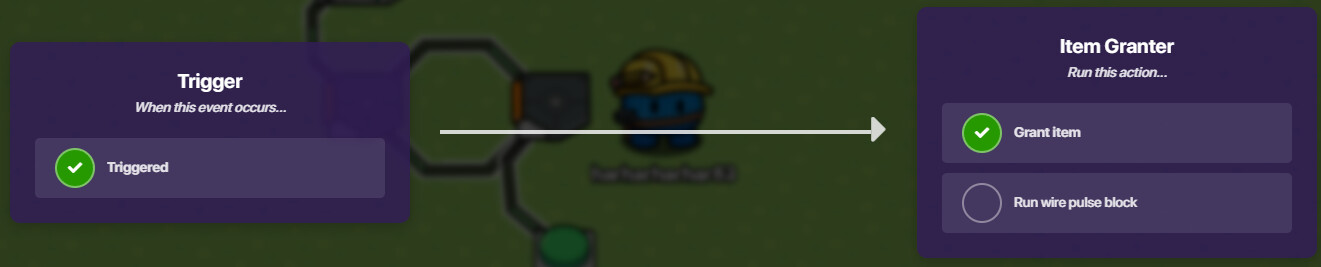
When [this thing happens] make [this thing happen]. Here are some examples:
Lifecycle → Trigger
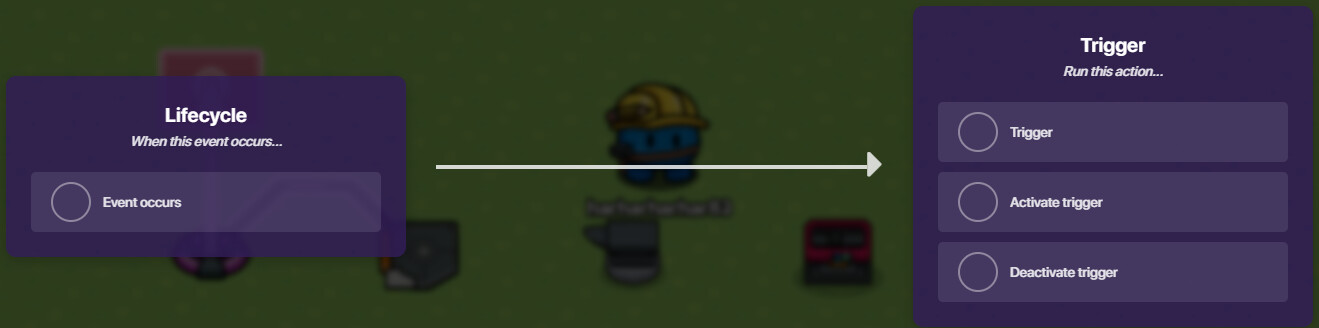
When
[event occurs] make this trigger [trigger]
Trigger → Prop
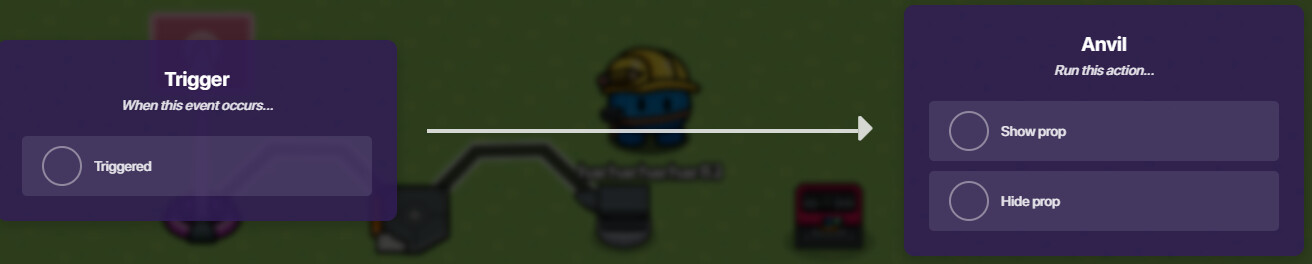
When
[triggered] the make this prop [show]
Prop → Prop
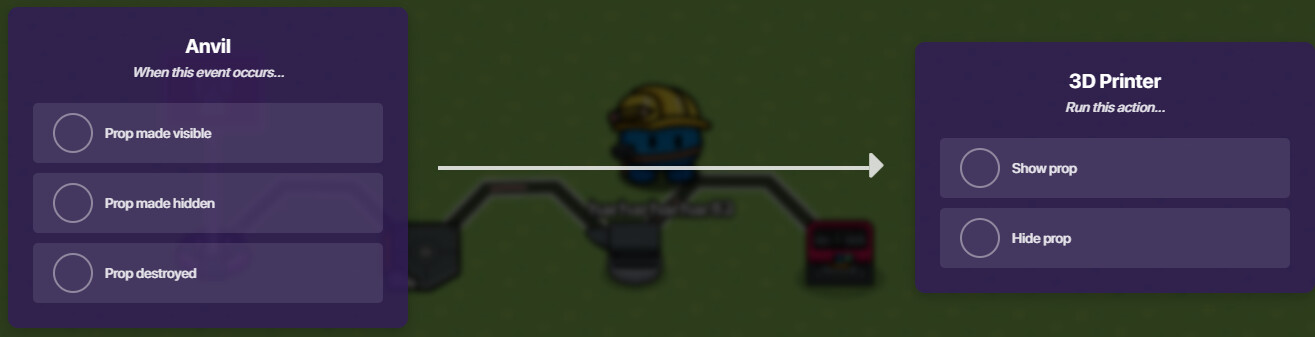
When
[prop destroyed] make this prop [hide]
If devices don’t interact with each other, the game can’t function! Wires are limited however, a device/prop can only have 6 wires connected to it.
Hotkeys:
Z to quickly pull up the Wire Menu.
[/details]
[details = Example: Congratulation!]
Using the UI I grabbed some terrain to make this very simple map:
Notice how using terrain layers I made the illusion of an island floating through space! Space (Moving) is on 1 - Bottom, as the background. Then I added the Dirt on 2 - Lower to make it look like the island is well and island! Then I added Purple Grass on 3 - Middle to make it look like the foundation of the island. Finally, on 4 - Upper, I added Purple Grass as a wall to stop players from running off the edge!
I opened the Prop Menu and and grabbed some Alien Plant and Purple Trees. They make a nice edition to this alien-esk planet. Finally, I added a Tree (Green) which looks out of place:
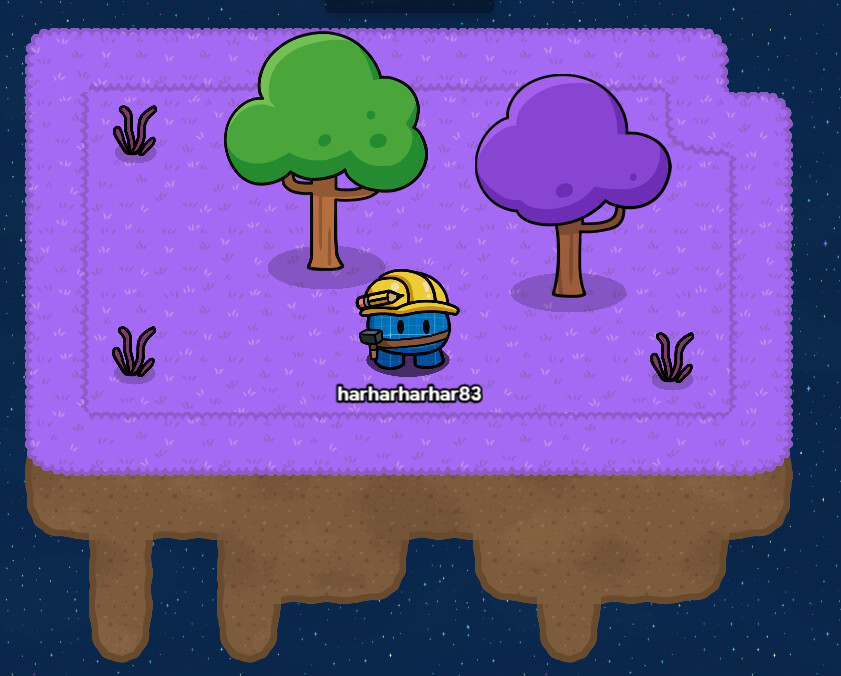
For the Green Tree I turn the Damage
ON.
Now for the devices! I’m going to use this Text device to write “Destroy Me!” on the green tree! Now I add a Notification device that says “Congratulations!” Finally, I added a Starting Inventory device that gives the player a “Zapper”.
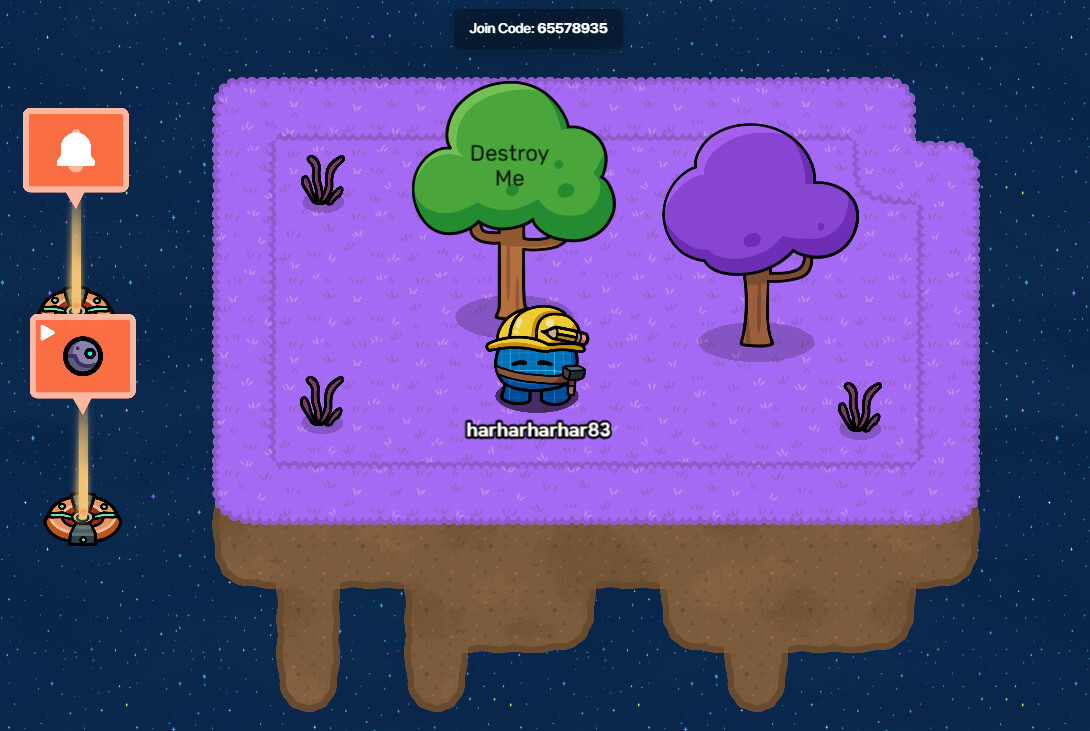
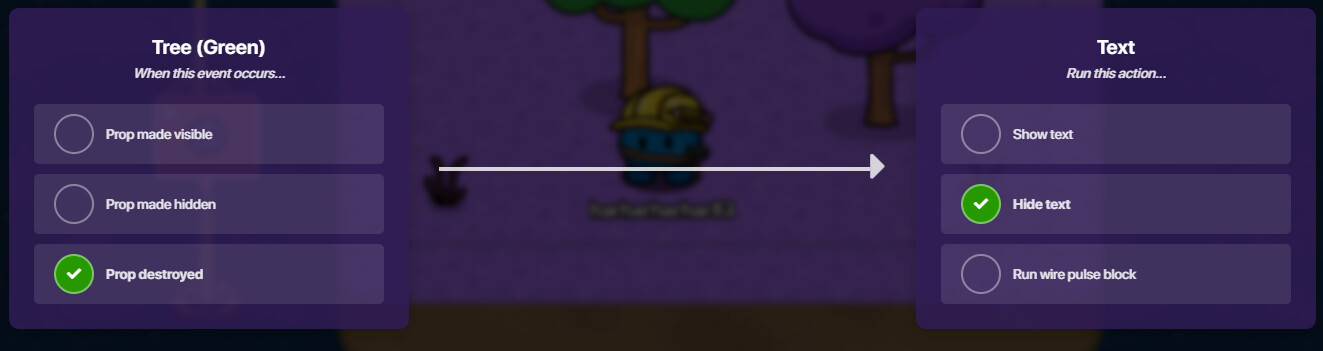
Now for the last thing! Wires! I wired the Green Tree to the Text:
And last but not least, I wired the Green Tree to the Notification:
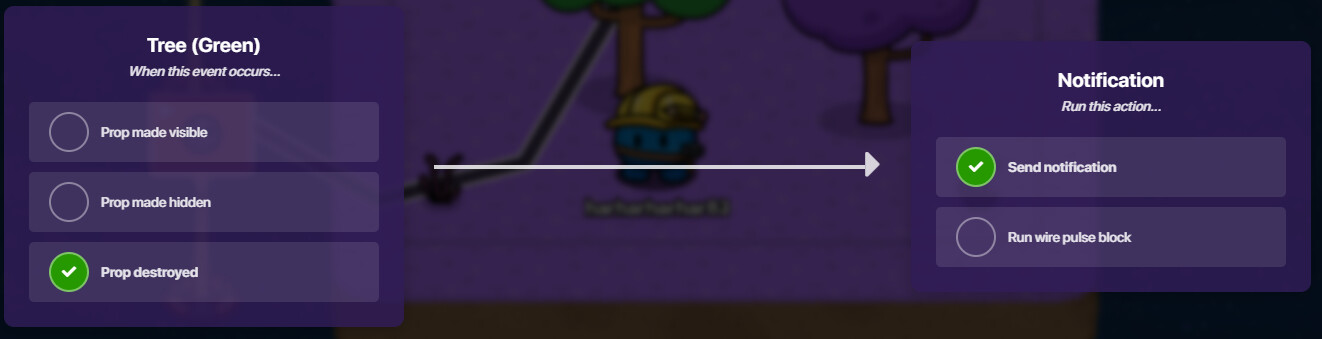
If this works, when we destroy the Tree it should tell us “Congratulation!” Let’s test it:
[Video]
[/details]
[details = Quiz: The Tutorial]
How the quiz will work is you will take it ![]() and then check your answers and see what you should do next!
and then check your answers and see what you should do next!
-
What does UI stand for?
a. User Interface
b. User Interactables
c. User Instances
d. UI, duh -
What is the Hotkey for the add menu?
a. Shift
b. E
c. Q
d. Space -
If I wanted to customize teams where would I go?
a. Publish
b. Showcase & Save
c. Editing Options
d. Map Options -
What terrain type has collisions?
a. Walls
b. Floors
c. Mystery 3rd Option -
What Hotkey will hide the Terrain Menu?
a. Shift
b. 2
c. Q
d. Space -
Where will you find the Device Menu at?
a. The Eraser Menu
b. The Prop Menu
c. The Add Menu
d. The UI -
How many Setting Types where in the Prop Setting
a. 1
b. 2
c. 3
d. 4 -
What is the prop/device that does something when an event occurs?
a. Input
b. Output
[details = Results]
| Number | Answer |
|---|---|
| 1 | a |
| 2 | b |
| 3 | d |
| 4 | a |
| 5 | d |
| 6 | c |
| 7 | d |
| 8 | b |
0-4 of 8 correct: YOU NEED TO REVIEW THIS CHAPTER
5 - 7 of 8 correct: Pretty good! Maybe skim back over before moving on
8 of 8 correct: Nice! Move onto the next chapter!
[/details]
[/details]
Chapter II: Device Basics
Now we will be diving into 14 devices that you will need for every map. I will not expand on every single device’s unique settings or we’d be here forever!
[details = Information: 14 Basic Devices]
These devices are used in almost every map! I provide of examples of where you use them as well!
-
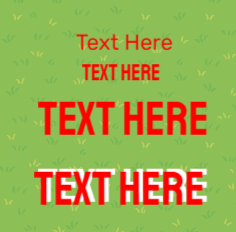
Text: This devices allows you to place down text and change font, color, and size!
This device is used to explain things, add titles, or otherwise do things that use text. Some examples are:
-
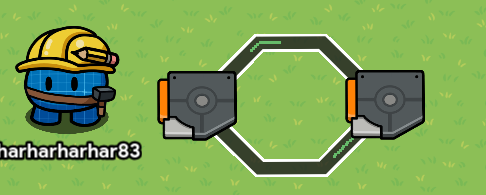
Button: This is an intractable device that requires you to hold enter. This is can be attached to various other devices as bridge. What do I mean? Well a player can’t directly interact with and item granter, so they use this button as bridge between player and device.
You can connect it to tons of different devices! Almost anything I player needs to use/interact with can be connected to a button:
-
Sentry: This is an NPC enemy to attacks other players. It can be set to any team to help or hinder players. Select from a wide variety of skins to give your map a good steady theme.
Sentries can be really only used in two ways: As an enemy that attacks players, or if it is friendly, as an NPC for players to interact with.
-
Barrier: You’ll never guess what barriers do. They barricade areas
. However, unlike walls, they can be deactivated.
Using barriers, you can lock certain levels until a player is far enough along or make some cool barrier art! I would definitely recommend checking out Art guides!
Credit to @Kat_aronii -
Trigger: A trigger is like a button that can be clicked by being stepped on. It can also be triggered by a channel or a wire. For now, that’s all they really are but later (with blockcode) they become our besets friends.
They have a wide variety of uses (like buttons) but are most commonly seen with blockcode and trigger loops.
-
End Game: Ends the game. Like buddy, I don’t think you needed a whole bullet point on this.
[NOT GIVING A PICTURE] -
Spawn Pad: While spawn pad seems simples, like end game, it actually has a a lot more settings to fool around with, to adjust where hosts spawn, and where players spawn, when they spawn, etc.
But yeah its only function is to spawn a player really -
Item Image: This displays and image of any specific item on the map. That’s all it does.
-
Questioner: This is how you bring a kit into your game to study. Eventually we can make correct answer streaks but that’s for a blockcode day.
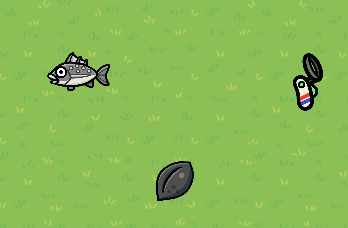
It is used a lot of different places, including with game overlays to energy systems similar to Tag or just the questioner, like bait system in Fishtopia.
-
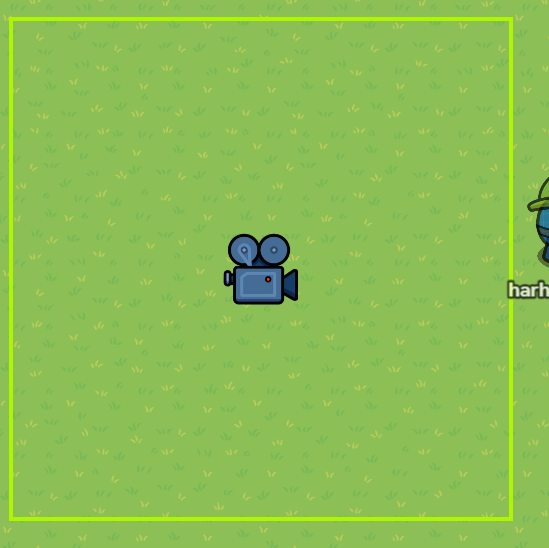
Camera View: This device dictates the bounds the player can see in. It is so they don’t see any part of the game they’re not supposed to yet. By clicking the blue button in the bottom right corner you can adjust its size.
-
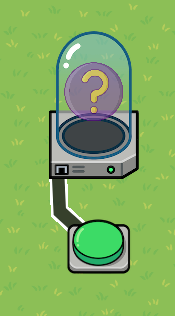
Item Granter: Grants the player items. That’s it really.
-
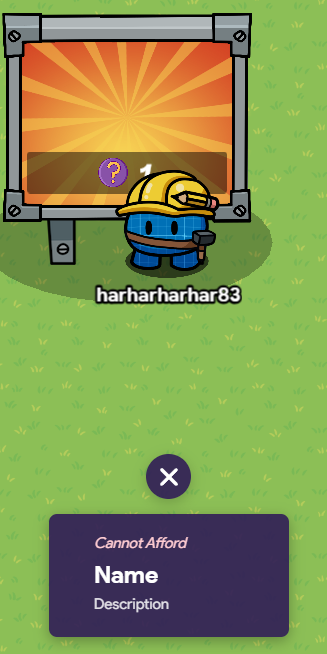
Vending Machine: This is a device that requires and input of an item, to do an output, usually an item or transmit on a channel. So you can think of it as a button that costs money or an item granter that costs money.
-
Starting Inventory: This device is very important, it allows the player to start with items and not have to fend for themselves. You can select an item and the amount.
-
Teleporter: Exactly what it sounds like, a teleporter is a device that moves, or teleports the player to various locations.Its also used to make cutscenes (outdated now that we have the Camera Point).
[/details]
[details = Information: Confusing Settings]
So I said that I’m not going over in every setting in every device and I’m not. However there are some settings that are a little confusing and could be expanded on. If I missed a setting you are confused on, they just ask me in the comments. -
Text: Alpha - Alpha is essentially opacity. I don’t know why they called it that. Anyway, the smaller the number, the more transparent it is.
-
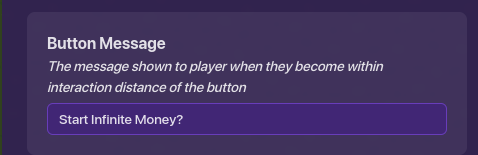
Button: Button Message - This message is displayed when the player is in range of clicking the button, should usually say something like “Inspect” or “Gather”, etc.
-
Sentry: Aim Accuracy - This is how accurate the Sentry is while fighting.
You can set it to @recalledMemories, where it will fire the opposite way or set it to @THEHACKER120, and have it never miss.It ranges from Very Low to Max. -
Sentry: Fire Rate - This is however it fires. It ranges from Super Slow to Fastest. DO NOT SET BOTH TO MAX WHEN IT HAS A LEGENDARY BLASTER.
-
Sentry: Adaptive Health - This health is added onto the Sentry’s health for every player in the game.
-
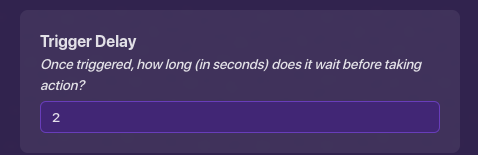
Trigger: Trigger Delay - It will do its job this amount of seconds after it’s been stepped on or triggered.
-
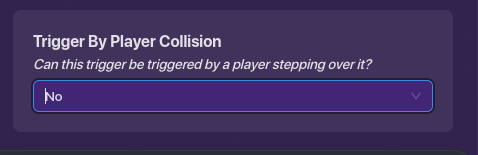
Trigger: Trigger by Player Collision - If this is disabled, it will not be triggered when the player steps on it.
-
Questioner: Kit Link - I know you know what a link it, but I wanted to be clear what link to be put in, when you first open a kit like this:
It’s that link at the top. -
Vending Machine: Name & Description. I just wanted to clear up which is which:
-
Vending Machine: Match Item Rarity - Different rarities of gadgets are associated with different colors, this will make it match that color.
[/details]
[details = Example: Buy the End]
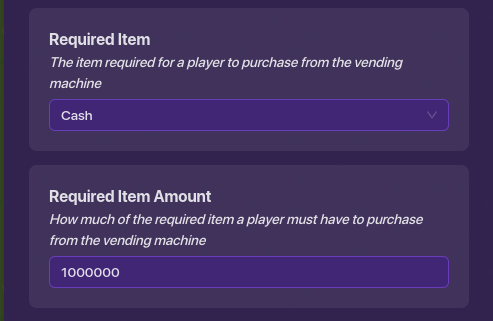
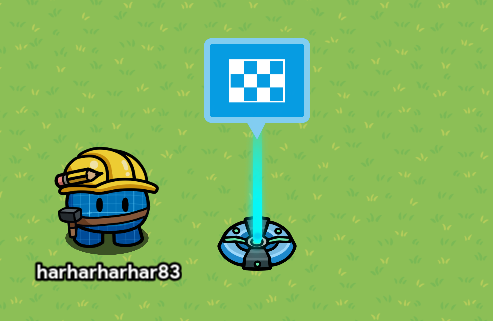
So lets say I make a tycoon game where in order to end the game you need to get $1 million dollars. For this we will need a Vending Machine and a End Game.
First I will make the Vending Machine that costs 1,000,000 Cash:


Next, I will add and End Game Device:
Finally, I’ll wire the two together:
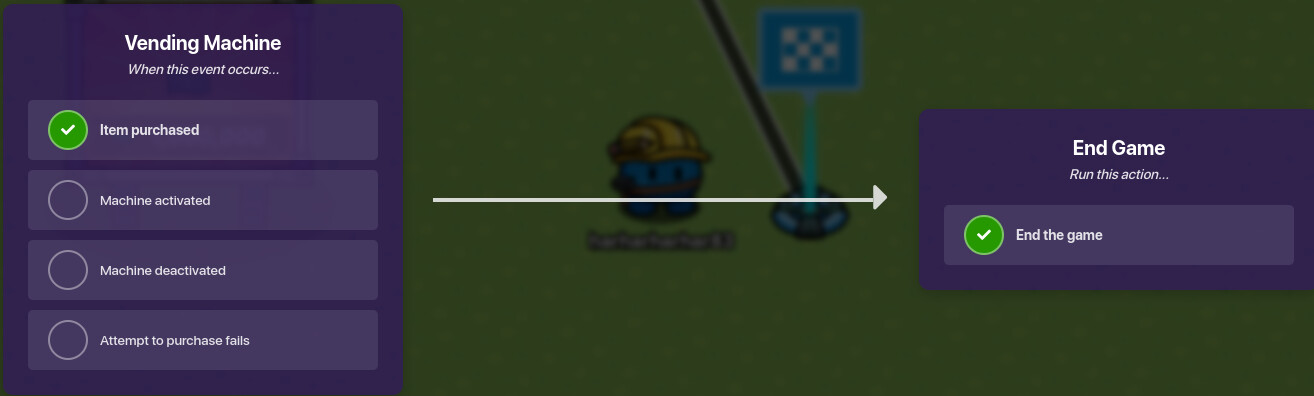
Now if I test it:
[Video]
[/details]
[details = Example: Infinite Money]
If you go to any more complex Gimkit Guide you will notice an overwhelming hate for the repeater. The repeater is bad for multiple reasons so people will commonly use a trigger loop. So I am going to teach you to use a trigger loop to give a player infinite money. You will need a button, two Triggers, and a item granter.
First, I am going to add a button with the button message “Start Infinite Money?”
Next, I’m going to make two triggers that have the following settings. Trigger by Player Collision should be off so that way players can’t interfere with the trigger and a Delay, so that way it doesn’t crash the game:
Now wire the first trigger to the second trigger and the second trigger to the first:
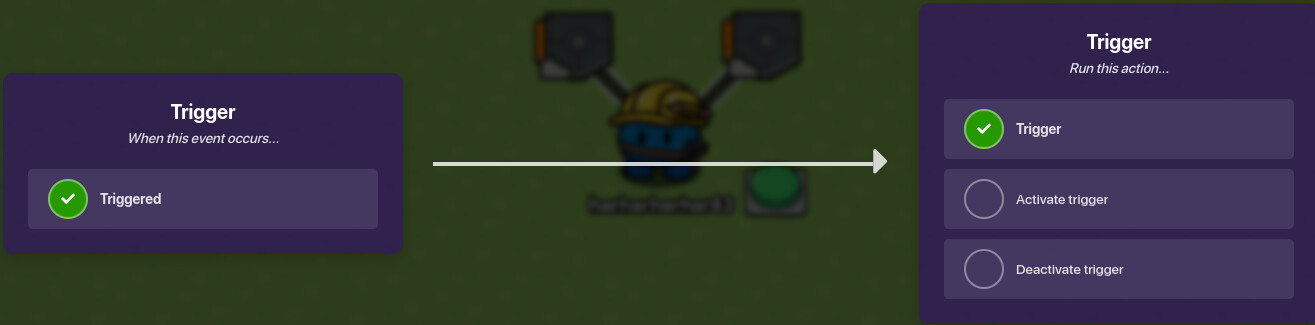
Now wire the button to the second trigger:
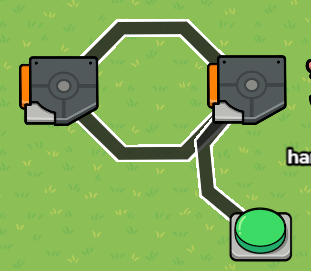
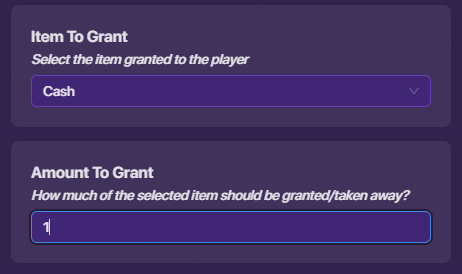
Finally, wire the first trigger to an Item Granter that grants 1 Cash:
Now lets test that out:
[Video]
[/details]
I know that there are many other combos. If you have any you think I should have them let me know in the comments.
[details = Quiz: Device Basics]
-
What device is like a “bridge” between the player and device:
a. End Game
b. Vending Machine
c. Button
d. Text -
What is adaptive health?
a. Health that is added to the sentry for every player in game.
b. Health that is subtracted to the sentry for every player in game.
a. Health that is added to the player for every sentry in game.
a. Health that is subtracted to the player for every sentry in game. -
What device is mostly used blockcode?
a. Text
b. Sentry
c. Questioner
d. Trigger -
What device attacks players or can be used as an NPC?
a. Trigger
b. Text
c. Sentry
d. Starting Inventory
[details = Results]
| Question # | Answer
| — | —
| 1 | c
| 2 | a
| 3 | d
| 4 | c
0 - 3 Correct: Go back and review
4 Correct: Move on to Chapter III
[/details]
[/details]
So in between Chapter II and Chapter III I would like you to do is go through all the other 35ish devices and go through settings, read their descriptions and get used to them. In the final 2 chapters we will be using many of the other devices.
Chapter III: Scope & Channels
Now we will start discussing two very important concepts: Scope and Channels! Scopes is very important to any game where players work by themselves or in a team towards a goal. Channels make maps more memory-efficient.
[details = Information: Scope]
If certain devices that can be changed there are different states they can be at. For example, a counter. A counters device state can be any integer number. The counter’s resting state is 0. When someone/something changes the counter it changes the state.
Now Scope is when this change only applies to whoever the scope is. So if I apply player scope, the state is unique to each player. If I apply team scope, the state is unique to each team. if I apply global scope, the state is the same for everyone.
[/details]
[details = Information: Channels]
Remember wires from way back when? Now lets try an analogy here.
You remember how kids make telephones out of string and plastic cups? Well thats what a wire is. Only the two people with the plastic cups can hear it:

Channels is like a person with a megaphone. The device (person) yells out to every device (person). Like this:
Now if the thing the device (person) yells out applies to you, then you do what they are telling you.
So if a Lifecycle yells out
startGame, all devices in the map hear that. But only Trigger does something because he is the only one that triggers when receiving on startGame.[/details]
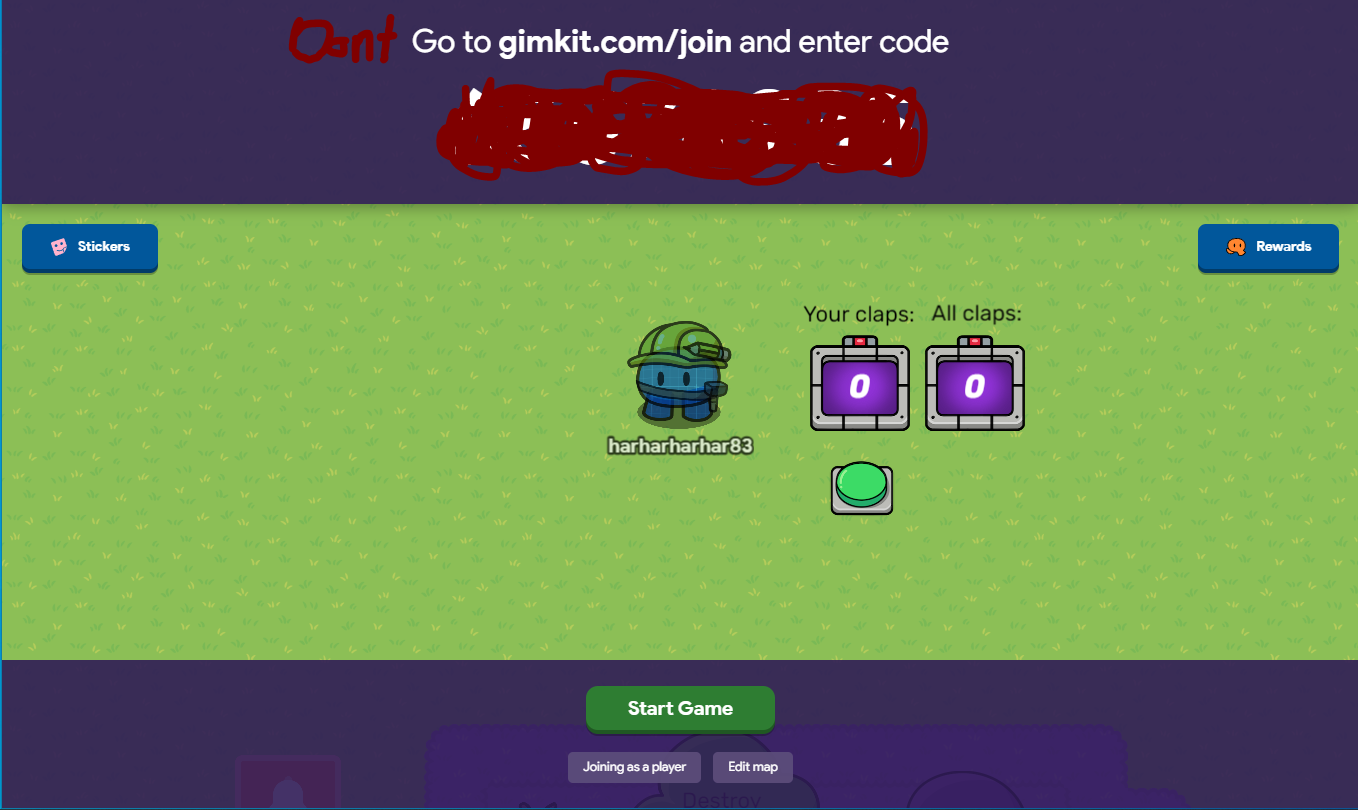
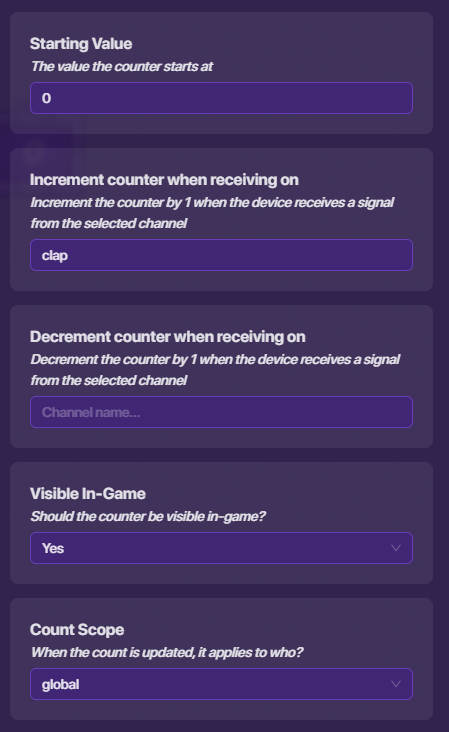
[details = Example: Clapping]
Here I am going to make a clapping mechanic in gimkit. You will need 2 text, 2 counters and 1 button.
First have this button have the Button Message “Clap”, Interaction Duration to “Instant” and Broadcast on
clap when clicked:
Next, add counter that “Increments when receiving on” clap. It’s “Scope” should be set to global.
Now, add counter that “Increments when receiving on” clap. It’s “Scope” should be set to player.
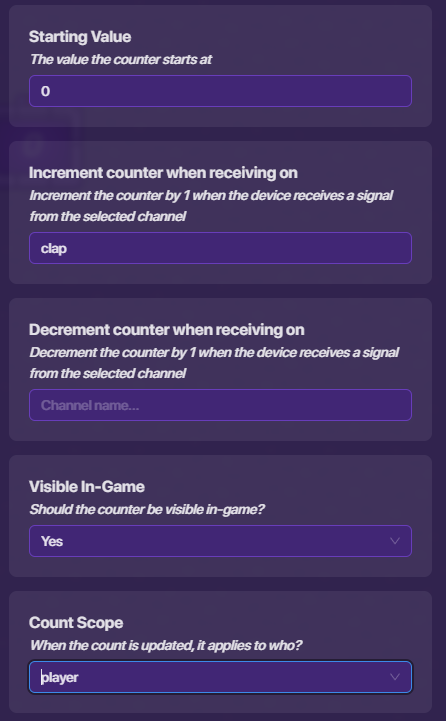
Finally, add some text that says “Your claps:” above the player-scoped counter and “All claps:” above the global-scoped counter:
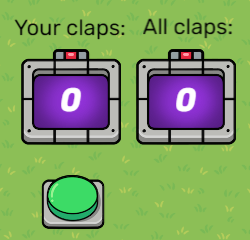
Now if you test it with a friend it should work like this:
[Video]
[/details]
[details = Quiz: Scope & Channels]
-
What are the 3 types of scope?
-
If I want only one team to see a counter countdown which scope should I use?
a. Player
b. Team
c. Global -
Which scope applies to the whole lobby?
a. Player
b. Team
c. Global -
How many devices will hear a channel call out?
a. 1
b. All of them
c. Only the ones receiving on that channel. -
How many devices will respond to a channel call-out?
a. 1
b. All of them
c. Only the ones receiving on that channel.
[details = Results]
| Question # | Answer
| — | —
| 1 | player, team, global
| 2 | b
| 3 | c
| 4 | b
| 5 | c
0 - 3 Correct: Go back and review
4 - 5 Correct: You finished!
[/details]
[/details]
Beginner Stuff to Check-Out
Outro: Thanks for reading! If this helped you leave a like please! Also votes in this poll on what I should do next:
- Undertale/Deltarune
- Omori
- Crafting based Survival Game (ie, Minecraft, the Forest, Subnautica)
- Lethal Company
Thanks @Blackhole927! ↩︎
This is the meat of what we are learning to do. ↩︎
I show how this would apply in a Gimkit game. ↩︎
The quiz is 5-10 questions and lets you know if you should go back and review what we just learned. ↩︎

