This is a wiki for @C-C to edit. If you want to edit you can if you get C-C’s permission.
- Is editing
Please do not put that you are editing for fun
꧁༺ 𝓘𝓷 𝓽𝓱𝓮 𝓽𝓲𝓶𝓮𝓼 𝓸𝓯 𝓽𝓱𝓮 𝓪𝓷𝓬𝓲𝓮𝓷𝓽, 𝔀𝓱𝓮𝓷 𝓽𝓱𝓮 𝔀𝓸𝓻𝓵𝓭 𝓱𝓪𝓭 𝓳𝓾𝓼𝓽 𝓯𝓸𝓻𝓶𝓮𝓭..𝓣𝓱𝓮 𝔀𝓸𝓻𝓵𝓭 𝔀𝓪𝓼 𝓯𝓾𝓵𝓵 𝓸𝓯 𝓭𝓪𝓻𝓴𝓷𝓮𝓼𝓼, 𝔀𝓱𝓮𝓷 𝓼𝓾𝓭𝓭𝓮𝓷𝓵𝔂.. 𝓐 𝓵𝓲𝓰𝓱𝓽 𝓬𝓪𝓶𝓮 𝓯𝓻𝓸𝓶 𝓽𝓱𝓮 𝓼𝓴𝔂…𝓪𝓷𝓭 𝓬𝓻𝓮𝓪𝓽𝓮𝓭… ༻꧂
C-C’s GRIMOIRE!!!
Its finally here!!
This will be a full guide on how to make EVERY. SINGLE. ONE. of my beautiful…Creatures…
AND NOW…We Begin!
The first monster… the one that started this whole idea…GOES TO @cheesebox 's BILLY!!! Link posted below!
Now onto MY Creatures…
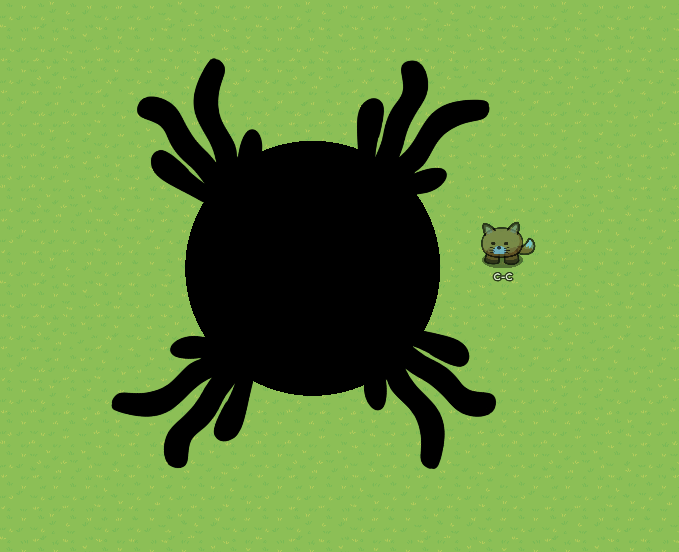
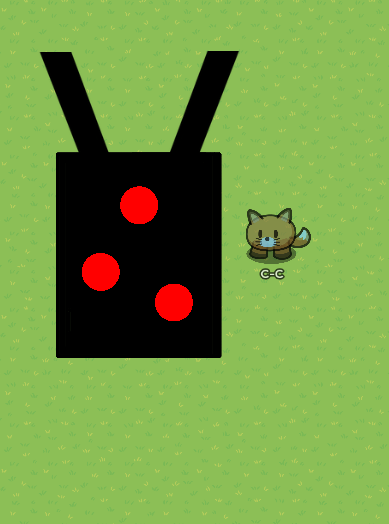
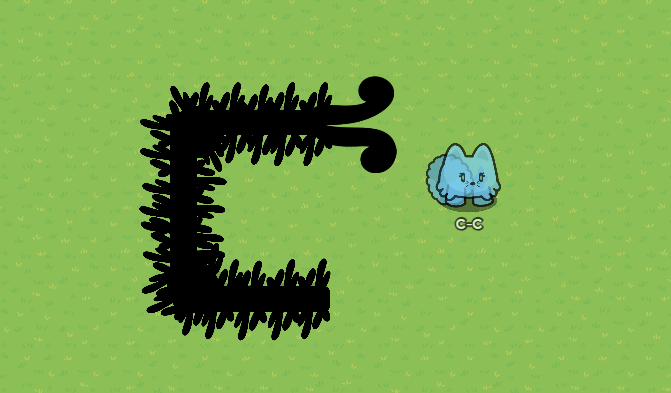
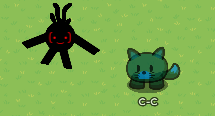
The first one being…JOHN!!
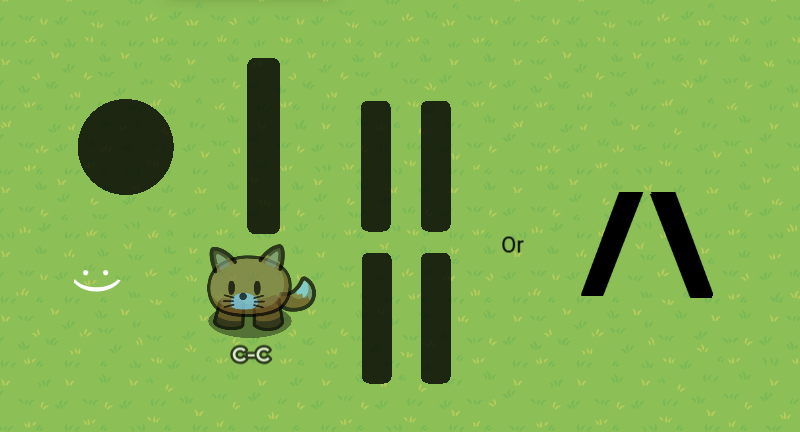
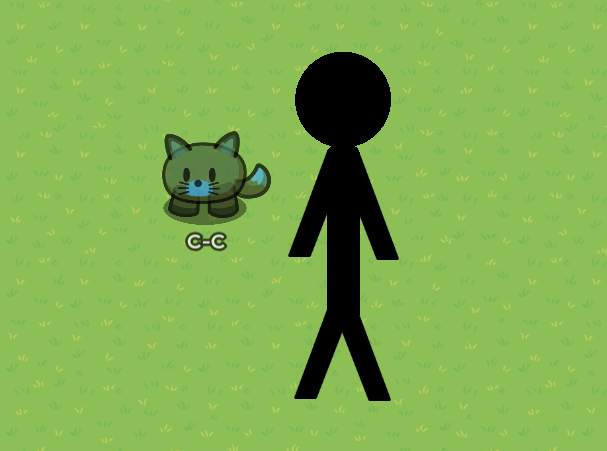
John
Heya! In this Guide I’ll show YOU, yes You! on how to make a John!
The First step to making a john is the materials, witch will be in the picture below!
Once you have everything you’ll need to make John a face, Which is where the text comes in!
You’ll want to color the text to white, so that you can see his face!
Then, Position all the materials together; like so!
Once positioned in a way you feel comfortable, it’s now time to assemble a John!
Take the round barrier and take the longest rectangle barrier and put them together, that’ll form a
neck & Torso!

Then once you’ve assembled the torso, You’ll need to take the 4 smaller rectangles (Or blackboard legs colored pitch black-) to make the arms & legs!
You can position them in any position you want; but for this i’ll be putting it in a standard stick man position.
I used the 4 blackboard legs for his limbs. Now for the most important part of John, his face! You can make his face to whatever your desires are. (Nothing inappropriate you scandals!)
Side note: The Text needs to be one layer or higher above the head barrier.
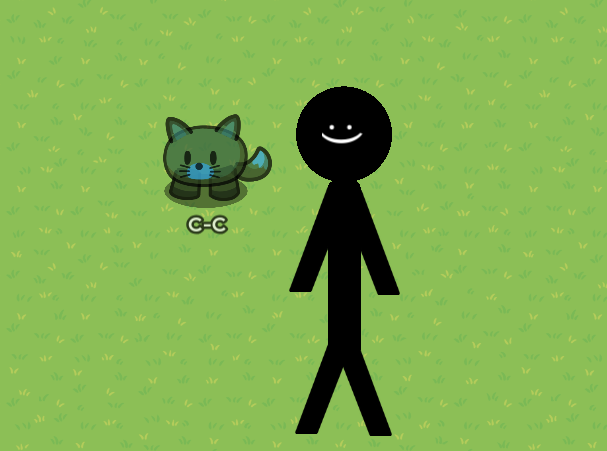
Look at his small little face! Now, you could stop at this part; but im going to go a bit farther and give John some clothes! John’s clothes can be made out of anything as long as it fits him!
For the clothes, I’ve given john some armor! Dont tell John but his armor is literally just stone walls- I’ve also given him some hair and a goatee, (all of which are made out of alien plants-)
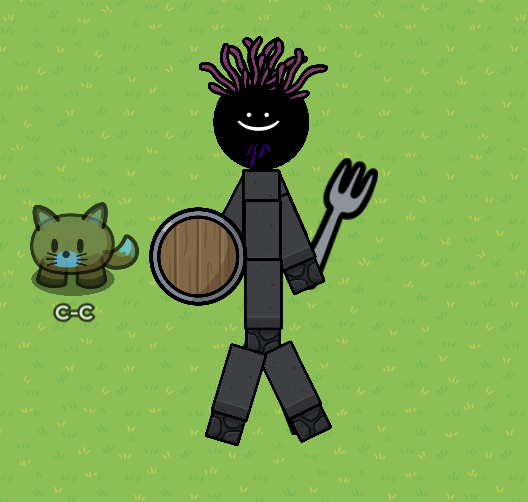
And that’s it! You’ve successfully created a John!
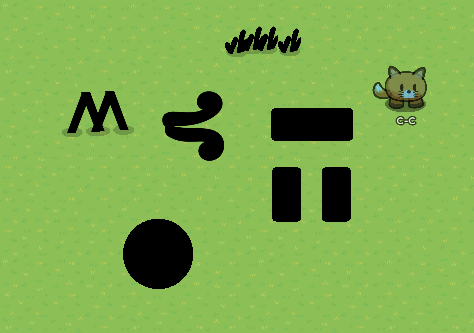
The next…Creature… Is Joe!
Joe
In this guide I’ll show you how to make another one of these guys! I might even make an entire art guide for them all >:)
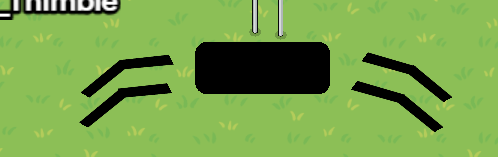
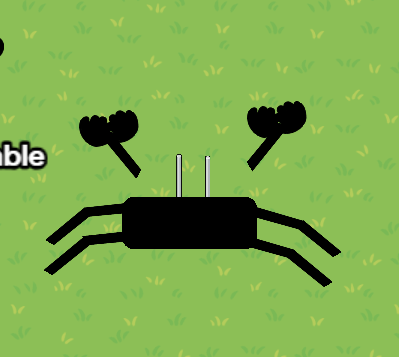
Joe is fairly simple to make, unlike john, Joe doesn’t have body parts; but one big ol’ head!
Heres a picture of all the materials!
Once you’ve gotten the materials; it should look like this so far.

Now its time for Joe himself! First thing you want to do is take the 4 alien plants, and place them in different directions on the big barrier! Like so:
Now it’s time for the eyes! The eyes are a little complicated but not too bad… You’ll want to take the Text and type in “()” for both of them, then rotate them until they’re on their side. (Snap rotation helps!) Like so:
Once you’ve got the text setup, add the two other barriers, and place them inside the “()” Text! Make sure to layer the text above the barriers so the barriers look like they’re in the text!
Then, Once you’ve done that; You can add the eyes to the head barrier! (Make sure the text and little barriers are layered above the head barrier!
And there you have it! You have successfully made Joe!
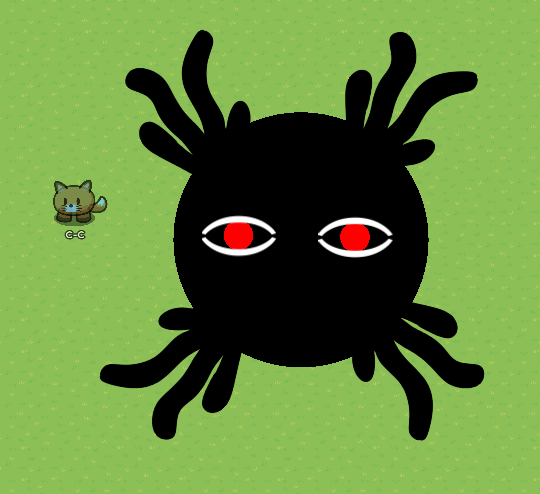
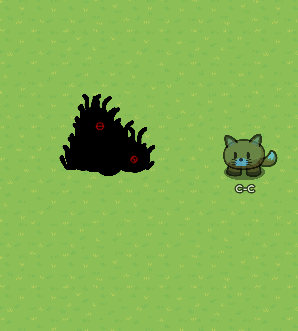
And now…We have the NEW CREATURES!!… The first one is Toko!
Toko
Heya! In this little grimoire here i’ll be showing YOU on how to make a Toko!
It’s fairly simple..Lets start with the materials!
Materials
For the materials you’ll need…
- A living sacrifice
- 2 Large Blackboard legs
- A wide blackboard
- 3 Red Barriers
- 5 Large Alien Plants
Once you have all the materials Toko should look like this!

Looks pretty big doesn’t he? You can shrink him and grow him to whatever size you want though!
The next part is to build the head!
The Head
You should’ve gone for the head…
Anyways! Take the two blackboard legs and place them on top of the wide blackboard. (Make sure the blackboard is flipped sideways) Once you’ve done that take the 3 red barriers and layer them above the blackboard to make eyes! If done correct it should look like this!
Once you’ve done that, your done with the head!
And now onto the final part! (probably the most simple part anyway) The Torso- (or whatever you want to call it…).
Torso
Now onto the torso!
If you can even call it a torso…
Take the 5 alien plants and connect them to the head, so that the alien plants look like tentacles!
If done correct it should look like this!

Isn’t he so cute!!
And that’s it! You’ve made a Toko!
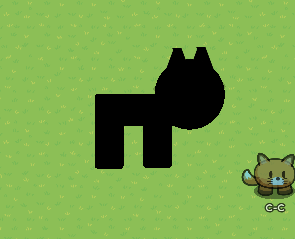
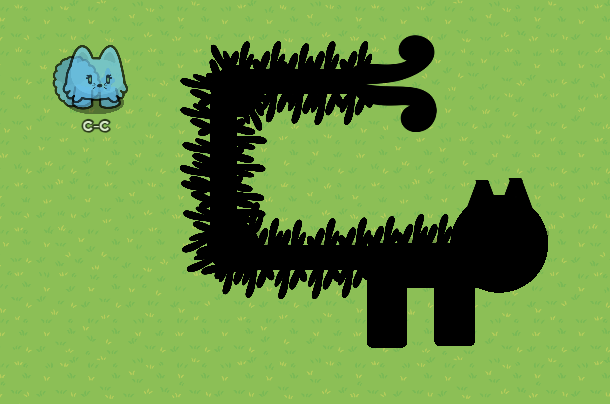
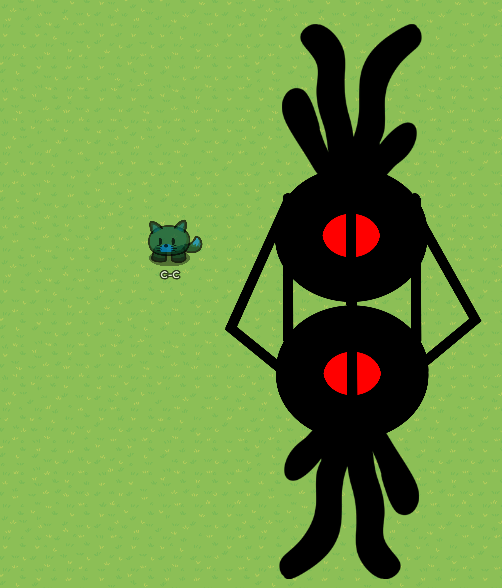
The next New Creature being…Zack! (The C is silent…)
Zack
In this summary I’ll show you how to make A Zack! (Wow that sounded weird..) The first few things you’ll need are the materials! The building blocks towards Zack!
Materials
- 1 Circle Barrier
- 3 rectangle Barriers
- A LOT of alien plants
- 4 Blackboard legs
- Curly Alien Plant
Once you have the materials, It should look like this!
That’s it for the materials!
Once you have all the materials..It’s time to start building Zack!
The Body
For the body, all you have to do is make it like a cat! the round barrier being the head and the 3 other barriers as a body! Take the blackboard legs and make them into ears. If done correct it should look like so..
And that’s it for the body!
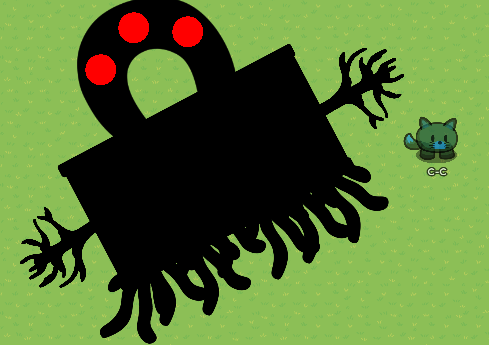
And Now onto the final part of Zack.. The hardest part..THE TAIL!
The Tail
For the tail itself, you’ll need two more round barriers and 3 More rectangle barriers…You’ll also need a BOAT TON of alien plants! to make it kinda creepy but…soft…at the same time.
You’ll want to make the tail like so:
Once you have that down, its time to add the BOAT TON OF ALIEN PLANTS!!!
Keep them in the same direction as barriers and it should come out like this!
Once you have that down, just add it to the body and you’ll have the final product!
Once you’ve completed the tail just connect it to the end of the body and BOOM! you’ve got yourself a Zack!

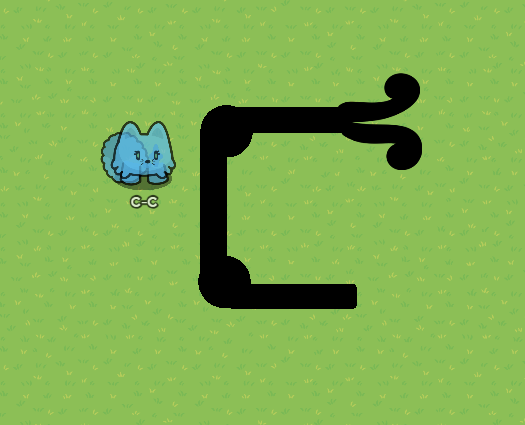
The next new creature on our list is…Drumroll… Naki!
Naki
In this summary i’ll show you how to make a Naki!
Naki is VERY Shy…So i’ll only be able to show you her around a corner…If I can even find her that is! Oh..There she is!
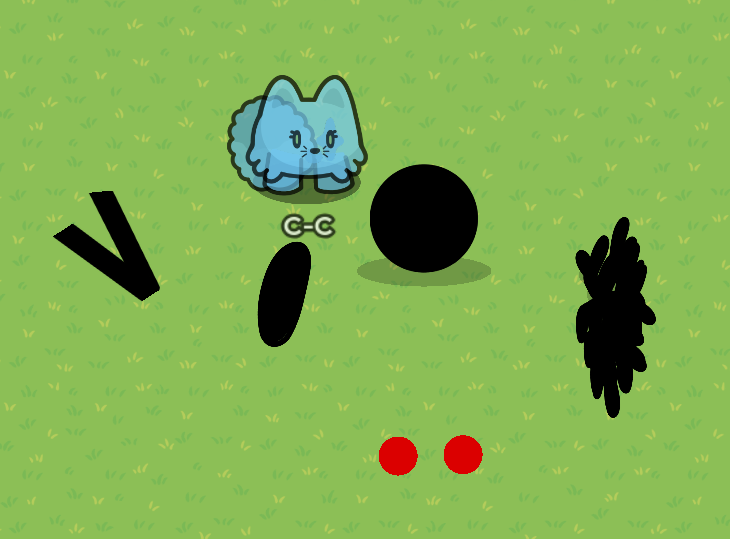
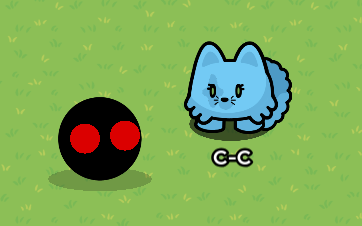
Anyways…Here’s the materials you’ll need for Naki!
Materials
- 1x Basketball
- A lot of alien plants
- 1x Bread
- 2x Red Barriers
- 2x Blackboard Legs
Once you’ve got the materials For Naki, You’ll want to organize them out like so:
Now that you’ve done that the next step is to make the head!
The Head
The First step to making the head is taking the Black Circle Barrier and put the two red barriers one layer above it. So that you have the illusion of eyes! It should look like this afterwords
Then you have to add the hair! It should go behind the barrier head and move over to the side like this:
And that’s it! you’re done with the head.
Once you’ve done the head, place it behind a wall or something like that and it should appear as if she’s peaking around the corner!
The body is literally just bread so I dont think I need to summarize on that…But anyway! Once you’ve done that Just take the blackboard legs and layer so that one is above the other and put it behind the wall! The final product should look like this if done correct:
And that’s it! you’re done with Naki!
This one was significantly shorter because i’m making this at 11:30 at night and i’m insanely tired so…i’m glad its done.
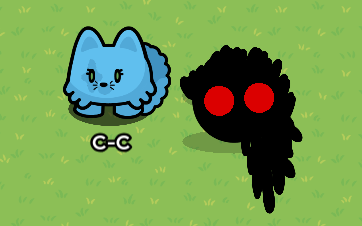
Onto the next creature, requested by the poll in the replies, its name is..346589342729157! Bit of an odd name but lets get into it!
346589342729157
In this summary I’ll show you how to make 346589342729157!
Since im lazy and dont like to put in effort, this will be a bit shorter than other guides. Lets get onto the materials!
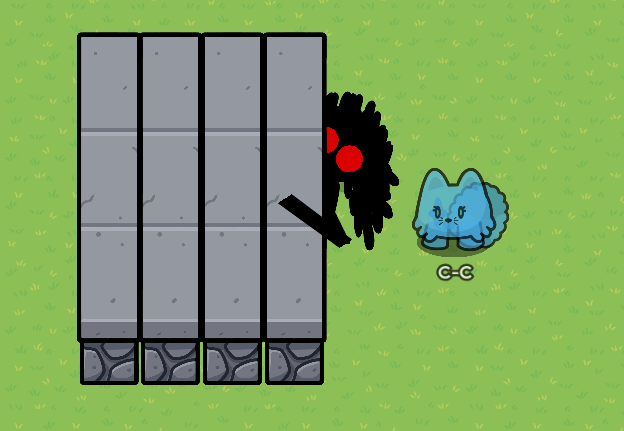
Materials
- 5 (144 font size) Text Devices
- 16 Barriers (4 of the barriers are circle)
Once you’ve got all the materials it should look like this:

Now onto the…I guess you could call it a head?
Head
For the head all you need to do is take the 5 large texts, and rotate them in weird directions, then put them all together and you’ll have the base. Then take the two red barriers and layer them above the text and place them on it. It should look like this: (If it doesn’t look good to you, you can copy & paste more texts to make to look better)
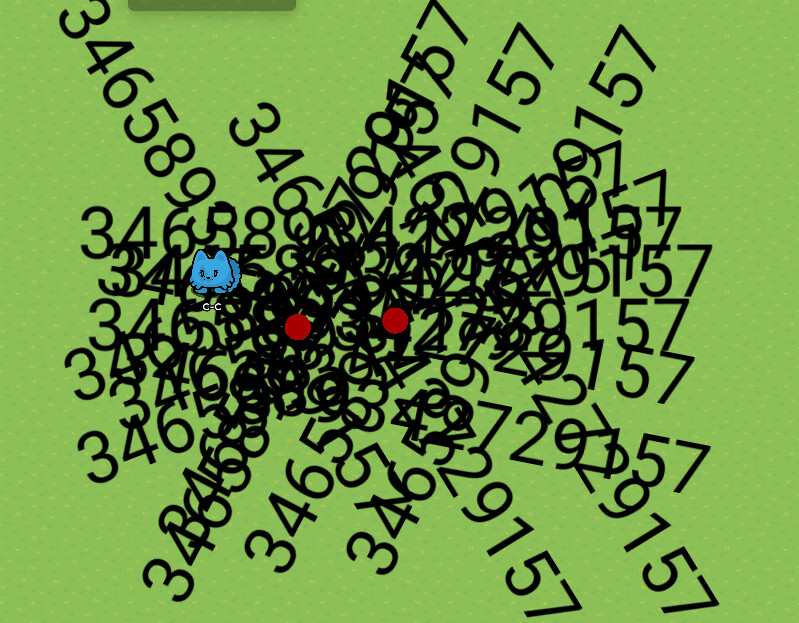
Thats it for the head!
The next step is to make the arms!
Arms
For the arms you’ll need to take the two long barriers and attach them to both sides of the head, (If you want you can add another long barrier to make a joint) It should look like this!

Then we need to add the hands! Take the two large round barriers and attach them to the end of the arms. It should look like a Mii character.. Then take the 10 small barriers and attach them to the hand, to make fingers! If done correctly it should look like this:
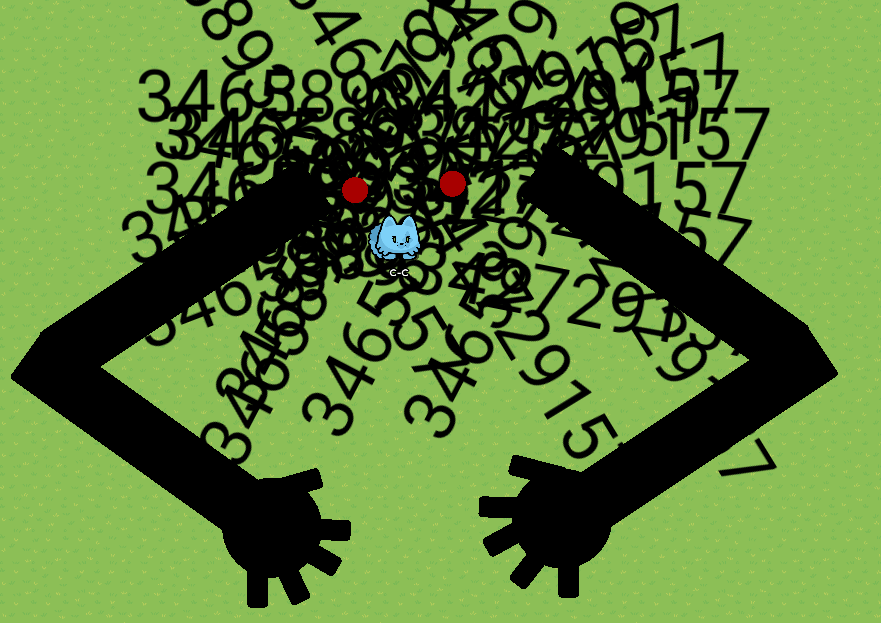
Thats it! Your done with the arms!
And thats that! You’ve succesfully completed making a 346589342729157!
On to another one of my little creatures, This one is a father son duo!
Father J & Little J
In this summary I’ll show you how to make both the J’s!
The first thing you wanna do to make them is get the materials!
Materials
For the materials you’ll need…
- A lot of alien plants
- A lot of text
- 2 Barriers
- 8 Blackboard legs
Thats all you’ll need for the materials
Once you’ve gotten the materials, we can move onto Little J!
Little J
Little J is very small and not too complicated to make, the first thing you want to do is to take a small round barrier, (Pitch black) Then connect the 4 blackboard legs to make arms and legs, then take one of the alien plants and put it on the top of the barrier, so he has hair! Then you want to give him a face; take the text and put whatever little face you want, then boom! you’re done with little J!
Now onto the next part, FATHER J!
Father J
So for Father J it’s pretty much the same thing as Little J, just MUCH BIGGER. So do the same few steps of Little J, then instead of giving him one alien plant for hair, give him multiple! Another thing you want to change with Father J is his face, Little J gave him a hard time this morning so he’s a bit mad… Use the texts to express his anger at Little J! Once you’ve done that Father J should look like this!
And thats all! You’ve made Father J & Little J!
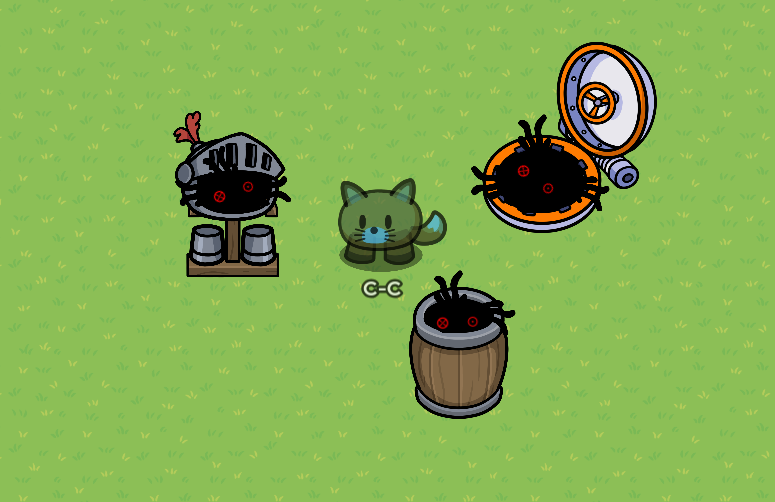
The next creature is veeery sneaky, he’ll be happy to inhabit any pocket space you have, Welcome;
Hides
In this summary I’ll show you how to make Hides!
In order to make hides though, you’ll need your materials first!
Materials
- A lot of Alien plants
- Texts
- A LOT of bread
Once you’ve got the materials we can move onto Hides!
Hides himself.
In order to make hides, you’ll need to grab anything that has a place for something, like an armor stand! Then, you’ll take the text and make eyes out of whatever emojis you want, Then; take the bread and make it pitch black, then form and place it into whatever you found that has a open spot, and put the bread in it so it makes the illusion of something being in the open spot, then take the alien plants and put them on the outside of the bread, then add the eyes and you’re done!
And that’s all! you’ve made Hides!
The next creature on my list reminds me of a minion, so in respect of the minions, I’ll name this one;
Kevin
In this summary i’ll show you how to make Kevin! The first thing you’ll need are materials!
Materials
- 1 Arcade machine
- 2 Wooden poles
- 2 Curly Alien Plants
- 1 Wiggly alien plant
- 1 Empty armor stand
- 2 barriers
Once you’ve got the materials we can move onto the next part!
Kevin Himself
Once you have all the materials, place the arcade facing like a normal arcade machine would, then add the poles onto both of the sides, giving him arms; then add the curly alien plants on the end of those poles to give him hands! Then take the wiggly plant and put it on top for hair. Once you’ve done that, add the empty armor stand to the bottom of the machine, making a type of legs. Then take the two barriers and make them both small, one smaller than the other; make the bigger one white and the smaller one red, (Keep the red one’s border on) Then put them on the top middle part of the arcade machine and you’re done! He should look like this when completed:

And thats it! you’ve made Kevin!
Onto a newer creature made in a lab, Welcome;
Blobby
In this summary I’ll show YOU how to make A Blobby, there are two ways you can make him but before that lets go over the materials!
Materials
For the materials you’ll need
- A lot of Alien plants of your choice
- A lot of basketballs
- 1 or more Text
- 3 barriers, 2 white 1 teal / blue
Once you’ve got the materials we can move onto the first way to build Blobby!
Test Tube
As its name suggests, the first way to build blobby is to have him in a test tube! So the first thing you want to do is make the test tube itself, you’ll need the 3 barriers that you took from the materials and make two of them white, then make one really long and color it teal or light blue, then make it transparent, but still visible to the eye. If done correct the tube should look like this so far!
Pretty simple huh? Now time to move on the Blobby!
Once you’ve built the test tube it’s time to put something in it, that something would be Blobby!
Blobby
As the name suggests he doesn’t really have a definite form, he’s more of a Mush with eyes. In order to make him you’ll need to grab all the basketballs and alien plants of your choice and slam em all together to make whatever shape you so desire Blobby to be in! Then, Take the text you made and give it eyes! Then put that text on blobby to give him some amazing pairs of eyes! Once completed it should look like this:
Once you’ve completed the step above, put blobby in the test tube and you’ve successfully made a Blobby!
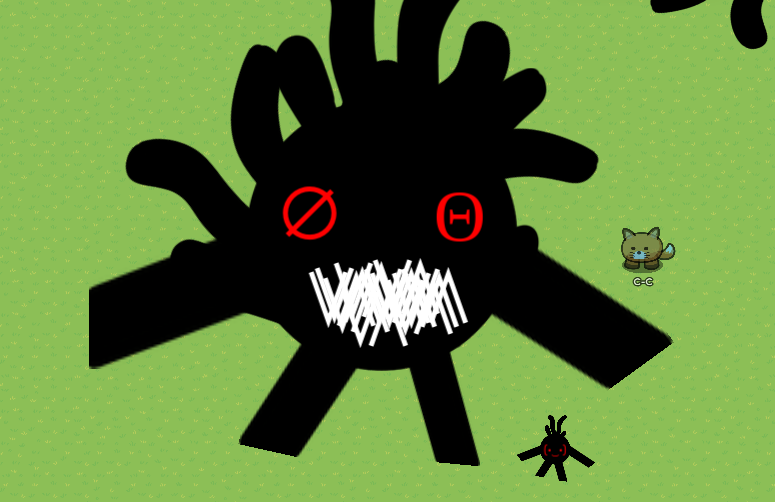
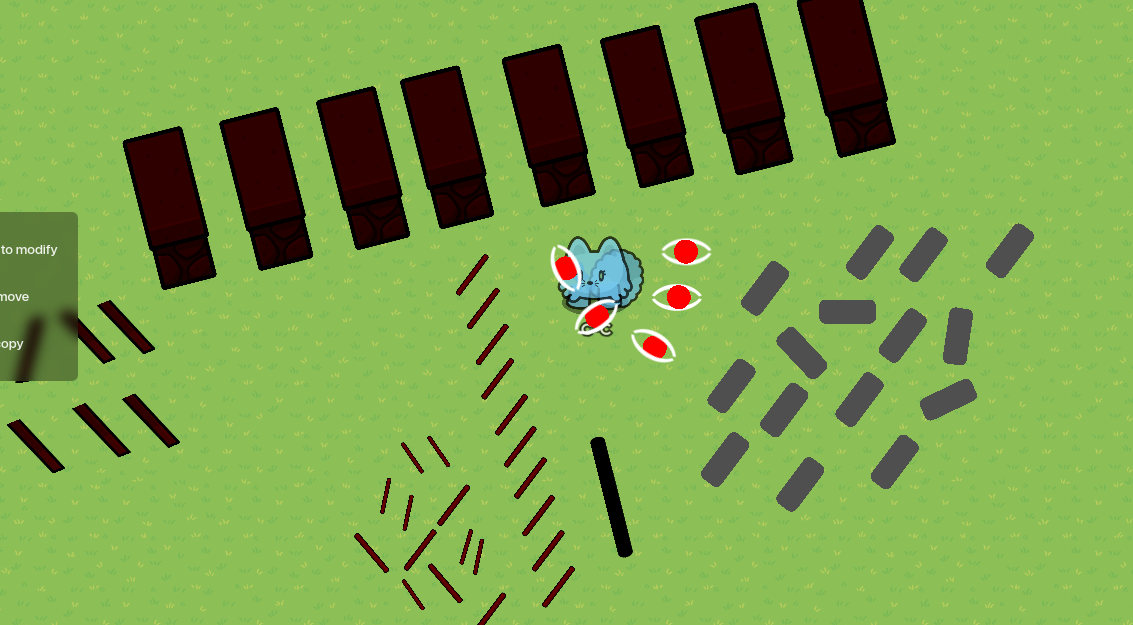
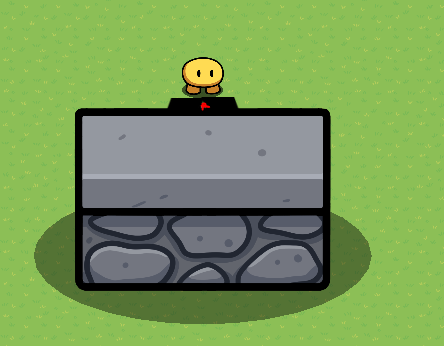
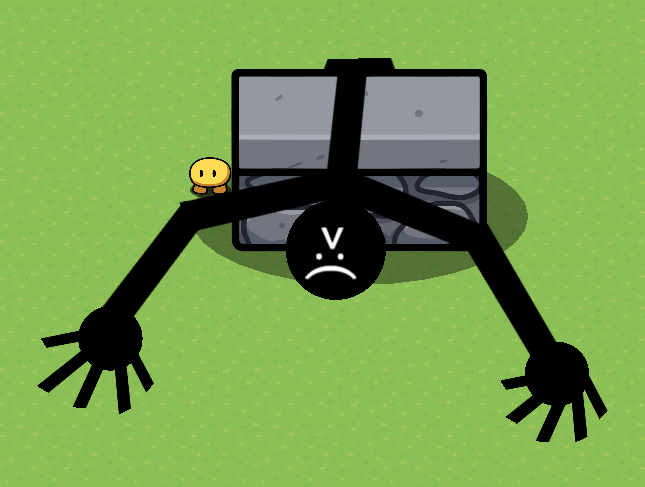
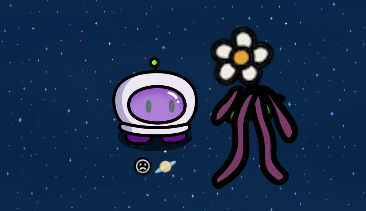
Would you look at that! A new monster! Welcome; Titanus Penumbra
Titanus Penumbra
In this summary I’ll show you how to build Titanus Penumbra! the first thing you’ll need it the materials to build this monstrosity!
Materials
- 1 Hydration Drink
- 8 Blackboard Legs
- 7 Barriers
- 3 Arcade Machines
- 2 Alien Plants
Once you’ve got the materials its on to build Titanus Penumbra himself!
Building Penumbra
In order to build penumbra, take everything from the material list except for 3 barriers and color them all black. Then, take the Hydration bottle and size it up a lot. Once you’ve done that take the three arcade machines and stack them underneath, the farther you go the smaller they are; to form a torso! Then take two of the blackboard legs and connect them to the biggest arcade machine, these form the arms! Connect two more blackboard legs on both sides to form an elbow and the rest of the arm. Then take two barriers and put them at the end of each arm to form the hand, then add the alien plant on top of that and you’ve got the arms! Then once you’ve done that, add 3 barriers to the head and torso and color them red, once completed It should look like this:

You could stop there but why not make the lower half!
In order to make the lower half take the remaining blackboard legs to form his knees and legs! then take the remaining barriers and put them on the bottom of the legs as feet!
When fully completed Titanus Penumbra should look like this!
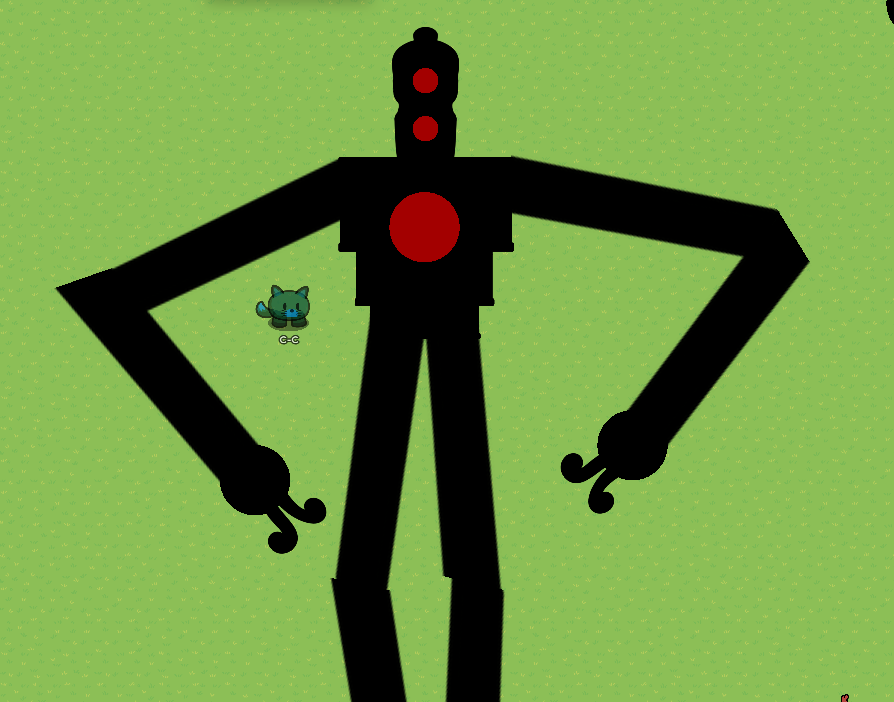

And congratulations! You’ve made Titanus Penumbra!
This next guy looks funny to me, welcoming; Flipz!
Flipz
In this summary I’ll show you how to build a Flipz!
The first thing you need for every summary is the materials!
Materials
- 2 Kitchen Tables
- 2 Barriers
- 2 Alien plants
- 7 Poles
Once you’ve gotten the materials we move onto building him!
Building Flipz
In order to build Flipz you’ll first need to grab the two kitchen tables and put them right on top of each other! Then connect them with one of the poles, add two red barriers in the middle and you’ve got the eyes! Add the alien plants on the top of the one thats north, and one on the bottom of the one facing south. Then take two more poles and connect the outer edges together. Once you’ve done that take the last remaining poles and place them like <> so they can connect the very top of one table to the very bottom of the other table. Once completed it should look like this:
And thats it! You’ve successfully made a Flipz!
A new creature, also reminds me of a minion; so therefore i’ll name him Stuart!
Stuart
In this summary I’ll show you how to make a Stuart! The first thing you’ll need is the materials!
Materials
- Bookshelf (Empty)
- 3 Barriers
- Alien Plants
- Blackboard Legs
Once you’ve gotten the materials the next part is to move onto building him!
Building Stuart
Since you now have the materials; you’ll wanna color all of these completely black except for 1 barrier. Then take the bookshelf and size it to your liking, then add 1 barrier on both sides to make shoulders, then connect two long blackboard legs to the shoulder pads, Forming arms! Once you’ve done that; add two alien plants on both arms to form hands! Once you’ve formed the hands; you’ll take the alien plants and spam them on the bottom of the bookshelf, to form legs. Finally; you’ll add a red barrier to the top middle part of the bookshelf, and add one massive alien plant on top; and then you’re done!

That’s it! You’ve built a stuart!
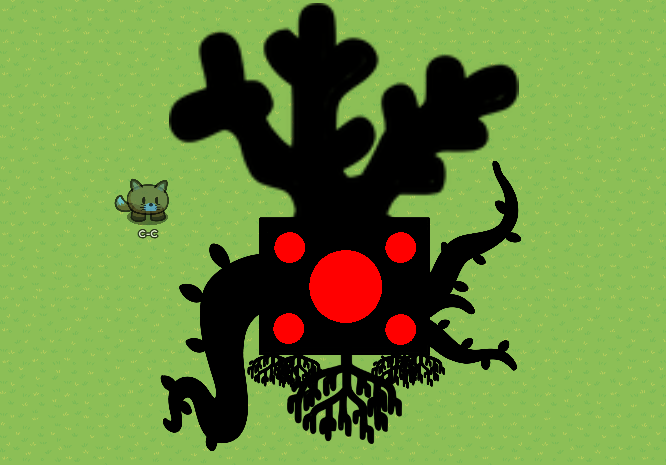
A new creature who you may all recognize is the best minion of all time..BOB
Bob
In this summary i’ll show you how to build the almighty bob himself, first you’ll need materials!
Materials
- 2 groundbreaking plants
- 1 Wide Blackboard
- 6 Coral
- 5 Red barriers
Once you’ve got the materials we can move onto building the almighty bob!
Building Bob
In order to build a bob himself, you can take the wide blackboard, color it pitch black then place it wherever you want in your map. Then take 5 coral (the one that looks like a tree) and place them on the bottom, making one of them significantly bigger than the other. Then take the 6th coral and place it on top of bob, make sure to size it to fit bob’s big head! Then take the two of the groundbreaking plants (make sure they’re different ones), then add them to the sides; making them pitch black like everything else. Then add the 5 red barriers in the pattern of a 5 sided dice. And then make sure everything is in place and sized up and then you’re done!
it should look like this when completed:
Once you’ve completed that last step you’ve finished building a bob! Congrats!!
Once again, a new creature has joined; welcoming Branka!
Branka
In this summary i’ll show you how to make a Branka! First, you’ll need materials!
Materials
- 1 Arcade machine
- 1 Horseshoe
- Alien plants
- 2 snowy trees (No leaves)
- 3 barriers
Keep in mind these are all pitch black except for the barriers!
Once you’ve got the materials we can move on!
Building Branka
Once you’ve gathered the materials we can start to build Branka; first things first you’ll need to make the horseshoe pretty big, then add the arcade machine right underneath it, making it look like a briefcase. Then, add a lot of alien plants on the bottom; make sure they’re big but not bigger than the arcade machine. Once you’ve done that take the two bare snow trees and add them on both short sides of the arcade machine, forming arms! Then add 3 barriers to the top of the horseshoe to make eyes. Once you’ve done that it should look like this:
And that’s it! you’ve made a Branka!
One of the creatures that was requested in the poll is here! Welcoming Noah! (Credits to @BendyTheInkDemon!)
Noah
In this summary i’ll show you how to make Noah! He’s a little different than the others, He’s a sword! Here are the materials you’ll need to make him!
Materials
- 8 Gray stone barriers
- 6 Blackboard Legs
- 5 Texts
- 5 Round barriers
- 15 Rectangle Barriers
- 23 Metal Poles
Once you have all the materials noah should look like this so far:
Now onto the next part of Noah! The sword itself!
The Sword
What I did for the sword was I took the mold and put the stone barriers into it so it would form a sword, Then I took some of the rectangle barriers and put them on the bottom of the sword mold, to make a cutlass kind of hilt! Then I took a bunch of small red poles and put them inbetween the handles and the cutlass hilt, to make it give the effect of flesh inbetween. Then I added some eyes to the sword itself and added a bunch of rectangle barriers to the back of the sword, then added some poles for a kind of steampunk vibe, but evil in a sense? In the end it should look like this when completed!
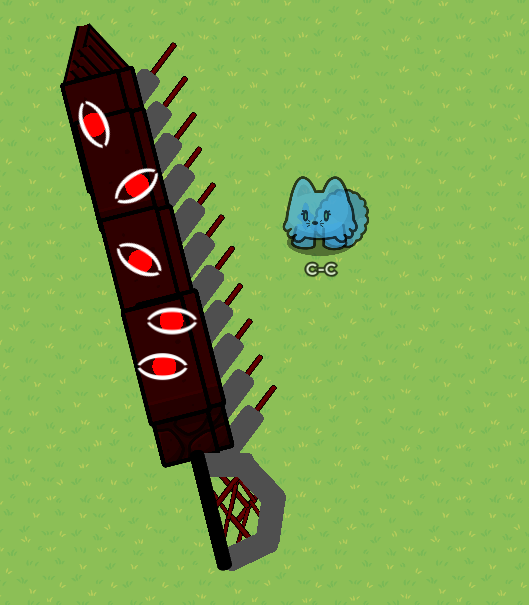
And thats it! You’re done building a Noah!
Now onto other people’s creatures! The first one being…Sami! Posted by @Quimblo
Sami (Made by Quimblo)
So you want a creature named sami?
materials : 17 black blackboard legs 1 wall thing 3 barriers (circle also black) and 1 text device + a metric gallon of layering
Step 1 (legs/wall) so take 2 blackboard legs and place them in an upside down v
then take your wall and make sure the legs poke up out a little. (legs need to be layered under wall)
Step 2 (body/head) take 1 blackboard leg and layer it over the wall and make it look like he’s bending over it. Then take a black circle barrier and make it look like a head. also add a text box with a >:( and rotate it to look like a face
Step 3 (arm/hands) take 1 blackboard leg and make it horizontal then take 1 more and angle it towards the ground but not straight repeat for other side. for the hands take a smaller circle barrier and place it on the stump then take your desired amount of fingers (i chose 5) and make the hand repeat for other side.
Finished results, Mine looked like this
(This has nothing in common with the colossal titan from AOT.)
Another person’s creature is known as Thomas! Credit to @EGGacha For this!
Thomas (Made by EGGacha)
Some new props are here!
Lets make a little stick man!
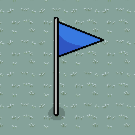
You will need:
Flag of any color
4 poles
First place down your flag and color it black, the color of my soul ![]() !
!

Next, color your poles black and move them onto the body (size them down however you’d like)
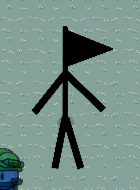
Since he looks like a plague doctor, lets give him some flowers!
FUN FACT: Plague doctors put flowers in the tip of their masks to ward off ‘‘bad smells’’, which we thought to be the cause of the plague!
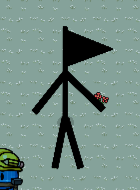
I shall call him…
Thomas
EDIT:
But wait! Thomas has no face!
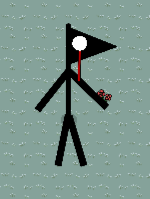
A little recoloring from my last guide…
BOOM
This next creature is made by @Quimblo !
Samuel
To make it you need… 10 blackboard legs, a barrier, 2 metal poles and 4 coral

Legs
Make the legs like this:
Connect to body
Eyes
Insert eyes into body like so:

Claws
Then build claws like this:
Connect to body and you’re done! All of this was made by @Quimblo ! (P.S. Give him hugs; he’s such a good voidcrab
This next one is a bunch of creatures in one! They’re called the Creepy Friends! They’re Made by @VoidFluffy !
Creepy Friends
- Classic Friend
-Ceramic Plate
-Alien Plant
Tint both of these black and place them like this:
Then use white text for the eyes and smiley face.
- Plant Friend
Credits go to @smil.eface5
Get a flower and an alien plant. Then, arrange them like this.
I usually only have space for a smiley face.
- Pitchfork Friend
You can just take the classic friend and put a pitchfork in it’s hand.


Classic Friend/Pitchfork Friend
One day, VoidFluffy and her friend TheCentaursHoof were bored. So, they decided to create something so magnificent, so intimidating, that it struck fear and awe into their friends’ hearts. They created… the Friend. They multiplied it over and over, and placed them in their friends’ space beds and bookshelves. Then, they decided that Friend needed an accessory. They gave it a pitchfork.
Plant Friend
Friend was standing, as usual, in ------'s garden. -------- was never around, so Friend wanted… a Friend. It found some flowers, and twisted them into the shape of a Friend. And so, Plant Friend was created.
Next one is made by @VWOOM
Shapeshifter, by @VWOOM
To start a “Shapeshifter” (Insperation from prey) do the following
- Make a small black barrier with 1.0 as alpha
Then, add a couple blackboard legs tinted black. Be sure to resize them
Your blob should look like this
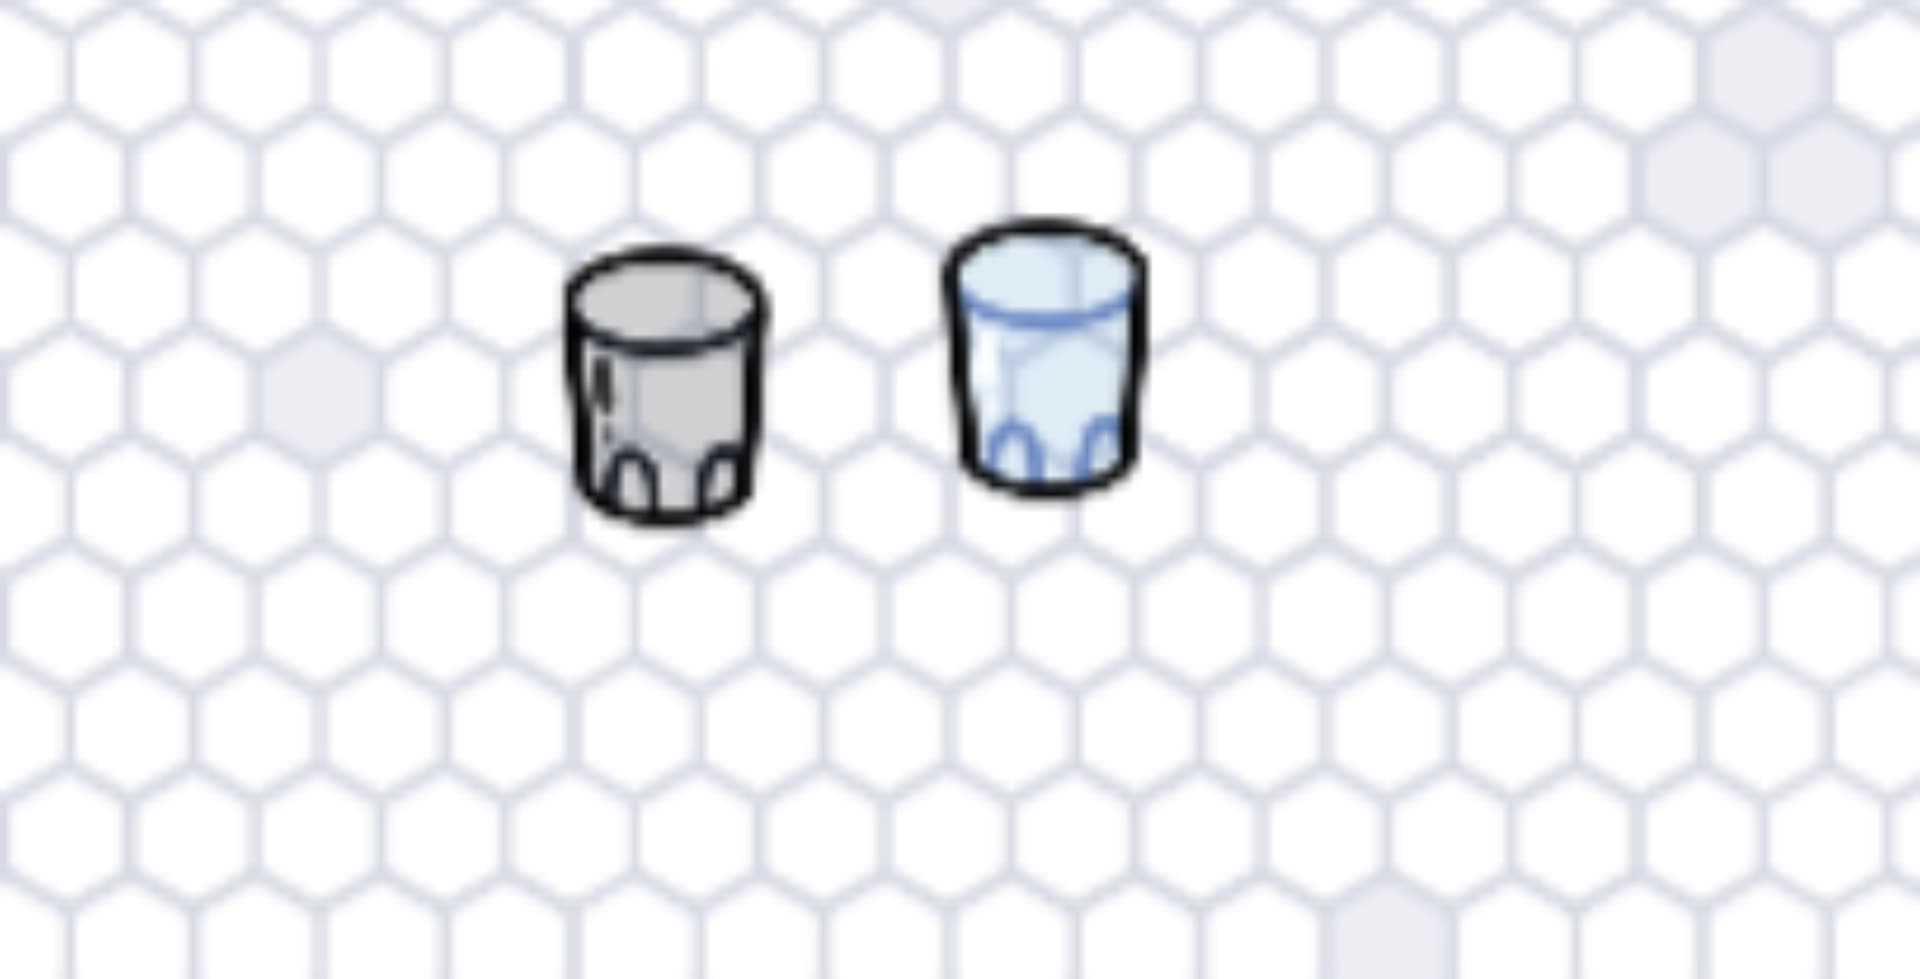
Now, in the game the blob morphs into props. In the game the first hint of this is a coffee mug that eats a man’s face, but for… reasons we will just make it morph.
Now just copy the cup and add a Slight black tint.
Now you are done! And the blob is based off these guys, they are hard to kill, and shapeshift


Trish:

That’s all the Creatures I’ve got access to right now! I hope you enjoyed this little Book of monsters That i’ve made! Have a great day!
Special thanks to @cheesebox for giving me this wonderful idea! I couldn’t (and probably wouldn’t) have done this without you!