So, the last guide I made on this got 338 views and 13 likes so I created a new version, where there will be better grammar, stupider puns, a better dungeon, new format, and TWO polls! The difficulty will stay for now. I am keeping the old guide up because I holds a special place in my heart! Also thanks to @Caternaught and @California_Love for their overwhelming support immediately! So, it is with enormous pleasure I announce: Playcare– Er, wait wrong game!
It is with enormous pleasure I announce:
[ ] The Simplified Guide to a Dungeon Crawler 2.0
Intro:
My very first guide on Gimkit Forums was a guide to a Dungeon Crawler. At the time of me making it I was OBSESSED with Gim Dungeon (Check it out on Discovery, it is really cool!). When I discovered Forums and found @Wumpus’s Dungeon Crawler guide, I was hooked. My happiness at finding this almost immediately turned to frustration as I didn’t understand ANY of it. (I was a newbie) So, I dug around and decided to create a Simplified Guide to a Dungeon Crawler for all the inspired newbies out there! Also, if you to look at my old guide here it is:
https://forum.creative.gimkit.com/t/the-complete-simplified-guide-to-a-dungeon-crawler-5-10-wip/31661?u=harharharhar83
Table of Contents
- Setting up the Settings
- Game Starting…
- Basically the Basics
- Advancing down the Line
- Big Boi Boss Man
- Other Stuff
- - - - [Setting up the Settings]- - - -
Intro: This part of the guide will explain the game settings and endings. Also, it shows the different editing mechanics the dev can use! This part is very basic and contains 0/5 warnings!
Warnings! ⚠️
Property Warning!
Wire Warning!
Channel Warning!
Blockcode Warning!
Prop Warning!
🏳️Game Settings🏳️
Intro: The games setting for a dungeon crawler are nearly just as important as the game itself. This includes stuff like scoring, terrain, and more!
Background Terrian🌱
The first setting is Background Terrian. This is a way to make it so you don’t have to spend a whole bunch of time setting the flooring to whatever you want it. I set mine to Space (Moving).
Game Clock 🕒
The next setting is Game Clock. I set mine to Count Up because my dungeon crawler gives the players unlimited amount of time to complete the dungeon. If you want to limit them set the time to Count Down
Music Track 🎵
Music is very important to a game to set the mood. A dark creepy song makes it scarier. A light happy song makes it more upbeat. A fast-paced song makes it suspenseful or thrilling. While it is hard to describe the actual song, I can say what song makes me feel what.
Gimkit has 8 different tracks.
Creative Funk is a bopper. It’s kind of like a snazzy Roblox Tycoon music.
Spy is like Creative Funk but without all the access sounds. It also sounds like Tycoon Music.
Jazz Club is a mellow beat meant for slower gameplays.
Peaceful Guitar makes me feel super peaceful on the inside. It is meant for calmer gameplays.
Epic Battle is a fast-paced thrilling song for gameplays full of battle.
![]() My Favorite Hip Hop - Neon is an epic song. It isn’t as fast paced as Epic Battle but is still good for thrilling gameplay.
My Favorite Hip Hop - Neon is an epic song. It isn’t as fast paced as Epic Battle but is still good for thrilling gameplay.
Hip Hop - Movement sound like a normal song sped up. It should be for fast-paced games.
Rock Band is well, rock music. It sounds like and a song used for boss battles in other games.
Teams👥
This part of the settings depends if you want a game where it has Teams, FFA (Free For All), Cooperative. FFA and Cooperative are pretty self-explanatory. For FFA everyone is on their own team. For Cooperative everyone is on Team 1. Split into Size and Specific Team Amount need a little more explanation.
Spilt into Size - For this one you choose how many players you want on a team. Say I choose 4. If 20 people j0in my game then there will be 5 teams of 4. On a number that isn’t a variable of four, say 26. There will 6 teams of 4 and one leftover team of 2.
Specific Team Amount - For this one you choose how many teams you want. Say I choose 3. Then if 15 people j0in my team then there will be 5 people on a team. If a number that isn’t a variable of the team amount. Say, 16 people then there will be 6 people on one team and 5 on the other two.
Health & Shield🛡️
For Health & Shield we need to look a little more the mechanics of Gimkit. Med Packs will fill up your health bar all the way, no matter your health. Shield Cans will fill up 25 Shield to a max of 50. With this in mind I recommend that you set your Max Shield to 50 so that way shield cans CAN max it out (see my pun?). Setting the Max HP is really up to you. For your average game use 150. For a game that encourages players to be more cautious set the HP lower, for a game that encourages rushing in and tons of fighting, set the HP higher!
Starting Shield and HP: I always like to start my players off with less-than-max HP and no shield because it encourages them to explore and find items or complete side quests for healing items.
Scoring 💯
This is all about scoring!
So the first thing is Score Type. The there are three types of Scoring.
Knockouts: This does not count sentry knockouts. Whenever you knockout a player, your score increases by 1.
Amount of Specific Item: This is pretty self-explanatory, your is equal to whatever item you want the score to track.
Score Item: This is the item you will have set as the score.
Property: The score will be equal to whatever property you choose. This is good for scores like: Sentry Knockouts, All-Time Cash, or other property based values.
Score Property: This is the property that you will have set as the score.
Th next setting is Score Name. This is pretty easy! Just set this to what you want to show up here:

The second to last setting is
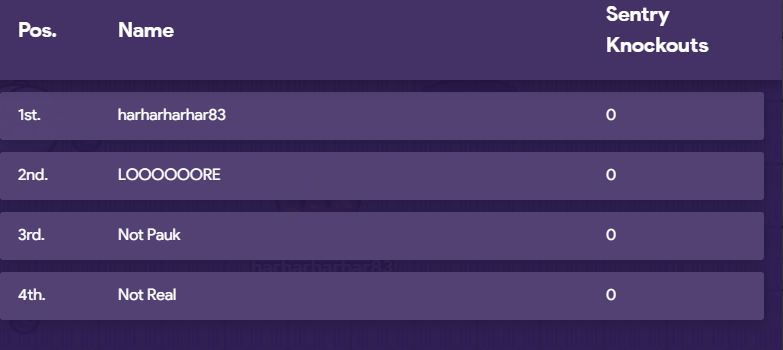
Score Group. Team means all players on each team scores will be added together and set that and their score. Player means each player’s score is handled individually.Team:
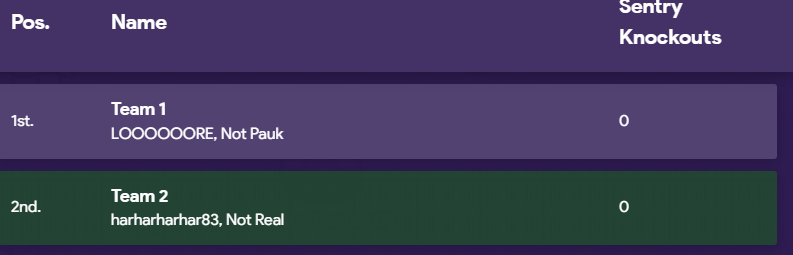
Player:
The final setting, Leaderboard Sort Mode just asks if you want the leaderboard to got Highest to Lowest or Lowest to Highest.
Items 🩹
So here we will discuss items.
The first setting I want to talk about is Item Slots, otherwise known as your hotbar. Here is where your gadgets, Medpacks, and Shield Cans will be. You can set this as a number 0-5
The next two settings are exclusive to gadgets: Infinite Refills and Refill Duration. The first one is whether or not they need ammo. When that is set to yes, they never need ammo to refill their gadget. When that is set to no, they need ammo to refill their gadget. The second setting decides how long it takes to refill. The two options are pretty self-explanatory.
For this next part you need to know the difference between a consumable, a gadget, and a resource.
If you don't know click here
A consumable is a Medpack, a Shield Can, and some foods. It is anything you can eat or use in game. A gadget is one of the we@pons. You know it is a gadget if it had a rarity. A resource is everything else.
Allow Drop: This allows you to choose whether or not a player can drop items from their inventory.
Respawn Behavior: This allows you to choose whether or not a player keeps their items when they get knocked out.
Other 🛠️
In this section I’m just going to be going over some other miscellaneous settings that I didn’t go over before.
Allow Game Host to Spectate: If this is turned off, the Game Host will be forced to j0in.
Show Placement: At the end of the game the player will be show their placement on the leaderboard
Dropped Item Visibility: If a player drops and item it decides who can see it and pick it up.
Outro: Well that is it for the Game Settings! If there are any I didn’t do it’s because I felt they were self-explanatory or not necessary. If you have any requests for settings I should add let me know!
⚙️Dev Settings (Editing Settings)⚙️
Intro: The developer settings are very important when designing a game. They allow you navigate the map easier while building & coding. These setting range from changing view size to turning on a memory bar
✨My Favorite Settings✨
Camera View Size: This allows you to zoom out and see more of the map while you are editing. I find this helpful while building bigger rooms because I can zoom out and see all of the room and place props where they make the most sense. You can set it to .5 (Zoomed out) all the way too 2.0 (Zoomed In [1])
Player Collision: This allows you to turn off collision to fun through various props and walls to quickly go through walls and get to other parts of your map without having to run through the whole shebang. Setting it to Off makes it so you can run through walls and setting it too On makes it so you can’t move through walls/props.
Speed: This allows you to change the speed (OH MY GOSH! THIS IS SO CRAZY, SPEED SETTING CHANGED SPEED!). This is pretty self-explanatory. The slowest is .5 (I think that the GimKit creators really like .5’s) and the fastest is 3x speed.
Memory Bar: So, surprise surprise, GimKit Creative maps have limited memory. The memory won’t usually show up unless it reaches 75% or if you manually turn it on here.
Other Settings⚙️
Grid Snap: This allows you to snap devices and props to the ground, making it look more organized. You can also choose the size of the snap.
Show Grid: This shows the grid (OH… MY… GOSH… CANNOT BELIEVE THIS…).
Zone Device Display: Hides, shows only the border, or shows the whole zone device, depending on your choice
Outro: That concludes the Developer settings. Thank you so much for watching and always, I will see YOU in the next video, Buh-Bye!!!
Outro: That concludes this section. I hope that this helped you navigate your settings a little easier. To recap: We learned how the basic map settings and how to setup your settings for your Dungeon Crawler. Then, you learned different settings that the Dev can use to help navigate.
- - - - [Game Starting…]- - - -
Intro: This part of the guide will explain how to create a screen for the host, a lobby, and how to start the game! This guide is a little more complex than the last and contains 3/5 warnings.
Warnings! ⚠️
(You can click on the blue text for guides on this things)
Property Warning!
Wire Warning![2]
Channel Warning!
Blockcode Warning!
Prop Warning!
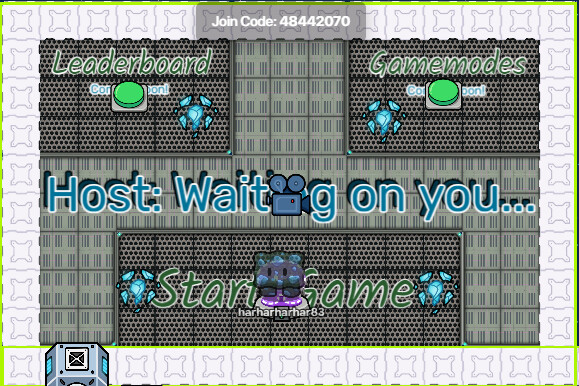
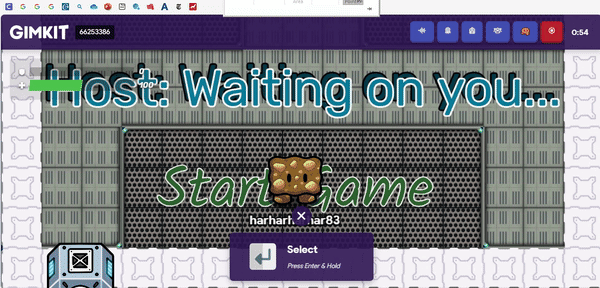
Host Screen 👤
Intro: This guide will be split into two parts: Design and Coding[3]. Design will be making the area easy to navigate and Coding will be well, the coding. The Design section will be vague and just have tips on design since that is really up to you.
Design
Part 1: Terrain
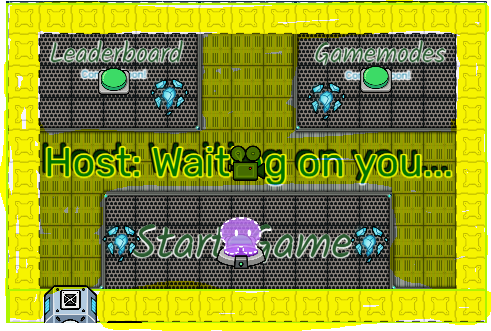
So for the design of the Host screen all you need to worry about is terrain. There should be no props here simply because it clutters the area. For the terrain that you use you should use the terrain that fits the theme of your game. Since my takes place on a spaceship mine looks like this:
Part 2: Navigation
For the navigation you can either use teleporters or just have an empty room. For mine you I used a room with a bunch of areas blocked off and invisible teleporters to navigate around.
Everything highlighted in yellow is a wall.
Part 3: Text
There are a few pieces of text that are necessary. The first part should be something like Host: Waiting on you... or Start the game when you are ready. The next piece text should say Start Game. Next if you have any optional areas like Leaderboard or Gamemodes add in the text for those. Also, here is a guide for making text look cool:
Creating Detailed Text - @mysz
Coding
Devices:
- Button(s)
- Spawn Pad
- Camera View
Part 1: Buttons
So there are three types of button that will be included in my game. I will go more detail in them below. Just remember the two MAIN categories that you MUST edit: Button Message & When button pressed, transmit on:.
Start Game:
So for this button all you have to do is set the Button Message toSelectand set Visible In-Game toNo. In the “Starting the Game” section I will show how to start the game.
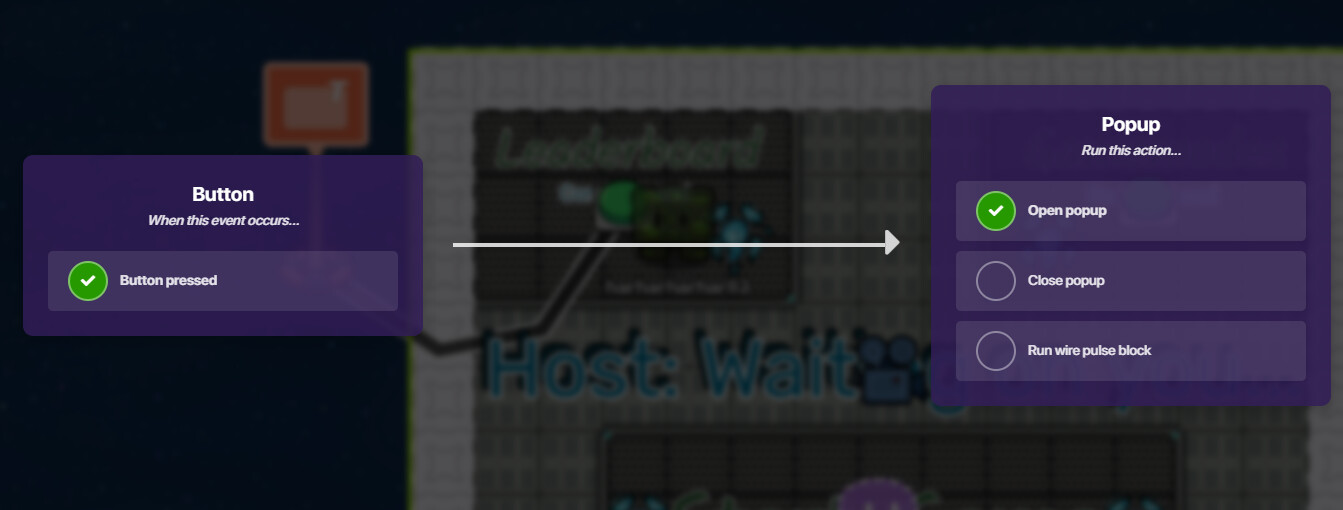
Leaderboard:
So for this button set the Button Message toSelect. Set Visible In-Game toNo. Now get a Pop-Up and wire the button to the pop-up.
Button Pressed → Open popup
For the popup set the Header toLeaderboard. For the Context put the leaders (OH MY GOSH). For the specs, it is up to you.
Gamemodes:
This section is still a WIP because I haven’t gotten a chance to implement it into my game yet.
Part 2: Spawn Pad
Now you have to set Allowed Player Type to Game Host so that way only the host will start here ![]() .
.
Part 3: Camera Zone
Size the Camera Zone to fit the area of your Host zone.
Outro: So I know this part of the guide was vague and it will get better, I promise! This area is left a lot up to design and I can’t force a design on you. When it gets into the heavy coding it will be more step by step guide!
Lobby 👥
Intro: Welcome to the Lobby! This guide will about designing a lobby. This is left a lot to design choices so it will be really short!
Design
Part 1: Terrain/Props
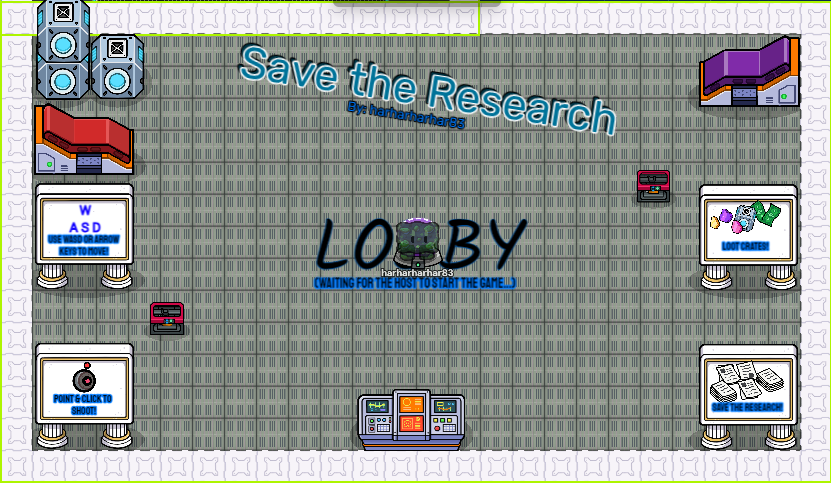
Once again you want to use terrain to design but, this time you also want to use props. Here is an example of my Lobby:
Part 2: Text
So you need 4 pieces of text:
- [The Name of the Game]
By:[Your Name]LobbyWaiting for Host to start the game
Part 3: Spawning
For this spawn pad it needs to set Allowed Player Type toPlayers
Outro: Thanks for reading! Hope this helped design your lobby!
Starting the Game 🟢
Intro: This will allow all the players to teleport to the dungeon when the host clicks start.
Step 1: You remember that button from earlier? The Start Game button? Yeah so get that ready.
Step 2: Place a Relay device and set the Relay Audience to All Players. Now wire the button to the relay
Button pressed → Trigger relay
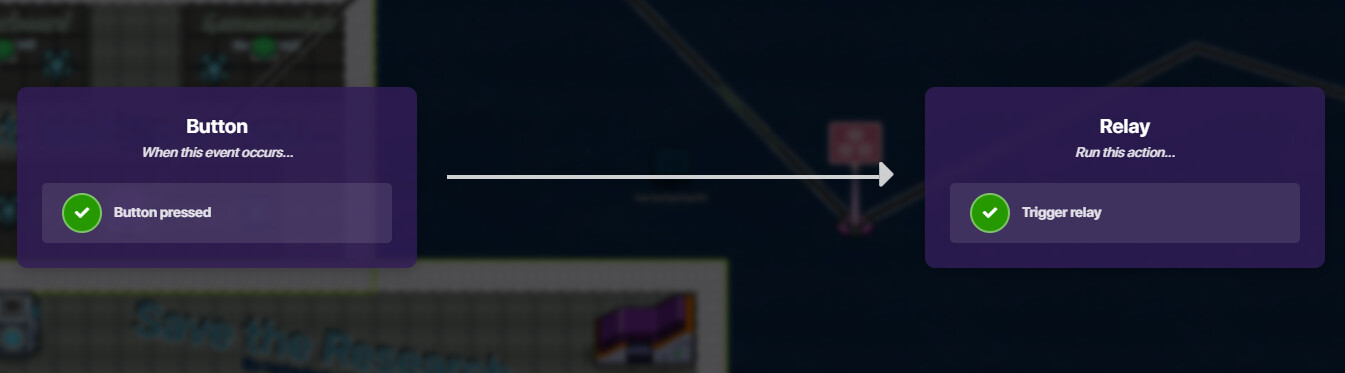
Step 3: Now place a teleporter in the beginning area of your dungeon. Set Visible In-Game to No. Wire the relay to the teleporter
Relay triggered → Teleport player here

Outro: Easy as pie ![]() ! Now please leave a comment if I can fix anything! This took so long! More update to come!
! Now please leave a comment if I can fix anything! This took so long! More update to come!
- - - - [Basically the Basics]- - - -
Coming Soon
- - - - [Advancing down the Line]- - - -
Coming Soon
- - - - [Big Boi Boss Man]- - - -
Coming Soon
- - - - [Other Stuff]- - - -
Coming Soon
Here is the ending poll:
- 1/10
- 2/10
- 3/10
- 4/10
- 5/10
- 6/10
- 7/10
- 8/10
- 9/10
- 10/10
Oh, as promised:
![]()
![]()
![]()
![]()
![]() ___
___ ![]()
![]()
![]()
![]()
![]() ___
___ ![]()
![]()
![]()
![]()
![]()
![]() _______________
_______________ ![]() _________
_________ ![]() ___
___ ![]() ________
________ ![]()
![]() _______________
_______________ ![]() _________
_________ ![]() ___
___ ![]() ________
________ ![]()
![]() _______________
_______________ ![]()
![]()
![]()
![]()
![]() ____
____ ![]()
![]()
![]()
![]()
![]()
![]() _______________
_______________ ![]() _________
_________ ![]() ___
___ ![]() _
_ ![]()
![]()
![]()
![]()
![]()
![]()
![]() ___
___ ![]() _________
_________![]() ___
___ ![]() _____
_____ ![]()
![]()