![]() This is the guide I started earlier and ran out of time to complete
This is the guide I started earlier and ran out of time to complete ![]() . So, I’m finishing here!
. So, I’m finishing here!
I just wanted to let everyone know: I have seen people say that they might get flagged for personal information (tabs, names, etc.) and game codes showing in the snips. So, I just wanted to let you all know that Nathan/Nate is my online persona and not my real name and all game codes show in snips are no longer active
I found it hard to find a simple guide to a creating a dungeon crawler. A lot of it contained coding and various other things I am not skilled enough to do yet. So that is why I created:
The Complete Simplified Guide to a Dungeon Crawler (By @harharharhar83)
2.0!!! So this is my announcement for a 2.0 Update for this guide! It will still keep the semi-simple concepts for beginners but, will be better.
Things you can expect from 2.0:
- Dumber Puns!
- Much more better Grammar!
- A NEW DUNGEON!!!
- A New Format
- TWO POLLS ![]()
- CAR!
Releasing Friday, April 5th, 2024
It is going to split into several parts:
- - - - (Before You Start) - - - -
1. Memory
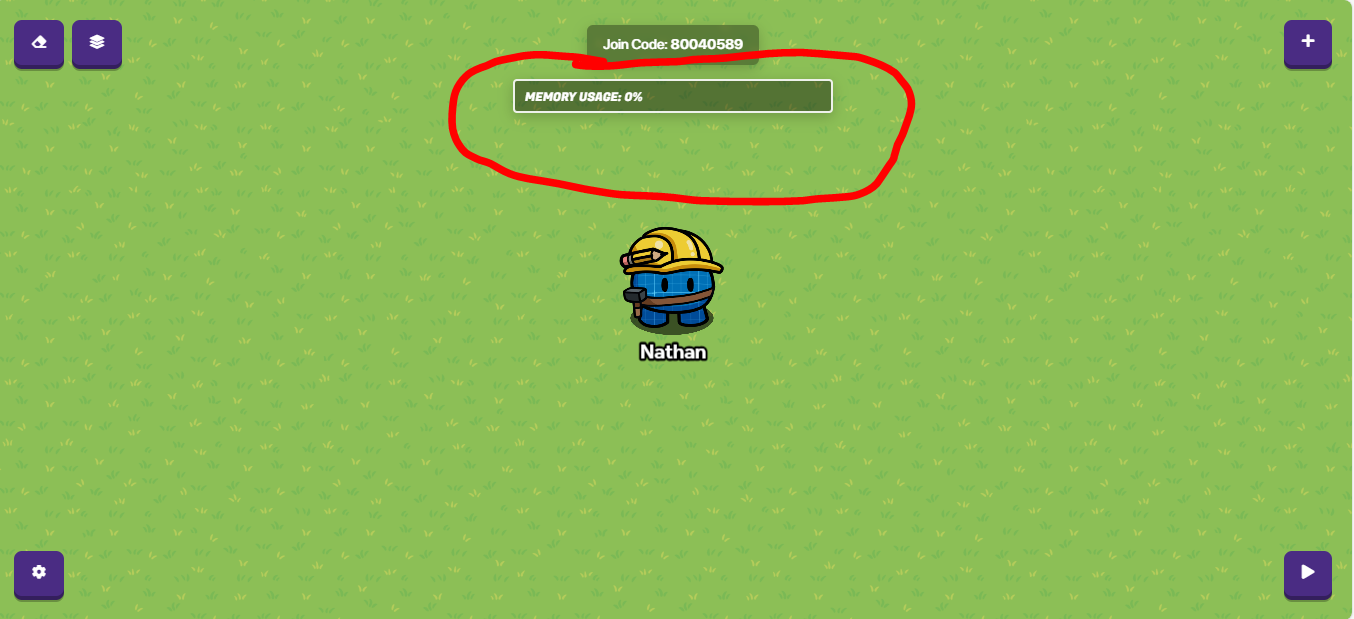
One important thing to keep in mind while creating your Gimkit creative is memory. You only have so much of it. Usually, you cannot see your memory however, there is a way to enable a bar at the top of your screen that shows your memory percent used. For more information on conserving memory refer to Part 2 (not out yet)
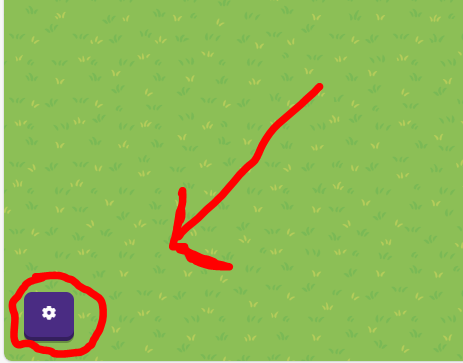
To Activate Memory Bar:
- Click the gear on the bottom left corner of your screen.
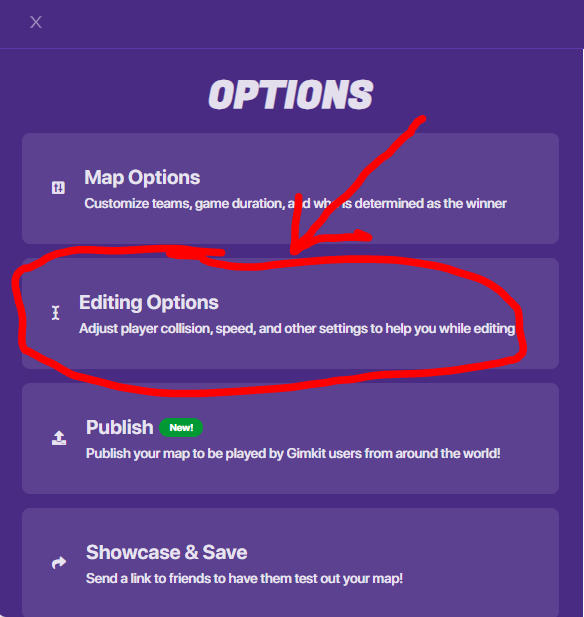
- Click Editing Options (the second option down)
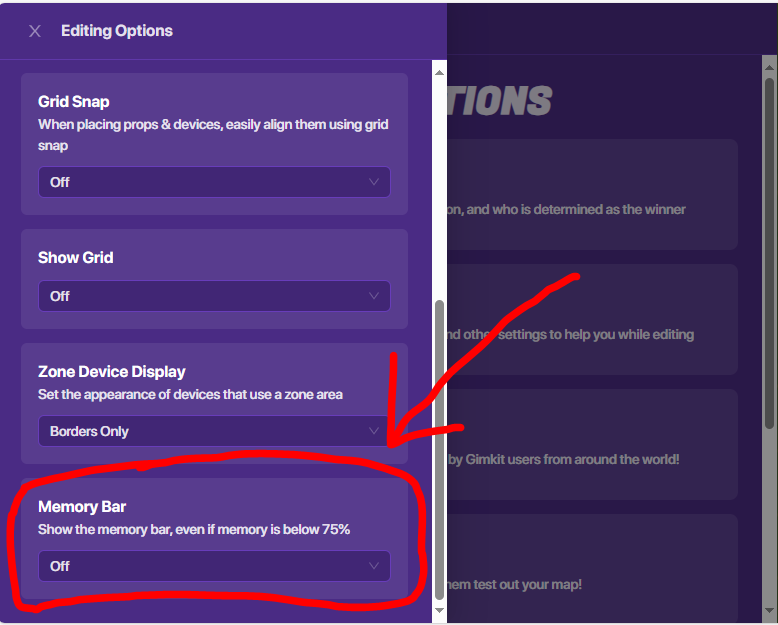
- Scroll down until you see Memory Bar (the last option)
- Set it to On
- Now you have a Memory Bar!
---->END OF MEMORY GUIDE<----
2. Theme
Difficulty Level: n/a
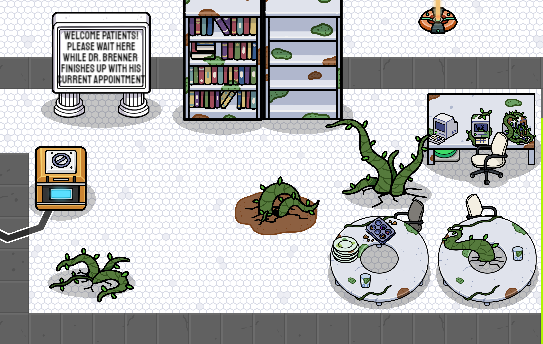
Every game (in my opinion) needs a theme. This theme can literally be anything. A theme decides how your game will be decorated. In this guide I have chosen an lab experiment gone wrong theme. In the past I have done an infested space theme (similar to One Way Out) and a snowy robot-controlled theme.
---->END OF THEME GUIDE<----
3. Storyline (Optional)
Difficulty Level: n/a
The final thing that it needs is a storyline. This is optional however it adds a flavor to your game. In my example you can find various lab reports explaining the experiment and finally how it went wrong. It can allow players to find secrets which hooks players.
---->END OF STORYLINE (OPTIONAL) GUIDE<----
- - - - (Basics) - - - -
4. Title Screen (Lobby & Tutorial)
The Lobby
The Lobby is an important place where the player will wait while everybody joins. I would recommend to not have to many devices in this area, as players should usually not be able to see this. The first thing you should do is set the mood with terrain. For my lab I used Lab Floor (White). Make sure that this is set to floor. You don’t want your players to be trapped in your flooring as if it was a wall.
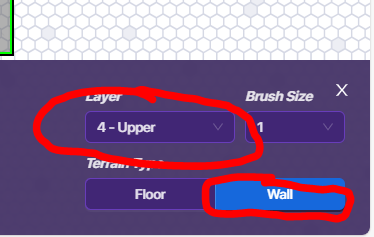
Next you want to add a wall otherwise you might be allowing your players to run amok. You want your wall to be set on 4 - Upper otherwise it might look a little wonky.
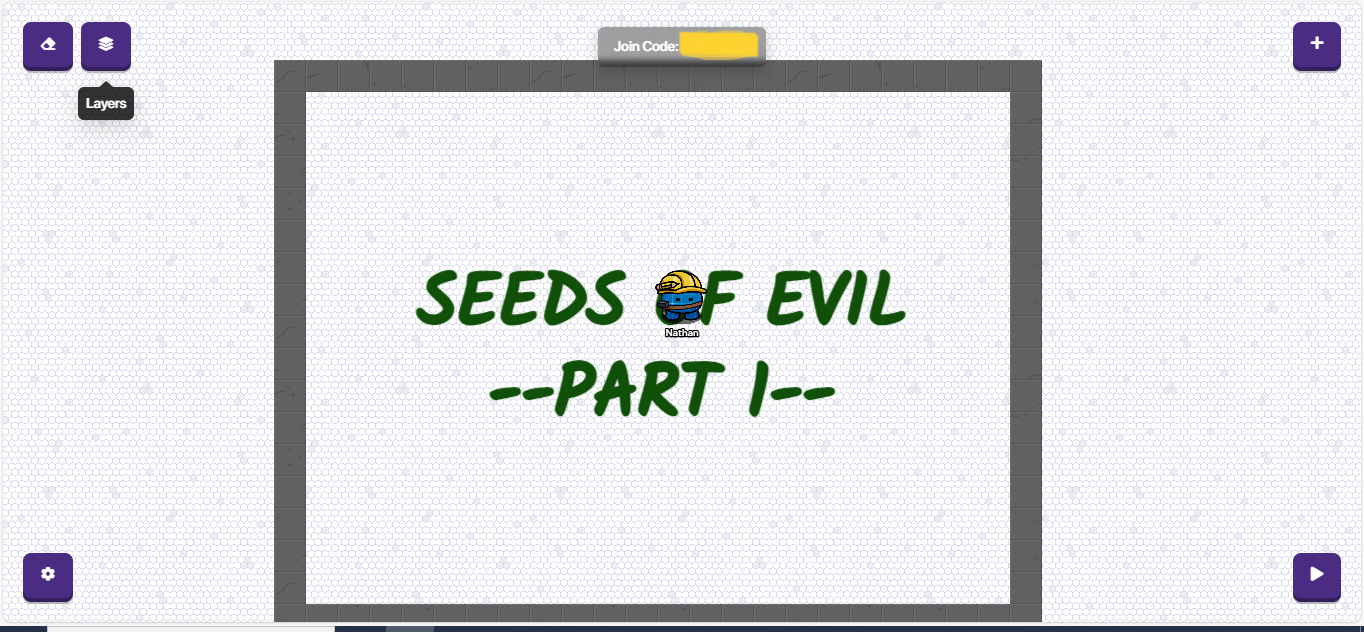
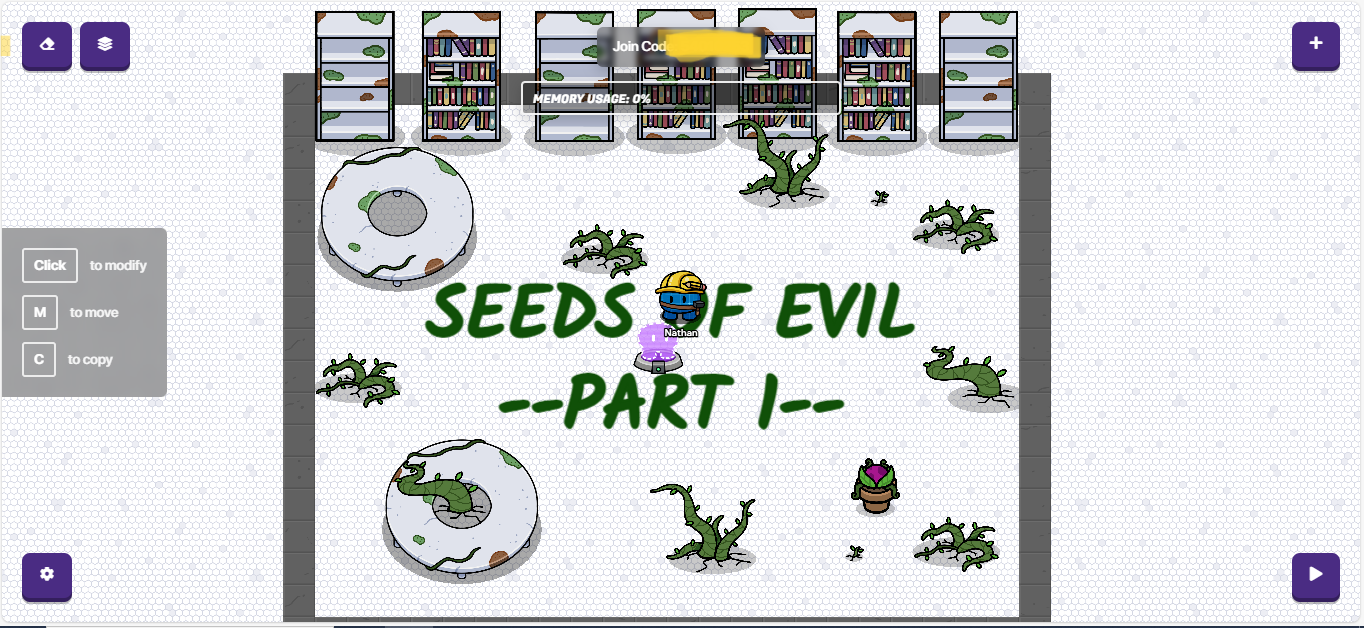
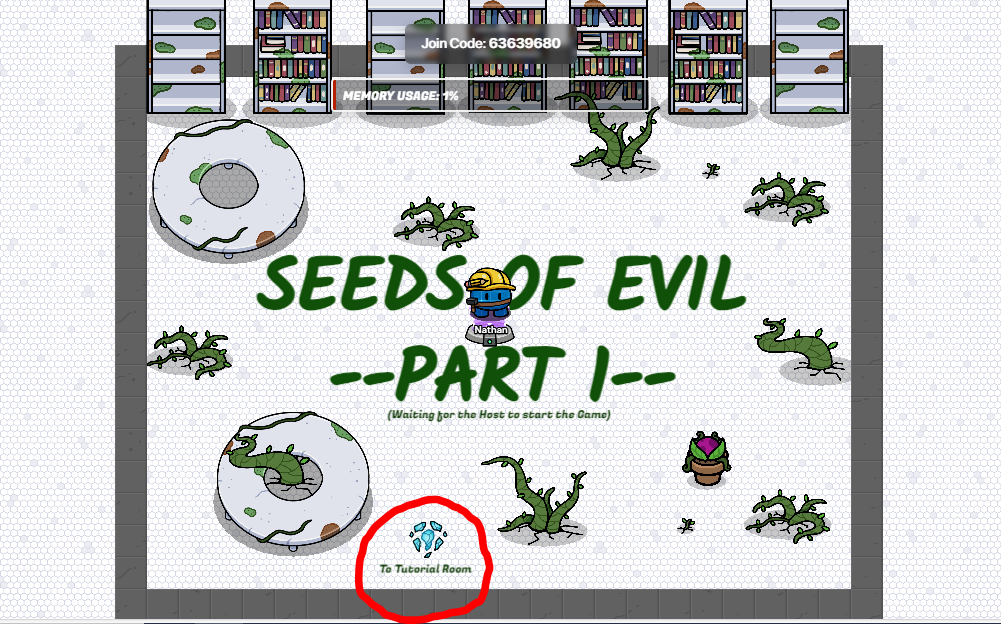
Make you lobby as big as you would like it. Next you should put the name of your game in big. It should stretch from one end of the lobby to another. Mine is called Seeds of Evil.
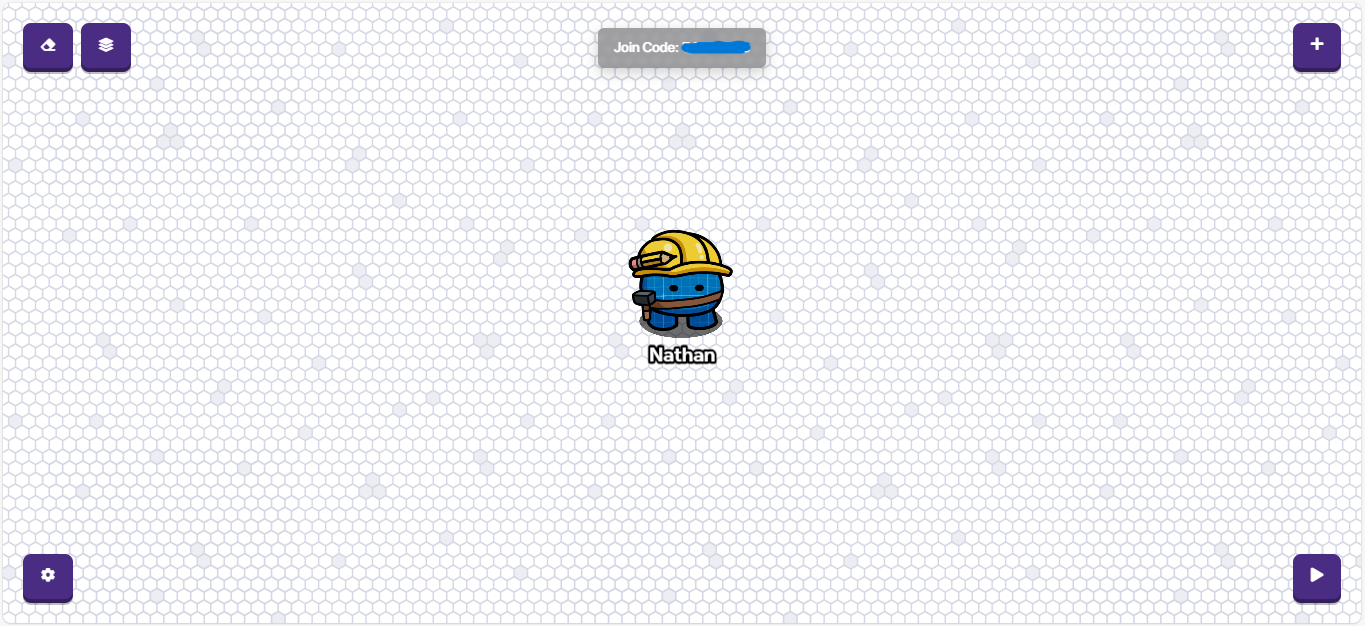
Using the text device is as simple as using Word/Google Docs. Just type in what you want and adjust the color, font, and size as you wish. Another device necessary is the spawn pad.
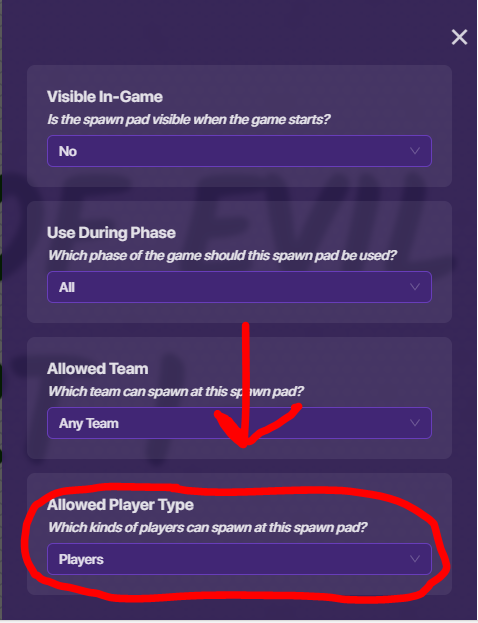
This is where players can spawn as they load in and when the game starts. Also, if they die, they will respawn here. Since this is the lobby where only players will wait you must click on the Spawn Pad to modify and set Allowed Player Type and set it to Players.
Now use props that fit the theme of your game to decorate around the Lobby.
Tutorial Room
The Tutorial Room should be branched separate from The Lobby and should players a basic idea for what the game is about and the controls. You should use Signs (found in props) to put text on top of. To create a separate room that can still be access by the Lobby you should use a teleporter.
![]() –New Device: Teleporter–
–New Device: Teleporter–
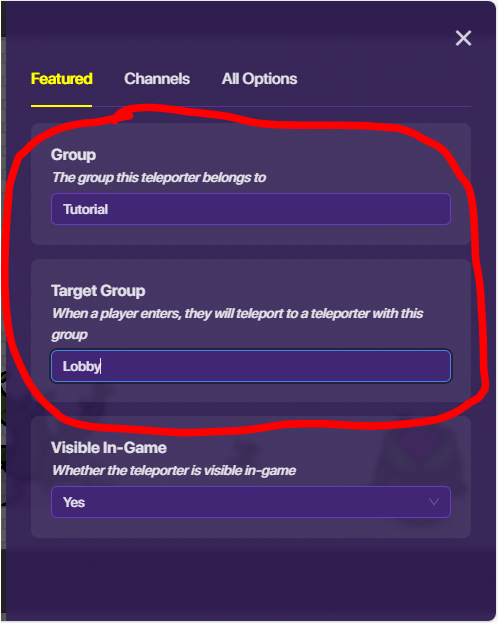
Using teleporter is quite simple once you understand them. The two most important parts in a teleporter is the Group and the Target Group.
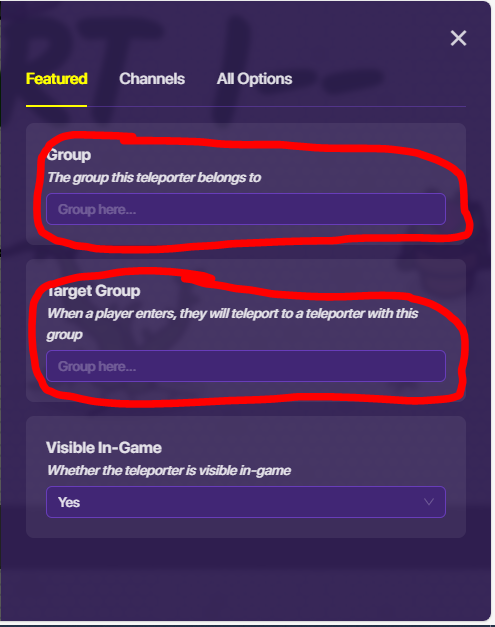
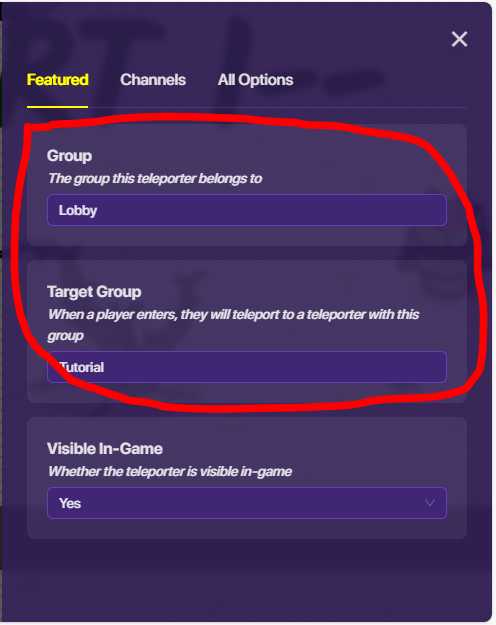
Until you begin to put multiple teleporters in one group the easiest way to think about it is as Name and Target Name. In this situation I named this teleporter "Lobby" (Hint, hint! It’s because it is in the Lobby). The Target Name will be “Tutorial” because it will teleport you to the tutorial room.
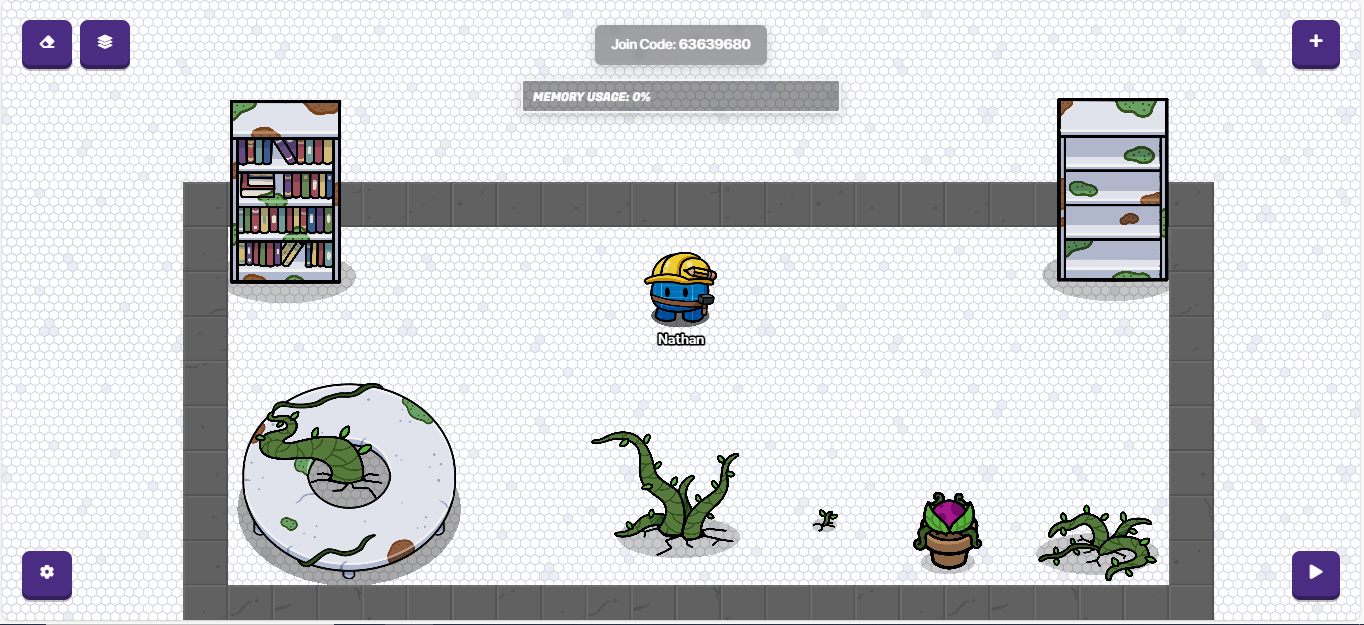
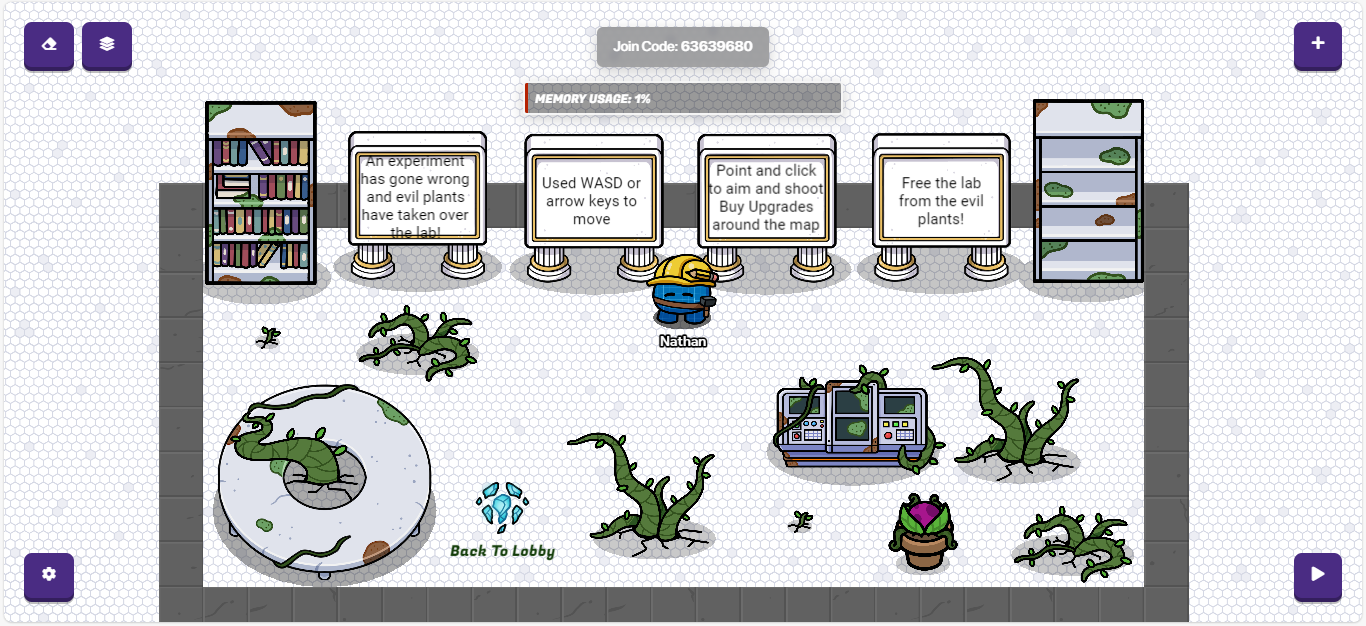
Next you will go and create the Tutorial Room. It must fit the same theme as the Lobby did. Here’s my example:
To connect the teleporter in the Lobby to the Tutorial Room follow these steps:
1. Place a Teleporter in the Tutorial Room
2. Set the Group (Name) to “Tutorial” since this is the tutorial room
3. Set the Target Group (Target Name) to “Lobby” since this will teleport back to the lobby
4. Label both Teleporters with the text device. Label the Teleporter in the lobby “To Tutorial Room”. Label the Teleporter in the tutorial room “To Lobby”

Now we must add the most important part of the Tutorial Room. The Tutorial! First choose the sign that would fit your theme. I chose Marble. Now use the text device to write out the tutorial. After that follow these steps, so the text can be on top of the sign instead of under it:
1. Select Layers (It’s the 3 squares on top of each other in the top left corner)
2. You will see a lot of stuff (it might be kind of overwhelming), hover over all the options until your text is outlined in red. Click the up arrow until you move the text option over the Marble Sign option. If it doesn’t allow the text to be moved higher, move the Marble Sign below the text. Be careful though. You don’t move the text onto the Above section and don’t move the Mable Sign to the Below section. They must stay in the Primary section. (Any text not on signs must stay on the Below section)
3. Now your text is on your signs.
Now you can do that for all your text devices to put them on top of the sign. My finished Tutorial Room looks like this:
---->END OF TITLE SCREEN GUIDE<----
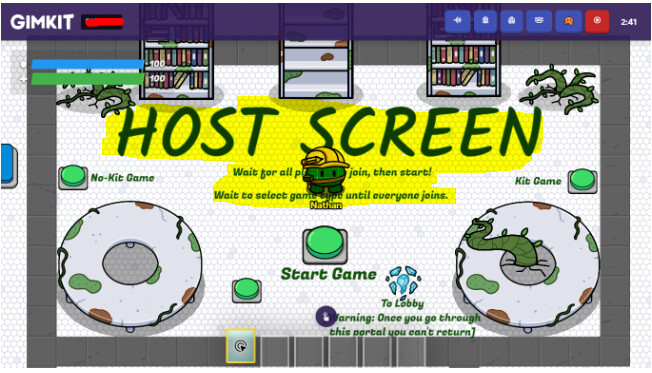
5. Host Screen (Starting the Game & Behind the Scenes)
Since my host screen was finished when I made this guide, I highlighted the important parts that I was talking about.
In this guide I am going to add the essential steps behind creating a host screen and then show additional steps to give your host more options.
Layout = Our host room should be just big enough to hold all the various buttons you need but, no more. Mine is 20x11 and fits 3 normal buttons, a teleporter, and a extra large Start Button.
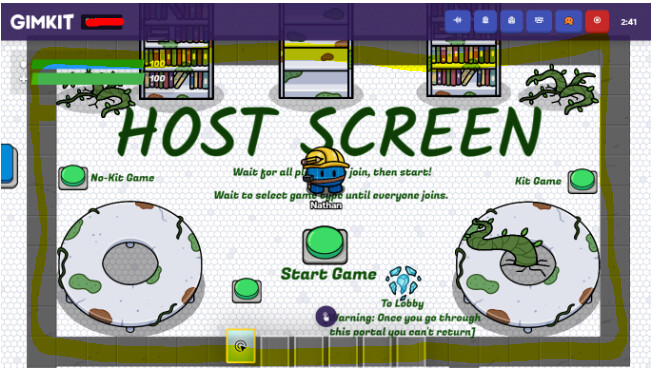
Decorations = Similar to shops (See below) a host screen shouldn’t be too cluttered. Remember the point of this screen is just a place for the hosts to wait while the players are joining. I did a prop in each corner and all along the top, but that was all.
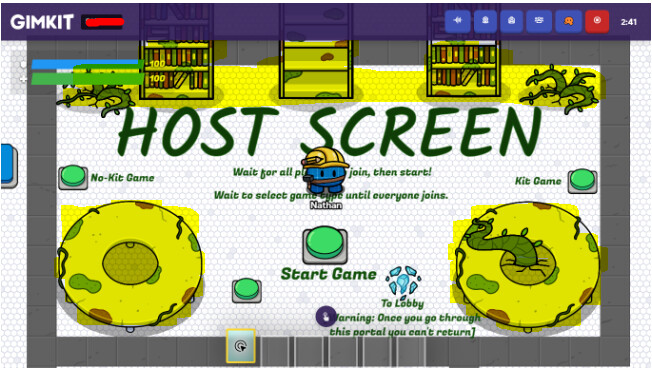
Text = There two sets of text that you will need in the host screen. The first should be big and bold and announce that this in fact, THE HOST SCREEN (OH MY GOD THE SCREEN WHERE THE HOST IS, IS THE HOST SCREEN, MY MIND IS BEING BLOWN) JSDQSDODQJQSDBWUCWICUWDCIUWHCUIWDHCIUWBCWIUCWCUIH. --clears throat–Sorry. The second set of text should be any special instructions the host will need.
Finishing Soon
- - - - (Starting Out) - - - -
5. The First Room (Decoration & Basic Bots)
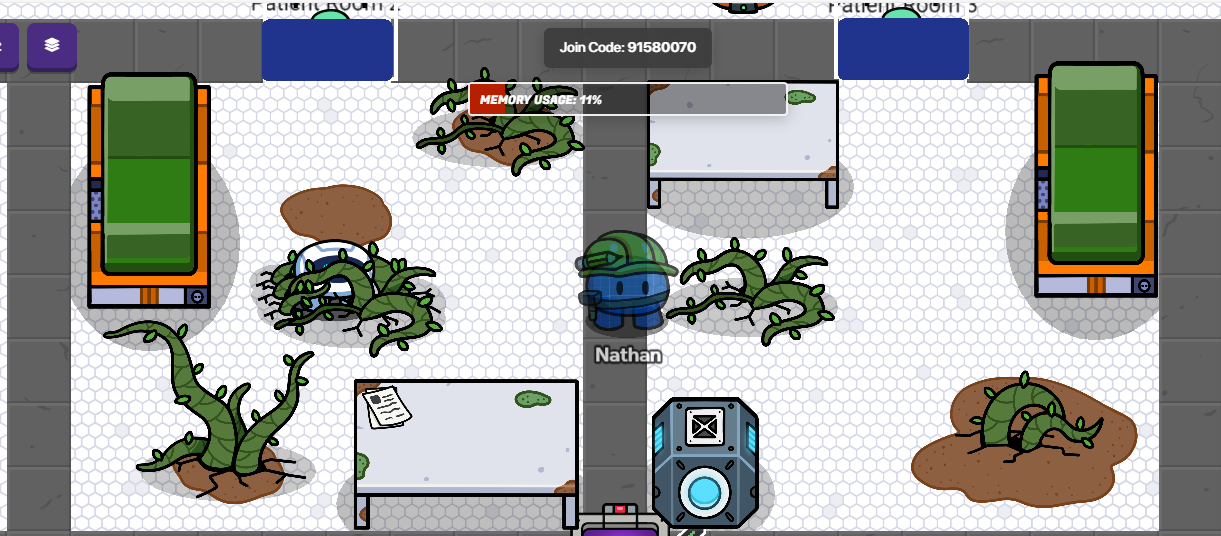
Decoration
For decorating your room, it essentially is based off of your theme. However, there are some necessities. First you need some walls around for players to hide around when under fire from enemy bots.

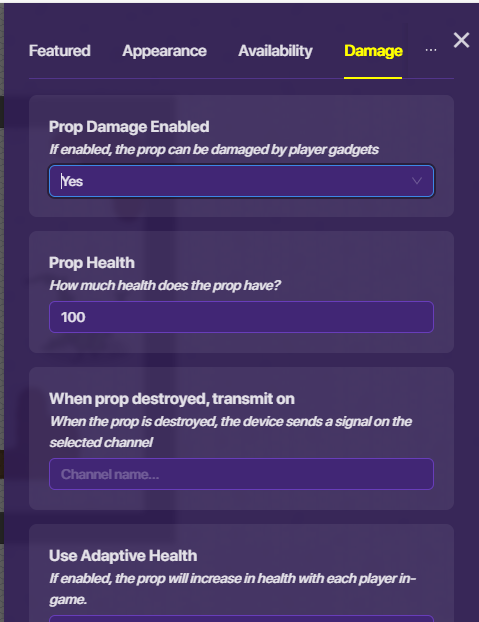
Second, add some props for extra places to hide behind and for decoration. You should change the props to be able to be damaged so that players can destroy them and move freely.

To allow props to get damage Damage → Prop Damage Enabled = Yes → Prop Damage = (However much damage you want).
Basic Bots
The first bots should be easy to kill. (I refer to them as bots however their legal name is Sentry.
![]() --New Device: Sentry–
--New Device: Sentry–
The health should be based on what weapon they have at the time. So if the players a have Zapper (Common) [Deals = Deals 14 Damage]. Multiply the damage by the 3 [42]. Round your number up to the nearest tenth. [50]. The two other things you must pay attention to Aim Accuracy and Fire Rate. They should never be lower than Accuracy = Slow and Fire Rate = Very Slow. I recommend that unless you want bots to not respawn than you should set the Respawn Duration = 20.

That’s it. For more stuff on bots check out Advanced Bots
---->END OF THE FIRST ROOM GUIDE<----
6. Expanding Out (Adding More Rooms)
Adding More Rooms
This part is honestly really short. I can’t really help you here. I only have _ pieces of advice:
- Keep with the general theme of your entire dungeon
- Make each room with its own theme (i.e, Security, Kitchen, Med Bay, Farm)
- If you want to add a special thing for the room theme (Med Bay might have a Med Pack station)
- If your guns have limited ammo have sure to add ammo crates see Dungeon Mechanics
Here are some examples of my rooms:
Two Infected Patient Rooms
An Infected Waiting Room
---->END OF EXPANDING OUT GUIDE<----
7. Merchants (Fair Pricing & Designing Shops)
Designing Shops
This is how to create simple shops. There is really nothing to advanced here. I will be displaying how to get there, showing my design, and breaking down how to use TOC & GI Vending machines.
Getting There
There are several different ways to get to a shop. You can use a teleporter to transport a player to the shop. (That’s what I did). You can make so it is a room within your dungeon as well.
Design
An important thing to remember is that you don’t want to over clutter your shop. You can still use props to decorate around but, do not place them in front of anything important. Over cluttering a shop with props can annoy some players.
Another thing to keep in mind is that you can make your shop have multiple rooms. In my shop there is a room for upgrades, items, and weapon upgrades.
Types of Vending Machines.
There are two types of vending machines: Transmit on Channel (TOC) & Grant Item (GI). Both are pretty self-explanatory. TOC machines transmit on a channel when the player purchases it and Grant Item gives a player an item when they purchase it.
Transmit on Channel
When you create a TOC Vending machine you need to change a few essential parts for every vending machine.
– New Device: Vending Machines–
For TOC Vending Machines you need several different areas to be edited for every TOC Machines you create:
Purchase Action = Transmit on Channel (NO WAY!).
Required Item/Required Item Amount =Whatever Item is the Currency of your DungeonandSee Fair Pricing.
When item purchased, transmit on =Whatever channel you decide
Item Name= Self Explanatory
Item Description = Self Explanatory.
Item Image = Go to this website an you can find a plethora of images and icons to use and how to use them - Custom images (gimkit.com)
You can link Transmit on Channel Vending Machines to almost anything but, I typically use Speed Modifier, Damage Boost, and Health Granter.
In the future I am going to post a Device Guide to Simplified Dungeon Crawler, describing all the devices more in depth.
Grant Item
When you create a GI Vending machine you need to change a few essential parts for every vending machine.
Purchase Action = Grant Item (NO WAY!).
Required Item/Required Item Amount =Whatever Item is the Currency of your DungeonandSee Fair Pricing.
**
Finishing Soon
8. Weapons (A Guide to Weapons; Creds to @JoeTheChicken )
[![]() ] The Ultimate Guide for EVERY WEAPON (2.0), Creds: @JoeTheChicken
] The Ultimate Guide for EVERY WEAPON (2.0), Creds: @JoeTheChicken
---->END OF WEAPONS GUIDE<----
- - - - (Advanced) - - - - (Lasers)**
9. Editing Mechanics (Changing Speed, Collision while Editing)
This is guide will show you how to make building your game 10 times easier (in my opinion).
Step 1 - Click the Settings in the bottom left corner
Step 2 - Click Editing Options
Camera Zoom - Adjusts how much you can see. The smaller the number the more you can see. The bigger the number the less you can see.
Player Collision - On means you cannot walk through any devices, walls, etc. Off means that you can walk through devices, walls, etc.
Player Speed - Adjust how fast you can move. 1x is normal speed, 0.5x is half speed, 2x is double speed.
Grid Snap - Use this to easily align devices on the grid
Show Grid - Pretty Self-Explanatory
Zone Device Display - When using the zone device it shows you visible, borders only, or not visible at all.
Memory Bar - Check Before You Start - Memory
---->END OF EDITING MECHANICS GUIDE<----
10. Dungeon Mechanics (Ammo, Dropping Items, Scoring, ETC.)
Coming Soon
11. Advanced Shops (Without Vending Machines and Speed Upgrades)
Coming Soon
12. Advanced Bots (Better Aim, Better Fire Rate, and Dropping Items)
Coming Soon
13. More Mechanics (Puzzles & ~~LAZZZZZZERS!!!!!!!~~)
Puzzles
Here I will be showing 2 types of puzzles:
Code Puzzle
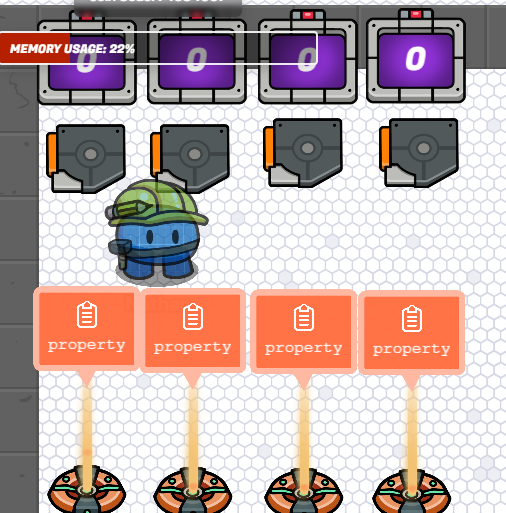
This puzzle is required by entering a 4-digit number code and then confirming it by clicking a button. Gather the following devices:
- 4 Properties
- 4 Triggers
- 4 Counters
- 1 Checker
- 1 Button
Step 1 - Set your devices up something like this (The checker and the button aren’t necessary at the moment).
Step 2 - Wire all the triggers to their respective counter. Set it to Trigger (Triggered) → Counter (Increment Counter)
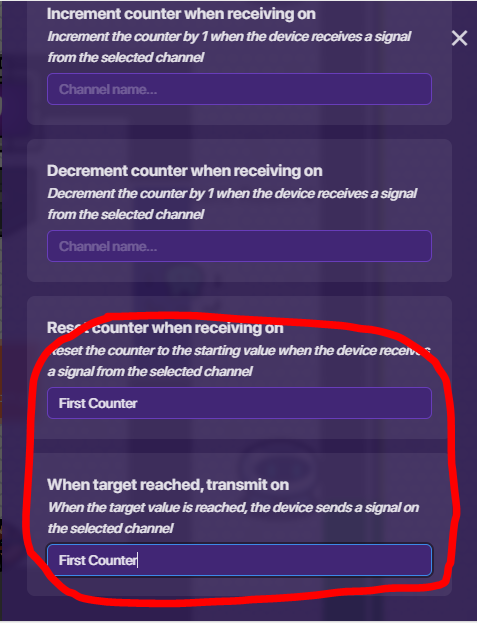
Step 3 - Go into the first counter and set the Use Target Value = Yes and Target Number = 10. Set the Count Scope = Player. Go to the channels section and set both Reset counter when receiving on and When target reached, transmit on to say, “First Counter”. Repeat this for all the counters with this discrepancy. For the second counter have the channels say, “Second Counter”. For the third counter have the channels say, “Third Counter”. For the last counter have the channels say, “Fourth Counter”.
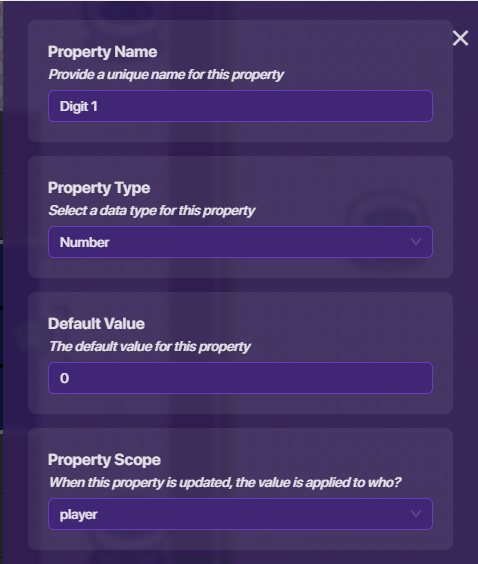
Step 4 - Now name your four properties Digit 1, Digit 2, Digit 3, and Digit 4
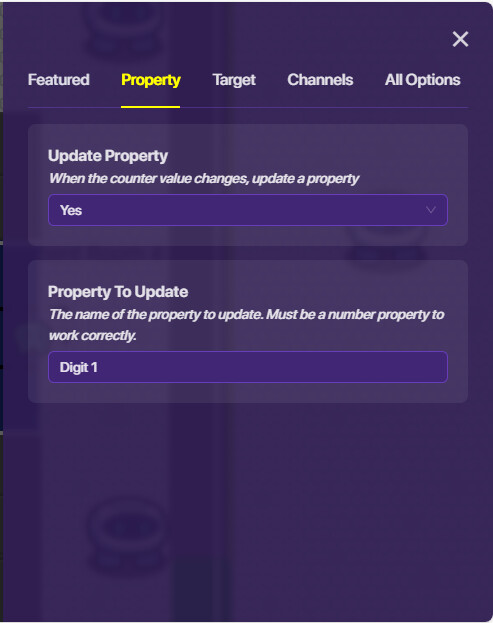
Step 5 - Set First Counter to Update Property = Yes and Property to Update = Digit 1.
Step 6 - Go to Digit 1 property and change the following settings. - Property Type = Number
- Default Value = 0
- Property Scope = Player
Step 7 - Follow Steps 5 and 6 for Second Counter & Digit 2 and Third Counter & Digit 3 and Fourth Counter & Digit 4.
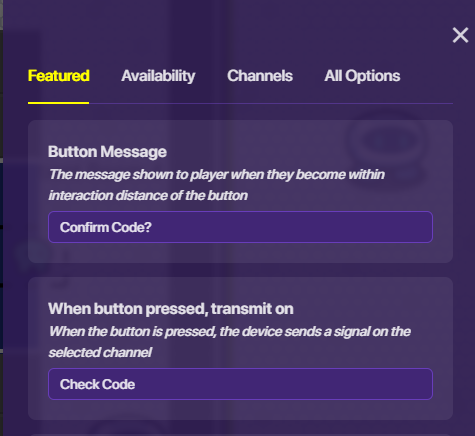
Step 8 - Place a button and change the following areas: - Button Message = Confirm Code?
- When button pressed, transmit on = Check Code
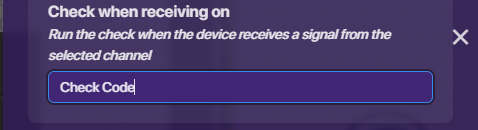
Step 9 - Place your checker and set Check when receiving on = Check Code and Number of Checks = 4 and Pass Condition = All Checks must Pass.

Step 10 - Choose a code. Mine is 1394.
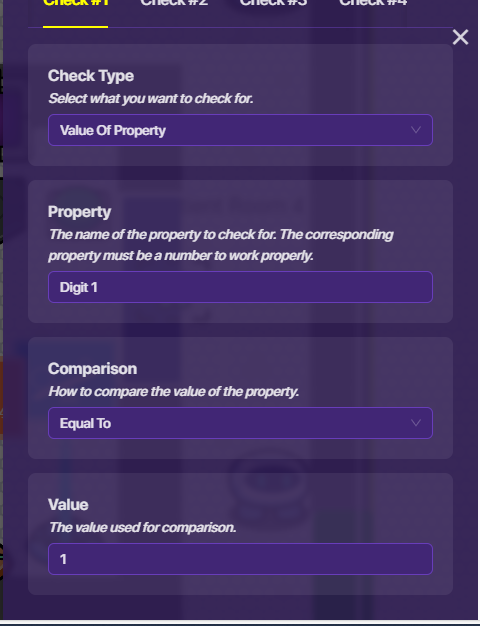
Step 11 - Go to the Checker and Check #1. Change the Following Settings: - Check Type = Value of Property
- Property = Digit 1
- Comparison = Equal To
- Value =
[The First Digit In Your Code]
For the Check #2 do the same expect the property is Digit 2 and the value is the second digit in your code. Do this for all four checks.
Steps 11+ is different depending on what you want the code to do. Click the arrow of which you would like it to do.
Open a Door
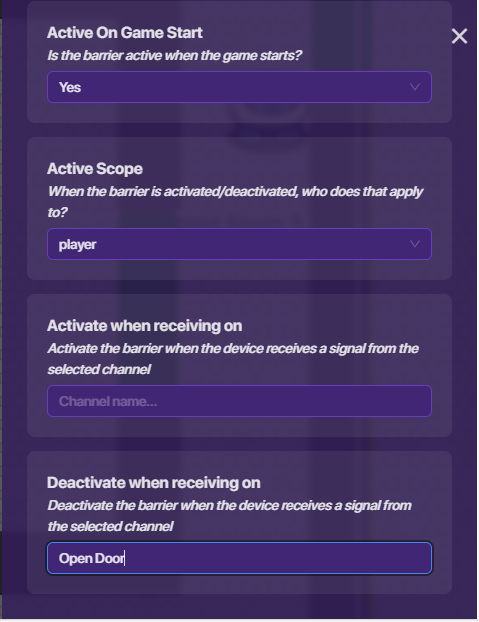
Step 11 - Place a barrier in the door way.
Step 12 - Set the checker’s When check passes, transmit on = Open Door

Step 13 - Set the barrier’s Active Scope = Player and Deactivate on = Open Door
Turn on a Device
Step 11 - Gather the On & Off version of the prop(s) you want to turn on.
Step 12 - Set the checker’s When check passes, transmit on = Turn on Power
Step 13 - Go to your OFF props and set them to Show Prop on Game Start = Yes and Visibility Scope = Player and Hide prop when receiving on = Turn on Power
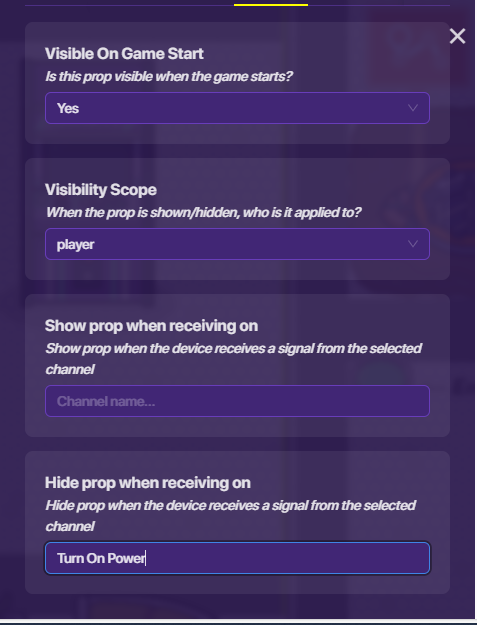
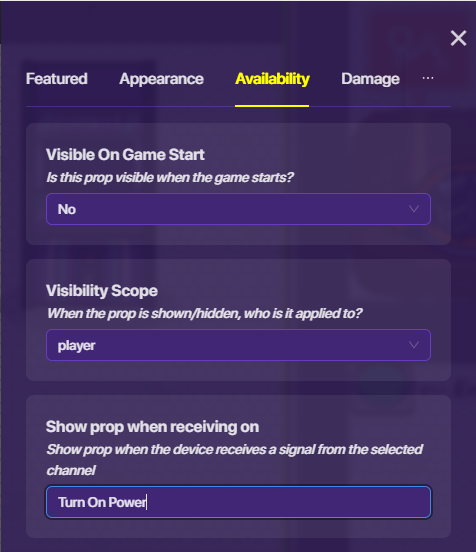
Step 14 - Go to your ON props and set them to Show Prop on Game Start = No and Visibility Scope = Player and Show prop when receiving on = Turn on Power
Step 15 - Stack the props right on top of each other.

Optional Step - Set up a notification to go off on either ‘Open Door’ or ‘Turn on Power’ depending on the route you went and have it say Door Unlocked! or Power On!
The Journey Puzzle
This puzzle requires players to run around all over the map to unlock certain areas. I am going to provide steps for how mine works. Do yours however you like. For this puzzle you want to have a set of instructions. Most of the “puzzle” work comes from running around finding places. To create a pop-up follow these directions:
Step 1 - Gather your devices and props. You will need:
- Any type of prop that info could be stored in. I used an infected Command Table; however, you could also use: Papers, computers, etc.
- 1 Button
- 1 Pop-Up
- 1 Item Granter (Optional)
--New Device: Pop-Up–
Step 2 - Place down your pop-up and edit the following areas: - Header Text - This will be your title. It shows up big and bold at the top.
- Content Text - These are the smaller word that will show up under the title and will be instructions.
Open when receiving on - Set this to say: New Protocol.
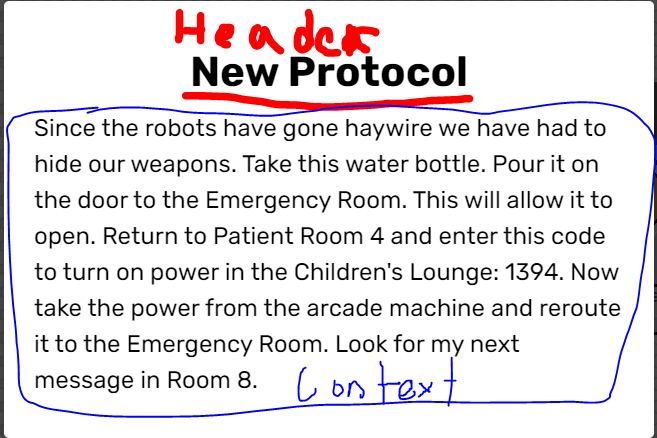
Step 3 - Place the button and change it as follows: Button Message = Interact with[Name of Your Prop]. When button pressed, transmit on = New Protocol.
Step 4 (Optional) - If they get a certain item for reading this pop-up (I did this, mine was a water bottle) then add an item granter and change Grant when receiving on = New Protocol and grant them whichever item you please.

Now they will have to follow your steps to find whatever you told them to look for. In my case they use the water bottle to short circuit the Emergency Room door. These mechanics are similar to the unlocking a door (found in 9. Dungeon Mechanics). Then they use the code to turn on power in the Children’s Lounge (see Code Puzzle above).
Multi-Part Journey Puzzle
The example I used above is a two-part journey puzzle. Notice I said “Look for my next message in Room 8.” So they follow the steps to restore power to the Emergency Room and then look for the Room 8 message, a second Journey Puzzle or Part 2 to this current Journey puzzle. Basically, you create as many journey puzzles as you like and link them together.
- - - - (The End) - - - -
13. The Final Boss (Proper Difficulty and Such)
Coming Soon
14. Which One? (How to create multiple endings)
Coming Soon
15. Conserving Memory
Coming Soon
Update Log:
- Completed Before You Start
- Completed 3/4 Starting Out
- Completed 1/5 Advanced
What difficulty should it be?
- 1/10
- 2/10
- 3/10
- 4/10
- 5/10
- 6/10
- 7/10
- 8/10
- 9/10
- 10/10
- 11/10