![]() Welcome, future overlords of chaos! Tired of polite duels and fair fights? Do you yearn for the satisfying splat of an unexpected barrier, or the gleeful chomp of a homemade monster? Then you’ve come to the right place. This isn’t your grandma’s guide to Gimkit; this is How to Squish a Player (and more). Prepare to unleash your inner prankster, because today, we’re not just playing the game—we’re playing with the players.
Welcome, future overlords of chaos! Tired of polite duels and fair fights? Do you yearn for the satisfying splat of an unexpected barrier, or the gleeful chomp of a homemade monster? Then you’ve come to the right place. This isn’t your grandma’s guide to Gimkit; this is How to Squish a Player (and more). Prepare to unleash your inner prankster, because today, we’re not just playing the game—we’re playing with the players.
Heh heh heh. Eheheh. AHAH! AHAhaHAHaHA—uh, *cough *cough *cough Sorry, my inner evil got let out for a lil bit… just a bit… trust…
[1]
Editing rules:
- Do NOT check for fun, I can look in the edit history and see who you are
- Please make sure all edits follow the TOS and the FAQ
- Please ask for permission before editing, but if its after 4 PM EST you might get ghosted
- If you wanna make an edit make sure it follows the idea list allll the way at the bottom of this post
Or just add to the list!
Check if you’re editing
![]() Just realized this guide features traps, trolls, and tricks, so check out this tag while you’re at it :>
Just realized this guide features traps, trolls, and tricks, so check out this tag while you’re at it :>
trap
Build #1. The Player Squisher
Materials:
x2 Barriers
x2 triggers
1 Zone
1 Respawn Device
1 Lifecycle

Poor little guy…
Step 1, Making a Trigger Loop
You can do this by making a lifecycle broadcast on game start to the first trigger (T1) the first trigger (T1) will trigger the second trigger (T2) and the second trigger will trigger the first trigger (T1). It’s just a loop

Both triggers should have a delay of 1 second
Step 2, Making channels for the Trigger Loop
T1 Will transmit the channel “disable short”

T2 Will transmit the channel “enable short”

Step 3, The barriers and their settings
Place your two barriers down, they can be any colour, just make sure collision is on. Make sure one is shorter than the other, but still has enough space for a Gim to run underneath.

B1 should be active on game start and have these settings:

B2 Should not be active on game start, and will have these settings:

Step 4, Making the Zone
Place down a zone and wire it to a respawn device: Player enters zone → Respawn
The zone NEEDS to be the same length as the longest barrier, and just a tad bit smaller in width.
This will be its settings:

The zone will enable when the longest barrier is enabled, so if the player is in the area of the longest barrier when it is enabled, they will respawn.
Build #2: The Pirahna Plant
The Trigger Loop

You should know the drill by now with this… But anyways, This is a Trigger Loop. It’s meant to repeat infinitely. The Lifecycle (Pink Device) will transmit on Game Start and, well, start the trigger loop
T1:
When Triggered: Disable Phir
Trigger Delay: 0.9
T2:
When Triggered: Enable Phir
Trigger Delay: 0.9
The Pipe

Listen, I don’t mean to disappoint anyone here but it’s just two barriers ;-;
Light Green Barrier RGB: 41, 117, 0
Dark Green Barrier RGB: 23, 66, 0
The Vine
Materials: 3 Corn Stalks (Empty)
The Short Vine:
Show Prop When Receiving on: Enable Phir
Hide Prop when Receiving on: Disable Phir
The Long Vine: (x2)
Show Prop When Receiving on: Disable Phir
Hide Prop when Receiving on: Enable Phir
There are two different lengths of vines because the Pirahna Plant will move up and down
The Pirahna Plant

Here are your materials, you will need 6 barriers total, 5 are white, and 1 is a dark red.

And here is how you would make the head
Now this is where it gets tricky, you need two of these heads, but each head will have a different channel that will match up with the vine that they are on

The Head on the Short Vine:
Show Prop When Receiving on: Enable Phir
Hide Prop when Receiving on: Disable Phir
The Head on the Long Vine:
Show Prop When Receiving on: Disable Phir
Hide Prop when Receiving on: Enable Phir

Then just merge them together
The Chomp Zone

So you have two zones and a respawn device, the size of the two zones doesn’t matter as long as they match up with the size of your Pirahna Plant. A longer zone for when the Pirahna Plant is jumping up blah blah blah. When a player enters the zone, the zone will transmit on “respawn” and the Respawn device will receive on “respawn”

The zone’s spawn and de-spawn channels will also line up with the plant. [2]
So, like when the short Pirahna Plant gets enabled/disabled, so will the zone. Make sense?
Build #3. The Bear trap…?
By c0smo!
Materials:
Barriers
Wires
Zone device
Damager device
The Steps
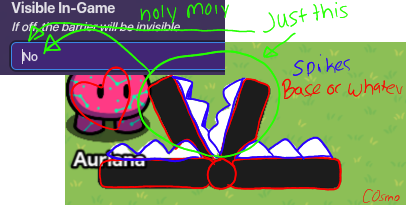
step 1- build what I did using barriers. change the part circled in green to where it is NOT visible during game start.
step 2- take the zone and wire literally everything NOT circled in green “when player enters zone deactivate”, and for the ones circled in green “when player enters zone activate”, (you may have to use like 4 of the zone devices just FYI) now it should look like this…
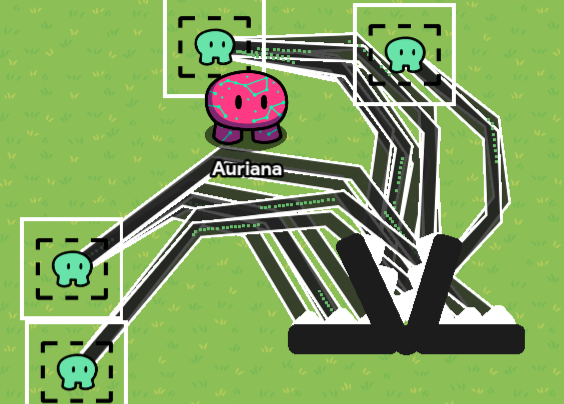
step 3- connect the damager to the zone devices and walla! if it doesn’t work redo everything, that’s what I had to do bc I did everything wrong when I was still new to gkc
if you want some more ideas for this, you could add a button another player can press to free you, but it would make it so much better if you added a speed modifier so when your freed you can only walk slow because of obvious reasons…
![]() Build #4. The Moving Spike Wall
Build #4. The Moving Spike Wall
Materials
7 Checkers
1 Player Coordinate Device
2 Properties
1 Respawn Device
1 Speed Device
1 Button
And a buncha text
![]() Step 1
Step 1
Step 1 - Getting our player Coordinates
Alright first things first we need to get the player coords. To do that we’re going to use 2 Property Devices, and the Player Coordinates Device.
Settings for the Player Coordinates Device:
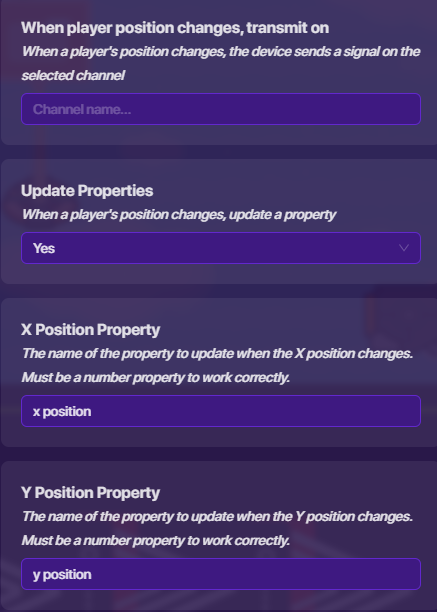
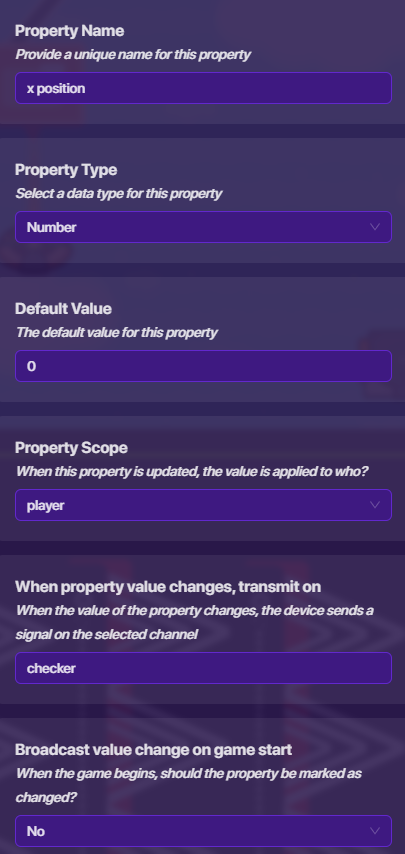
Property Device #1 Settings (X):
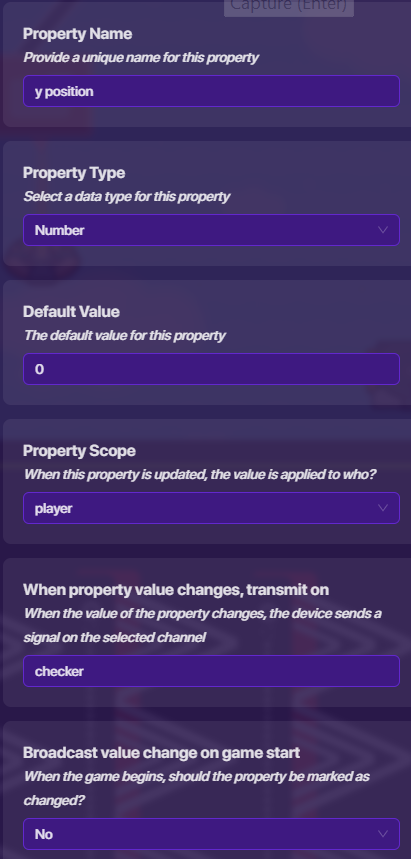
Property Device #2 Settings (Y):
Credits so far @ShadowDragon44 & @c0smo
Additional Ideas:
Write them here!
(yes you, the viewers :0)
Key:
Not started.
In progress.
Completed, and will be removed from the list in 3 days.
Bug Section
Solution
Refer to Post 58
The Naughty List (checklist clickers):
The_Gimster
Creator_real
8581599486
booper11111
coderguy
ailurophile
Swordking
Bibo4414
ray
BluePrint
TinanYx
darkevil802
Jarcksock
SeamlessMoon
deletedbot
flofy
reecespieces
AXOLOCHI
Pl241671
@Boss_1s
Update Log
February 10th, 2026 - Sorry community, I’ve been absent


