How to make a custom pressure plate

:herb: Intro

its palm!
(first guide yay)

Okay sooo pressure plates in gimkit are one of those things where everyone’s like “oh yeah that’s easy” and then five minutes later they’re staring at a zone wondering why it’s acting like a decorative floor tile.

This guide is here to fix that!! :smiley:

It’s simple, clean, and actually works in both top‑down and platformer, no cursed logic, no mystery bugs, no “why is the counter at -3” moments

Whether you’re making puzzles, traps, co‑op doors, or just want players to step on something and feel important, this’ll get you there

Alright, let’s get into it

🌱 CHAPTER 1 — making the plate

Pressure plates in Gimkit aren’t actual “plates”, they’re just zones pretending to be plates, and honestly, they do a pretty good job…

:check_mark: zone setup

  • Player Enters Zone → channel: plate_step
  • Player Leaves Zone → channel: plate_leave

:check_mark: placement tips

top‑down:

  • Put the zone exactly where the player stands
  • don’t make it microscopic

platformer:

  • zone should overlap the player’s FEET
  • not buried in the ground
  • not floating above their head
  • just… touching the platform surface

:check_mark: optional visual

Throw a prop on top tile, plank, whatever it’s just for looks the zone does the real work


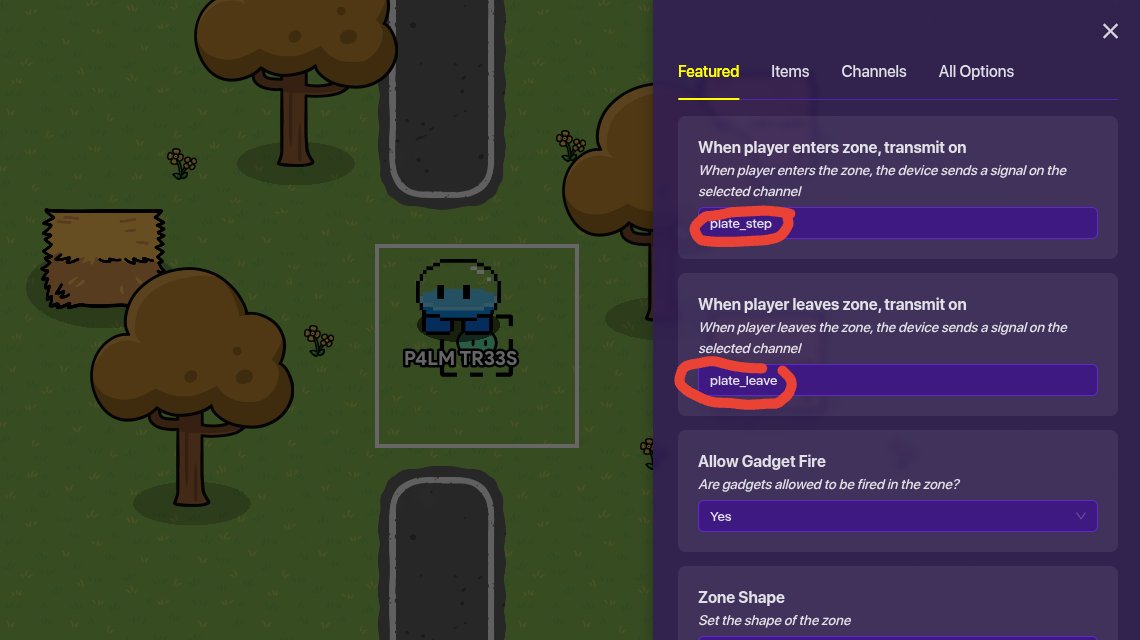
(the zone in top down)

⚙️ CHAPTER 2 — making it do something

ok so the plate exists, but it’s basically a fancy rug until you connect it to something

:check_mark: door version

barrier settings:

  • start visible: ON
  • start collision: ON
  • on plate_step → hide
  • on plate_leave → show

it works in both modes, super reliable!

:check_mark: trap version

damage device:

  • on plate_step → damage player

simple effective chaotic

:check_mark: light version

light or show/hide prop:

  • start visible: OFF
  • on plate_step → show
  • on plate_leave → hide

great for spooky maps or dramatic entrances


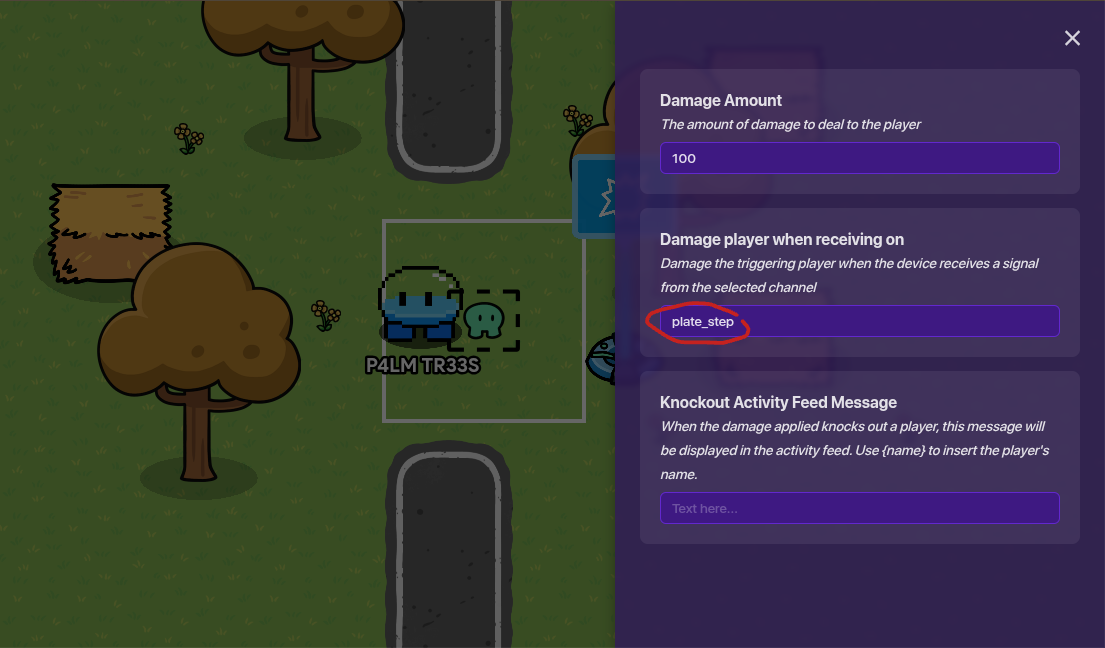
(simple trap version with damager)

👥 CHAPTER 3 — multiplayer version (the fixed one)

This is the part that usually breaks so here’s the version that actually works

:check_mark: counter

  • start value: 0
  • min value: 0
  • max value: something like 50

:check_mark: zone

  • player enters → increment counter
  • player leaves → decrement counter

:check_mark: checker

  • check: counter
  • condition: > 0
  • if true → plate_active
  • if false → plate_inactive

:check_mark: connect it

Example for a door:

  • on plate_active → hide barrier
  • on plate_inactive → show barrier

This fixes:

  • the “two players step on, one leaves, plate turns off” bug
  • the “counter goes negative” bug
  • the “checker only checks for =1” bug
🧹 CHAPTER 4 — common mistakes

These are the actual reasons plates break:

  • zone is inside the floor
  • The zone is too small
  • channels spelled wrong
  • barrier isn’t actually blocking anything
  • counter allowed to go negative
  • checker set to = 1 instead of > 0
  • The device isn’t listening to the channel
  • prop is in the right spot, but the zone isn’t

Fix these, and your plate will work every time


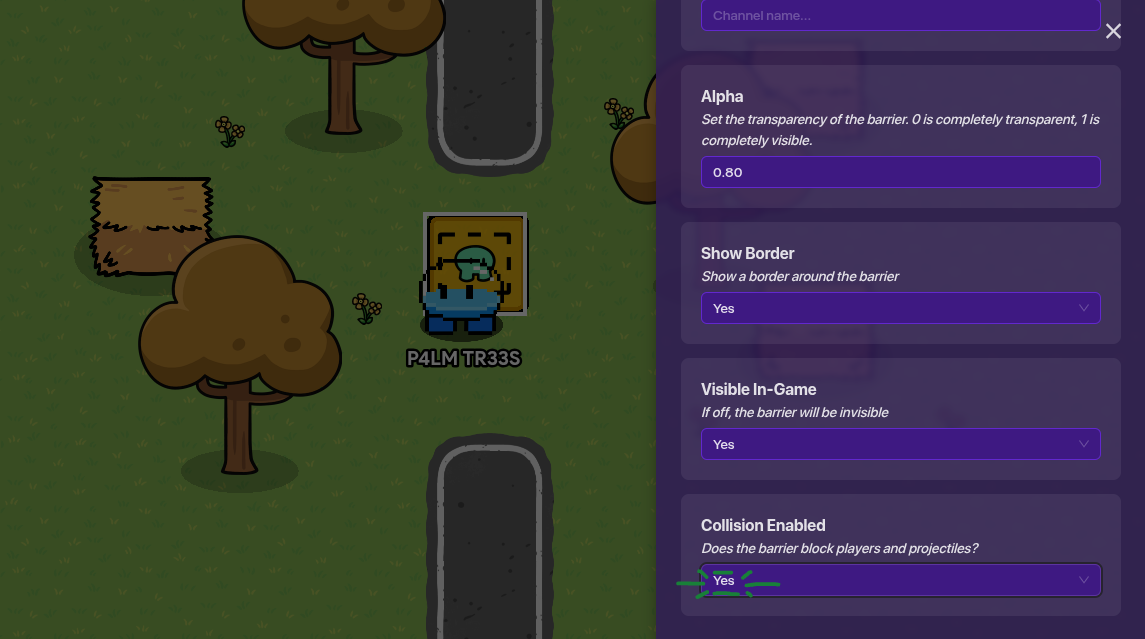
(make sure collision is on)

🎉 CHAPTER 5 — wrap‑up

ok so yeah, pressure plates are literally:

  • a zone
  • a couple of channels
  • something reacting to those channels

and that’s it works in top‑down works in platformer works with one player works with ten players as long as you follow the setup above

Go make puzzles, doors, traps, co‑op mechanics whatever you want

:sheaf_of_rice: Outro

And that’s pretty much everything you need for a pressure plate that actually works and doesn’t randomly break because a zone was 0.2 studs too low. It’s simple once you get the hang of it, and now you’ve got a setup that works in both top‑down and platformer without any weird surprises.

Use it for puzzles, traps, co‑op doors, timed challenges, whatever you’re building — pressure plates are one of those tiny mechanics that end up making your whole map feel way more interactive.
Thanks for reading!
palm

How would you rate this guide?
  • 1/10 — nah this ain’t it
  • 2/10 — kinda confusing
  • 3/10 — needs work
  • 4/10 — almost there
  • 5/10 — mid but usable
  • 6/10 — solid enough
  • 7/10 — pretty good
  • 8/10 — very helpful
  • 9/10 — great guide
  • 10/10 — peak tutorial energy
0 voters
HEHE ANOTHER POLL how hard do you think this is?
  • 1/10 — TOO EASY
  • 2/10 — piece of cake
  • 3/10 — still chilling
  • 4/10 — not too bad
  • 5/10 — mid
  • 6/10 — solid challenge
  • 7/10 — tricky
  • 8/10 — pretty hard
  • 9/10 — really hard
  • 10/10 — GIMPOSSIBLE
0 voters

Here’s a TL;DR summary! How to make a custom pressure plate - #28 by P4LMTR33S

10 Likes

TRigger 0: ( ) nahhhhhh

5 Likes

CHAT WHEN IS THE LAST TIME I SAW A USEFUL GUIDE

This is extremely good and impressive! Nice job!
I love the checklist-style writing and the background info, intro/outro, all things looking good!

I would like some visual representation of the building process though, that would help a lot. (aka images) Also maybe a poll at the end of the guide for ratings. Other than that, EXTREMELY impressive! Excellent job, palm!

6 Likes

cant we just use triggers? what am I missing

4 Likes

@Boss_1s glad you liked it! visuals would definitely level it up, I’ll try to add some when I’m not fighting Creative’s camera angles.

3 Likes

well we are talking about custom ones, but yeah that would take less memory

1 Like

Nice Guide!
You formatted your guide nicely using dropdowns. You could formatt more with headings!
Also love that you used emojis. Kind of unique in a way!
I approve.

But… my constructive criticism here is the grammar should be more top-notch and reviewed.

Also add pictures they are quite useful to show information in a visual way.

@P4LMTR33S I’m not saying to add intense vocabulary just fix up the Grammer, liked adding Capital letters and such.

5 Likes

yeah triggers can activate when stepped on in platformer, but zones are still better for pressure plates since they work in both modes and detect entering/leaving way more cleanly.

also this is for custom ones

3 Likes

me response box so I don’t get flagged as spam:

@hellosmartie
oki…but grammar isn’t my thing bc either
grammar check on and it sounds like a formal executive email
or off and its just me
but I’m too lazy to do that myself lol
otherwise appreciate the feedback

edit to everyone: okay…sure im gonna fix up the grammar rn :slight_smile:

to everyone :slight_smile:
i will add pictures later but my screenshot command is not working so i have to switch devices but thats later :smiley:

@Duckie haha but its grammar not grammer :rofl:

hi new visuals!!

@Duckie wdym by include that in title (what should i say lol)
@Zappy_Zaptos you could use triggers but in this guide we’re talking about custom pressure plates (triggers are more memory efficient and work tho on a limited scale)

4 Likes

its a great guide but:

I was a little confused from time to time so this is helpful
and

again Grammer might not seem important but it can be so please.
overall a 8.5/10 (Add a poll maybe?)

4 Likes

great guide!

i dont think theres really much to change but just in case, heres a formatting guide
maybe you could see if theres anything you might want to add?

extra formatting options for the uninformed!

[1]

Headings!

you can make this using a hashtag and a space (# exampleText)
there are SIX different sizes of heading!

exampleText (# exampleText)

exampleText (## exampleText)

exampleText (### exampleText)

exampleText (#### exampleText)

exampleText (##### exampleText)
exampleText (###### exampleText)

you can also make this using h1-h6 wrapped in the left and right arrows!

exampleTxt

<h1>exampleTxt</h1>

however, it seems like if you put text under headings using html formatting (that ^) then all formatting for that text just doesnt work

heading6
**bold**

bold

<h6>heading6</h6>
**bold**

**bold** //why does this one work?

[2]

heading6

bold

<h6>heading6</h6>

**bold** //??????

Dividers!

you can make these using three asterisks in an empty row! (***)
examples above this and directly below this sentence


Footnotes!

i used to refer to these as tooltips but it turns out theyre actually named footnotes
you can make these using one caret (^), one left bracket, whatever you want inside, and one right bracket!
[3]
[4]
also images can go into the tooltips
[5]


Images!

you probably know how to put these in
but you can actually change the sizes to a number outside of 100, 75 or 50!
simply go to the text version of the image

![2025_12_05_0dl_Kleki|690x431, 50%](upload://8Z7cJoamPD5uiGyRpwYgOg29ujL.png)

find where the size is typed in;

690x431, 50%]
/* aka
width x height, size of image] */

and change the percentage!

![2025_12_05_0dl_Kleki|690x431, 10%](upload://8Z7cJoamPD5uiGyRpwYgOg29ujL.png)

you can also crop them via the size (they wont stretch)

![2025_12_05_0dl_Kleki|690x200, 50%](upload://8Z7cJoamPD5uiGyRpwYgOg29ujL.png)

Strikethrough!

you can make these by using two tildes (~) on both sides of your text!
exampleTxt
exampleTxt
[6]
theres multiple ways of doings this, though markdown uses less characters

[s]exampleTxt[/s] bbcode; <s>exampleTxt</s> html; ~~exampleTxt~~ markdown

the rest of these will just be extra things you can make using markdown (and maybe bbcode or html)

More Formatting Options!

Superscript and Subscript!

[7]

Normal text for comparison<sup>exampleTxtSuper</sup>
Normal text for comparisonexampleTxtSuper

Normal text for comparison<sub>exampleTxtSub</sub>
Normal text for comparisonexampleTxtSub

Small Text!

jk apparently “< small >” but with no spaces is blocked

Big Text!

<big>exampleTxt</big>
exampleTxt

Marked Text!

<mark>exampleTxt</mark>
exampleTxt

Deleted Text!

<del>exampleTxt</del>
exampleTxt
[8]

Inserted Text!

<ins>exampleTxt</ins>
exampleTxt

Keys!

<kbd>exampleTxt</kbd>
exampleTxt

im pretty sure it would be flagged for being off-topic (i didnt copy paste this from the discourse forums either i just have it saved on a draft)

nvm it works what
did you use a symbol


  1. if it matters at all for you; i just copy & pasted this in since i dont have the energy to constantly retype this everytime somebody makes their first guide or has bad formatting ↩︎

  2. two slashes (//) make a comment in c sharp ↩︎

  3. ↩︎

  4. exampleTxt ↩︎


  5. ↩︎

  6. :.|:; ↩︎

  7. some of these might tell you “< aa >exampletxt< aa > is not allowed!” or smth like that dont ask me why that happens but idk how to fix it ↩︎

  8. fun fact: this is actually how i used to do strikethroughs :sweat_smile: ↩︎

5 Likes

@cheezesrcool hm. ty for that but in case you didnt make that urself u should credit, and also maybe its easier to include a link to that guide if its posted already? ty tho

1 Like

cheezesrcool is a knowledgable person that is probably capable of writing that, its probably just copy pasted or smtn.

I also doubt someone would steal something without crediting it.
(If someone did that their reputation would be ruined for eternity :sob:).

Also, wouldn’t a trigger be better? its more memory efficient and it can be activated on a player scope unlike the zone which would be good for things like escape rooms or puzzles that are mean to be played solo.

2 Likes

Could you add pictures? I’m a visual learner

1 Like

Very nice. Great first guide.

(remembers back to my first guide :D)

Organization is 10/10

I agree, Im the same lol.

2 Likes

please read posts above about the trigger. someone has already said that

okay… ppl can settle down lol. im getting pictures.

Please don’t bump topics within 5 days of the last bump. In addition, edit your posts instead of making multiple. If it’s the last post in a topic, then it bumps the topic no matter what.

I love the formatting of this guide!

Not sure the game-recreation tag is right for this one, but I don’t have any authority here[1], so do as you wish.

Maybe add trap though?


  1. anymore ↩︎

2 Likes

Gahh curse discourse’s silly new user link max (making me make a new reply :sob:)
Anyways:

@P4LMTR33S
If min3craft is a banned word just copy and paste this[1]:

Mine​craft

If only…

I use a different method lol
The power of ASCII
In between these brackets, there is a space that is impossible to see unless it’s in a text checker.

ㅤ>​<
Just highlight the brackets, paste it into a banned word, then delete the brackets

Banned word: Dum​b

Image:
image


  1. its alot easier to bypass the blocked word mechanism than it looks ↩︎

3 Likes