Wassup guys!
Today I am going to show you how to make Pokemon characters in Gimkit Creative!!!
(YAY!!!)
There are currently 8 Pokemon that you can capture in this region!
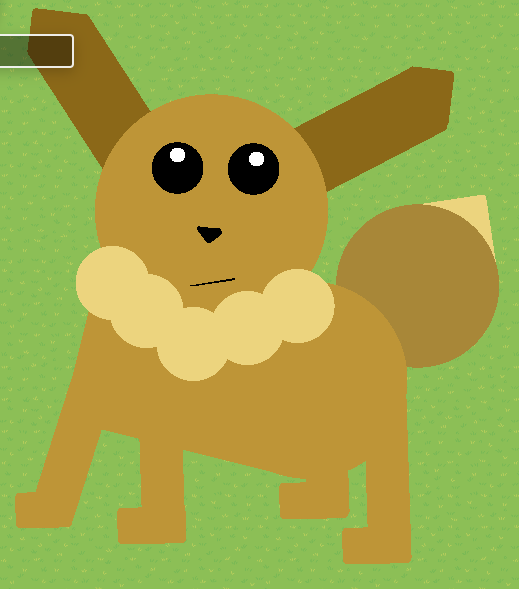
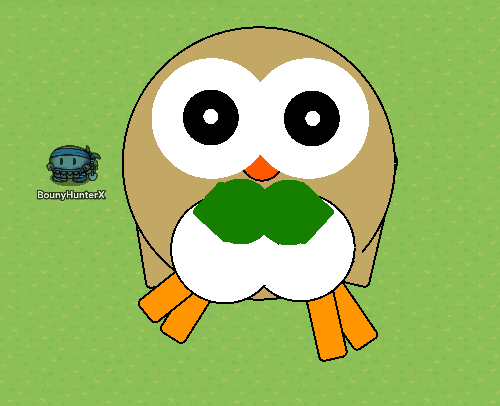
No. 0133: EEVEE
Difficulty: ![]()
Materials: 30 Barriers
Step I: Place a single circle barrier for the head. Make it scale your liking. The color code for mine is 190 145 55.
Step II: Place four rectangle barriers for the ears. Make it scale your liking. The color code for mine is 139 104 24.
Step III: Place two black circle barriers for the pupils. The code is 0 0 0. You might have to change the layer to make it visible.
Step IV: Place two smaller white circles for the iris. The code is 255 255 255. You might have to change the layer to make it visible.
Step V: This is probably the hardest part. Place a black square barrier. Make a barrier that will go over the black one to make the nose. Make the top one blend in with the head, and the bottom one goes under the camouflaged one to make a triangle.
Step VI: Make five cream-colored circles for the neck puff. The color code for mine is 236 212 126.
Step VII: Make a large rectangle for the body, and a circle for the backside of the body. The color code for mine is 190 149 55.
Step VIII: Make a darker circle for the tail. The color code for mine is 168 135 56.
Step IX: This is similar to step 5 (V). Make a cream color square barrier to make the tip of the tail. Mine is the same color as the neck puff, but yours can be different. Use layers to make the darker park of the tail be on top.
Step X: Place four vertical barriers that are the same color as the larger one for the legs. Make it look realistic!
Step XI: Place four more horizontal barriers for the feet. Again, make it look realistic.
Step XII: If you haven’t already, go to editing options and put the camera zoom on 0.5.
Step XIII: Be amazed (I hope) at how awesome your Eevee looks!!!
Note: No borders should show.
Achievement Unlocked: Ecstatic About Eevee
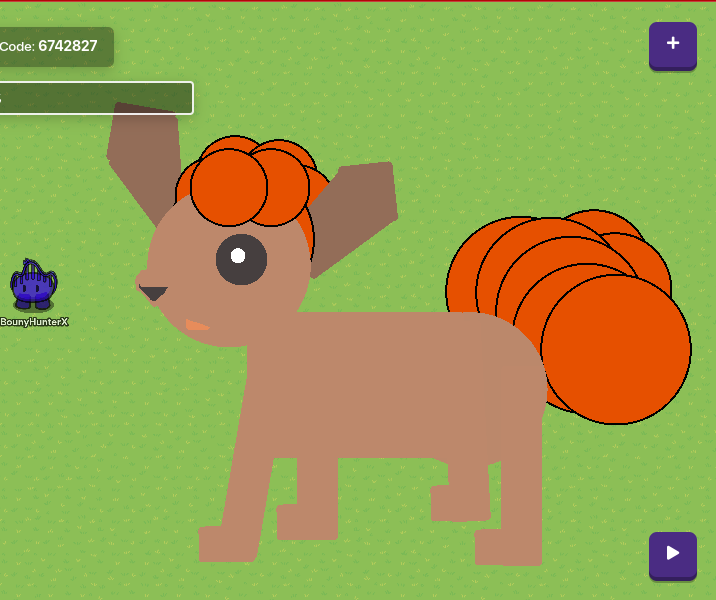
No. 0037: VULPIX
Difficulty: ![]()
Materials: 41 Barriers
Step I: Start with the head. Place a single circle barrier for the base head. Make it scale your liking. The color code for mine is 189 136 107.
Step II: Place a single black circle barrier, and a smaller one for the iris and pupil. The black one’s code is 0 0 0, and the white one’s code is 255 255 255.
Step III: Place three rectangle barriers for the right ear. Rotate them to make them look right. Make sure they are under the base head, or it’ll look weird. The color code for mine is 147 109 88.
Step IV: Place three more barriers for the left ear. Follow the same steps as Step 3 (III).
Step V: Place a black square barrier, and rotate it to look like a diamond. Like the Eevee (See step 5 (V) above), you need two barriers that will go over it, which means they’ll have to blend in. Make it look triangular, same as the Eevee. Do the same for the mouth. The color code for my mouth is 245 132 86.
Step VI: This is probably the hardest step on this one, because you have to get it just right. Place 7 red-orange circle barriers. This time, the border will be shown. Make 5 of them go under the ears and head, but the other 2 go on top. Keep moving them around until it fits your liking. The color code for mine is 230 80 0.
Step VII: Now for the body! Place 2 circle barriers, and a single rectangular barrier. They should all be the same color. The color code for mine is 189 136 107. Put one of the circle barriers below the head, but also touching it. Place the rectangle to the right of the head, and make it blend in and not have any wankey edges. Lastly, place the other circle barrier on the right end of the rectangle.
Step VIII: This is similar to step 5 (V). Copy a head puff circle from step 5 (V), and move it to the backside of the body. Make it a little bit bigger. Copy this one 4 more times. Then copy one of these, and make it smaller, but bigger than the head puff ones. Copy this one time.
Step IX: After you understand the preparation, step 8 (VIII), move all the barriers to make it look like Vulpix’s tail. If you need an image, tap the link listed below.
Step X: The legs and feet are pretty easy if you know what you’re doing. Place 8 rectangle barriers. The color code for mine is 189 130 107. Make the legs look realistic, same as the Eevee. Also, please make the feet look even vaguely even! One foot should not look like they have a serious mutation, just saying…
Step XI: Be amazed (I hope, if you’re more artistic than me) at how fabulous your pet Vulpix looks!!!
Step Unlisted: Player [Insert Name Here] captured a Wild Shiny Vulpix by using a Gim Ball!
Achievement Unlocked: Valorous Vulpix
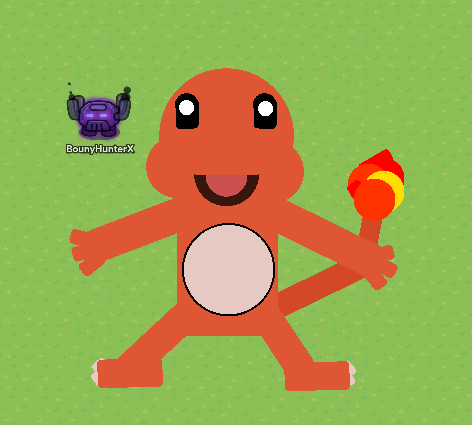
No. 0004: CHARMANDER
Difficulty: ![]()
Materials: 38 Barriers
Step I: Like the Eevee and the Vulpix, place a circle barrier for the head. This one will be front-view (Like the Eevee), not side view (Like the Vulpix). The color code for mine is 223 86 52.
Step II: Place two more circle barriers for the cheeks. Make them look like those Agar.io tanks. If you don’t know what I’m talking about, just look at the picture.
Step III: Place another circle barrier for the outer mouth. The color code for mine is 0 0 0. Make the transparency 0.75.
Step IV: Place a pink circle barrier for the inner mouth. make this one smaller than the outer, and make it go on top using layers. The color code for mine is 251 101 101.
Step V: Place a rectangle barrier. Make it the same color as the head. Then make it just big enough to go over the inner and outer mouth to make it look real.
Step VI: Place 2 black circle barriers, and 2 black rectangle barriers. Put the two circles on the top, and the two rectangles below the two circles to make the fingernail-looking eyes. The color code for mine is 0 0 0.
Step VII: Place two white circle barriers. Make them tiny for the irises. The color code for mine is 255 255 255.
Step VIII: Place a rectangle barrier for the body. Make it the same color as the head (Mine is 223 86 52). Make it big to the extent that it makes him not to skinny, tall, big, or short, but just right.
Step IX: Place 4 rectangle barriers for the left arm. Make one long and skinny, and the other small and skinny. They should be the same color as the head and body. Move them around and rotate them to make them look like fingers coming off the arm. Repeat this step for the right arm.
Step X: Place a cream-colored barrier for the belly. Make the border show. Put it right in the middle of the body. The color code for mine is 229 201 194.
Step XI: Place two rectangle barriers for the bent left leg and foot. They should be the same color as the head, body, and arm. Rotate and move the bigger one to make the leg, and the other one horizontal making the foot. Repeat this step for the right leg.
Step XII: Place two white rectangle barriers for the toes. Make them go under the foot using layers. The color code for mine is 229 201 194. Repeat this step for the right-side toes.
Step XIII: The hardest part in my opinion! To make the tail, you need 4 rectangle barriers, and 4 circle barriers. We’ll start with two of the rectangle barriers. Make them both one color similar to the rest, but a little darker. The color code for mine is 211 73 39. Make the first one long and wide. Put it touching the body, and under the right arm using layers. Make the second one shorter and less wide, and make it go under the right arm and almost vertical.
Step XIV: Place the four circle barriers. Put two of them aside. Make the first two orange in color. The code for mine is 255 51 0. Place one of these two over the end of the tail, and the other slightly up and to the left of the other one. Now for one of the other two. Make it yellow in color. The code for mine is 255 221 0. Place this one above the upper one, but below the first orange one using layers. For the last circle barrier, make it red in color. The code for mine is 255 0 0. Place this one below everything to the right and above the rest, using layers.
Step XV: Copy the red circle. Make it a rectangle. Shape it to a square, and rotate in to make it fit under all the tail fire barriers, like shown in the picture. Copy this result, and make it smaller and more rectangular. Put this one above everything except the top orange circle barrier.
Step XVI: Be astounded by how marvelous your pet Charmander looks!!!
Achievement Unlocked: Captivating Charmander
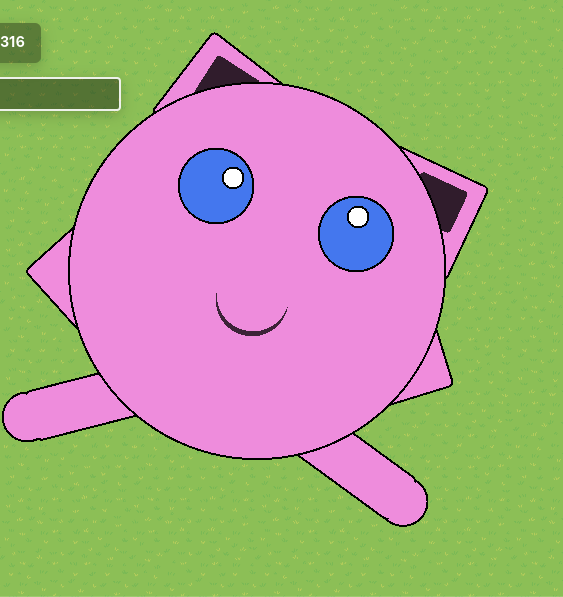
No. 0039: JIGGLYPUFF
Difficulty: ![]()
Materials: 19 Barriers
Step I: Place a circle barrier for the body/head. Make it to scale your likings and space you have. The color code for mine is 238 140 220. Make the barrier show.
Step II: Place two circle barriers, and make them light blue, for the pupils. Place them where you’d like their eyes to go. The color code for mine is 68 119 238. Make the border show.
Step III: Place two white circle barriers for the irises. Place them on the pupils, and make sure they do NOT look cross-eyed, because that’s wrong. Make the border show. The color code for mine is 255 255 255.
Step IV: Now for the ears! Place two rectangle barriers for the outer ear. Make them go under the base using layers. Make the border show, and they should be the same color as the base.
Step V: Place two more rectangle barriers, and make them black. The color code is 0 0 0. Set the transparency to 0.75. Make them go above the outer ear, but under the base using layers. The border does not have to show.
Step VI: To make the mouth, you need two circle barriers. Make one blend in with the base, and the other black. Put the black one towards the bottom of the base, and put the pink one slightly above it. Make the pink one go above it using layers. The borders on these two should not show.
Step VII: For the two little T-Rex arms, place two rectangle barriers. I would copy one of the outer ears, but that’s just me. Place them under the body using layers. Make the border show.
Step VIII: Last but not least, the feet. You need four rectangle barriers, and two circle barriers. Put two of the rectangles aside. The other two should be the same color as the base, and make the border show on both. Make them skinny and tall. Rotate and move it to the bottom of the base, and make it look like feet.
Step IX: Place the two circle barriers. They should be the same color as the base, like the main foot. Make them go below the main foot, using layers. Make the border show, even though it looks weird. I’ll cover that in the next step. Move them to the end of the main foot that is not touching the base.
Step X: Size one of the two rectangle barriers I told you to put aside in step 8 (VIII) to make it cover the rectangle line that is showing, but looks wankey. It should be the one cutting the circle for the toes in half. Make it go on top of everything. Move it to where it covers the line, but doesn’t mess up anything else. Repeat this step for the other one.
Step XI: Be astonished at how excellent your pet Jigglypuff looks (although it is pretty bad in Super Smash Bros Ultimate)!!!
Achievement Unlocked: Joy in Jigglypuff
No. 0722: ROWLET
Difficulty: ![]()
Materials: 24 Barriers
Step I: Place a big brown circle barrier for the base. Make it scale your likings, and area. The barrier should show. The color code for mine is 195 167 101.
Step II: Place two white circle barriers for the outer eye. Make them go above the base using layers. The border should not show. The color code for mine is 255 255 255.
Step III: Place two more white circle barriers for the frontal feathers. Place them towards the bottom and overlapping like bu++ocks. Make them go above the base like the outer eye using layers. The border should show on both. The color code for mine is 255 255 255.
Step IV: Place a single white circle barrier. Make it go above everything using layers. The border should not show. Move it to the middle of the two non-eyes white circles to block out the line that’s showing.
Step V: Back to the eyes! Place two black white circle barriers for the inner eyes. Make them go above everything else using layers. Size them to be a little smaller than the outer eyes. The border should not show. The color code for mine is 0 0 0.
Step VI: Place two white circle barriers for the irises. Size them to the smallest it will let you. Move them into the middle of the inner eyes (the black portion). Make it go above everything using layers. The color code is 255 255 255.
Step VII: Now for the tucked-in wings. Place two brown rectangle
barriers. Put one aside. Make it long and skinny. Make it go under everything using layers. The border should show. Move them under the base, but make sure it’s not sticking out. The color code for mine is 195 167 101. Repeat for the other side.
Step VIII: For the feet, you need four orange rectangle barriers. Make them long and skinny like the wings. Make them go under everything using layers. The border should show on both. Move and rotate them to make them look like taloned feet. The color code for mine is 255 149 0.
Step IX: To make the nose, place a single circle barrier. Make it go under the eyes, but not the base. Make the border show. It should be a bit darker in color than the feet. The color code for mine is 255 89 0.
Step X: Last but not least, the green bowtie-looking feathers. Place two circle barriers, and two rectangle barriers. Place one of each aside. Start with the circle. Make it go above everything using layers. The border should not show. Move it to the middle-right of the left circle of feathers. The color code for mine is 21 128 0. Make the rectangle go over it and make the left end pointy. Rotate it to fit. Repeat vise versa for the other side.
Step XI: Be befuddled by how superb your pet Rowlet looks!!!
Achievement Unlocked: Rapturous Rowlett
No. 0050: DIGLETT
Difficulty: ![]()
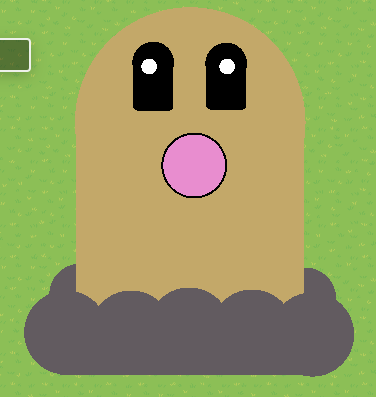
Materials: 17 Barriers
Step I: Place a circle barrier for the head. Make it decently big, or whatever size you’d like. Make it light brown. The border should not show. The color code for mine is 195 168 105.
Step II: Place a rectangle barrier for the body. Make it the same width and length as the diameter of the circle head. The border should not show. Make it the same color as the head.
Step III: Place a circle barrier for the nose. Make it pretty small, to look like the reference picture. The border should show. Make it go over the head and body using layers. The color code for mine is 232 141 207.
Step IV: Place two circle and two rectangle barriers for the eyes. Make all of them go over everything currently placed. Put one of each shape aside. Move the circle over towards the top of the head, and move the rectangle one touching the circle one to make it look like Diglett’s eyes. The border should not show. Repeat for the other side. The color code for mine is 0 0 0.
Step V: Place two circle barriers for the irises. Make them as small as possible. Make them go over everything using layers. Move them to the pupils. Make sure he’s not cross-eyed, because that’s wankey. The color code for mine is 255 255 255.
Step VI: Now for the earth around Diglett! Place two circle barriers to start. Make them go under everything using layers. The border should not show. Move them to go under and a little upwards from the bottom of his body. The color code for mine is 98 91 96.
Step VII: Place 5 more circle barriers for the front earth. Make them go above everything. Place the to make the earth a little more realistic! The border should not show. The color code for mine is 98 91 96.
Step VIII: Place a single rectangle barrier to flatten out the bottom of the earth. Make it the same color as the other earth barriers. Size it to make the bottom of the earth even. The border should not show.
Step IX: Be shocked at how splendid you pet Diglett looks!!!
Achievement Unlocked: Dauntless Diglett
No. 0172: PICHU
Difficulty: ![]()
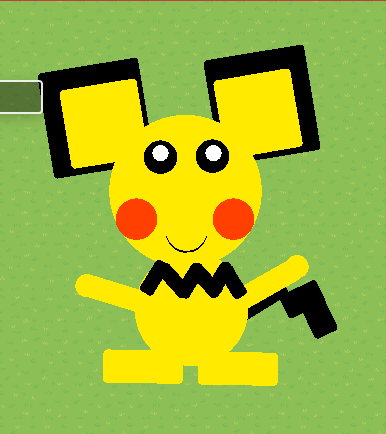
Materials: 29 Barriers
Step I: Place a single circle barrier for the head. Size it to your liking, and space. Make it yellow. The color code for mine is 255 234 0.
Step II: Place two circle barriers for the rosy cheeks. Make them go almost out of the face, but not actually, just really close. Make them rosy. The color code for mine is 255 64 0.
Step III: Place two circle barriers for the irises. Make them black. They should be a little smaller
than the cheeks. Make them go where the eyes should go. The color code for mine is 0 0 0.
Step IV: Place two more circle barriers for the pupils. Make them as small as possible. Make them go over the irises using layers. Move them and make sure that Pichu is NOT cross-eyed. The color code for mine is 255 255 255.
Step V: Place two circle barriers down for the smile. Make one the same yellow (255 234 0), and one black (0 0 0). Make them both go over the head using layers. Also make the yellow one go over the black one using layers. Move the very bottom of the black one where you want the smile, and put the yellow one a little above it to make the smile.
Step VI: Now for the ears! Place two rectangle barriers. Make them a little smaller than the default size. Rotate them almost to a perfect diamond shape. Move them over to the top of the head to make the inner ear. The color code for mine is 255 234 0.
Step VII: Place two more rectangle barriers. This time, though, make them a little bigger than the default size. Rotate them to the same angle as the inner ears. Make them go under the inner ears using layers. Move them to leave a little bit of black space around the ear spaces that are not attached to the head. The color code for mine is 0 0 0.
Step VIII: Place a single circle barrier for the body. Size it to your liking, but preferably smaller or the same size as the head. Move it to go below the head. The color code for mine is 255 234 0.
Step IX: Place 2 rectangle barriers for the black neck design. Make them all black (0 0 0). Start with one of them. Make it skinny and not long. Rotate it to make it fit. See the Result for more reference. Move it to go along the curve of the left side of the body. For the second one, do the same things, but rotate it to make it face the opposite direction. Copy the first and second barriers each twice. Move them to look like the Result (I don’t know how else to explain it).
Step X: For the feet, place two rectangle barriers. Make them the same yellow as the rest (255 234 0). Make them lay flat, or just don’t rotate it at all from the default. Make it long, and half as tall as it is long. Move them to the bottom to make the feet. Make sure they’re not touching.
Step XI: For the tail, you need three rectangle barriers. Make them black (0 0 0). We’ll do one at a time. For the first one, make it skinny and decently long. Make this one go under everything using layers. One the other two, it won’t matter. Rotate it to the same angle as the first neck design barrier. Make it go behind the right side of the body, to look like a tail, but a little shorter than most would expect. For the second one, make it wider and shorter. Rotate it to the same angle as the first barrier in this step. Make it just barely touch the first tail piece. For the third one, copy the second one in this step. Make it a little longer, but the same width. Rotate it to make it look right. Move it to overlap the second one, but not stick out.
Step XII: Place two rectangle and two circle barriers for the arms. Make the two rectangles pretty long and pretty skinny. Rotate one to point to the top left, and the other one to the top right. Move them to their designated place. Make the circle barriers the same diameter as the rectangle’s width. Move them to the ends of the rectangles to make the hands. They should be the same yellow as the rest.
Step XIII: Be bewildered at how gorgeous your pet Pichu looks!!!
Note: No borders should show.
Achievement Unlocked: Passionate Pichu
No. 0960: WIGLETT
Difficulty: ![]()
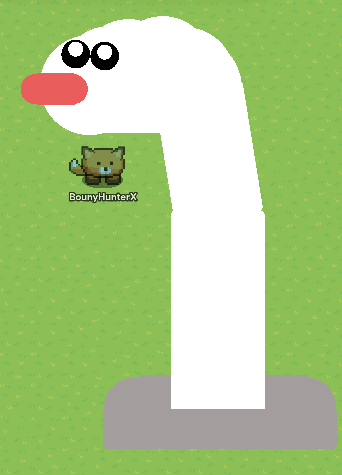
Materials: 21 Barriers
Step I: Place a single white barrier for the head. Place it where you want it. The color code for mine is 255 255 255.
Step II: Place two circle barriers and one rectangle barrier. Place the rectangle barrier aside. Make the two circle barriers the same size, and like a fifth the size of the head. Make them go over the head using layers. Move one to barely be touching the left side of the head, and the other to about the middle of the head. Place the rectangle to the middle of the two circles, and make it the same tallness, and make it blend in with the circles to make the nose. They should all be the same color. The color code for mine is 234 93 93.
Step III: Place two circle barriers for the irises. Make them a tiny bit smaller than the nose’s circle barriers. Place them towards the top of the head. Make sure it is in just the right spot, because it took me forever to get it right on mine. Make them go over everything using layers. The color code for mine is 0 0 0.
Step IV: Place two more circle barriers for the pupils. Make them the smallest it will let you. Move them towards the top of the irises, but leave a little space. Make them go over everything using layers. The color code for mine is 255 255 255.
Step V: Place four more circle barriers. Make them go under everything using barriers. They should be the same size as the head. Move them to make the curve of Wiglett’s body. The color code for mine is 255 255 255.
Step VI: Place two rectangle barriers. Put one aside. Make the first one the same width as the diameter of the curve circle, and 1.5 times the diameter tall. The layer on these does not matter. Rotate and move it to make the straight curve part of its body. For the second one, make it the same width as the first, but make it twice as tall. It should go straight up and down (no rotating). The color code for mine is 255 255 255.
Step VII: Last but not least, it’s hole. You need 3 rectangle barriers for this step. Make them go under everything using layers. Start with one. Make it really short and super wide. Place I fully below the second rectangle body piece, with a little space in between. The second one should be the same shortness, but less wide. Move it to barely touch the first one from above. Make sure it is symmetrical with the first one. Look up the definition if you don’t know what it means. For the third and last one, make it the same shortness as the other two, but again, make it less wide. Move it in the same way as you did the second to the first. The color code for mine is 164 157 157.
Step VIII: Place two circle barriers to finish the hole. Make them a little bigger than the irises of the eyes. The layer does not matter on these two. Move one to the left side covering up the two corners hanging out, and the other one to the right side doing the same thing. The color code for mine is 164 157 157.
Step IX: Be amazed at how beautiful your pet Wiglett looks!!!
Note: No borders should show.
Achievement Unlocked: Welcoming Wiglett
Resources (The first image listed is the one I used):
Eevee
Vulpix
Charmander
Jigglypuff
Rowlet
Diglett
Pichu
Wiglett
Scale
Check your mastery level on this scale:
0/8 Pokemon - Newbie (My Advice: Make a Pokemon!)
1/8 Pokemon - Beginner (My Advice: Make another Pokemon!)
2/8 Pokemon - Novice (My Advice: Pick another to make!)
3/8 Pokemon - Rookie (My Advice: Keep making Pokemon!)
4/8 Pokemon - Expert (My Advice: You’re halfway to being a Pokemon Legend!)
5/8 Pokemon - Ace (My Advice: C’mon! Do a harder one!)
6/8 Pokemon - Champion (My Advice: Just two more to go! Great work!)
7/8 Pokemon - Master (My Advice: Complete the last one!)
8/8 Pokemon - Legend (My Advice: WOWY! You completed all of my Pokemon! Go to Part 2 and continue there!)
Credits
A big thanks to @Kosm0-o for the achievements mechanic.
Another big thanks to @morphues for the encouragement to keep me going!
See Part 2: