Yea, im wondering if this is a dupe, and it’s pretty simple if anyone does a bit of tinkering around. Also no images, also don’t you already have an account called @X-Zero? Alts aren’t allowed on the forums.
Added no-pictures
Yea, im wondering if this is a dupe, and it’s pretty simple if anyone does a bit of tinkering around. Also no images, also don’t you already have an account called @X-Zero? Alts aren’t allowed on the forums.
Added no-pictures
here’s similar guides with images/gifs, making this a duplicate. I wont remove this guide if it has some uniqueness to it, but I may have to.
![]() this one needs the images fixed
this one needs the images fixed
Nice guide. But I will say, this does fall flat in the eye of one thing: BLOCKS.
They basically can trigger from a channel (a wireless wire, basically), and with some code, they can change the text content and color. The only downside is that a block takes up 500 memory.
Memory efficiency: your route
Simplicity: use channels and blocks
And this is unfortunately a dupe guide, and your account is an alt. The forums aren’t open to people using alt, for obvious reasons.
I mean.. its technically not a dupe since it is more memory efficient
bumpity brump bromp brop
bump
reusable for a good guide even with no-pictures
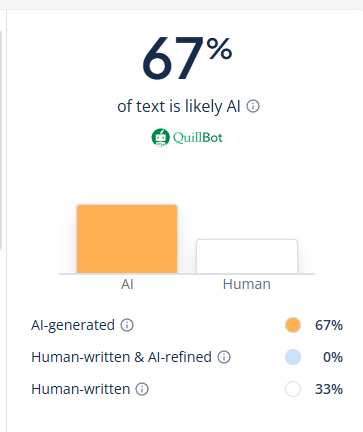
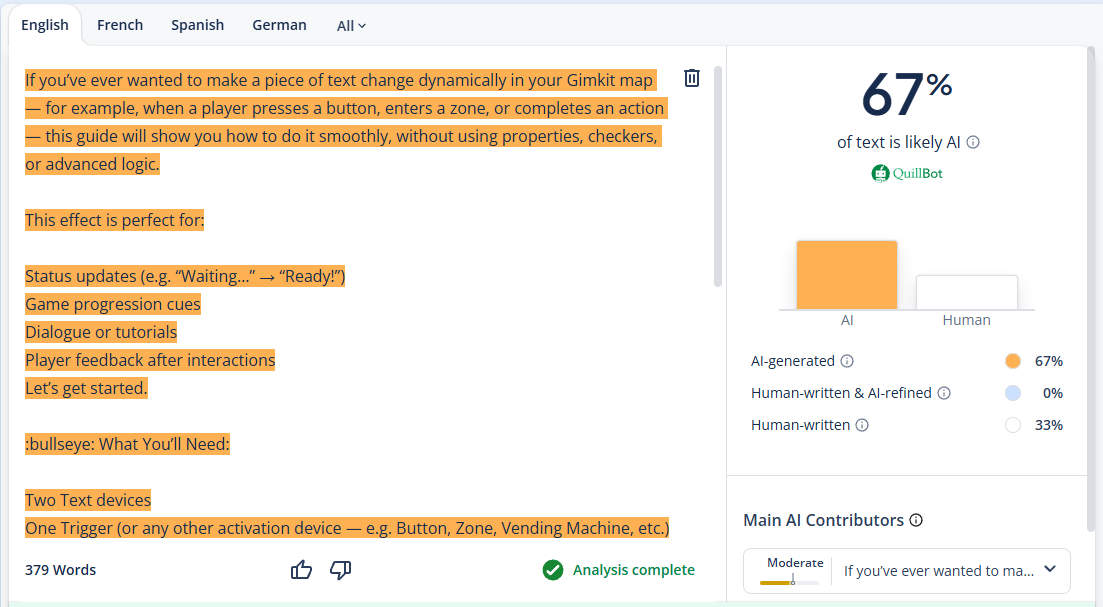
I am wondering if this is AI generated, other wise, pretty cool guide.
You nullified the reusable ![]()
Anyways, not AI.
Lots of users have a complicated guide style with a really nice layout, nothing unusual.
@Thebananman
(Sorry, you’re the only regular I could think of)
Can you make another reusable bump?
Edit:
Looking over the guide, it looks like some Grammarly or something similar might’ve been used.
I pinged a reg
I mean it’s really helpful and it could be half Ai helping out.
But who knows they can just be smart or really good at this stuff in general like Bakedpotato said.
Edit your posts to save clutter in the forums @Micheal
Annyways, can someone make a reusable bump?
I got its Made of 25 % AI
I can try, but IDK how.
Make a checkbox in your post (a new one, since it has to be the latest reply to work), then click the three dots and use the wiki button.
that’s the checkbox, now wiki it.
yeah, that’s it!
congrats, you did a regular thing
I’ma edit it rq to make it look nice lol
i think the populace have decided that the guid eisn’t worthy of one lol
for future reference, just add a checkbox into one of your posts and wiki-fy it (in the three dots.) It only works when it’s the latest reply though
also who the what is builderman
REUSABLE BUMP
not to hate, but this guide looks as-if it’s ai-generated content.
and saying “downloadable template” surely makes it seem as-if
also, for these types of guides- it’s highly recommended for images to be present so users can have a better understanding of what they’re making.
not trying to self-advertise, but this is kind of an example:
the guide is a little less explained (I got lazy there)
but it does show pictures of what it’s supposed to look like and how other users would take on this.
so uh
#supportHUMANcreativity
ig
Please don’t nullify reusable bumps ![]()
(/j)