I wasn’t really sure what to name this so if you have a better one then hit me[1]. AND YES, I’M STILL WORKING ON MY UNDERTALE GUIDE. This is and improved version of the text system in that guide. However, I liked this idea so much that I felt it should get it’s own glory as well.
What is this is you decide on some dialogue and then it will be distributed on 3 different lines. Then it will use a typing effect to right it out. Ready? Here we go. [2]
Devices
- 1x Barrier
- 9x Property
- 3x Text
- 6x Trigger
Steps
[details = Step 1: The Basics]
-
Create a Barrier with it’s collision set to
off, it’s color set towhite, and it’s alpha set to0.01. It should look something like this:
-
Now we add a Text. You can set the settings to whatever works for you! Make sure to make the Text
-for now though. Add it right here:
-
Now did you know that W is the widest letter? Using W as a measurement I figured out that in this box I can fit 40 characters[3]. Remember this number for later!
-
Now copy and paste that text two times like so:
-
Finally we are going to add a Property. Set property name to
Base Dialogue. When property changes, transmit ondialogueCheck!
[/details]


[details = Step 2: Splitting Up Dialogue]
-
Have a trigger that has it’s trigger by player collision and visible in-game to
No. Have it trigger when receiving ondialogueCheck -
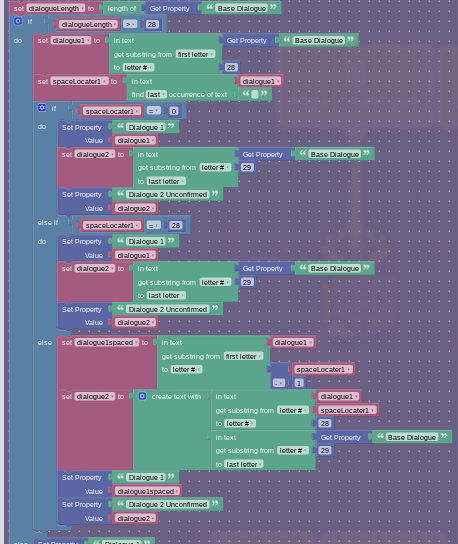
Now on that trigger add this: This is going to be a LOT of blockcode but, I’ll do my best to explain it.
I’m gonna be so fr when this work I nearly cried out of happiness.
If you pull this image up in a seperate tab it’s less grainy
a. We set a variable,dialogueLengthto the length of our “Base Dialogue”
b. We run an if statement. If our “dialogueLength” > 40[4] then:
b1. We set a variable called “dialogue1” to a substring from the text “Base Dialogue” The string will be from the first letter to the 40th letter
b2. Then we set a variable “spaceLocater1” that is the last occurence of " "[5] in “dialogue1”. If there is no space it will set the variable to 0.
b3. Now we have another if statement. If “spaceLocater1” = 0[6], then:
b3a. It will set property “Dialogue 1” to variable “dialogue1”.
b3b. It will set variable “dialogue2” to a substring from text “Base Dialogue”, from letter # 41 to the last letter.
b4. Else if “spaceLocater1” = 40[7] then:
b4a. It will set property “Dialogue 1” to variable “dialogue1”.
b4b. It will set variable “dialogue2” to a substring from text “Base Dialogue”, from letter # 41 to the last letter.
b5. Else:
b5a. It will set variable “dialogue1spaced” to a substring from text “dialogue”, from first letter to [“spaceLocater” - 1]. This means that instead of cutting off the word, it will instead cut it off at the space.
b5b. It will set variable “dialogue2” to creating text with [substring from “dialogue1”, from letter # “spaceLocater” to letter # 40] + [substring from “Base Dialogue”, from letter # 41 to last letter]. This will add-on the the cut-off word we took off onto the second dialogue.
b5c. We set property “Dialogue 1” to “dialogue1spaced”.
b5d. We set property “Dialogue 2” to “dialogue 2”
c. Else[8]:
c1. We are going to set property “Dialogue 1” to get property “Base Dialogue” -
Now we are going to add a Property. Set property name to
Dialogue 1. When property changes, transmit onsetDialogue1! -
Next we are going to add a Property. Set property name to
Dialogue 2 Unconfirmed. When property changes, transmit oncheckDialogue2! -
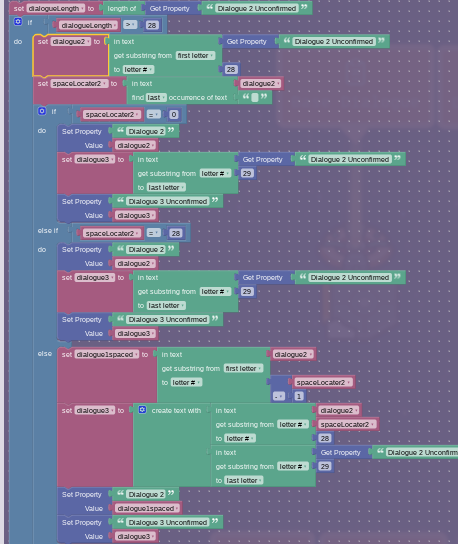
Now we need to copy and paste that trigger from a couple #s ago and have it trigger when receiving on
checkDialogue2. -
Make the following changes to the blockcode:
-
Now we are going to add a Property. Set property name to
Dialogue 2. -
Add Property. Set property name to
Dialogue 3 Unconfirmed.
[/details]
[details = Step 3: The Animation] -
Create a Property with its property name set to
Loop. Its property type should beNumberand its default should be1. -
Create a Property with its property name set to
d1Typing. Its property type should beTextand it when property updates broadcast on…text1 -
Create a Property with its property name set to
d2Typing. Its property type should beTextand it when property updates broadcast on…text2 -
Create a Property with its property name set to
d3Typing. Its property type should beTextand it when property updates broadcast on…text3 -
Create a Trigger that has its trigger by player collision and visible in-game set to
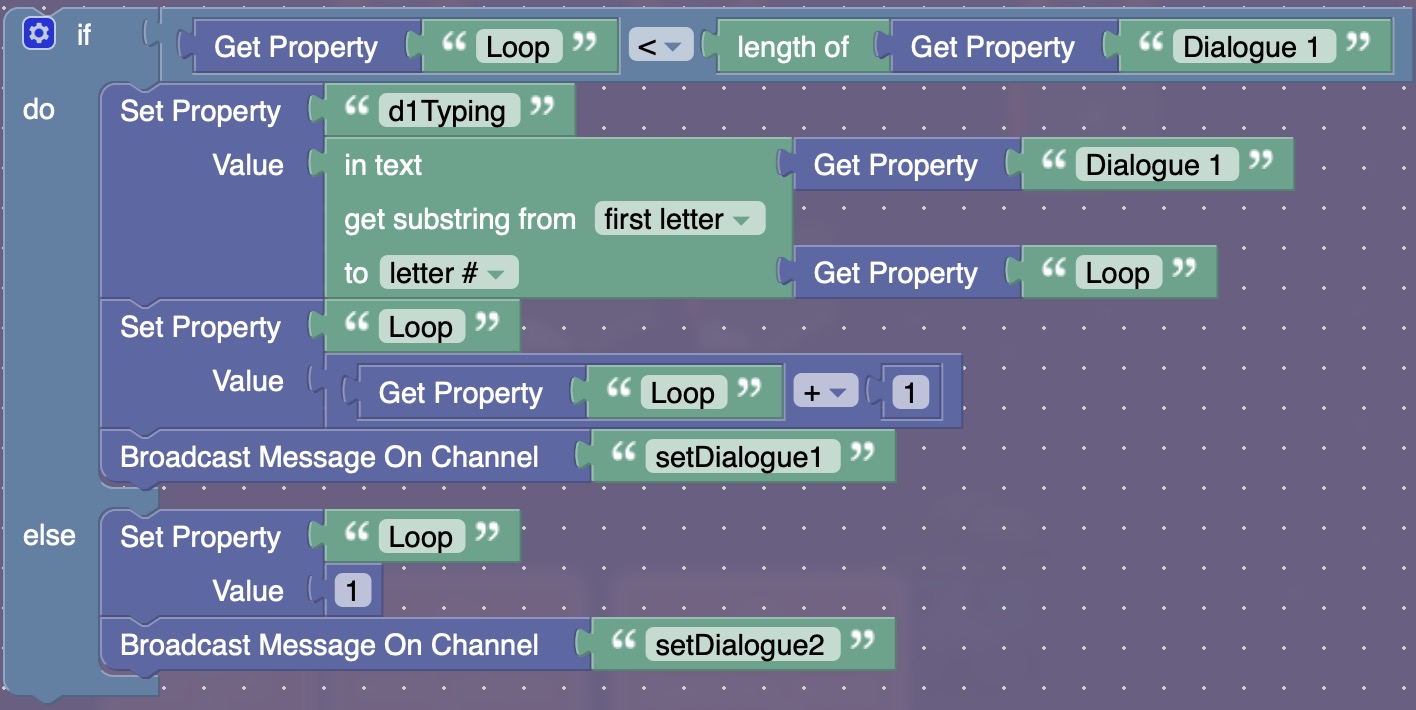
No. It should trigger when receiving on…setDialogue1and have a trigger delay of0.1. Have the trigger run this blockcode:
Once again I’m going to do my best to explain this blockcode…
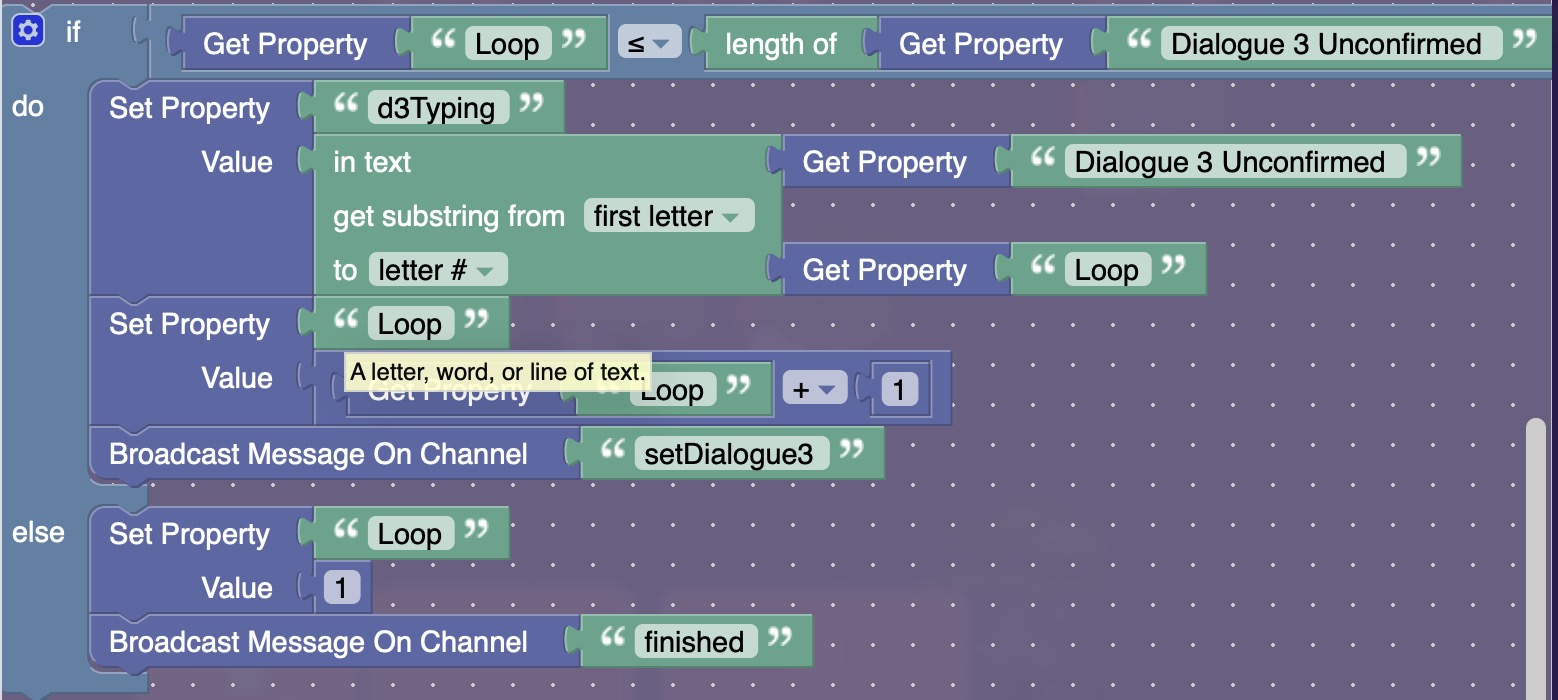
This is called a “For Loop”
a. First it checks to see if our property “Loop” is less than “Dialogue 1”. We don’t want it to be bigger than “Dialogue 1” or it will screw with the animation.
a1. Next it sets our property, “d1Typing” to a substring of “Dialogue 1” from the first letter to “Loop”. So if our text phrase wasHello!, the first time it loops it would beH, thenHe, theHel, etc.
a2. Next, we increase our Loop property by 1 when it loops, it will draw the correct substring.
a3. Now we broadcast on that channel so that way our For Loop, loops :0
b. Else:
b1. It will reset our “Loop” property so the next time it loops it loops correctly
b2. Finally, it broadcasts on that channel to animate the next line of dialogue. -
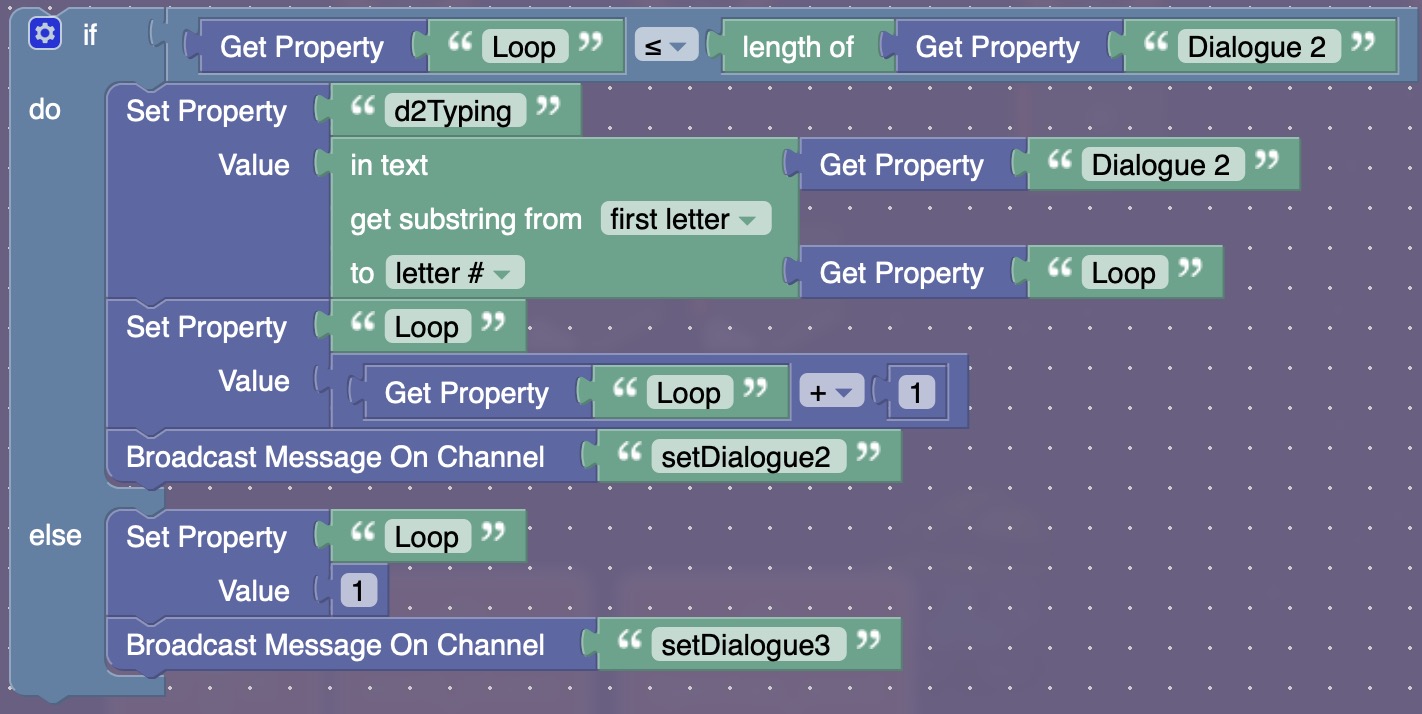
Create a Trigger that has its trigger by player collision and visible in-game set to
No. It should trigger when receiving on…setDialogue2and have a trigger delay of0.1. Have the trigger run this blockcode:
-
Create a Trigger that has its trigger by player collision and visible in-game set to
No. It should trigger when receiving on…setDialogue3and have a trigger delay of0.1. Have the trigger run this blockcode:
-
Now you remember that text we made forever ago? Go into the first on and add this blockcode when receiving on…
text1

-
In the second bit of text add this blockcode when receiving on..
text2:

-
Finally, in the third bit of text add this blockcode when receiving on
text3:

[/details]
[details = Step 4: Ending & Resetting the Text]
We are in the home stretch!
- Create a Trigger that has its trigger by player collision and visible in-game set to
No. It should trigger when receiving on…finishedand have a trigger delay of5. Have the trigger run this blockcode:
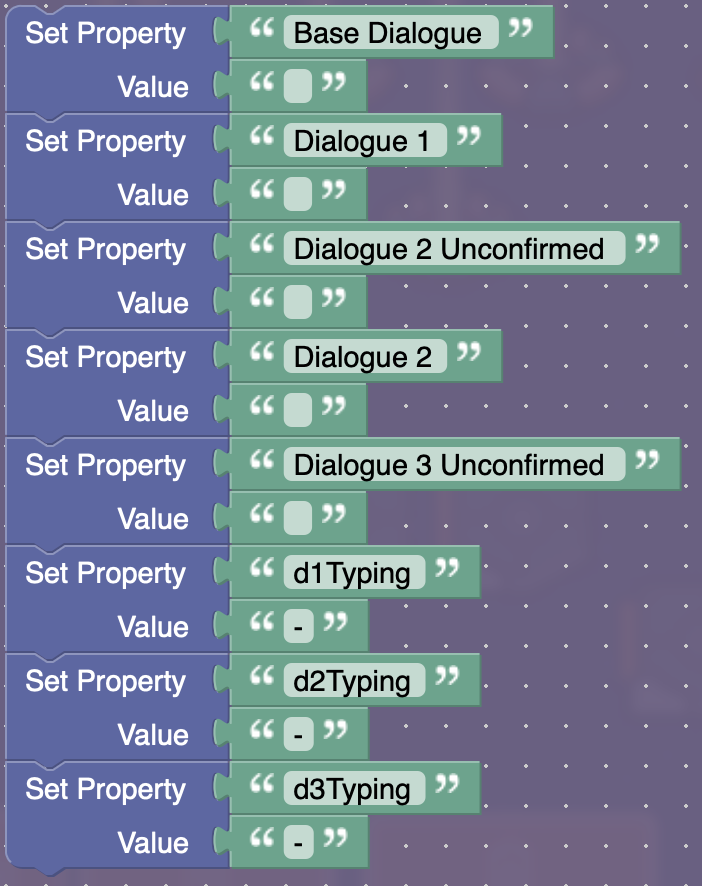
In our final block of code, it resets everything so it is prepared for the next time you want to set some dialogue up!
[/details]
Polls
- 1
- 2
- 3
- 4
- 5
- 6
- 7
- 8
- 9
- 10
- 11
Outro
I hope that you enjoyed this guide! Credits to myself[9] and @VALUEX [10]! Now back to working on Undertale…
Don’t really hit me ↩︎
*You feel like your going to have a bad time. (Megalovania starts playing) ↩︎
Note: The amount you can fit depends on the size of the box and the font and even the font size :O! Make sure to measure yourself!!! ↩︎
Remember this is the biggest that the text should be? ↩︎
That’s a space ↩︎
That means there is no space ↩︎
The last character in the string ↩︎
So if the dialogue isn’t long enough to be split across multiple lines ↩︎
Duh ↩︎
Becuase he made an OG text animations guide ↩︎
