Countdown Timer (Redux)

Continuing the discussion from Countdown Timer (3/10):

:memo: This guide uses repeaters, which consume a large amount of memory, but are friendly to beginners. If you would like to use the trigger, you can do so by altering the components to take advantage of triggers instead.

This is an improved version of an old guide I made back in 2023. It will show you how to make a Countdown Timer in Gimkit Creative. Uses less memory, but functionally the same (+ an extra feature)

Why I made this

After looking back from my old guide, I realized you donā€™t need to use the checker at all to make a timer like this. I also found a comment from a while ago.

Ingredients

With no reset button

1x Button
1x Repeater
1x Counter
2x Wire

With a reset button (reset on timer end)

2x Button
1x Repeater
1x Counter
2x Wire

With a reset button (no reset on timer end)

2x Button
1x Repeater
1x Counter
3x Wire

Section A

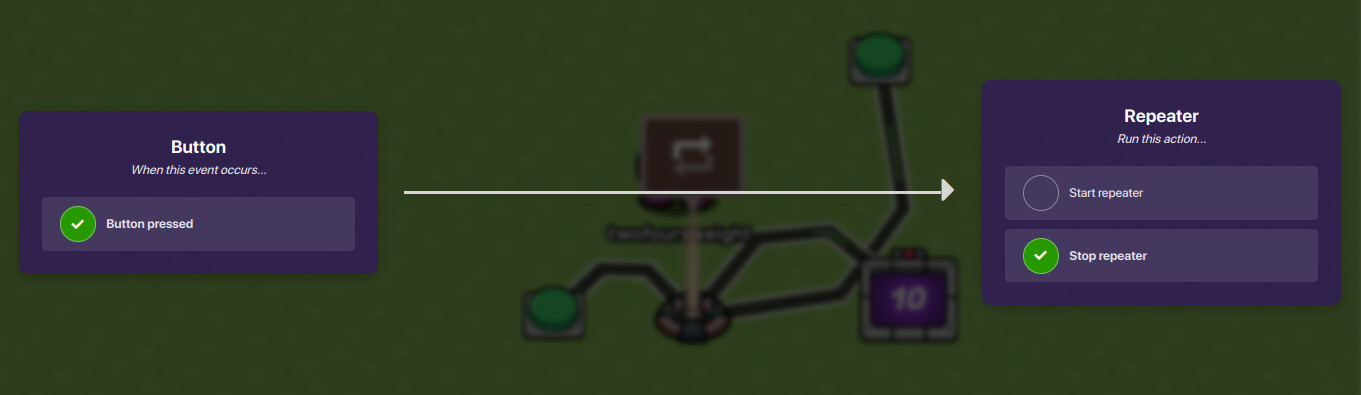
activates the repeater

  1. Place down your button and repeater.
  2. Set your button to these settings:
Interaction Duration: Instant
  1. Add a wire, set these settings:
  2. Set your repeater to these settings:
Task Interval: 1.0
Stop Strategy: Channel

If you would like to reset the timer after it is done counting:

Stop Repeater On: [reset]

Otherwise, donā€™t put a channel for this if you donā€™t want the timer to reset.

Section B

The timer portion

  1. Place down your counter.
  2. Wire the repeater to the counter with these settings:
  3. Set the amount of seconds you want your countdown to be:
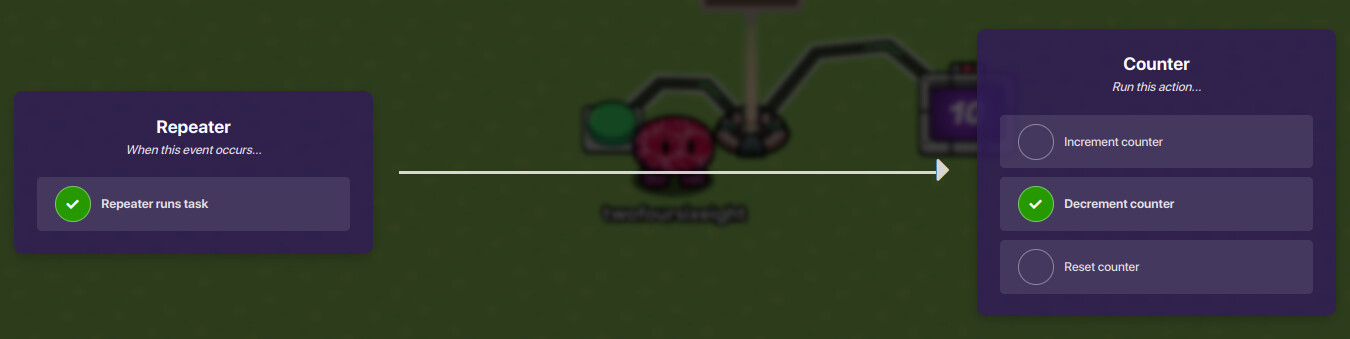
FEATURED
Starting Value: [The number you want]
  1. Program the clock to stop (counter settings).
TARGET
Use Target Value: Yes
Target Value: 0 # Value must be 0
Target reached when receiving on: [reset]

If you would like to reset the timer back to said number, do this:

CHANNELS
Reset counter when receiving on: [reset]

Otherwise, leave it be.

Additional Feature

You can also make another button to reset the timer at will.
Material: one button

  1. Donā€™t wire the button to anything. Settings:
When button is pressed, transmit on [Reset]
Interaction Duration: Instant
Variant without resetting the counter on time expiration but do want to reset by button

For those that donā€™t wish to reset the counter on time expiration, you will want to make a new channel called [reset2].

When button is pressed, transmit on [Reset2]
Interaction Duration: Instant

Afterwards, go back to the counter and set this:

CHANNELS
Reset counter when receiving on: [reset2]

You will need an additional wire.
Wire the button to the repeater.
Then: Do this:


Afterwards, the timer is done.

You should be done from there.

2 Likes

Couple of tips, try not to make guides on things people have made already,

And donā€™t use repeaters.

With that said, I will say that this is a nice guide with a lot of effort put into it, and once you do find an idea that hasnā€™t been made already, it would probably be really good!

1 Like

SPEED READ Iā€™m speed reading thisā€¦I totally read thisā€¦yes I didā€¦ you canā€™t prove that I didnā€™t

Great guide and organizing everything! I love the GUI effort into this!

1 Like

This was a redo on an outdated version of a guide I made back in October 2023 that had an unnecessary checker in it for some reason (and added a reset button) Countdown Timer (outdated)

1 Like

Yep I saw that and I think itā€™s ok to make improvements like that. You didnā€™t really do anything too wrong, but I still think if youā€™re going to improve it, you should really consider using triggers instead of repeaters lol

1 Like

So the problem with triggers being used like repeaters is that THEY ARE NOT BEGINNER FRIENDLY. Repeaters are straight forward though, I tried messing with triggers and itā€™s kinda wonky to work with compared to a repeater. (It might be that repeaters are meant to be for beginners anyways and none of the experienced people use repeaters because they want to sacrifice memory. But if your game is low memory, then smth like repeaters work, otherwise I would perform the learning curve


Summary:
Repeaters for beginners, triggers for experienced people
Triggers confuse me.

2 Likes

The problem with not using a trigger loop is that itā€™s straight up bad building practice, and by trying to maintain an anti-repeater mentality across the whole forums, beginners will learn to build better. Trigger loops are one of the easiest concepts of complex GKC, and theyā€™re the foundation and first step towards becoming a much better GKC user.

Most people are scared of more complex mechanics, so rather than convincing them itā€™s a good idea, itā€™s easier to just force the mechanic on the user as being the solution for their problem. Again, trigger loops arenā€™t complex at all, so much so I can describe the entire setup for one in just a few words. (Wire one trigger to another, then wire the second trigger to the first. Set one of the triggerā€™s delay to be the time you want between iterations. Trigger one of the triggers to start the loop.) Trigger loops are one of the most beginner friendly mechanics that require a small bit of thinking, and itā€™s a good idea to encourage them.

Of course, in the end itā€™s up to you in what you put in your guides, but itā€™s generally better to discourage repeater use as much as possible, for the sake of trying to ensure learners get better at using devices fluently. Obviously, repeaters are useful in lazy situations, and Iā€™ve personally used them when Iā€™m trying to invent a new mechanic or test a complex system with many parts, but whenever I need a loop in a game, I go straight to trigger loops.

8 Likes

Arenā€™t you experienced though? You could say ā€œthis way for repeatersā€ and ā€œthis way for trigger loopsā€. Wow, BH that is a speech.

2 Likes

I donā€™t have the most knowledge so basically I try to help to the best of my knowledge but I donā€™t know some things

2 Likes

I think just saying ā€˜donā€™t use repeaters AT ALLā€™ is a bit harshā€¦ There are valid points against repeaters, but here it was just easier to use one (there are less channels so it makes it easier to explain). If the reader wants to use a trigger instead of a repeater, they can happily do so, but I donā€™t think you should automatically decide that someone is wrong for using them. This is just my opinion thoughā€¦ You decide what you would use.

1 Like

I agree! Repeaters use less channels and complicated setups, so they are so much more beginner-friendly. I know repeaters arenā€™t technically as memory-friendly as triggers, but they work better for this guide, so I think you did the right thing here.

1 Like

Donā€™t you only need one trigger to make a trigger loop (a trigger that is triggered and sends on the same channel, just the one)? I might be wrong thoughā€¦

1 Like

Yeah, thatā€™s still right. Hereā€™s the whole thing:
Beginners: Oh, itā€™s definitely easier to use a repeater
ā€œAdvancedā€: Triggers yay

Easy-to-build maps - Use a repeater. That way itā€™s easier.
Harder, more memory-consuming maps - Use a trigger loop. Itā€™s efficient.

2 Likes

Iā€™m going to add a note at the top of the guide saying this guide uses repeaters and that if they want to use trigger loops, they can do so by altering the triggers to behave like a repeater.
Done:

1 Like

Nice guide, @twofoursixeight !

You can use my comment too. Just to clarify stuff.

Iā€™m fully aware Iā€™m not in the best position to say that trigger loops are easy, but Iā€™ve never had an issue teaching them to anyone. The worst I can recall is it taking 20 posts to explain them to someone who was probably very very underage, but they got it down eventually. This isnā€™t just me claiming something random because Iā€™m a technical person, this does actually work to help people improve.

Yes; you can do that, but I explained a version of the trigger loop that would be more beginner friendly I guess, idk I was writing this on low sleep and wasnā€™t thinking straight lol

3 Likes

Thank you for clarifying that!