![]() Warning: This guide is advanced!
Warning: This guide is advanced! ![]()
Introduction
Hello and welcome to quite possibly the hardest guide I will ever make. I will try my best to explain what’s happening. The total memory is ~3-4% for a 3x3 maze. I got a lot of inspiration from Gimkitsuggestor’s research topic. By the end of this guide, you will have a great-looking random maze! Without further ado, let’s dig into it.
There are a total of the following items:
-
14 Properties
-
6 Triggers
-
1 Wire Repeater
-
6 Wires
-
5 Counters
-
1 Lifecycle
-
20 Repeaters(This one is a joke) -
Lots of barriers creating the maze.

If you do everything correctly, the final result should be similar to the photo above. [1]
List of All Properties
…and what they do.
-
currentSelectionX - This one is self-explanatory. It stores the x value of the current selection.
-
currentSelectionY - This one is also self-explanatory. It stores the y value of the current selection.
-
list - This property stores all the possible coordinate pairs. [2]
-
usedSections - We need to keep track of the sections we have already used. This property stores that information! It is in the same format as list.
-
backtrackTracking - This property is exclusive to the backtracking system for it to work properly. It isn’t required for the pathfinding of new sections, but is required for backtracking to work!
-
topAvailable - This property is a true/false value that tracks whether or not the randomizer can pick it. [3]
-
bottomAvailable - This property is a true/false value that tracks whether or not the randomizer can pick it.
-
leftAvailable - This property is a true/false value that tracks whether or not the randomizer can pick it.
-
rightAvailable - This property is a true/false value that tracks whether or not the randomizer can pick it.
-
topPicked - This property tracks if the randomizer has picked the top spot.
-
bottomPicked - This property tracks if the randomizer has picked the bottom spot.
-
leftPicked - This property tracks if the randomizer has picked the left spot.
-
rightPicked - This property tracks if the randomizer has picked the right spot.
-
numUsedSections - This tracks the number of spots the system has chosen. If it has used up every section, then the system stops.
All 6 of the Trigger's Code
Trigger #1
I’m glad I didn’t spend too much time writing everything above this, otherwise I would have no yapping left to explain the system. For the first trigger, you must set up the following properties. The scope and channel settings should be set to default on all of the properties.
Property Name: currentSelectionX

Property Type: Number

Default Value: [YOUR DEFAULT X-VALUE GOES HERE] (My default value is 4)
Property Name: currentSelectionY

Property Type: Number

Default Value: [YOUR DEFAULT Y-VALUE GOES HERE] (My default value is 3)
Property Name: leftAvailable

Property Type: true/false

Default Value: FALSE
Property Name: rightAvailable

Property Type: true/false

Default Value: FALSE
Once you have all these properties set up, reference to the picture below for the following paragraph(s).

Note: A lifecycle listens for the game start. The lifecycle activates the first trigger on "start".
The first trigger accomplishes setting the x and y variables to currentSelectionX and currentSelectionY and finding the coordinates of the adjacent left and right cells. The trigger sets leftCheck and rightCheck to these coordinates. You might be wondering why I have a lot of math involved in those variables. Well, I’m so glad you asked! [4] The way I’m doing coordinates is basically combining the x and y with a “create text with” block. Now you might wonder why I’m not doing that. Variables can only be set to a numerical value, so the “create text with block” doesn’t apply to the variable’s logic. [5] If x was 2, and y was 3, then the coordinates would look like 23 instead of (2, 3) in the code. This is more efficient and saves crucial blocks.
If you want to learn more how the variables work, click here. If not, don't worry about it and continue on with the tutorial.
The math portion might confuse many people, but if you understand math well, you will probably know what I mean. Let’s pretend we have the numbers 2 and 3. They want to come together to form 23, but can only do this by doing math equations. The 3 can easily get to the one’s spot by adding, but what about the 2? The answer is much simpler than you might think! By doing multiplication, we can times the digit by ten. The 2 is now in the ten’s spot; all that’s left is adding them together! Now you are a certified math nerd and I’m an accredited yapper. ![]()
The part that might seem the most advanced is the “find first occurrence of” blocks. We have the (possible) coordinates of the right and left cells, now we need to check if they exist, and if they are used. We can do this using the “find first occurrence of” block. While this block is within an if, it will produce an output of 0 if it is not found within the selected text. We can use this to our advantage and check if it’s in our list of possible coordinates by using not equal to 0. Checking if it’s not equal to 0 will produce a true output if it is in the list of possible coordinates. Now we need to find out if the coordinate has been used. [6] We can check if it is not in the property by doing if = to 0.
If both these checks pass, it is a valid spot for the randomizer.
Trigger #2
Properties you will need to set up. Properties not in here should already be set up.
Property Name: topAvailable

Property Type: true/false

Default Value: FALSE
Property Name: bottomAvailable

Property Type: true/false

Default Value: FALSE
That was a lot, right? Well, I have good news for you. This second trigger has almost all the same blocks, but the variables, properties, and broadcast messages differ slightly. Copy this code to your second trigger. I’m so glad I don’t have to explain the second trigger. If you don’t understand it, read the description for the first trigger.

One thing to note: The second trigger receives on the channel "continueChecks", broadcasted from the first trigger's code. The second trigger broadcasts on "startRandomizer" to the third trigger.
___Trigger #3
Properties you will need to create.
Property Name: topPicked

Property Type: Number

Default Value: 0
Property Name: bottomPicked

Property Type: Number

Default Value: 0
Property Name: rightPicked

Property Type: Number

Default Value: 0
Property Name: leftPicked

Property Type: Number

Default Value: 0
Oh boy, here we go with the third trigger. This trigger receives on startRandomizer, and copy the following code to your third trigger. Read the paragraphs below the image for a description.

First things first, what’s a randomizer without a random integer block? We set b to a random integer from 1 to 4. Next, we need to check if all the cells are unavailable. If they are, then it starts to backtrack. I included an activity feed message for testing. In the else section, create an if statement checking to see if b is 1, 2, etc. Create if statements inside each to check if the cells are available. Please let me know if you find a more effective way to create this randomizer. I can’t think of more things to explain- all this trigger does is randomly pick one. ![]()
Counters
There are four counters you need to set up- along with a property for each. Set up each of the triggers as follows. All other settings will be default.
Counter 1
Starting Value: 0

Increment Counter when receiving on: topPicked

Update Property: Yes

Property To Update: topPicked

Target Value: 1
Counter 2
Starting Value: 0

Increment Counter when receiving on: bottomPicked

Update Property: Yes

Property To Update: bottomPicked

Target Value: 1
Counter 3
Starting Value: 0

Increment Counter when receiving on: leftPicked

Update Property: Yes

Property To Update: leftPicked

Target Value: 1
Counter 4
Starting Value: 0

Increment Counter when receiving on: rightPicked

Update Property: Yes

Property To Update: rightPicked

Target Value: 1

Wire all the counters so that when the target value is reached, it goes to a wire repeater with a delay of 0.1 seconds. Wire the wire repeater to the 4th trigger.
Trigger #4 & #5


This might initially seem a little complicated, but getting under the block limit is necessary. I will organize the steps the code takes in bullet points this time around.
-
First, the 4th trigger imports x and y.
-
Next, the trigger checks to see which spot was chosen. It sets the x and y properties to the updated coordinates.
IMPORTANT: The x and y Variables are set to the old coordinates. The Properties are set to the new ones.
-
Then, trigger four sets the variable
newCoordsandoldCoordsto the old set of coordinates and the new set of coordinates. -
Finally, it broadcasts on a combination of the old and new coordinates to disable certain maze walls, reset properties, add the new set of coordinates to
usedSections, and broadcast on channelprepBacktracking.
For the 5th trigger, just copy the code from the image. I will explain the last and final trigger with an explanation of the property setup. Don’t forget to have the 5th trigger trigger when receiving on prepBacktrack!
Trigger #6
The last and final trigger. Set up this last property, then connect this counter to the property.
Property
Property Name: numUsedSections

Property Type: Number

Default Value: 0
Counter
Starting Value: 1

Increment Counter when receiving on: resetCounters

Update Property: Yes

Property To Update: numUsedSections

Target Value: None
We increment the counter on resetCounters because we need this to increase exactly once after every run. Instead of using two more blocks, we reuse the channel. **Do not confuse this with “reset counter when receiving on”. Put it in “Increment counter when receiving on”.
Copy this code into the last trigger. (The 6th one.)

Some unpacking:
-
We set a variable,
backTracking, to the property,backTracking. -
The next four if statements convert text to numbers.
-
We set the property,
backTracking, to the variable,backTracking. -
We set the x and y variables appropriately.
-
The last if statement stops the system if all the cells have been used.
The property, backTracking, looks like this: 3432343243223. Each two numbers is a pair of coordinates. If the property was 3233, it would house the coordinates 32 (3, 2), and 33 (3, 3). Each time it back tracks, it removes the last two numbers from its line, setting the previous coordinates as the current x and y values.
Building the Maze

The image above shows the grid system in this 3x3 maze. It checks the surrounding cells, so the lowest it could go in this scenario is (1, 1). If the lowest was 0, it would break the whole thing because anything times 0 is 0. Move to the next image. >:D
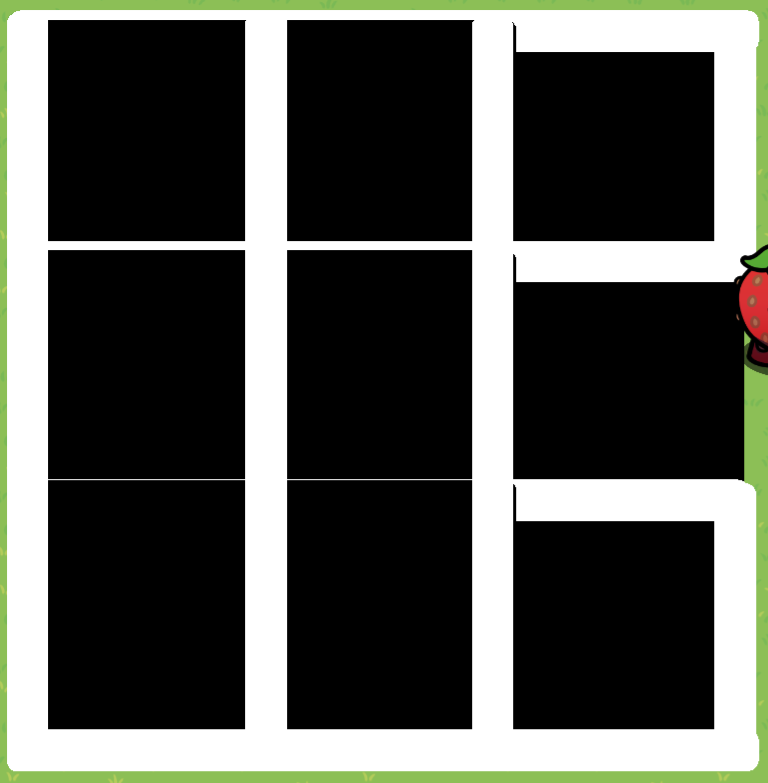
Set up a grid like this. The black barriers aren’t necessary, but the white ones are. The black barriers show each cell and has a giving coordinate. It is very easy to set up the black ones, all you need to do is set the “deactivate barrier when receiving on” to the coordinate it is given.
Set the white barrier to deactivate when receiving on a combination of both of the surrounding barrier’s channels. It doesn’t matter which order it goes in; the system broadcasts both.
Here is an image of one of my black barriers.

Here is an image of one of my white barriers.

Exit
The end result is this.

Let me know if you have any questions, concerns, or feedback. If you enjoyed or liked the guide, I kindly ask you to give the guide a ![]() . I have some exit polls down below; please put some thought into it.
. I have some exit polls down below; please put some thought into it.
- Bulleted List
- Paragraphs
- 1
- 2
- 3
- 4
- 5
- 1/10
- 2/10
- 3/10
- 4/10
- 5/10
- 6/10
- 7/10
- 8/10
- 9/10
- 10/10
- No need, the amount here already is fine.
- Eh
- Yes, please, I need more. (Reply with what photo(s) are needed.)
- Yes
- No
- Yes
- No
- ._. you really just made that joke
Thanks,
Slim

