hallo again! I am too addicted to Hollow Knight ![]() to stay away for too long… So I am back again. This part is a walk in the park compared to what we did last time
to stay away for too long… So I am back again. This part is a walk in the park compared to what we did last time ![]() phew. So I hope you enjoy installment 3! I love Hollow Knight so much and I hope you began to love Hollow Knight through these guides as well.
phew. So I hope you enjoy installment 3! I love Hollow Knight so much and I hope you began to love Hollow Knight through these guides as well.
harharharhar83
alright im back at it again with another useless rant. i dont think anyone cares but i cannot get back into my actual account unless i do some special something that im too lazy and not active enough to want to do so i talk through this now exclusivley. only thing i have done is i got to help duplicate like three things in the game for the last guide and just looking at it was way too much for my tiny little itty bitty brain to handle so if you can handle it then great but if not thats fine since it was a lot. now im going to leave for another two weeks or so until my regularly scheduled paragraph ![]() [1]
[1]
tired_rat
So here are the 8 parts to our Guide! Yippee Skippee!
Part 1: The Inventory & Map Menus Click Here
Part 2: The Charms Menu Click Here
Part 3: Resting (That’s this one)
Part 4: Locations/Mapmaking (In development)
Part 5: Items (Not out yet)
Part 6: Relics, Shards, Abilities, & Nails (Not out yet)
Part 7: Map Pins/Charms (Not out yet)
Part 8: The Hunter’s Journal (A Guide to Bugs) (Not out yet)
Part 9: Bosses (Not out yet)
Warnings
WARNING: Memory Intensive
WARNING: Device Intensive
WARNING: Includes Blocks
WARNING: Length Alert
WARNING: Major Repetition
WARNING: Unclear Sections
WARNING: Organization is key. Make sure you are organized!!!
Let’s jump right into:
[ ] The Ultimate Guide to Hollow Knight
Resting
Intro: Hey guys! Make sure to read Part 1+2 before continuing! So, you’ve done that? Good! Now we are setting up the Knights health, as well as damage and benching systems! Get ready to jump into the world of Pseudo-Health!
Chapters:
- Review
- Pseudo-Health
- Damage
- Bench System
- Polls
Review
In the last guide we finished establishing the menu system (thank goodness). Now if we look back on our menu system it will have an Inventory Menu and Check Map. The Charm Menu, completed last time, allowed players to find/equip charms, stop players from equipping charms based on certain conditions, and list all the charms equip.
Pseudo-Health
This part is setting up the Pseudo Health overlay. It is short, but repetitive (not a lot though).
Devices
- 15x Property
- 1x Game Overlay
- 1x Trigger
Game Overlay
For this overlay I am trying to recreate this:

However, I used ![]() s because they are a more common type of health-signifier-thing.[2]
s because they are a more common type of health-signifier-thing.[2]
Settings:
Set the overlay text to🤍🤍🤍🤍🤍and the overlay color toR 120 G 120 B 120. Have it run the following blockcode when receiving onUpdate Health:

Explanation:
Each heart represents one health, so you start the game with 5 health. Whenever the game overlay receives on Update Health it will combine all the health properties into one overlay. And yes, it is in order from greatest to least. We will hop into that later though. For now, just do what I say, and you will understand.
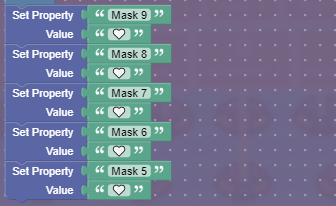
Properties 1-5 (Basic Masks)
I know the names seem in a funky order, just don’t question it.
Settings:
Set the default text to🤍and have it broadcast onUpdate Healthwhen changed. Then give each one a unique name from the list:
Mask 9
Mask 8
Mask 7
Mask 6
Mask 5
Explanation:
Each of these properties keeps track of the status of each heart. For future reference:
= 1 Life
= Not a Life
= Lifeblood
Properties 6-15 (Gainable Masks + Lifeblood)
Settings:
Have it broadcast onUpdate Healthwhen changed. Then give each one a unique name from the list:
Mask 4
Mask 3
Mask 2
Mask 1
Lifeblood 6
Lifeblood 5
Lifeblood 4
Lifeblood 3
Lifeblood 2
Lifeblood 1
Explanation:
Each of these properties keeps track of the status of each heart.
Trigger
Trigger when receiving on +1 Mask, then run this blockcode:

Explanation:
When the player gains a mask (ie. transmitting on +1 Mask), it will check to see what slot is available to put the new mask (heart) into. If Mask 4 = " " (aka empty), it will set the heart to that slot. Then, it heals all the masks that you already had.
Damage
In this part we will be making the system that will damage players, here we will be making the system that takes away health and ki-lls the Knight if he drops to 0 Masks
Side Note
If you were wondering why it counts down instead of counts up. Why is the 9th Mask on the far left? This is because the 1st Mask (the one on the far right) will be the first Mask to be damaged.
Also, one again here is the list of what each heart meant:
![]() = 1 Mask (1 Health)
= 1 Mask (1 Health)
![]() = No Mask (No Health)
= No Mask (No Health)
![]() = Lifeblood (This is specific mask that is like temporary health, cannot be healed back) For this system we are making TWO damage systems, one for dealing 1 damage and one for dealing 2 damage. I realize I could just loop the 1 damage but making the 2 damage one makes it look more authentic.
= Lifeblood (This is specific mask that is like temporary health, cannot be healed back) For this system we are making TWO damage systems, one for dealing 1 damage and one for dealing 2 damage. I realize I could just loop the 1 damage but making the 2 damage one makes it look more authentic.
Devices
- 8x Trigger
- 1x Respawn
Trigger (Damage 1 Start)
This trigger will start the 1 damage cycle
Settings:
When receiving onDamage, trigger and run this blockcode:
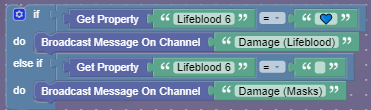
Explanation:
Whenever a player needs to take damage this trigger checks to see if it they have any Lifeblood. [3] If they do they have lifeblood it will transmit onDamage (Lifeblood)if they don’t it transmits onDamage (Masks).
Trigger (Damage 1 Lifeblood)
Settings:
When receiving onDamage (Lifeblood)trigger the trigger[4] and then run this blockcode:
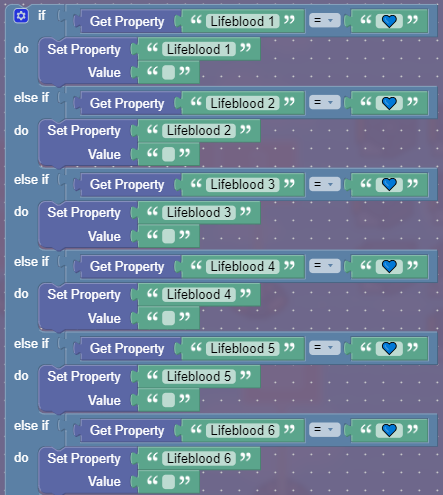
Explanation:
When the computer says to take away Lifeblood, it will go down the list checking for which “Lifeblood Slot” has Lifeblood. After it finds the most recent slot with Lifeblood, it gets rid of it. Since Lifeblood is temporary then just replaces it with NOTHING.
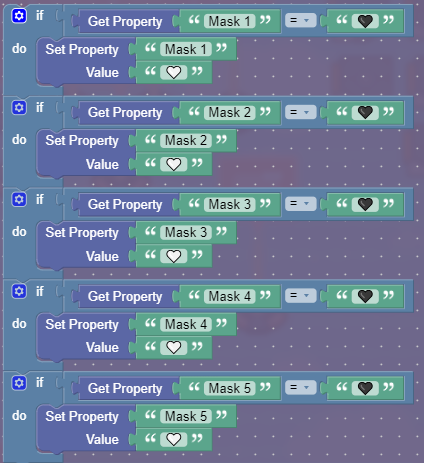
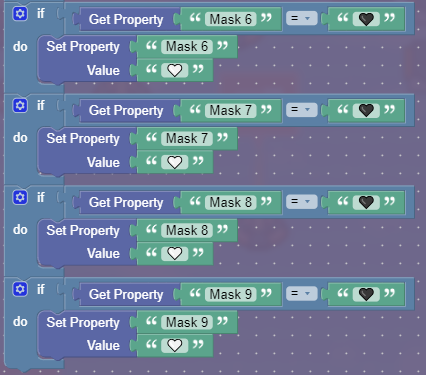
Trigger (Damage 1 Masks)
Settings:
Trigger when receiving onDamage (Masks)and run this blockcode:
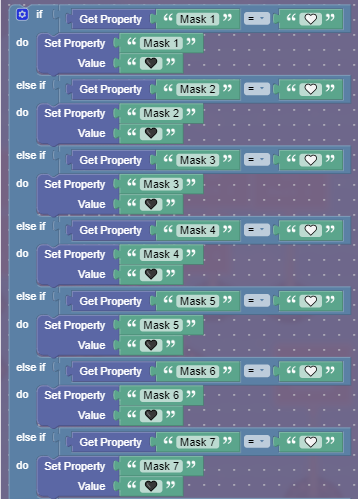
Explanation:
Similar to the last trigger, it will find the most recent “Mask Slot” with health. However, this time it will replace it with a black heart, representing a slot that has no health, however this Health can be healed back.
–
Now it is time for the double damage system.
Trigger (Damage 2 Start)
Settings:
When receiving onDamage 2, trigger and run this blockcode:
Explanation:
When a player has two Lifeblood (ie. Lifeblood Slot 5 filled) it will transmit onDamage (Lifeblood) 2. If a player has one Lifeblood (ie. Lifeblood Slot 6 filled) it will take away one Lifeblood and one Mask. If they don’t have any Lifeblood (ie. Lifeblood Slot 6 is empty) it will transmit onDamage (Masks) 2.
Trigger (Damage Lifeblood 2)
Settings:
When receiving onDamage (Lifeblood) 2trigger the trigger. Then, run this blockcode:
Explanation:
Same as the other Lifeblood system, it takes away Lifeblood, however this time it takes 2 away.
Trigger (Damage Masks 2)
When receiving on Damage (Masks) 2 have the trigger run this blockcode:

Explanation:
Same as before, it takes away Masks however this time it takes two. You WILL run out of blockcode so you will see that when we get down to Mask 7 it will transmit onDamage (Masks) 2 [7+8], if only one health slot is remaining[5], it can’t do two damage, so it transmits onDamage (Masks)
Trigger (Damage Masks 2 “7+8”)
Settings:
Trigger when receiving onDamage (Masks) 2 [7+8]and run this blockcode:
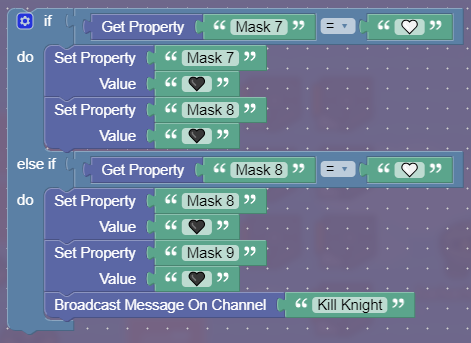
Explanation:
Like before, it takes two Masks away. When the Knight loses Mask 9, it transmits onKi-ll Knight.
Trigger (Ki-lling the Knight)
Settings:
When receiving onK-ill Knight, trigger the trigger. Give it a1 seconddelay. Now have it transmit onDi-e Nowwhen trigggered. Finally add this blockcode:
Explanation:
) Then, it restores all their health and transmits on
When the knight loses all health, it gives a 1 second delay the player can process they lost all health (similar to how when the knight di-es, this happens in Hollow Knight:Di-e Now.

Respawn
Settings:
Force the player to respawn when receiving onDi-e Now.
Explanation:
When receiving onDi-e Now, it will force the Knight to respawn.
Thats all for damaging! Next we move on to the Bench system.
Bench System
When we create this system, we have to create the unique part (some parts that you must recreate for every new bench) and the global part (you only have to make this once)
Unique
Devices/Props
- 1x Bench (Prop)
- 1x Barrier
- 2x Button
- 1x Checkpoint
- 2x Trigger
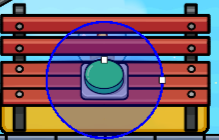
Bench
You’ll never believe what you do with this prop… YOU PLACE IT!!! (And turn collision off) (And place it in the Behind Layer).
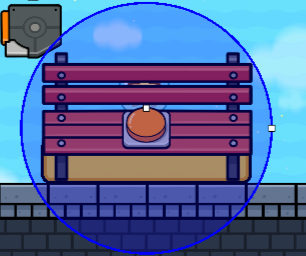
Barrier
Settings:
Place this barrier under the bench like this:
Now set Visible In-Game toOff.

Explanation:
This is so it gives the illusion of the player sitting on the bench.
Button (Rest)
Settings:
The button message should sayRestand it should transmit onBench [#][6]. Visible in Game should beOffand Interaction Duration should beInstant. Activated button when receiving onUnbenchingand deactivate when receiving onBenching. Finally set the size too:
Explanation:
This button will only be pressable when on the bench (due to the size) and allow the player to “Rest” on the bench. When a player is resting, it deactivates.
Button 2 (Getting Off)
Settings:
The button message should sayGet Offand it should transmit onUnbench [#]. Visible in Game should beOffand Interaction Duration should beInstant. Activate on game start is aNo. Activated button when receiving onBenchingand deactivate when receiving onUnbenching. Finally set the size too:
Explanation:
This button has a wider range to avoid softlocking the game, if the player rests and slides out of range of the button[7]. It is the opposite of the last button essentially.
Checkpoint
**Settings:*.
Set visible in-game toNoand Activation Limit toInfinite. And set as activate checkpoint when receiving onBench [#]. Place this on the bench, above the barrier.
Explanation:
When a player rests on a bench, there checkpoint gets set.
Trigger (Rest)
Settings:
Trigger when receiving onBench [#]and transmit onBenching
Explanation:
This feeds the unique system into the global system. Instead of having to make the global system over every time, you add the trigger.
Trigger (Get Off)
Settings:
Trigger when receiving onUnbench [#]and transmit onUnbenching
Explanation:
Same as the previous one.
Global System
Devices
- 2x Triggers
- 2x Speed Modifiers
Trigger (Benching)
Settings:
When receiving onBenchingrun this blockcode:

Explanation:
When a player gets on a bench, it sets “On Bench” property to true.
Trigger (Unbenching)
Settings:
When receiving onUnbenchingrun this blockcode:

Explanation:
When a player gets off a bench, it sets “On Bench” property to false.
Speed Modifier (Benching)
Settings:
When receiving onBenchingset speed to0.00.
Explanation:
When a player sits on a bench, they can’t move, as if they were actually sitting.
Speed Modifier (Benching)
Settings:
When receiving onUnbenchingset speed to1.00.
Explanation:
When a player gets off a bench, their speed resets to normal.
That’s all!
Polls
- Yes
- No
- 0/10

- 1/10

- 2/10

- 3/10
- 4/10

- 5/10
- 6/10

- 7/10
- 8/10

- 9/10
- 10/10

- 11/10

Outro: Thanks for reading guys! It will probably be a while till the next guide because I have to make all the items. Anyway. I’m really tired after all that I think I’ll sleep… ![]()
![]()
TLDR; yapfest -harharharhar83 ↩︎
-_- I can explain things good, I promise. ↩︎
If slot 6 is filled with lifeblood they have one lifeblood, if slot 6+5 is filled, they have 2 lifeblood, it counts backwards like the Masks do ↩︎
why does he say trigger so much -tired_rat ↩︎
Why can’t you type “rem-ains”,
only one health slot rem-ains.I get how that could be bad but, it also messes with my much more better grammar skills ↩︎Whenever I put a [#] I mean to put a number there, so if it is bench one, it will transmit on Bench 1 ↩︎
not me speaking from experience ↩︎