Hello! We’ve got something special for you! We are bringing you Part 1 of an 8 Part Guide! Me and @tired_rat have been working on this guide for a while. We are both HUGE fans of Hollow Knight and with the release of Platformer and the hopeful soon-to-be release of The Pickaxe, I think we finally have everything we may need to create Hollow Knight! Now if you are wondering why I am making a new guide while my Poppy Playtime Chapter 1 and Simplified Dungeon Guide are still WIPs here is why:
@recalledMemories out!
hey, im new to forms so if i do something out of line just correct me. im the little guy who forced '83 to get into hollow knight so you can blame me. i cant code (he has let me look at the code, its a lot and i cant handle all that) so im just like the guy who spins the sign outside the store. he also told me to add that i playtest for him. unfortunatley im not super active on here so if you want to contact me good luck. if you like actually genuinley want to get to me though tag him and he will let me know
@tired_rat
So here are the 8 parts to our Guide! Yippee Skippee!
Part 1: The Inventory & Map Menus (That’s this one)
Part 2: The Charms Menu Click Here
Part 3: Resting Click Here
Part 4: Locations/Mapmaking (In development)
Part 5: Items (Not out yet)
Part 6: Relics, Shards, Abilities, & Nails (Not out yet)
Part 7: Map Pins/Charms (Not out yet)
Part 8: The Hunter’s Journal (A Guide to Bugs) (Not out yet)
Part 9: Bosses (Not out yet)
Warnings
WARNING: Memory Intensive
WARNING: Device Intensive
WARNING: Includes Blocks
WARNING: Length Alert
WARNING: Major Repetition
WARNING: Unclear Sections
WARNING: Organization is key. Make sure you are organized!!!
Let’s jump right into:
[ ] The Ultimate Guide to Hollow Knight
The Inventory & Map Menus
Intro: So if you haven’t heard of Hollow Knight, I’m not really surprised! While it is a great game it kind of flew under radar due to the bigger games released that year. In fact I only found out about Hollow Knight this year. Since this is the first guide on Hollow Knight I’m going to have to explain the game explain the game.
Chapters:
- Hollow Knight
- Setting up the Menu
- Inventory (Pop-Ups)
- Inventory (Properties)
- Map
- Polls
Hollow Knight
In Hollow Knight you play as The Knight on a journey through Hallownest, the kingdom of bugs. It is a 2D Metroidvania game. This is you, The Knight:

Not to be confused with him, the Hollow Knight:

Storyline
King's Pass
When you start the game you go through a “tutorial” of sorts through an area called King’s Pass. After this you drop into The Fading Town of Dirtmouth. Here you can speak to Elderbug, Dirtmouth’s 1 resident.
Forgotten Crossroads
Dropping down through and old well leads you to the Forgotten Crossroads, the first area on your journey. Some places of interest here are the Black Egg Temple, Grubhome, and Salubra’s Shop. After proceeding past the Stag Station (There is one in almost every area), you fight your first boss, False Knight. He turns out to be a Maggot hiding inside of a great suit of armor. After the False Knight arena you get a “gift” from Snail Shaman in Ancestorial Mound.
Greepath
Now with Vengeful Spirit you can enter Greenpath Some points of interest in Greenpath are The Hunter, Stone Sanctuary, Lake of Unn, and Nailmaster Sheo. After unlocking the Stag Station here, you fight Hornet. In the end you don’t ki-ll her and she zips away with her silk abilities. On a de-ad body after the Hornet fight, you can gain the dash ability from Mothwing cloak.
Fungal Wastes
With this new power you can unlock Fungal Wastes. The only few points of interest here is the Mantis Village, Leg Eater (there isn’t even a stag here).
City of Tears
After getting Mantis Claw you can do some parkour to enter the City of Tears. City of Tears has new enemies, based on your level can be difficult. Some points of interest are Nailsmith, Soul Sanctum, TWO Stag Stations, and Lemm. In Soul Sanctum you can fight Soul Master. Soul Master is the second easiest boss in the game. After beating him you get Desolate Di-ve. After this part the game in pretty much up to you.
The Rest of The Game
To beat the game you need to get the Dream Nail from Resting Ground and then ki-ll 3 Dreamers: Monomon in Fog Caynon, Lurien the Teacher, and Herrah the Be@st in Deepnest. After this you can get in the final battle in Black Egg Temple: THE HOLLOW KNIGHT.
This is a very brief description. Check out a video on it for more info.
Setting up the Menu
So this part will show how to create this:
Basically in Hollow Knight you start with a basic menu that contains your inventory, your charms, and your map. Since pop-ups are so limited we have to create A LOT of pop-ups that store all this information. This part sets up the first 3 pop-ups that serve as the categories: Inventory, Charms, & Maps.
Devices
- 1x Game Overlay
- 1x Property
- 1x Item Granter
- 3x Pop-Ups
[/details]
Pop-Up 1 (Inventory)
Settings:
Make the header sayInventoryand make the content say something like this:
This is where you can see your shards, items, soul abilities, and more!
This Pop-Up should open when receiving on:Open Menu Page 1. For the background color useR 33 G 33 B 33and for the font useRye. Now for the CTA (Call to Action). The first CTA should sayOpen Inventoryand broadcast onOpen Inventory Page 1. The second CTA should sayNextand broadcast onOpen Menu Page 2
Explanation:
This will be the Pop-Up that will show to describe the Inventory before you access it. The first CTA is to open the Inventory. The second CTA opens the next Pop-Up. If you did this correctly it will look like this:

Pop-Up 2 (Charms)
Settings:
Make the header sayCharmand make the content say something like this:
Here is where you can view charm notches, check out charm abilities, and don/doff charms!
This Pop-Up should open when receiving on:Open Menu Page 2. For the background color useR 33 G 33 B 33and for the font useRye. Now for the CTA (Call to Action). The first CTA should sayOpen Charmsand broadcast onOpen Charms Page 1. The second CTA should sayNextand broadcast onOpen Menu Page 3
Explanation:
This will be the Pop-Up that will show to describe the Charms before you access it. The first CTA is to open the Charm Menu. The second CTA opens the next Pop-Up. If you did this correctly it will look like this:

Pop-Up 3 (Map)
Settings:
Make the header sayMapand make the content say something like this:
Here you can toggle on and off the waypoints that show critical locations around Hallownest.
This Pop-Up should open when receiving on:Open Menu Page 3. For the background color useR 33 G 33 B 33and for the font useRye. Now for the CTA (Call to Action). The first CTA should sayCheck Mapand broadcast onCheck Map. The second CTA should sayNextand broadcast onOpen Menu Page 1
Explanation:
This will be the Pop-Up that will show to describe the Charms before you access it. The first CTA is to open the Charm Menu. The second CTA opens the next Pop-Up. If you did this correctly it will look like this:

Okay, phew! That is all of the pop-ups out of the way! That was a doozy to type (definitely didn’t copy and paste). Now it is property time!
Property
Settings:
Name this propertyMenu Page. Make it aNumberproperty with a default of1.
Explanation:
This stores the last page number of the menu that the player was on. Inventory is 1, Charms is 2, and Map is 3.
Now how will we update the property… Hmmmmmmm… ![]()
Item Granter
Settings:
Go into blocks and make 3 blockcodes:
When receiving onOpen Menu Page 1:
When receiving onOpen Menu Page 2:
When receiving onOpen Menu Page 3:


Explanation:
When opening a certain menu page it will transfer the page number to the property so it will remember that page number. The item granter is essentially a vessel for this code.
Game Overlay
Settings:
So this is going to be aButtonoverlay in theTop Rightcorner that is calledMenu. When you click the button it should broadcast onOpen Menu Page. Now head into the blocks of the Overlay. Make a “When receiving onOpen Menu Page” block:

Explanation:
When you click the button it will look for which page number you were last on. Then it will open that page. So even though Inventory is the first page, if I close the Menu on Charms, it will open on Charms. Why is this necessary. Short answer: It isn’t[1]
I hope that was all pretty clear! We are now moving on to building the Inventory! Yippee Skippee!
Inventory (Pop-Ups)
Okay so for this part, you need to follow my directions to a tee so that way when we get properties into the mix it works. There will be no explanation on these parts because it is very simple. You’ll understand as you read.
Devices:
- 6x Pop-Up
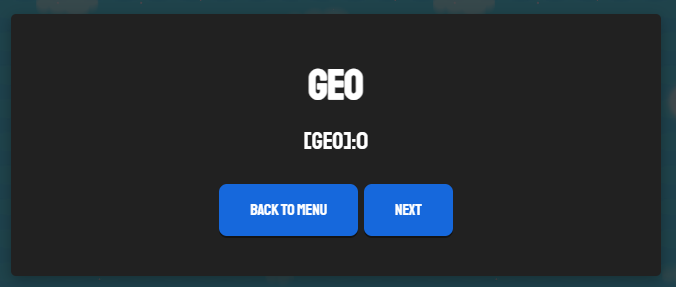
Pop-Up 1 (Geo)
Looks:
R 33 G 33 B 33
Header:Geo
Content: None
Channels:
Open Pop-Up on:Open Inventory Page 1
CTA 1 Name:Back
CTA 1 Channel:Open Menu Page 1
CTA 2 Name:Next
CTA 2 Channel:Open Inventory Page 2
Blockcode:
When receiving on channelGeo Overlay Update:

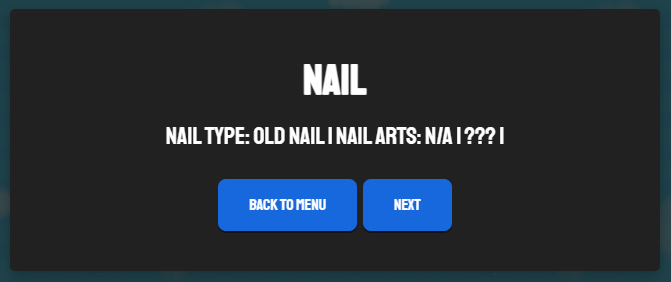
Pop-Up 2 (Nail)
Looks:
R 33 G 33 B 33
Header:Nail
Content:Nail Type: Old Nail | Nail Arts: N/A | ???
Channels:
Open Pop-Up on:Open Inventory Page 2
CTA 1 Name:Back
CTA 1 Channel:Open Menu Page 1
CTA 2 Name:Next
CTA 2 Channel:Open Inventory Page 3
Blockcode:
When receiving on channelUpdate Nail:

Pop-Up 3 (Shards)
Looks:
R 33 G 33 B 33
Header:Shards
Content:Mask Shards: 0/4 | Vessel Shards: 0/3
Channels:
Open Pop-Up on:Open Inventory Page 3
CTA 1 Name:Back
CTA 1 Channel:Open Menu Page 1
CTA 2 Name:Next
CTA 2 Channel:Open Inventory Page 4
Blockcode:
When receiving onUpdate Shards:

Pop-Up 4 (Soul Abilities)
Looks:
R 33 G 33 B 33
Header:Soul Abilities
Content:Focus: Focuses soul to heal.
Channels:
Open Pop-Up on:Open Inventory Page 4
CTA 1 Name:Back
CTA 1 Channel:Open Menu Page 1
CTA 2 Name:Next
CTA 2 Channel:Open Inventory Page 5
Blockcode:
When receiving onUpdate Soul Abilities:

Pop-Up 5 (Items)
Looks:
R 33 G 33 B 33
Header:Items
Content: None
Channels:
Open Pop-Up on:Open Inventory Page 5
CTA 1 Name:Back
CTA 1 Channel:Open Menu Page 1
CTA 2 Name:Next
CTA 2 Channel:Open Inventory Page 6
Blockcode:
When receiving onUpdate Items:

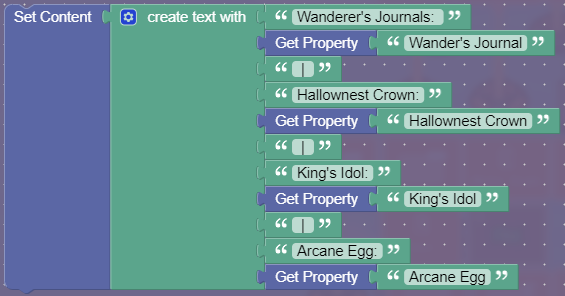
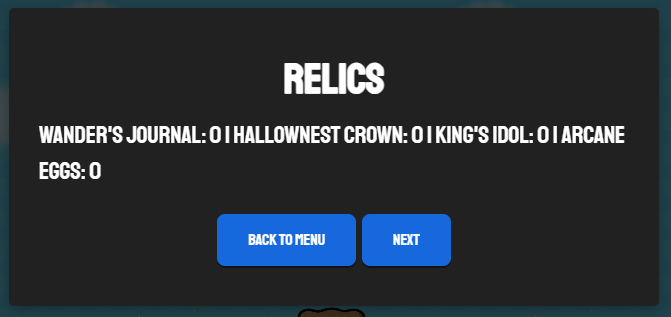
Pop-Up 6 (Relics)
Looks:
R 33 G 33 B 33
Header:Relics
Content: Wander’s Journal: 0 | Hallownest Crown: 0 | King’s Idol: 0 | Arcane Eggs: 0
Channels:
Open Pop-Up on:Open Inventory Page 6
CTA 1 Name:Back
CTA 1 Channel:Open Menu Page 1
CTA 2 Name:Next
CTA 2 Channel:Open Inventory Page 1
Blockcode:
When receiving onUpdate Relics:
Explanation:
Whenever the property updates it tells the Pop-Up to reset the information in it. Therefor adding in the new info that the updated Pop-Up got.
Sorry for that part being a little dry. That stuff is just really basic. Words and blockcode. That’s all. And I can’t say the next part is very interesting either. 20+ properties tends to ![]() .
.
Inventory (Properties)
Get ready! To code 20+ properties. Hey! It’s not my fault if you didn’t take the repetition warning to heart! Lets get this over with as quickly as possible. Here we go!
Devices:
- 29x Properties
- 1x Item Granter
Properties 1-12
Settings:
Okay so all you need to do is set all of 12 properties to transmit onUpdate Items. Now give each property a unique name from this list:
Mothing Dash
Mantis Claw
Crystal Dash
Monarch Wings
Isma's Tear
Lumafly Lantern
Map & Quill
King's Brand
Tram Pass
City Crest
Pale Ore
Rancid Egg
Explanation:
Each property will get a name filled out in its text zone when that item is collected.
Isma’s Tear Collect → Property set to Isma’s Tear.
Properties 13-15
Settings:
Make these aNumberproperty with a default of0. When the value changes, it should broadcast it onUpdate Items.Now create 3 of these properties and give them each a unique name:
City Crest #
Pale Ore #
Rancid Egg #
Explanation:
For those items you can have multiple of them. So we must add these properties to show how many you have. When you collect one of these items it will increase the number property, showing how many you have.
Properties 16 + 17
Settings:
Create 2number-type properties with a default of0. When these properties change broadcast on:Update Shards. Give each a unique name from this list:
Mask Shards
Vessel Shards
Explanation:
Here, the amount of shards is stored. Whenever the amount changes, it will notify the Pop-Up and change the Pop-Up.
Properties 18 - 21
Settings:
Make this anumberproperty with a default of0. When the property updates, it should broadcast onUpdate Relics. Make 4 of these and give them each a unique name from the list:
Wander's Journal
Hallownest Crown
King's Idol
Arcane Egg
Explanation:
The number property will track how many of each relic you have. When you get another relic, it will update the relic Pop-Up.
Properties 22 - 24
Settings:
All you need to do for these 3 properties is set them to broadcast onUpdate Soul Abilitieswhen property changes. Then give each a unique name:
Vengeful Spirit
Desolate Di-ve
Howling Wraiths
Explanation:
I think you understand by now. When this update gets updated (after they gain the ability) it will update the Soul Abilities Pop-Up
Properties 25 - 28
Settings:
Set the property to broadcast onUpdate Nailwhen it changes then give each 4 properties a unique name and default value
Name - Value
Nail Type - Old Nail
Nail Arts - N/A
Dream Nail - ???
Essence - None
Explanation:
This will update the Pop-Up with the nail type, nail arts, and dream nail & essence. Literally the same as the last 24 pop-ups we did.
Inventory Item Manager
Settings:
For the item that this will track set it tocashand set show item alerts tono. We want override respawn toyesand have the respawn behavior todelete. Finally set update property toyesand have it update a property calledGeo.
Explanation:
Whenever somebody collects cash the number of cash will be stored in a Property called: “Geo”.
Property 29 (Geo)
Settings:
Make this property typenumberand set the default to0. Set it to when the property changes, it should broadcast onUpdate Geo Overlayand ityes, it should broadcast on game start.
Explanation:
This property stores the amount of Geo[2]. Whenever the player gain Geo, it updates the Geo Pop-Up.
Okay! That WAS A LOT. Here are some photos so you know if you did everything correct, this is what it should look like when you finish:


Map
So this part is setting up for when we create the mapmaking section in Part 8.
Devices
- 1x Trigger
Trigger
Settings:
Trigger when receiving onCheck Map. Then have it run this blockcode:

Explanation:
Whenever the player checks to see if the player has Wayward Compass on it should broadcast on “Check MapTrue” for when WWC is on and “Check MapFalse” for when WWC is off.
That brings us to the end of PART 1. If you thought this was too much wait for Parts 2 & 3, you are probably gonna start crying!
Since this was a lot read, you gotta understand it was A LOT to type, if you find in errors please ping me or tired_rat, so we can fix it!
Polls
- 0/10

- 1/10

- 2/10

- 3/10
- 4/10

- 5/10
- 6/10

- 7/10
- 8/10

- 9/10
- 10/10

- 11/10

Before you ask, I limited this poll to TL3, admins, staff, and moderators. This is because these are the people who MAKE the tags.
- Yes
- No
- Yes, when there are at least 2 or 3 guides on the topic.