THIS IS A WIKI MEANING YOU CAN EDIT, BUT PLEASE ASK ME BEFORE EVEN CHECKING THE BOX!!!
Editing Rules:
- No griefing!
- No editing without permission!
- Only add stuff related to the topic, please!
- Do NOT check the box just for fun, for God’s sake!
- If you edit, I will put you in the “Contributors” section of the credits if I approved your contribution!
- Follow rules 1-5 (and you’ll be all good)!
Are you editing? If so, check the box to the left of this message.
Map Options
Made By: @BountyHunterX
This is for my game, but it is interchangeable, so toy with it as you’d wish.

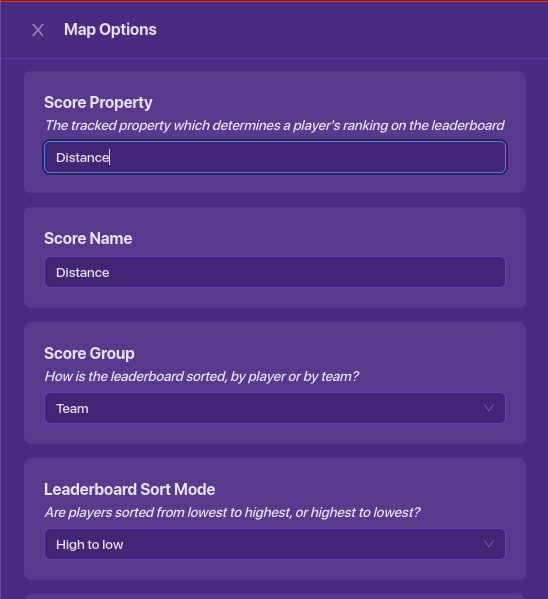

Achievement Unlocked: Magnificent Mapper
Number of Players (WIP)
The first mechanic and probably the most important one when making a Gimkit Board game is determining how many players can play your game. For my example, I will have to have 4 players. Your’s may be different. It all depends on how much work you want to put into the game. My game is called “The Game of the Rich.” To make each player on what team your game can recognize, you need the same number of team switchers as the number of players.
I setup mine like this, interchanging the numbers for the other players’ number:
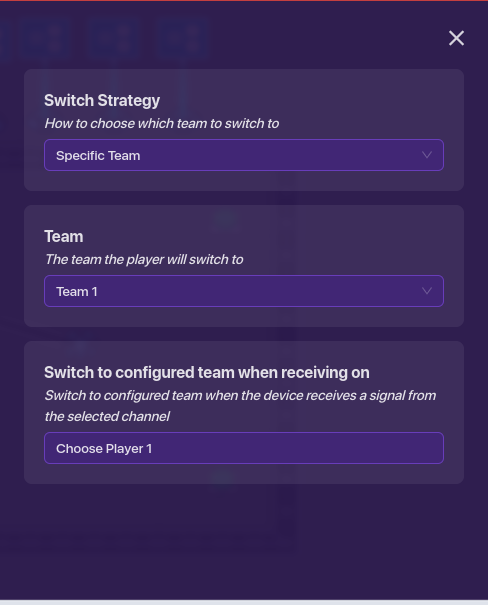
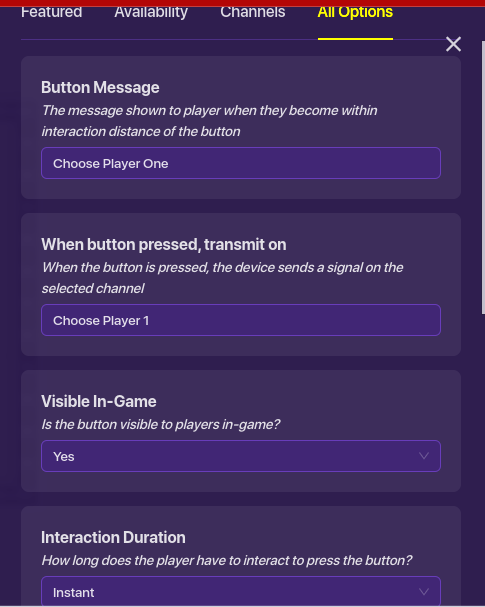
Letting the Players Choose Their Team
Made By: @BountyHunterX
When making the setup in the game, sometimes it is desirable to let the players choose what team they want to be on. This ties in with the Number of Players. You need a lifecycle, a relay, a counter, a teleporter, and four buttons for this.
For the lifecycle. set it to game start, and transmit on “Game Start.”
For the counter, make it start a 0, and count up when relieving on “Count Up Ready Timer.” Then set the rest to below:

Make the teleporter go where you want the player to start.
Place the four buttons separate from each other where you want the players to pick their team.
Set them to below, interchanging the 1 with 2, 3, and 4:
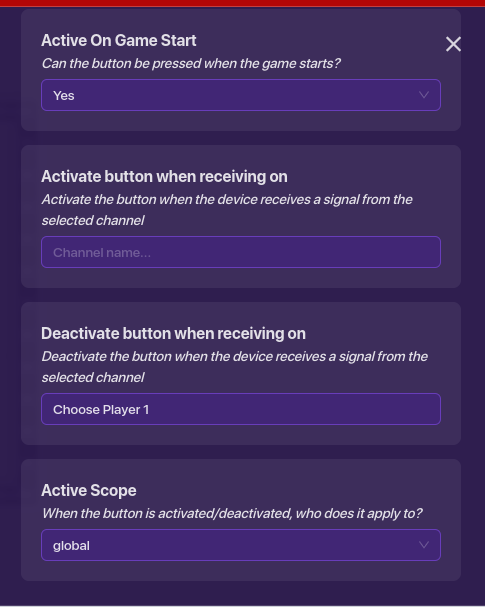
Now wire each button to the one teleporter, and you’re done with this mechanic!
Achievement Unlocked: Nice Person
Game Spaces
Made By: @BountyHunterX
The game spaces can be in a circle, square, a pathway, etc. This part is all up to you, but I have a few tips on how to do it right…
- Don’t overthink the process. I shouldn’t make your brain hurt by thinking about all the details, and if it does, take a break.
- Think “Less memory, less worries, less stress.” When you’ve done a bazillion spaces and barely have any memory left to make the actual game, you know you’ve taken a wrong turn.
- Decorate when desired. Props usually don’t take up as much memory as most devices do, so decorate as wanted to make your game seem complex, when really it isn’t!
- Follow tips 1-3 and you’ll be a game space expert!
Achievement Unlocked: Game Space Buff
Dice Rolling
Made by: Here_to_help
All board games need dice rolling! So you might ask… how do you make it? Well, let’s find out!
First of all, you’ll need to make some choices.
Do you want 1 or 2 dice?
How many sides do they have?
In my example, I will have two 6-sided dice. But at the end, I’ll tell you how to customize to fit your needs!
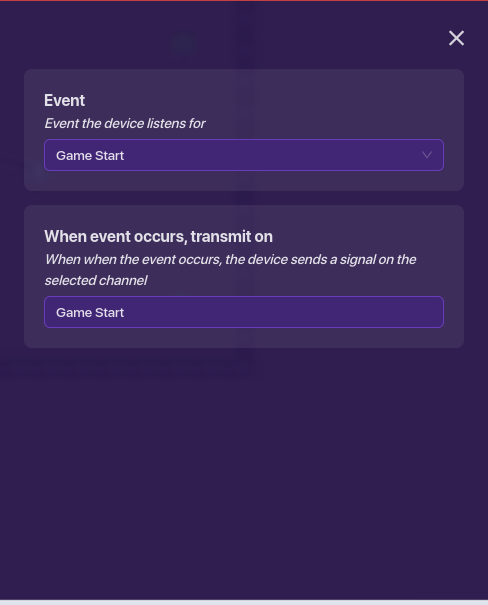
Now, it’s time to make the system. We need a way for the player to initiate the roll. This could be a button, game overlay, or other system, but I recommend a game overlay. So get the game overlay device and edit it to follow these settings:
Make sure that the visibility scope is player! This will come up later so that only one player at a time can go.
The “start” channel is from a lifecycle. No relays, just straight to the notification so that the host is the first to go. It should be disabled by default.
The actual rolling code
Now, here comes (sigh) block code…
Don’t worry it’s not too bad! I’ll walk you through it. This should be in the same notification device when receiving on “yourolled”.
Ok, this might look like a lot, but it really isn’t. First off, at the top we have two properties. Depending on the game, you could use variables if the numbers aren’t needed anywhere else.
Now, back to the system. We set our two “dice” to a random number, 1-6 since it is a 6 sided dice. If you’re making something with a D20, you would do 1-20. And just add or subtract the amount of properties you set to fit the amount of dice your game uses!
Next, we just give a notification. It says what you rolled, and who rolled it. Note that this part isn’t mandatory, just optional. Next, it checks if you rolled doubles. If you’re game has you rolling again after doubles, then include that part. If it doesn’t, then you don’t have to include that one if-else if-else block. After that, we figure out what square you are going to go to. It adds the two dice properties to a new property, “squareat”. This should be 1 by default, and represents the square everybody is at. Now, the reason we check if it is less than 40 is because we don’t have infinite squares. That number should represent how many spaces your game has! If it is less than 40, then we broadcast a number of the three properties added together, and in text form. If it is greater than 40, we add them all up and subtract 40, as well as broadcasting a channel letting the system know we passed go, if your game gives the player bonus cash for passing go. (That’s what that very bottom channel says in the third picture, I didn’t do a good job of including it).
That was it for rolling! Now, you’ll want to continue reading to see what all that nonsense does, and how it moves you to the next and correct square!
Achievement Unlocked: Gifted Gambler
Movement
Made by: Here_to_help
So, we’ve figured out how to roll! Now let’s put them into action! I would suggest your board having walls around each square. To move, we’ll teleport our players to their new location! So get some of your teleporters. Now, make the teleporters teleport you that teleporter (not target) when receiving on the square they are. For example, the third square receives on 3. The 30th on 30. Makes sense? Good, it should. Now, wire those teleporters to a device with block code. Now, get an item granter. Make some block code that receives on those numbers. You can put 6 in each item granter. The block code should look like this:
Ignore the “at1”, that it receives on, I reused a screenshot. It should actually be “1”. Do that for all of your squares, then test your game! It should work like magic! You, teleporting to each square, with your notifications coming in, and the computer doing everything for you with the click of a button. But then you realize one thing:
You don’t want everybody pressing the button and chaotically moving around the map. So continue reading to learn how to take turns rolling!
Achievement Unlocked:
One Player at a Time (WIP)
Events (WIP)
Tracking Players (WIP)
Game Modes (WIP)
Chess Style Game (WIP)
Candyland-Type Game (WIP)
Game Objective (WIP)
Themes (WIP)
Abilities/Special Actions (WIP)
Lights, Camera, Action! (WIP)
 0/10
0/10 1-2/10
 3-4/10
 5-6/10
 7-8/10
 9-10/10
 11/10
11/10