ARE YOU EDITING?
Introduction
Everyone talks about Doors, but not a single soul talks about Pressure!
(This guide is incomplete…)
Okay, I’ll admit Pressure’s lore is a bit dark, but we can use the power of imagination and change it up for the sake of children. There’s all sorts of cool stuff, like anglerfish and Sebastian my beloved.
So can we recreate that? Probably.
This is also beneficial, because there’s things that haven’t really been touched upon loads.
DISCLAIMER:
Please, if you do decide to re-create Pressure, don’t just call it Gimkit Pressure, be creative! I’m naming my recreation ‘The Underwater Expedtion’. You can get copyrighted for just stealing the name!!
Before you say ‘oh pressure is just a doors ripoff doors is better’ Pressure is better in my opinion, and you can’t change it.
So I’ll get to making the mechanics. Let’s start with…
The Basics
The Map
Pressure is set in an underwater facility full of monsters freed by Sebastian. The floors and walls are metal, and the few windows it has are underwater, where the shark with too many eyes will watch you.
We don’t need to use too much, but we’ll probably want a few decorations like Space Trash or metal signs. Make sure it looks in bad shape too, remember this is abandoned.
Currency
Currency isn’t too important, as you’ll only need it to trade it with Sebastian for stuff. That stuff being light and health kits.
Little cards and papers are scattered around the map. We can make an overlay that displays a…what do you call it…variable? Oh yes, a property.
That property will go up whenever you ‘take’ a prop, just wire a button to a prop and make some sort of code that adds to your property.
When you visit Sebastian’s shop to grab something, he’ll charge you something for something. We can just use vending machines and make the property something like shards or whatever.
Also make sure your pricing is fair. Sebastian is greedy, but he won’t charge you 8,000 shards (800 pieces of paper) for a med pack.)
Sebastian
Surprisingly, he isn’t too hard so I’m putting him in the basics section. He’s an experiment that trades currency for things like health kits.
He does have a completely complicated design though, but we can’t re-create it due to c o p y r i g h t so you’ll have to make your own creative design. This isn’t an art tutorial though so figure it out yourself lol.
I suggest probably a sentry with underwater themes, like Axle.
Flashing Sebastian comes in the other sections (where you blast him and he gets so mad he kicks you out, or worse.)
Monsters and How to Get Sent to the Ferryman
Anything Sebastian documents and shows you when you go the the ferryman is counted as a monster.
Anglerfish
This silly goober runs at high speeds. He rushes around certain parts of the map. But he messes up the electrical circuits lots, so you can hide in a locker or a box when the lights suddenly turn on.
You can recreate this with a black barrier on the top layer that turns on.
Just make a channel that sends itself out if Angle is near and make the barrier appear if it is.
And also, if you aren’t hiding anywhere and Angle gets you, goodbye sweet world. Simply force them to respawn or damage them with more than 100.
Eyefestation (CURRENTLY ALL THEORY)
Eyefestation is a tricky entity to grasp in GKC, this is because of the strict limits of GKC’s mechanics. However, I will start with the prop/barrier art for the entity since that is much simpler.
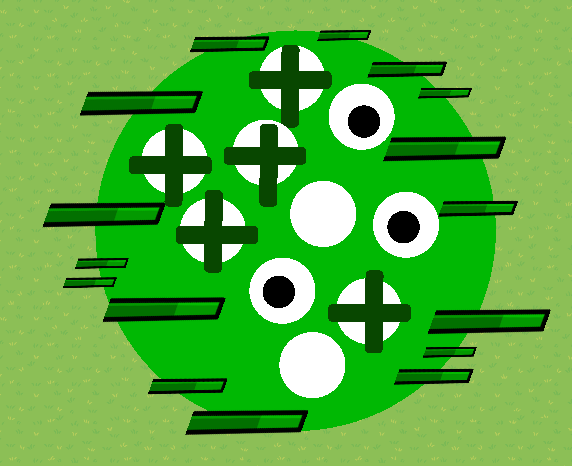
Here is the final product but if you want to go step by step - follow this mini-guide
How to make Eyefestation entity art
First of all, it is obvious in the final product that we only need 2 items:
1. Blackboard Leg
2. Barrier
The reason I chose a blackboard leg for the glitch-ish effect is because it has more texture than just a rectangular barrier.
With the barrier, make it a circle and opacity: 1. Change the color to a very light green. Then with the blackboard leg, change the appearance color to a dark green and go to the change size option in the bottom left of the options tab for the blackboard leg and turn the prop until it is straight. After that, make copies and enlarge some of the props to make a more realistic glitch effect.
Now, get more circle barriers and make them white - dot those with barriers all over the entity before making smaller, blacker ones and putting those in some of the eye socket-things. You can then get thin rectangular barriers (dark green) and copy them horizontally and vertically and put some of those in the eye sockets (like plus signs).
OPTIONAL: You can leave some eye sockets empty - as I did. I think it adds variation and mystery to the art.
![]()
![]()
![]() VERY CONCEPT CODE HEAVY
VERY CONCEPT CODE HEAVY ![]()
![]()
![]()
THE MECHS:
Imagine a Subway surfers kind of layout for this entity…
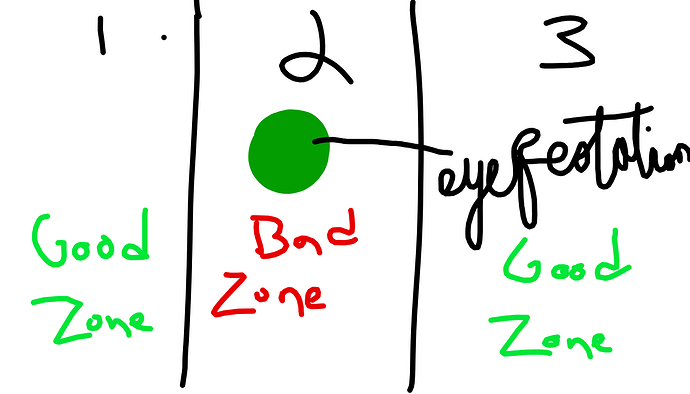
NONSENSE DEPICTION: Now imagine the police cop is coming at you instead of chasing you. Now you have to switch lanes (zones) to get out of the way. Since the eyefestation is always sort-of pushing you back, I thought
"If player enters Bad zone --> Player teleports backwards and takes damage." This works when you think "zone activate teleporter channel when player enters zone --> Player teleports and teleporter broadcasts channel to damager to make player receive damage for being in bad zone."
And what if you are in the good zone? Well, if you keep walking in that good zone, you will be teleported to the next round.
It would be way to quick and boring just to have 3 seconds of eyefestation and then nothing… so why not have 3 rounds. In the second round, we can have an RNG (random number gen) to choose which of the 3 zone-lanes that eyefestation will spawn in. Then the old process I had explained repeats. That’s the basic grasp of things. *However, If you still feel like you want more rounds, (or less…) you can change that whichever waay you want. Of course this is mostly concept/theory so I’ll have to go into more detail about it later.
Now some actual code-ish stuff.
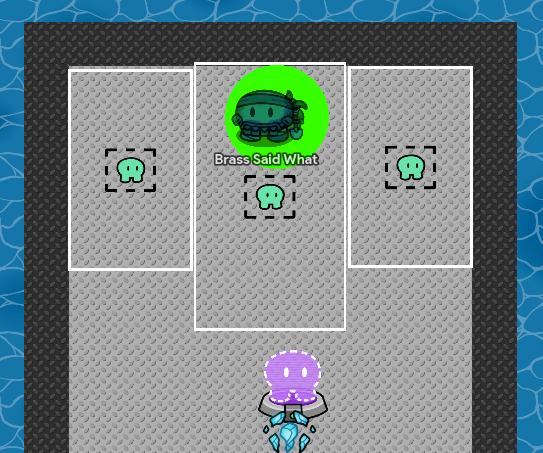
First you are going to have a layout as shown:
Make 3 zones, the middle one (or the one with eyes) larger, to make it just a bit harder. The information that is in the zones and teleporters is VERY simple.
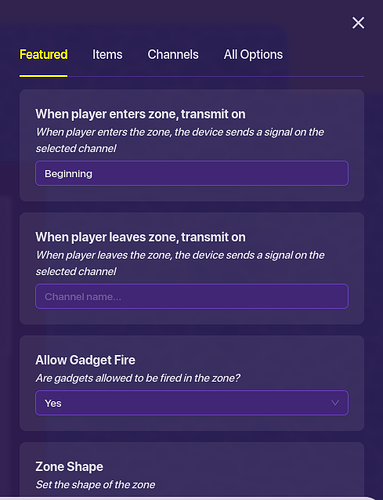
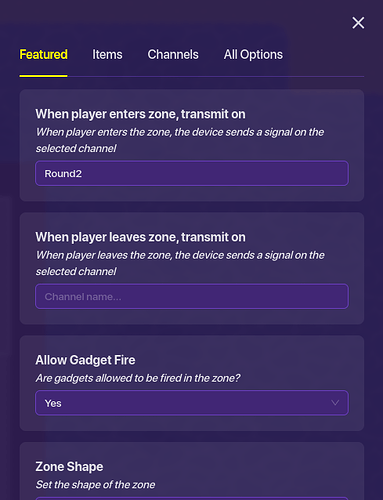
This is for the middle or bad zone:
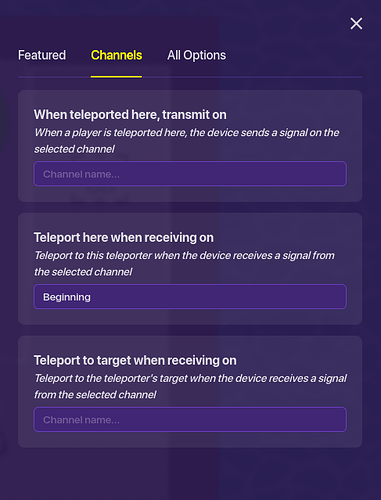
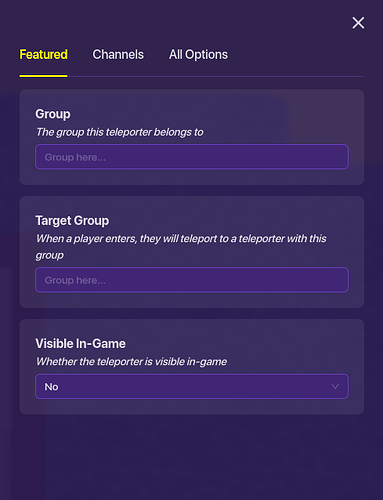
The channel ‘Beginning’ is to broadcast to the teleporter that sends you backwards for being in the wrong zone. And speaking of the teleporter:
The damager will also receive on ‘Beginning’, but I shouldn’t have to explain the damager, for it is very self-explanatory when you open its UI, and you can set the damage based on what you think is fair.
Now for the good zones (do the same thing for both good zones):
And of course, all VERY simple: The ‘Round2’ channel is transmitting to the teleporter:
That is some simple, simple stuff. However you still have to make the RNG for where eyefestation will spawn. Here is a link for a guide on how to make a RNG:
Make a random number generator
Laser system
It’s simple. Step into range, get hit by too many lasers to count. Just make a bunch of lasers that turn off and on (more often on than off…)
And remember to never use a repeater or else I will eat you
Puddles of void mass
See that one guide on how to make a puddle of death.
Also, they’re mostly purple/black so…
….yeah not fun to step on or walk into.
Pandemonium
He turns off all the lights before rushing in. And he bashes into lockers so make sure to fight to keep the doors closed.
He also has infinite vision. If he sees you, YOU’RE COOKED.
Annoyed Sebastian (NO CODE, JUST HOW HE WORKS
This one doesn’t have a document.
Flash him once, and he gets mad and warns you not to do it again.
Do it again? To the ferryman you go.
Pinky (a varation of the Anglerfish)
Ths monster works exactly like the Anglerfish except that you don’t hear or see the lights flicker, you can only tell that they are attacking by the sound of them approacing.
Froger (NO CODE)
He repeats. Need I say more?
Ok… maybe I must say more.
When he comes, the lights flicker like normal but he rebounds. Twice. One immediately after his attack, and one after about 10 seconds (to catch you off guard)
…I’ll finish this when the universe gets eaten.
