How to make generators from Forsaken / tasks from Among Us with a questioner!

Forsaken is an asymmetrical horror game heavily inspired by Dead by Daylight.
In it there is a mechanic where you can fix generators to decrease the round timer. This guide will teach you how to make them!

This guide was originally made for Forsaken generators, but I later realized the same principals could be applied to tasks from Among Us. You can make the same build, but replace the props with ones appropriate for Among Us tasks. You will also want to set every prop and device with a scope option to be player, rather than global. I will be using Forsaken terminology (generator, k!ller) rather than Among Us terminology (task, impostor).

Each instance of a number circled in red or the letter ‘x’ should be replaced with the number of the generator you’re working on.

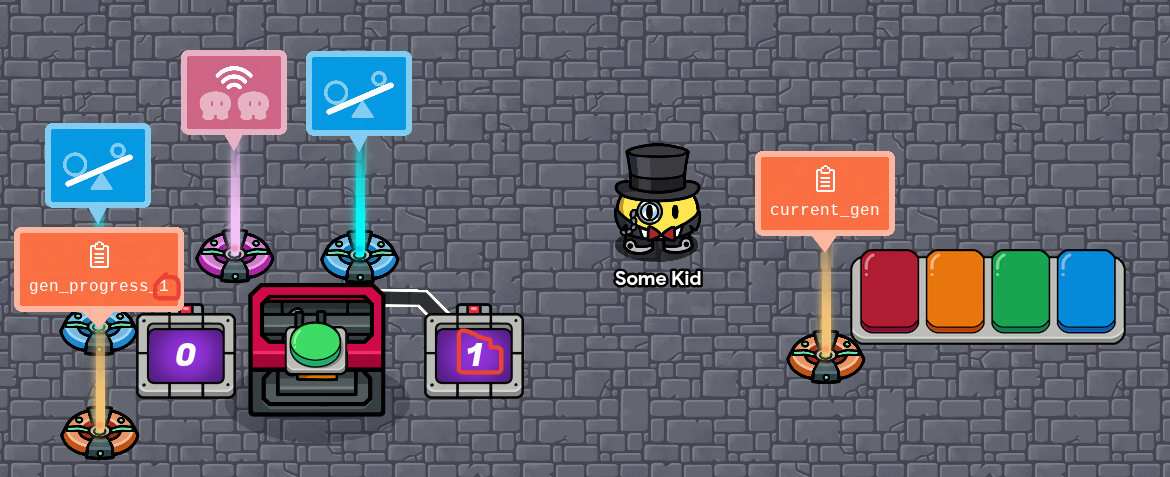
  1. You’ll need a questioner, 2 properties, 2 counters, 2 checkers, a relay, a button, and the prop you’ll be using for the generator. (There is an electrical generator prop, but it requires the season ticket at the moment.)

  1. Set the names of both properties. Both should be number properties. Current_gen should be player scope, and gen_progress should have global scope.

  2. Change these settings in the questioner:

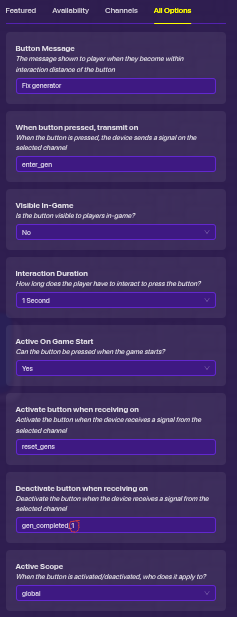
  1. Give the button these settings:

  1. Wire the button to one of the counters, such that when button pressed -> reset counter.
    Give that counter a starting value of x. Have it update the property current_gen. Set the counter to not be visible in-game and to have player scope.

  2. The other counter should have these settings:

You can change the target value of 4 to the number of questions that need to be answered to complete the generator.
Additionally, it should increment when recieving on gen_puzzle_completed_x.

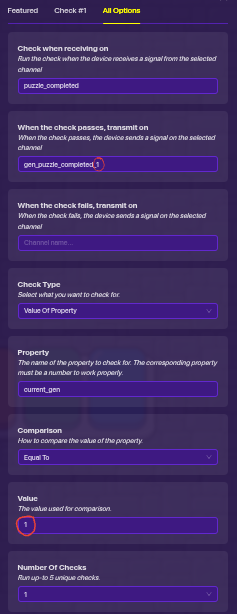
  1. Give one of the checkers these settings:

  1. The other checker should have these settings:

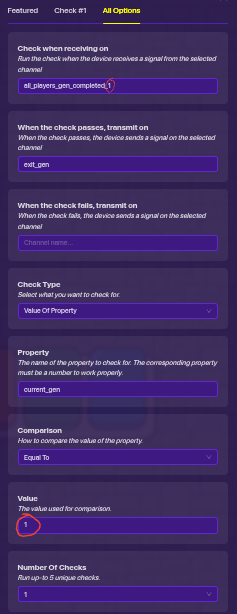
  1. Have the relay set to relay to the channel all_players_gen_completed_x on behalf of all players when recieving on gen_completed_x.

This system will broadcast on:

  • puzzle_completed when a question is answered.
  • gen_completed when a generator is finished.

Additionally, you can broadcast on reset_gens to reset the progress of all gens and allow them to be used again if they were previously completed. If you’re doing Among Us tasks, you’ll have to have a relay set to transmit as all players to broadcast on reset_gens.

That’s it! You’re all done… or are you?
There are a few optional functionalities you can add onto this mechanism if you want.

Ability to hide generators

Sometimes you might want to hide the generator if you have more than you’ll use on the map.

  1. Set the prop to be hidden on hide_gen_x and to be shown on reset_gens.

  2. Wire the prop to the button such that prop is hidden -> button is deactivated.

That’s it! Now, when you broadcast on hide_gen_x, the generator of that number will be hidden, and players won’t be able to work on it! Broadcasting on reset_gens will make them visible again.

Making only 5 of your generators appear

Or is it?

In Forsaken, some maps can have up to 16 spots where Generators can spawn, but only 5 of them will ever appear in one match.

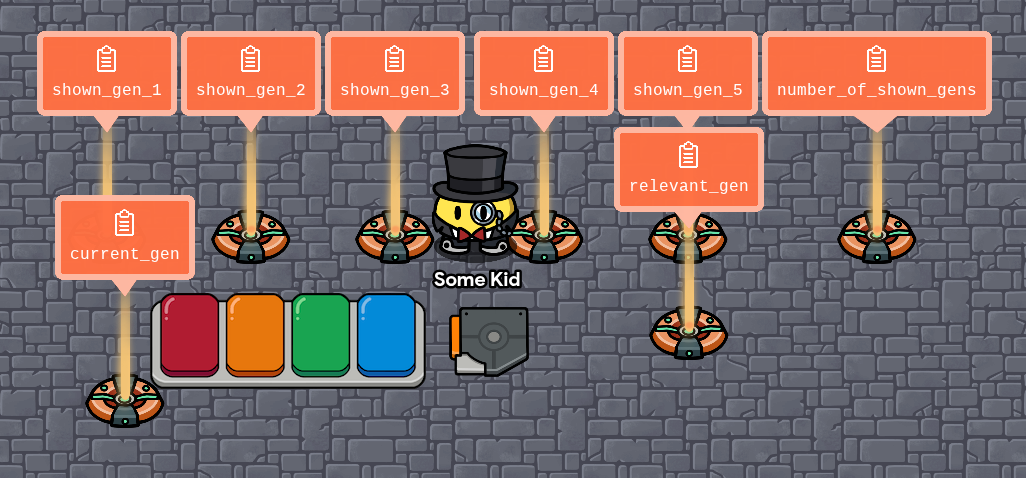
  1. You’re gonna need… hold up lemme count… 1, 2, 3, 4, 5, 6, 7. You’ll need 7 new number properties. Set each one to their respective name. They should all have the default settings otherwise. Oh, and also a trigger.

  2. Change these settings in the trigger, and make sure it’s not triggered by being stepped on.


    For Among Us tasks, have the trigger instead transmit to a relay, which relays as all players, and said relay should then transmit to the questioner block.

  3. Add this block to the questioner:

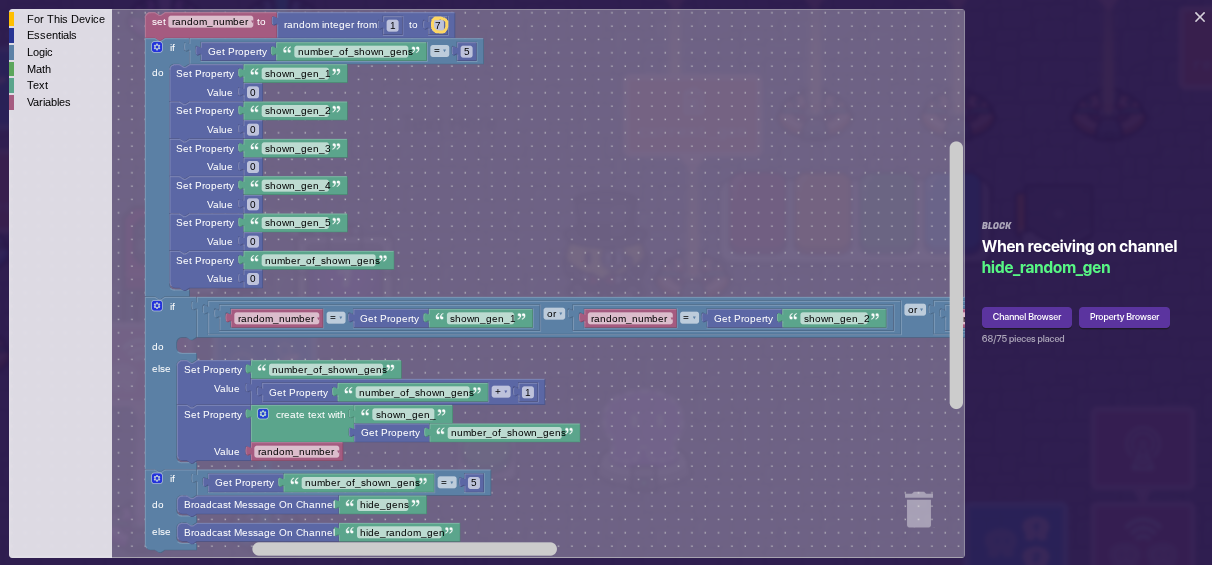
Replace the 7 (circled in yellow) with the total number of generators you have.
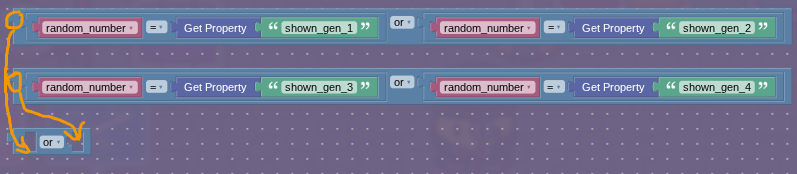
The long block that gets cut off looks like this. Put both of the large conditionals into the slots of the ‘or’ block.

  1. Add another block to the questioner:

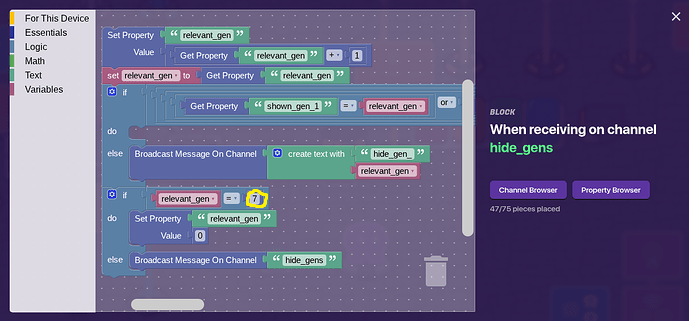
Again, the 7 circled in yellow should be replaced with the total number of generators you have on your map.
The long block that gets cut off looks like this. It’s the same as the last one, but with an additional ‘or’ for the 5th shown generator.

That’s it! Now, whenever you broadcast on reset_gens, only 5 of your generators will be shown to players, and they won’t be able to access the others.

Progress bar

You can do this two different ways. The easy way only shows if a generator is completed, while the hard one can show how many puzzles have been completed. However, the hard way requires you to piece together a fairly large block for each generator.

The easy way
  1. Create a prop or barrier to act as the progress bar. make sure it has collision turned off.

  2. Make it inactive on game start. It should deactivate when it recieves reset_gens, and activate when it recieves on gen_completed_x

The hard way

This will only work if you have the number of puzzles per generator set to 4.

  1. Set the gen_progress_x property to broadcast on gen_progress_update_x when it is updated. Make sure it broadcasts on start.

  2. Create a text device and put it over your generator prop, and add this block to it:

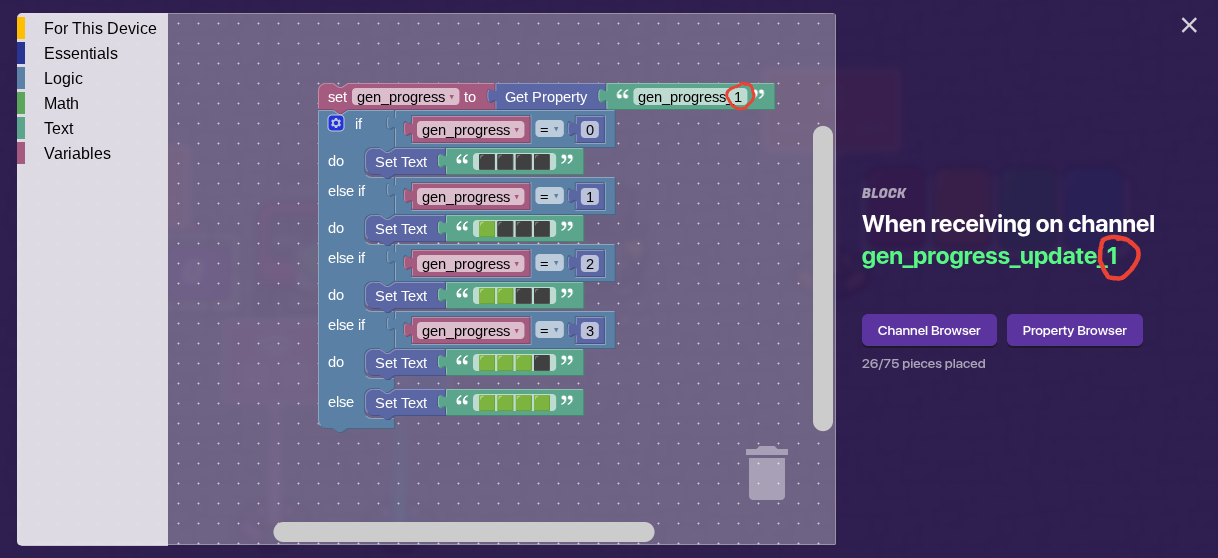
You can set the font size and outline to be anything you want!
Make sure you include the text when you copy it to another generator. Unfortunately, you can’t copy and paste blocks, so you’d have to completely recreate this block for each generator. :sweat_smile:

If you added the ability to hide generators, apply the same settings you did to the prop to the progress bar you created.

Making the evil scary unable to use generators
  1. Replace the channel the button broadcasts on to attempt_enter_gen.

  2. Add this block to the questioner, replacing the number circled in yellow with the team number of your k!llers:

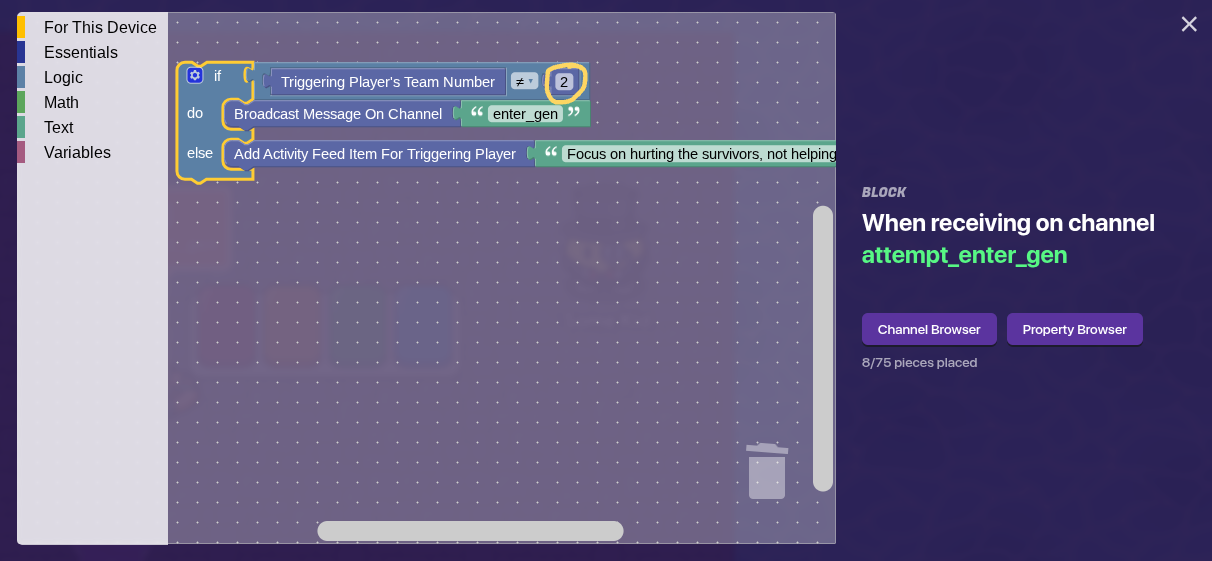
You can replace the text in the activity feed message with anything you want. This will be the message that is shown when the k!ller attempts to enter a generator. If you want, instead of sending an activity feed message you can broadcast on a channel that will send a notification to the k!ller, using a notification device.

Note: This is absolutely NOT the most memory efficient way to do this, but it’s way easier to make.

To add more generators, copy and paste the gen_progress property, checkers, prop, button, counters, and relay (everything on the left side of the overview). Then, change all the numbers circled in red and numbers that were denoted by an x during previous steps to the number of the generator. Finally, add any wires that were in your original generator.
Be aware that checkers can be buggy. Sometimes, when copied they’ll behave as though they don’t exist, and when you reload the map it will be as if they were never placed. To remedy this, you might have to make a new checker and copy the settings onto it.

How difficult do you think this guide is?
  • 3/10
  • 4/10
  • 5/10
  • 6/10
  • 7/10
  • 8/10
  • 9/10
0 voters

I hope this guide helps! Feedback is always welcome!

6 Likes

I didn’t put this in the ultimate Forsaken guide, as that is currently un-editable for some reason. Also, I plan to add the ability to reset the generators at some point.

2 Likes

Nice guide! It could totally also tie to this topic Once again, I like the guide!

2 Likes

he just said that he couldn’t put it in there because for some reason it couldn’t be edited

I completely remade the guide, as making generators was really tedious before, and I doubted anyone would be willing to take that much time. Now, it doesn’t require any blocks at all for just the base version!

3 Likes

Added a ton of optional functionality, and also changed the title!

Basically a bump 'cause I’m lwk miffed this guide got less attention than the one where I just changed settings in a text device.

Im a little confused with the “x.” Is it implying we have to do this for every generator in game?
nvm I understand now

1 Like

for some reason when I start the round its instantly sending gen_completed_4, and I don’t know why. In my game the task is supposed to dissapear when that’s sent out, and its just gone when ever I start.
Do you know what might be causing this

I guess I’ll just switch up how it works for now

I don’t know why this would be happening, as the system doesn’t even have a lifecycle that would broadcast on game start.

As for your confusion with ‘x’ and circled numbers, it’s supposed to be the number of the gen you’re working on. Each gen you make has a number assigned to it, so 1-4 in your case. In the settings for the parts for each gen, you should change the numbers that were shown as x in the instructions to the number you assigned to the generator.

4 Likes


bumpmub

@some_kid you are sus like an amongus,
unlike us, who take rides on a bus
plus, you wanna discuss?

what’s wrong with it? [1]

fair enough

yeah it’s still easy to understand
but drop-downs bro


  1. other than the formatting, the formatting is abysmal ↩︎

1 Like

Sigh.
Why oh why
do you not let this guide dle perish?
To what inquiry would you like me to reply?

“Dle” was the only rhyme I could think of.
Hey, I thought the formatting was at least passable. It seemed legible enough to me.

3 Likes

good guide

please do try using drop downs
or headings
its much easier to process large chunks of information in tiny bits- which is why people like to read guides that are clearly separated!

trust me i made an art guide on the wix chat with no headings and it is SO intimidating
heres a formatting guide that you might find useful

extra formatting options for the uninformed!

[1]

Headings!

you can make this using a hashtag and a space (# exampleText)
there are SIX different sizes of heading!

exampleText (# exampleText)

exampleText (## exampleText)

exampleText (### exampleText)

exampleText (#### exampleText)

exampleText (##### exampleText)
exampleText (###### exampleText)

you can also make this using h1-h6 wrapped in the left and right arrows!

exampleTxt

<h1>exampleTxt</h1>

however, it seems like if you put text under headings using html formatting (that ^) then all formatting for that text just doesnt work

heading6
**bold**

bold

<h6>heading6</h6>
**bold**

**bold** //why does this one work?

[2]

heading6

bold

<h6>heading6</h6>

**bold** //??????

Dividers!

you can make these using three asterisks in an empty row!
***
examples above this and directly below this sentence


Footnotes!

i used to refer to these as tooltips but it turns out theyre actually named footnotes
you can make these using one caret, one left bracket, whatever you want inside, and one right bracket!
^[]
[3]
also images can go into the tooltips
[4]


Images!

you probably know how to put these in
but you can actually change the sizes to a number outside of 100, 75 or 50!
simply go to the text version of the image

![2025_12_05_0dl_Kleki|690x431, 50%](upload://8Z7cJoamPD5uiGyRpwYgOg29ujL.png)

find where the size is typed in;

690x431, 50%]
/* aka
width x height, size of image] */

and change the percentage!

![2025_12_05_0dl_Kleki|690x431, 10%](upload://8Z7cJoamPD5uiGyRpwYgOg29ujL.png)

you can also crop them via the size (they wont stretch)

![2025_12_05_0dl_Kleki|690x200, 50%](upload://8Z7cJoamPD5uiGyRpwYgOg29ujL.png)

Preformatted Text! (alternate form)

you can make another version of preformatted text by just using two backticks (`) instead of six!

/* < this is a comment to get rid of the highlighting ignore
`exampleTxt`

exampleTxt
the only different with this is that it gets rid of highlighted key words that you’d see in actual code
and also gets rid of line breaks [5]

if (var example == string txt)
{
Console.WriteLine("line 3");
}

if (var example == string txt) { Console.WriteLine("line 3"); }

Strikethrough!

you can make these by using two tildes (~) on both sides of your text!
~~exampleTxt~~
exampleTxt
[6]
theres multiple ways of doings this, though markdown uses less characters

[s]exampleTxt[/s] bbcode; <s>exampleTxt</s> html; ~~exampleTxt~~ markdown

the rest of these will just be extra things you can make using markdown (and maybe bbcode or html)

More Formatting Options!

Superscript and Subscript!

[7]

Normal text for comparison<sup>exampleTxtSuper</sup>
Normal text for comparisonexampleTxtSuper

Normal text for comparison<sub>exampleTxtSub</sub>
Normal text for comparisonexampleTxtSub

Small Text!

jk apparently “< small >” but with no spaces is blocked

Big Text!

<big>exampleTxt</big>
exampleTxt

Marked Text!

<mark>exampleTxt</mark>
exampleTxt

Deleted Text!

<del>exampleTxt</del>
exampleTxt
[8]

Inserted Text!

<ins>exampleTxt</ins>
exampleTxt

Keys!

<kbd>exampleTxt</kbd>
exampleTxt

EXTRA STUFF

you can actually stack formatting! (kinda)
helloo
<ins><big>**he**~~ll<mark>o</mark>o~~</big></ins>

sometimes the formatting wont work
like in this example
hel~~lo~~
<kbd>hel~~<mark>lo</mark>~~</kbd>
this one is meant to have a slashed + marked segment
lo
~~<mark>lo</mark>~~
however <kbd></kbd> stops that
this will prob be true for other combinations i havent seen yet

its also possible to stack things on themselves
like this here
hihihi
<kbd>hi<kbd>hi<kbd>hi</kbd></kbd></kbd>
i tried doing the same thing with subscript however it seems they stop people from doing that


  1. if it matters at all; i just copy & pasted this in since i dont have the energy to constantly retype this everytime somebody makes their first guide or has bad formatting
    ALSO
    you will prob always find new things appearing on more recent copy pastes of this guide
    this is because i myself am always learning things i didn’t know i could do here ↩︎

  2. two slashes (//) make a comment in c sharp ↩︎

  3. exampleTxt ↩︎


  4. ↩︎

  5. and looks a little bit different ↩︎

  6. :.|:; ↩︎

  7. some of these might tell you “< aa >exampletxt< aa > is not allowed!” or smth like that dont ask me why that happens but idk how to fix it ↩︎

  8. fun fact: this is actually how i used to do strikethroughs :sweat_smile: ↩︎