This is my first guide, so any feedback is very appreciated. This guide is long, but so, so, so worth it. With that, let’s get to it! ![]()
![]()
Items Needed
In order:
Button - 1x
Game Overlay - 1x
Health Granter - Any Amount
Trigger - Any Amount
Lasers - 3 For Every Two Triggers
Shield Prop - 1 For Every 3 Lasers
Optional:
Item Granter - 1x
Health Granter - Any Amount
Checker - 1x2. 3.
It’s best if you separate the devices into groups.
(Button, Game Overlay, Health Granter, Item Granter)
(Trigger, Lasers, Shield Prop)
(Checker & Health Granter)5. 5. 7.2. 3. 3. 4. 3.
Device Set Up
-
Put the Button where ever you want the player to gain the ability to throw the shield, as if they were given the shield. You can either transmit on channel (Throw Shield) or wire the Button to the Game Overlay. Also, wire the button to an Item Granter and grant the player with an item that no other player can get.
-
Set the Game Overlay to button. I prefer the button to be on the bottom left or right, but do you can you do boo. Make it to where whenever the overlay button is pressed, it transmits on Shield 1. Make the Game Overlay’s scope set to player.
-
Place the triggers in pairs like so:
You can add as many as you like.
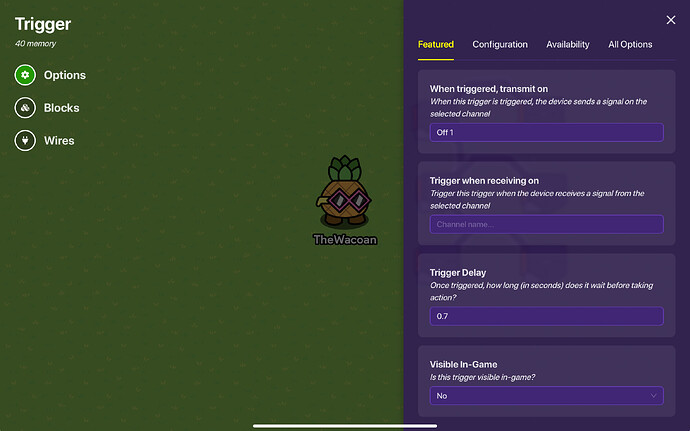
On the top left trigger, make the settings like so
-
Wire the top left trigger to the top right trigger. Make the wire say: Triggered —> Trigger
-
Make the left trigger’s settings like so:
-
Wire the top LEFT trigger to the one below it and make it look like Triggered —> Trigger
Make the second left trigger have the same settings as the first one, but with no Trigger When Receiving On setting and the When Triggered Transmit on setting set to Throw 2. -
Do the same thing you did with the top pair of triggers with the second pair, and every other pair you have. Make sure that with each pair, the Throw # and Off # match and increase with each number of trigger pairs.
Shield & Damage
After you’ve finished setting up the background devices, you can finally move onto building the bouncing (and damaging) shield.
- Choose a starting point. This is where the shield will start the throw.
- Place 3 red, white, and blue lasers down. They should start at the starting point and end where ever you want the shield to bounce from (Like a wall or a prop). The settings the first group of lasers should look like so (Bold Means that that setting is the same for every single laser):
Active on Game Start: No
Activate When Receiving On: Shield 1
Deactivate When Receiving On: Off 1
Laser Group: Shield 1
When Player Hit, Transmit On: Shield Damage
Do this with each group of lasers, but increasing the laser group number and the Shield # and Off # channels with the triggers that control them. - Add a patriotic shield to the point where the first group of lasers hit a prop or wall and make its settings look like so:
Visible on Game Start: No
Show Prop When Receiving On: Shield 1
Hide Prop when Receiving On: Off 1
Prop Damage Enabled: No
Use this same technique, increase the Shield # and Off # channels with the triggers that control them.
AND YOU’RE DONE!!
Extra
In order to make sure the person who “throws” the shield doesn’t get hurt by them, place down a checker.
- Make the Checker’s settings look like so:
Check When Receiving On: Shield Damage
When Check Fails, Transmit On: No Damage
And then on Check #1…
Check Type: Item Amount
Item: Whatever you granted the player earlier
Comparison: Equal to
Value: 0 - Place down a Health Granter and make it to where it grants the total amount of damage that the shield takes away, to the player again.
For some extra fun, place down some Health Granters
- Make the Health Granters grant only shield health, and fill it up all the way.
And there you have it! A working, bouncing, animated, damaging Captain America shield to use in your game. If you have any questions at all, feel free to ask away! Thanks for reading.
- 0/10
- 1/10
- 2/10
- 3/10
- 4/10
- 5/10
- 6/10
- 7/10
- 8/10
- 9/10
- 10/10
- 11/10


