This is a simple guide on how to make a keycard operated door. If a player with a keycard tries to open the door, it will open for a short period of time, letting them in. This is my first guide, and I did my best to make it very easy to follow.
Devices Needed
1x Barrier
1x Button
1x Checker
1x Notification
1x Wire Repeater
(Note: these devices are what you need to make the door, props and devices needed to make any room behind the door or to get the keycard are not included.)
Step 1
First you’ll want to place your barrier. None of the settings need to be changed, unless you want to change what it looks like.

Step 2
Next, place your button. The following setting should be changed:
Visible In-Game —> No
The button should be placed on top of the barrier, like so.

It is a good idea to also change the button message as well.

Step 3
Now, place a checker. Wire it to the button like this:

The checker will need to check if the player has at least one keycard. Change these settings on the checker:
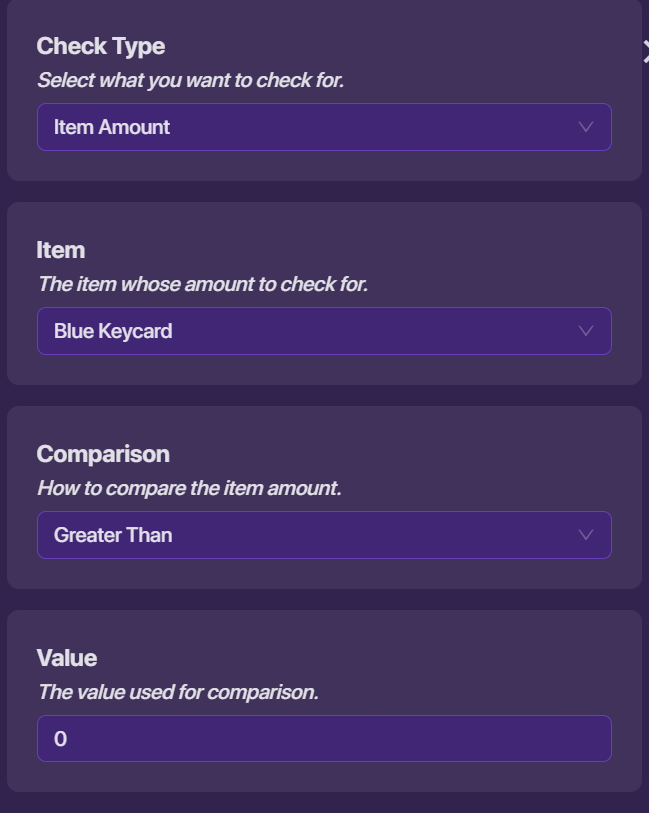
The other settings can be kept the same.
Step 4
If the player does not have a keycard, they’ll need to know that. Place a notification, and change the settings to look something like this:

Now wire it to the checker like this:

Step 5
Now, we need any player with a keycard to be allowed in the door. Wire the checker to the barrier like this:

Step 6
However, we still need the door to close again. For this, we will need a wire repeater. Once you place it, wire it like this:

We want the door to stay open for one second before closing. To do this, change the delay on the repeater:

Finally, wire the repeater to reactivate the barrier.

Testing
To make the door practical, we’ll need a way to get a keycard, as well as a room to get into. As you can see, I have added those here, as well as made the barrier slightly bigger.

As we can see, the door now only opens for players with keycards. However, a player quick enough can slip past the open doors while they last ![]()
If you enjoyed this guide, please click the ![]() button!
button!