Ok, I realize how late it is, but I don’t care about sleep, so I’m making a guide.
No way I just spent 3-4 hours when I was supposed to be sleeping making this guide ![]()
Just a warning, this involves block code which half of you don’t know how to do but it’s pretty simple.
Wiki editing rules:
- Ask for permission before editing
- Check the box when editing and uncheck when done
- Do NOT check the box for fun.
Check this box when editing and uncheck when done.
The Guide
This guide’s final product is recorded as a long gif. View it below. Do note that this includes all things that pictures got taken for, excluding activity feed as nothing ever appears in the activity feed on the device it was recorded on. You may have to click for it to play. Ping me if it doesn’t work.
Step 1: Property
Create a property. Name it something like “Team number”, set the type to “number”, default value to 0, scope to player, and “When property value changes, transmit on” to something like “propertyChange”.

Step 2: Triggering
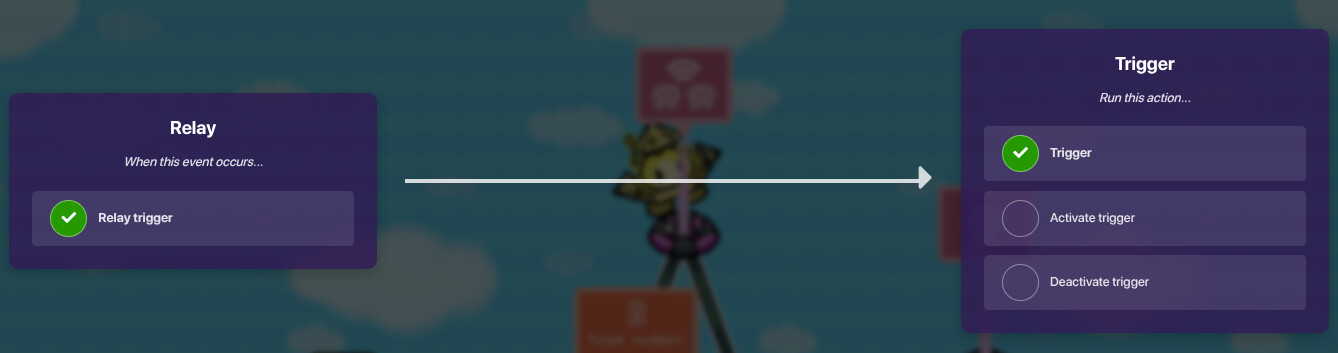
Place a lifecycle, relay, and trigger. Don’t change any setting on the lifecycle and relay, and place wires like this.
Lifecycle ⇒ Relay

Relay ⇒ Trigger
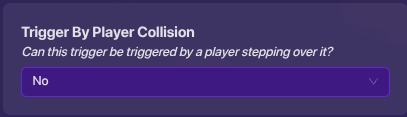
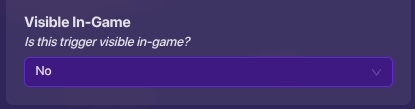
Trigger settings:
Set “Visible In-Game” and “Trigger By Player Collision” to no.
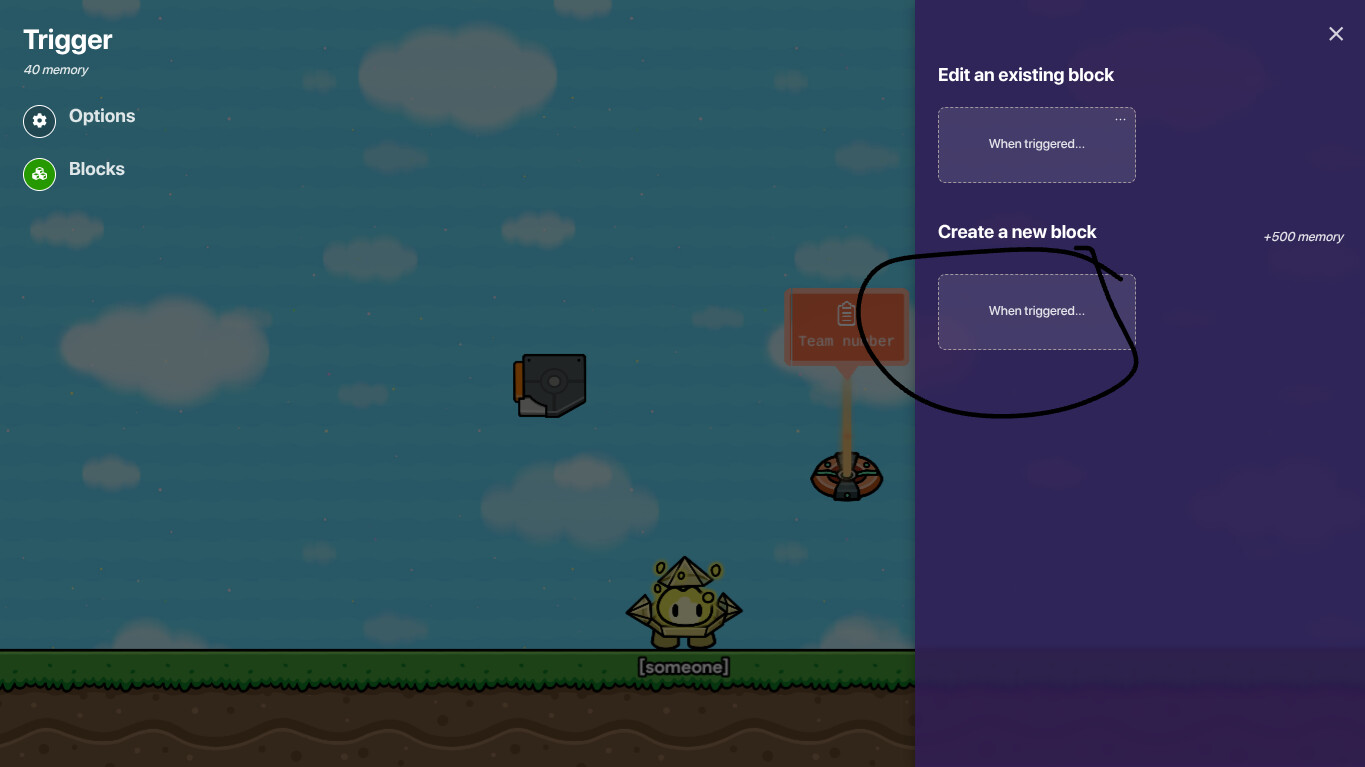
Step 3: Creating Blocks
On the left of the trigger’s settings, click on blocks. Then under create new block click “When triggered”.
Step 4: Block Code
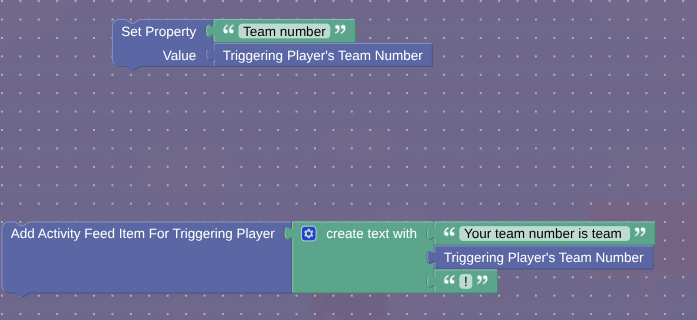
Click on essentials and drag the “Set Property _______ Value _________”. Select the property “Team number” and attach it to the “Set Property” block. Then click on essentials and drag “Triggering Player’s Team Number” to “Value”.
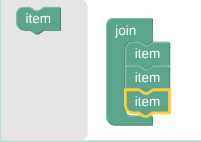
OPTIONAL: Go to essentials and drag out the "Add Activity Feed Item For Triggering Player block. Then go to text and attach the “create text with” block. Then attach a blank text box to the top. Type "Your team number is team " or whatever you want the message to be, INCLUDING A SPACE AT THE END. Now go back to essentials, drag another “Triggering Player’s Team Number” to the second slot. Now, click the gear at the top left of the "create text with. Drag another item to the bottom.
Now add another text box to the last slot containing whatever punctuation you want.
Final product for this step:
Step 5: Playtest 1
To make sure everything is working ok, start the game and open it in another tab. On both, you should see a pop-up saying something like this.
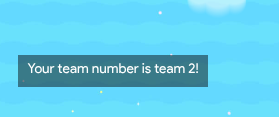
Make sure that they are both different numbers or you may have done something wrong.
Ok, technically, you are done, however how will this be used? All I’ve shown you is how to make a pop-up telling people their team at the start of the game. So how can this be used? Below are examples on how to use it, as well as how to make them.
Uses
Sabotage
There are many forms of sabotage, including (but not limited to) spawning sentries in a teams base/that can only attack a certain team, damaging all players on the opposite team, etc.
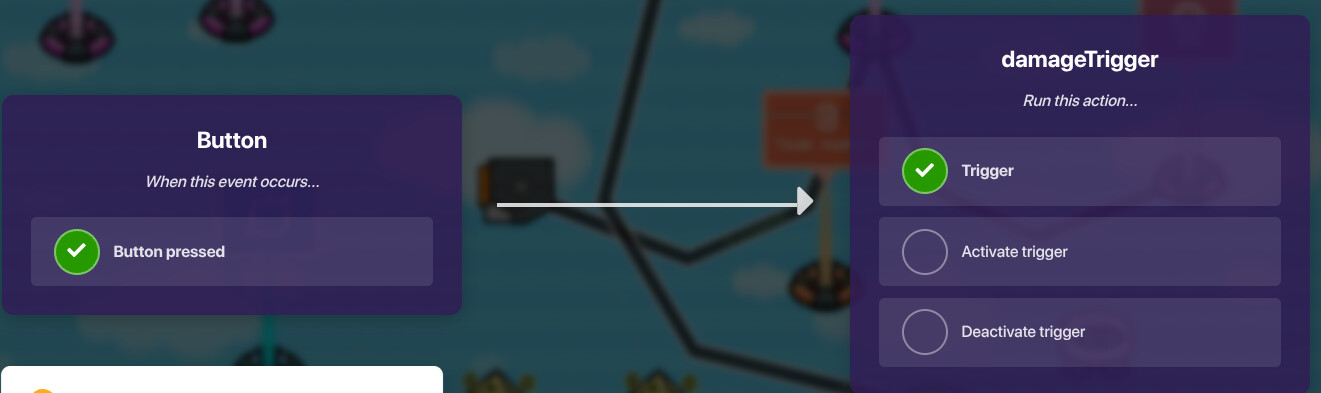
Step 1: Detecting team
First, place a trigger and set “Visible In-Game” and “Trigger By Player Collision” to no. Create a block the same way as you did step 3[1]. Click on logic and add an
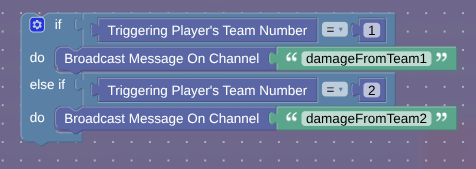
If _______ Do " statement. Now, this is where it gets messy. Click on the gear. For every extra team, you must drag an else if under the if. [2] Now, take a "=_" from logic, and connect it to the “If”. Add “Triggering Player’s Team Number” on one side, and get a number from math and put it on the other side. Set it to one.
Under “Do”, go to essentials and get “Broadcast Message On Channel” and grab a text box. Set it to something like “damageFromTeam1”.
Now repeat that doing the same for each “else if” just like “if”, only changing the team number for each.
In the end, it should look something like this, although it will look different depending on your number of teams. I used 2, however 3 or 4 would look different.
Step 2: Damage
Damager
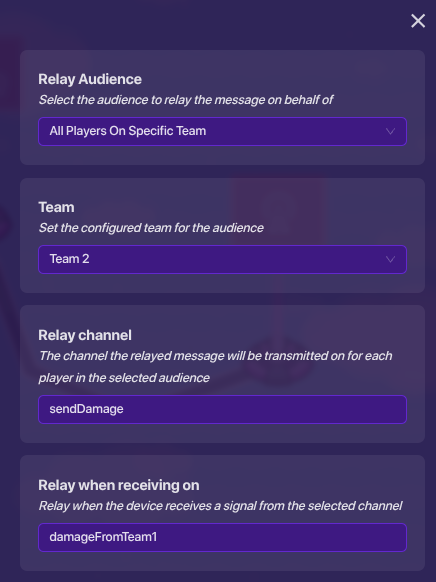
Place a relay. Set the audience to “All Players On Specific Team”. Set the team to team 2, set the relay channel to “sendDamage”, and “Relay when receiving on” to damageFromTeam1. Duplicate this for each team, changing the team number and channel. In this case, I made it so that team 1’s attack would affect team 2, but if you have more teams, you could change it so that team 1’s attack affects team 4 instead.
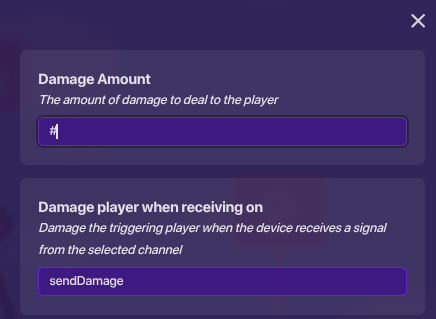
Place a damager. Set the damage amount to whatever you’d like. Set “Damage player when receiving on” to “sendDamage”.
Sentries
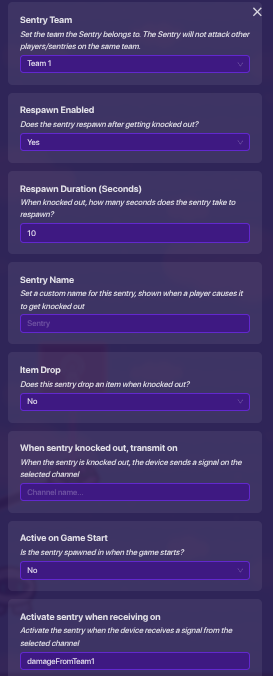
Place a sentry. Set its team to team 1, set it to not be active on game start, and set it to activate on “damageFromTeam1”. Now place it in team 2’s base, or any area that people from team 2 will be in. You can add some way to deactivate it later.
Now duplicate the sentry, but set this one to team 2 and set it to activate when receiving on “damageFromTeam2”, and place it near team 1. This way, sabotage will damage everyone on the team and spawn sentries near them.
Switching teams
If you have some point in the game where a player can switch teams, wire the device or add the channel that switches teams to the pop-up trigger (step 2). Then you will get a pop-up on the side saying what your team is.
Overlay
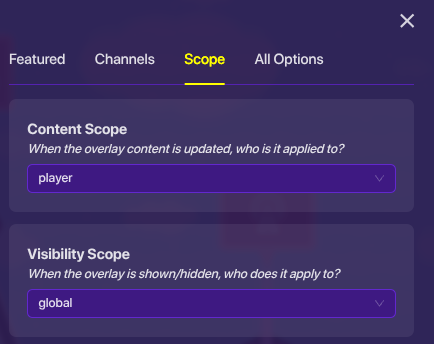
Add an overlay. Set the content scope to player.
Create a new block when receiving on channel (IN THE OVERLAY) and set the channel name to something like “overlay”.
Click on for this device and add “Set Text”. Then add “create text with” to the end. Set the first item to text saying "Team Number: Team ". Set the second one to “Triggering Player’s Team Number”.
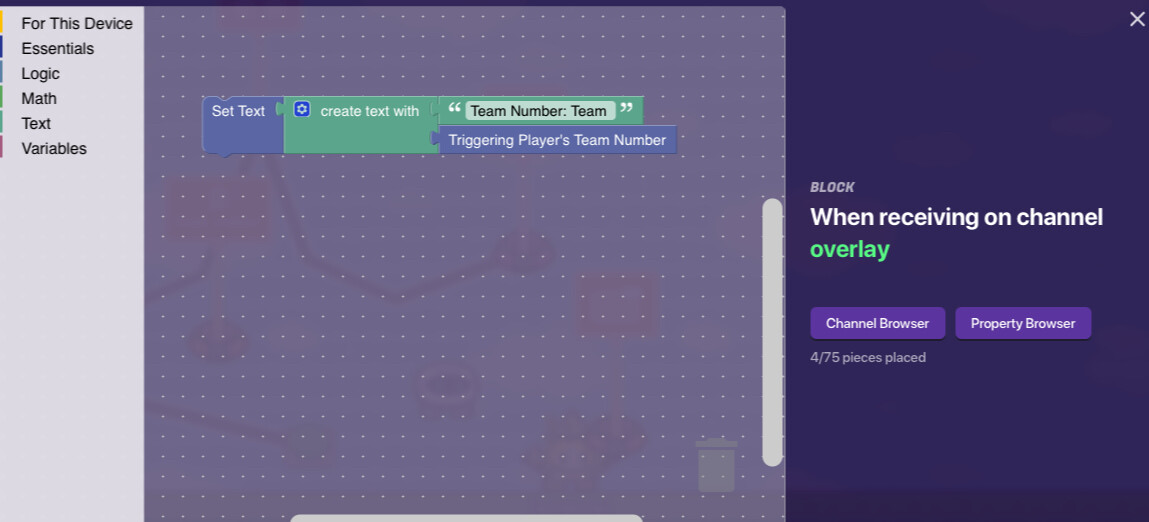
Now go back into the first relay from step 2 and add the relay channel as “overlay”.

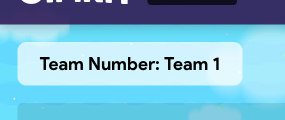
And now you will see something like this in the corner.
The explanation section here exists because while some people are fast learners, people might follow the exact steps but wouldn’t understand it, and they wouldn’t learn anything. I am adding this section so everyone knows what each step does.
Explanation
We start out on step 1, the property. A property is necessary so that whenever you need to detect the team number, you have something that holes it. The property needs to be a number because it stores the number of your team. If you are confused on what scope is, read here. The scope should be set to player because every player doesn’t have the same team.
Moving on to step 2, the lifecycle will send a message on the game start. The relay will receive this and trigger it for all players, meaning all players will receive the effects from whatever message was sent. The trigger doesn’t need to be able to be seen in the game and should not trigger every time someone touches it, so those setting are off.
Step 3 is simple, when the trigger gets triggered, it runs the block code.
Step 4 starts our block code. The first part is simple, the property will get set to your current team number. On the second part, create text with allows you to combine multiple things to make text. The activity feed is on the left side and can have messages pop up. The first part will add the text "Your team number is team ". The space at the end is necessary because otherwise your final product would be “Your team number is team#!” Now that that’s added, adding “Triggering Player’s Team Number” will add the team number, and the last text is just an exclamation mark for proper grammar.
Step 5 is just testing this out to see if it works.
Now, on to explaining the example uses.
Sabotage Explanation
All the block code does is if the triggering player’s team number is equal to 1, they must be on team 1 so there will be a message sent to do damage from team 1. The same thing for team 2 and if you have more than two, then continue to 3, and 4, and 5, and so on.
The damager will damage all players on a specific team so that team 1 could damage team 2, team 2 could damage team 1 (or team 3), and so on.
The sentries receive on a channel and appear. Sentry team means the sentry will be on the same team as players, not attacking those players. Team sentry means it will attack all players. Remember that sentries can attack other sentries of the opposite team.
Overlay Explanation
You should remember what scope is, so setting the content scope to player means that only the player can see what is there for them. For the blocks, all it does is sets the overlay text to “Team Number: Team #”. Then, the relay will make sure it appears for all players.
Ok, that’s it for now. More might be added at a later date.
Polls:
DIFFICULTY Poll
- 0
- 1
- 2
- 3
- 4
- 5
- 6
- 7
- 8
- 9
- 10
- 11
RATING Poll (be honest)
- 0
- 1
- 2
- 3
- 4
- 5
- 6
- 7
- 8
- 9
- 10
On the left of the trigger’s settings, click on blocks. Then under create a new block click “When triggered”.
↩︎
If that doesn’t make sense, set it up like this
 for 2 teams,
  for 3, and so on until you reach the number of teams. I’d recommend using a set number of teams, preferably very low, as opposed to splitting into even team amounts. ↩︎