Intro: Welp you guys asked and you shall receive. I’ll be doing weekly updates on Fridays.
So if you have never played before, Undertale is a turn-based RPG where you play as Frisk exploring the Underground, which is full of monsters.
Disclaimer
the OP isnt active as of writing this. they have put me in charge of allowing people to edit, so if you want to edit ask me. - Fleet.
Undertale
⚠️ Environmental Art ⚠️
This section will include terrain/props to make the following areas from Undertale:
Ruins
Floors
The Ruins is the first area encountered in Undertale, and has a Pink-Magenta Color theme.
For the Floors, you need a transparency 0.8 Barrier (COLLISION OFF, BORDER OFF), with the color [R: 255 G: 0 B: 255]. Under said barrier put Stone (Light) floors.
Your Floor should look like this:

Walls
Now for the Walls!
The same method will be applied as the floor, except the barrier has collision on, the colors are [R: 86 G: 0 B: 97]
The floor under the barrier should be Stone (Dark)
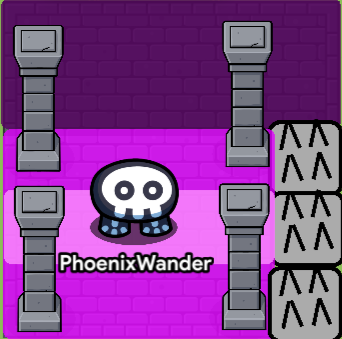
The wall should like like this:

Traps
Now that the walls and floor are done, we get to move onto my favorite part of the ruins.
TRAPS!
The ruins are full of puzzles which block off doors with spike traps, and here’s how to make that spike trap
-
First, you need a barrier, with transparency 1, [R: 171 G: 171 B: 171], that is about the size of a tile.

-
You then need to take 2 dark wooden poles, scale them down, make them jet black, and position them to look like spikes. Repeat this 4 times.

-
Finally, take the spikes and put them on top of the barrier. You now have a spike trap.

Minor Art
Now that all the major art is done, the minor details need to be taken care of.
For the pillars in the ruins, you can use the Gray Stone Column prop, specifically the one that isn’t broken down at all.
For the paths, you can take the normal floor barrier, and make it lighter.
For rocks, you can use a rock prop (revolutionary)
That should be all the minor art.
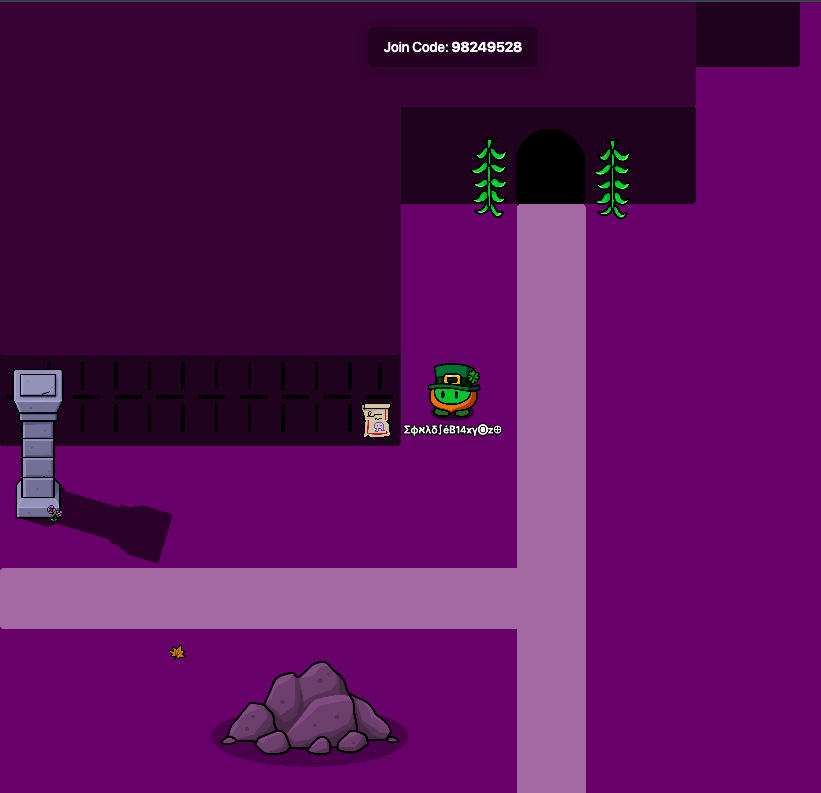
Here is an image of a small model of what the ruins could look like!
🛑Snowdin🛑
🛑Waterfall🛑
🛑Hotlands🛑
🛑Hotel🛑
🛑Core🛑
🛑Palace & Barrier🛑
⚠️ Enemies ⚠️
In this section you will make a enemy encounter randomizer, the turn-based attack system, and bosses.
Enemy Encounter
I’m not Toby Fox, so I have no idea how he made his random encounter work, but this will work pretty well for this Undertale remake.
Devices
- 1x Trigger per Encounter Location
Trigger
First, choose the area in your game where this trigger will go (each area should have 8-10 triggers, depending on size). I’m going to choose Snowdin. Now after you place this trigger, you need to decide what kinds of creatures you want to attack in this area. Choose at between 3-8 creatures. I chose:
- Snowdrake
- Ice Cap
- Jerry
- Greater Dog
Now we can finally move onto settings:
Settings:
Set visible in-game to no. Make it deactivate when receiving on enemy[#]killed. The # will whichever number trigger this is (if this is the first encounter trigger in your game then it will beenemy1ki<m>lled, if it is the second then it will beenemy2ki<m>lled, etc. Finally, run some blockcode when triggered.
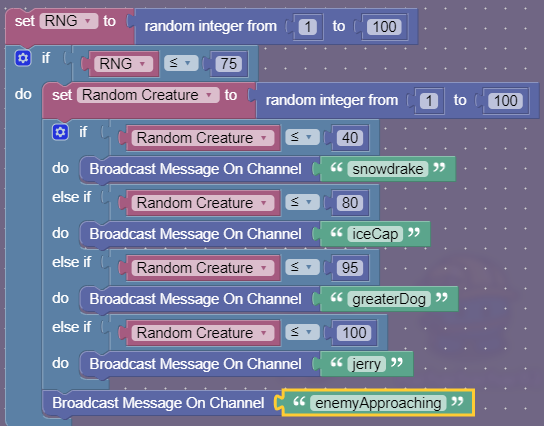
Explanation:
When a player unknowing runs over this trigger, they have 75% chance of having an encounter with a monster. The highest chance is Snowdrake/Ice Cap, followed by Greater Dog, the finally Jerry. No matter who they fight it will broadcast onenemyApproaching. If they kill the enemy it will deactivate the trigger because this enemy is dead and call no longer be encountered.
Side Note:
Minibosses are monsters that are slightly more powerful, but not enough to be considered bosses. They can only be encountered once. For these setRNG to 100%and make them the only possible encounter. Their triggered should deactivate after the fight because they can only be encountered once.
⚠️ Turn-based Encounter System ⚠️
This is the meat of the game, where the characters actually fight enemies and to help me explain things I brought my good pal, Napstablook! Say hello Napstablook.
hi
Tell us a bit about yourself.
i like to lay on the floor
Okaaaaaay. Uhhhhh. Are you excited?
no
Well I’m just gonna get started…
okay
Devices
- 14x Barriers
- 36x Zones
- 36x Trigger
- 4x Property
- 2x Teleporters
- 1x Camera Point
- 1x Camera View
- 4x Buttons
- 8x Text
sometimes i watch mettaton
Now’s not really the time…
oh. okay
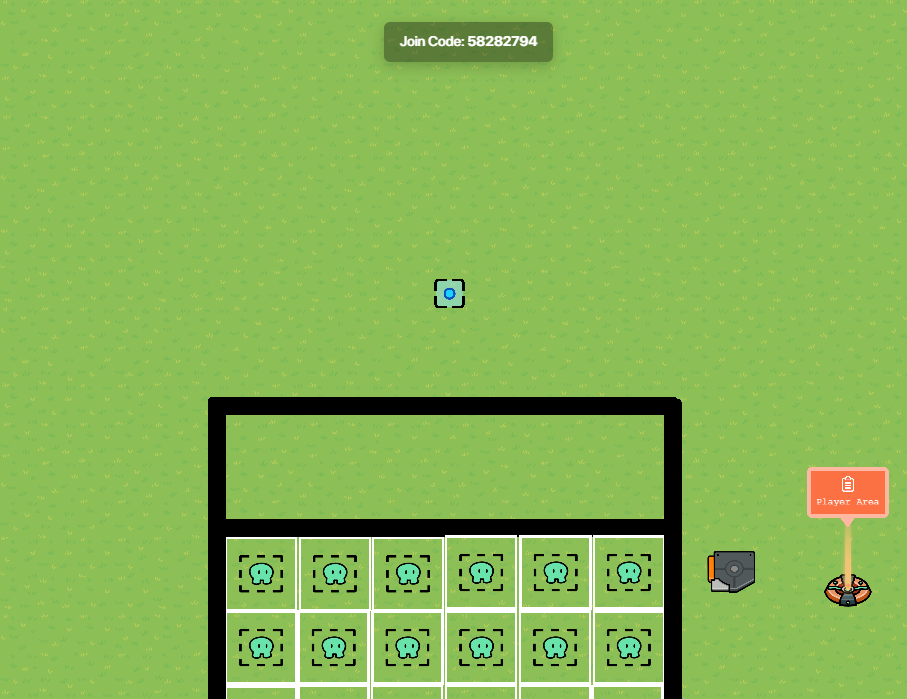
Barriers 1-6 (The Framework)
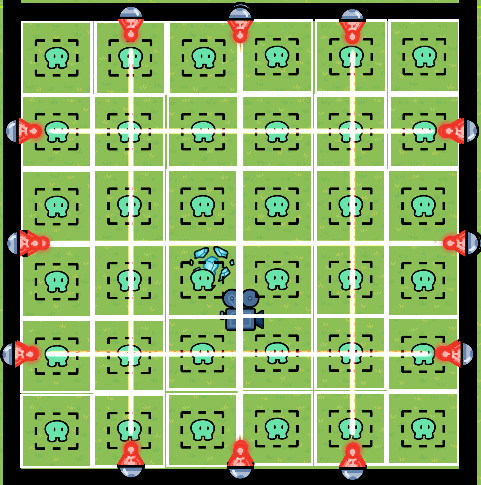
The first part is really simple. Simply line up the framework of the encounter arena like this:
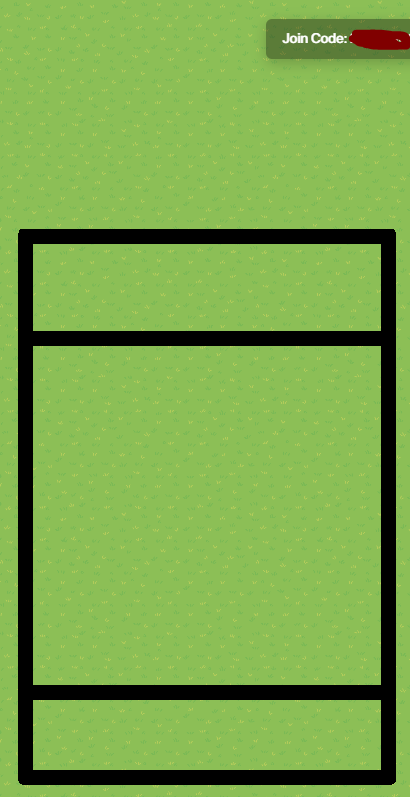
The horizontal barriers are about 11 gims tall and the vertical barriers are about 8 gims wide. You want to make sure to leave some room up to for the battle sprite art!
is that where they will see me atYes.
oh. that's unfortunateI set my barriers to Alpha 1, Border Off, and Color Black
Zones 1 - 36
Place the zones in a 6x6 grid inside of the biggest box like so:
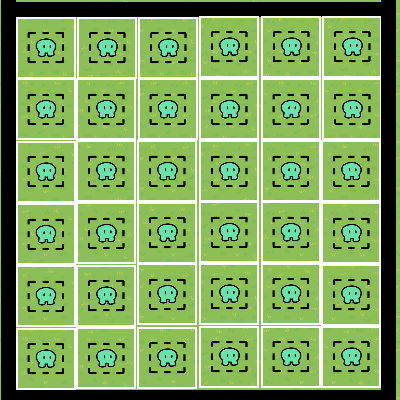
Settings:
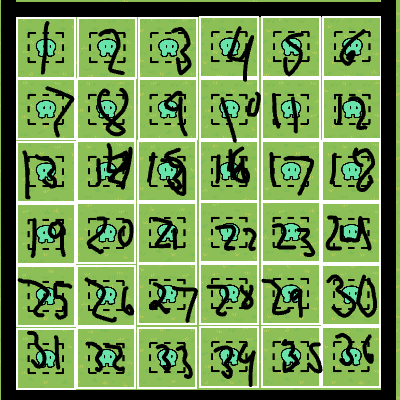
Make the enter zone when receiving onzone[#]. The # should be the number that is displayed in this chart:
thats too complicated i would rather lay down
Explanation:
When a player enters a zone it will transmit on the channel.
Triggers 1-36
Settings:
The trigger should trigger when receiving onzone[#]. Make sure to have trigger by player collision and visible in-game set to no. Finally add this blockcode when triggered:
(The blank number block should be the same number as[#])
Explanation:
When the players enters a zone, it will trigger this trigger to set a property to hold the players location.
Side Note:
You may be wondering why I didn’t just put the triggers instead of the zones in box. I did that so on the off chance I player manages to run in between the triggers the game doesn’t glitch and damage then when it shouldn’t have. Zones cover a whole area, which avoids this. I didn’t use the player coordinates device because it would complicate things that we would do later.
...
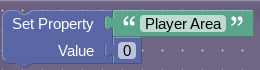
Property
This property will contain all the players location on that zone grid we made.
Settings:
The property name should be Player Area, property type should be number, default value should be 21, and finally property scope should be player.
Explanation:
This property will track the player’s location when dodging attacks, it will help later when we make attacks
Teleporter 1 (Dodging)
Settings
Set visible in-game to no and teleport here when receiving onsoul.
Explanation:
After the player selects their action, they will enter the be teleported into the Soul Box so they can dodge the monsters attack
Teleporter 2 (Options)
Settings
Set visible in-game to no and teleport here when receiving onoptions.
Explanation:
After the player dodges attacks, they will enter the be teleported into the Options Box (Bottom small box) so they can choose their action
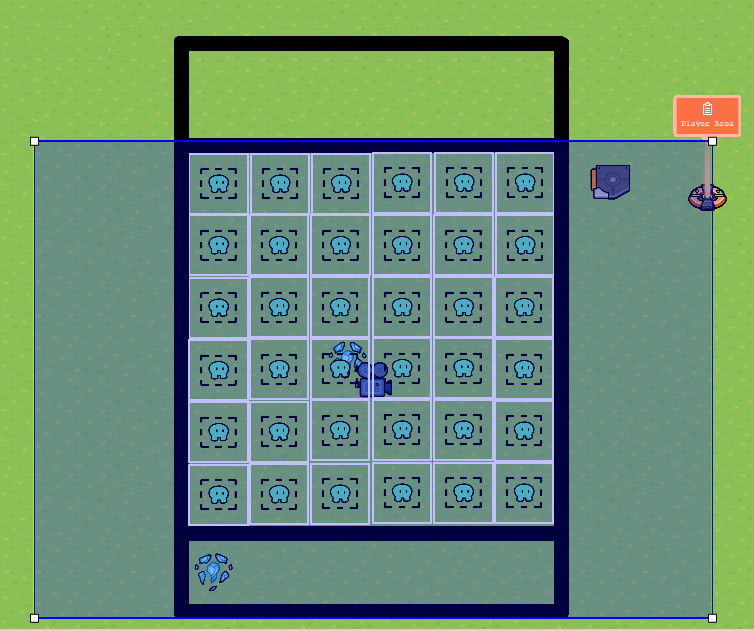
Camera Point
Settings:
This camera point should activate when receiving onactionand deactivate when receiving onsoul. When placing the camera point, I found this as the ideal location:
Because when used in the game it all lines up very nicely:

Explanation:
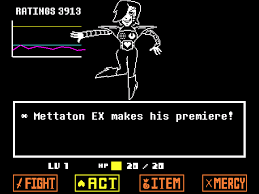
After a player does their action, the monster they are fighting generally responds like this:
Instead of having a player block that fabulous sprite art that I’ll make eventually, I just used a camera point.
Camera View
Settings:
This camera view is added simply so that way the player can’t see monster reponses while they are dodging. This isn’t really required, just mostly something to make it look nice.
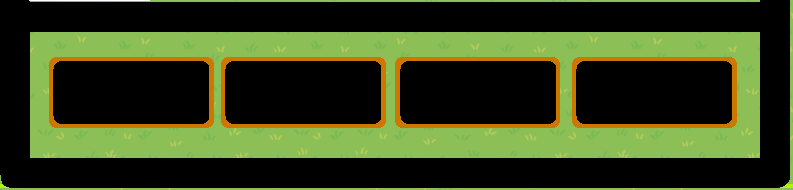
Barriers 7 - 14 (The Choices)
On your turn, you have four options: fight, act, item, and mercy.
Settings:
Add four barriers like this:
I set their color to black, their alpha to 1.00, border to off, and collision enabled to no.
Now add four barriers like this:
I set their color to #CC7700, their alpha to 1.00, border to off, and collision enabled to no. Using Layers, I moved them behind the black barriers

Explanation:
Eventually we will be text on these barriers and make them into clickable options for the player on their turn.
Side Note:
Make sure all 8 of these barriers are on Below Layer!!!
Text 1-4 (The Choices)
Settings:
Using 4 text boxes I added this text:
I set the font to Outfit and the color to *#CC7700. Here are the emojis if you need them:

⚔️FIGHT
🔊ACT
💰ITEM
✖️MERCY
Explanation:
These text boxes just add a bit of flavor to the buttons!
Buttons 1 (Attack)
i just woke up please dont attack
Oh no not you Napstabook… Probably Jerry though…
okay. can i watch?
Sure!
okay.
Settings:
Set the button message toFight[1] and it when button pressed, transmit on
fight. It should deactivate when receiving onfightand activate when receiving onsoul.
Explanation:
By clicking this button the player chooses to fight the monster. When clicked, it deactivates (so it can’t be abused) and then reactivates when the player is teleported into the Soul Box.
Button 2 (Act)
Settings:
Set the button message toAct and it when button pressed, transmit on
act. It should deactivate when receiving onactand activate when receiving onsoul.
Explanation:
By clicking this button the player chooses to act. When clicked, it deactivates (so it can’t be abused) and then reactivates when the player is teleported into the Soul Box.
Button 3 (Item)
Settings:
Set the button message toItem and it when button pressed, transmit on
item. It should deactivate when receiving onitemand activate when receiving onsoul.
Explanation:
By clicking this button the player chooses to use an item. When clicked, it deactivates (so it can’t be abused) and then reactivates when the player is teleported into the Soul Box.
Button 4 (Mercy)
Settings:
Set the button message toMERCY and it when button pressed, transmit on
mercy. It should deactivate when receiving onmercyand activate when receiving onmercyConfirmerd.
Explanation:
By clicking this button the player chooses to try and spare the monster. When clicked, it deactivates (so it can’t be abused) and then reactivates at a later time.
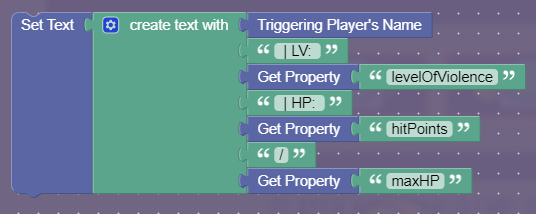
Text 5 (Stats)
In Undertale, under your name you have several stats displayed, and that is what we will be displaying here
Settings:
I set the font to Staatliches, the color to black, and font size to 30. I set the base text to: Player Name | LV: 0 | HP: 20/20. Finally add some blocks when receiving onstatsEdit:
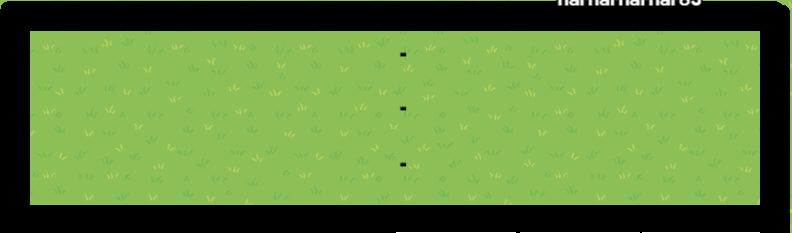
Text 6-8 (Dialogue)
This is what we are trying to create:

Settings:
Create 3 textboxes with the font to Staatliches, the color to black, and font size to 30. The base text should be -. Add three of them in a column like this:
The only things that should be different are the blockcode in the textboxes.
Textbox 1:
Textbox 2: (They are different! Pay close attention!!!)
Textbox 3:

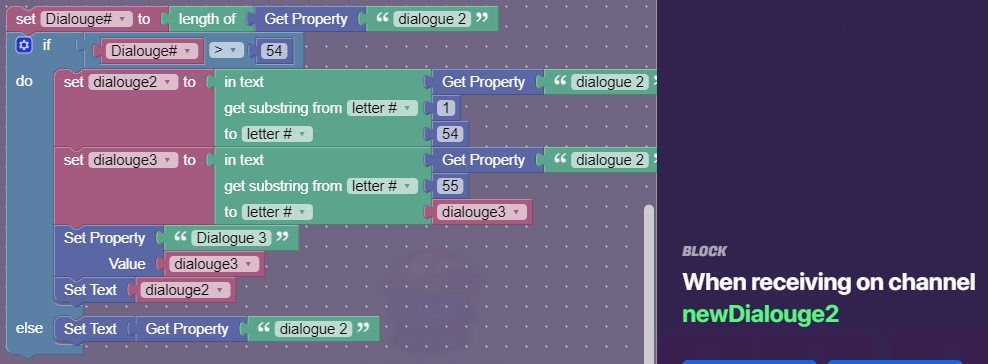
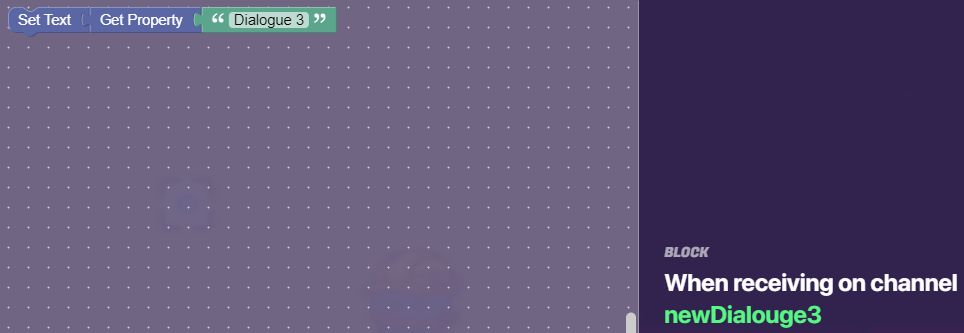
Explanation:
Okay. Pfffff. Here we go. The property “Dialouge”[2] will hold the entire dialogue. YOU SHOULD NOT EDIT THE OTHER PROPERTIES!!! When the first textbox code is run, it will first find the length of the dialogue. If this is more than 54 characters, which would make it run out of the box, it uses some text blocks to keep 54 of the characters here and transfer the rest of the characters to “dialogue 2”. Then it adds the text. This repeats for the second line of dialogue. For the third, I cap it off so all I need to do is set the text. With this system I can hold 162 characters of text, which I feel is more then enough.
Properties 2 - 4
Settings:
The property type should be text, broadcast on game start should be yes and finally property scope should be player.
| Property | Setting | Value |
|---|---|---|
| 1 | Name | Dialouge |
| 2 | Name | dialogue 2 |
| 3 | Name | Dialogue 3 |
| 1 | Default Value | Use a trigger to set this to dialogue base |
| 2 | Default Value | Blank |
| 3 | Default Value | Blank |
| 1 | When value changed, transmit on… | newDialouge |
| 2 | When value changed, transmit on… | newDialouge2 |
| 3 | When value changed, transmit on… | newDialouge3 |
Explanation:
These are the properties used in the text boxes from before.
Monster & Player Actions
Damaging the Player
why is there this little room inside of a big room inside of a small room inside this "guide"
Well the last part go really full so I added this make it neater
this is too much. it makes me sad. im always sad
It’s okay buddy.
do you like my hat?

Yes, I do. I gotta finish this now okay?
ill watch mettatonOkay.
So guys! It’s time for everyone’s favorite pseudo-health! I know I use it a lot but in most game recreations, I find setting up a pseudo health system easier.
Devices
- Pseudo-Health
- 2x Property
- 1x Trigger
- Damaging
- 36x Barriers
- 1x Trigger
- 37x Property
- 10x Lasers
all these devices make my head spin
Property 1 (HP)
Settings:
The property name should be hitPoints. It’s property type should be number, its default value should be 20, and property scope should be player. Finally, when property changes, transmit onstatsEdit.
Explanation:
This property will hold the value of the player’s health.
Property 2 (Max HP)
Settings:
The property name should be maxHP. It’s property type should be number, its default value should be 20, and property scope should be player.
Explanation:
This is the value of the Player’s maximum hit point.
Trigger 1 (Healed)
Settings:
Set trigger by player collision and visible in-game to off. This trigger should trigger when receiving onsave. Finally add this blockcode when triggered…

why is that block yellow?
Because I was too lazy to click off of it.
oh.
Explanation:
When a player saves their HP is fully restored. So we set hit points to max HP.
Barriers 1-36 (Attacks)
Make these barriers black, with no border or collision, alpha 1.00. It should appear when when receiving on
attacked[#]and disappear when receiving onnewAttack. Make each barrier about the size of the zones and line each one up with own respective zone. These will show which areas will damage players.
Trigger 1 (Damage)
Settings:
Set trigger by player collision and visible in-game to off. This trigger should trigger when receiving ondamage. Finally add this blockcode when triggered…
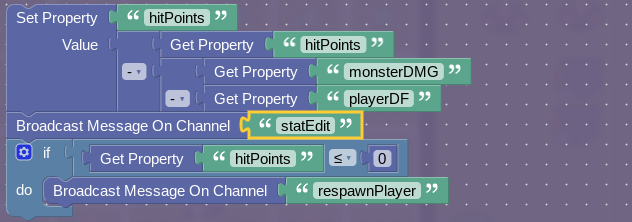
Explanation:
When the player gets damaged it will damage the player’s hit points. It will decrease the damage done based off the players DF (defense). If the player is 0 or below on hit points it will respawn them.
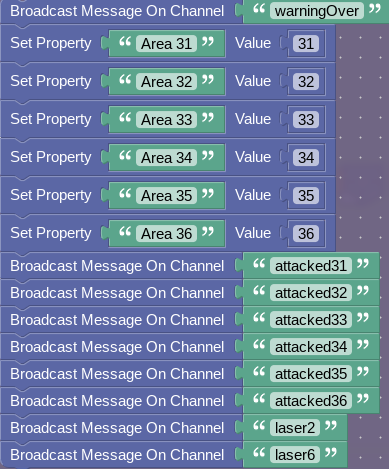
Properties 1-36
Settings:
Each property should be namedArea [#]and it’s property type should be Number. It’s default value should be0. When property updates…zone[#].
Explanation:
Eventually this property will store whether or not that this area has an attack (something that could damage the player) in it.
Triggers from Earlier x36 (The ones that set Player Area)
Now we need to add this block code into those triggers:
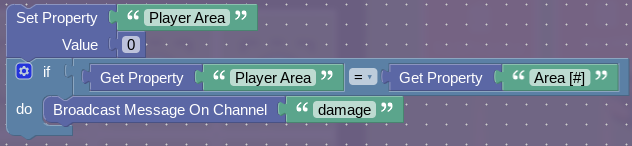
Explanation:
When an area has an attack its value will be set to its location number. So if there is an attack in Zone 36, its property will be set 36. If the character enters Zone 36, it will set the Player Area to 36 and then the Player Area will be = Area[#]it will damage them.
Lasers 1-6 (Warning)
Settings:
The laser damage should be0, it should activate when receiving on…laser[#]Warning. It should deactivate when receiving on…warningOver. They should be deactivated on game start. Finally arrange them like this:

Explanation:
These lasers deal no damage, they serve as a warning that an attack will appear there shortly.
Lasers 7 - 12 (Damage)
Settings:
Now copy and paste those 6 lasers and make the following changes to them:
Their color should bewhiteand when player hit, transmit on…damage. It should activate when receiving on…laser[#]. It should deactivate when receiving on…newAttack.
(It’s hard to tell, but I layered the white lasers right on top of the red ones.)
Making an Attack
Now I’m going to show you how to design your own attack.
-
Choose the zones/lasers you what to use. I choose lasers 2 (the middle vertical one) and 6 (the bottom horizontal one), and zones and 32-36.
-
Add a trigger, it should trigger when receiving on
attack1. With this blockcode:

-
Add another trigger, it should trigger on
attack1and have a delay of3. In this trigger:
Oops wrong image…
-
Add another trigger with a
10second delay this time. When triggered transmit on…newAttack.
Now when there is an attack, it will give the warning before letting loose the attack! Use multiple triggers for the attack if necessary. Have fun!
🛑 ⚔️ Fighting 🛑
🛑 🔊 Acting 🛑
🛑 💰 Using Items 🛑
🛑 ✖️ Giving Mercy 🛑
🛑 Bosses 🛑
🛑 Inventory & Levels 🛑
⚠️ Sprite Art ⚠️
In this section you will be making the character sprites with barrier art!


Ketchup
First, place a long barrier, like this
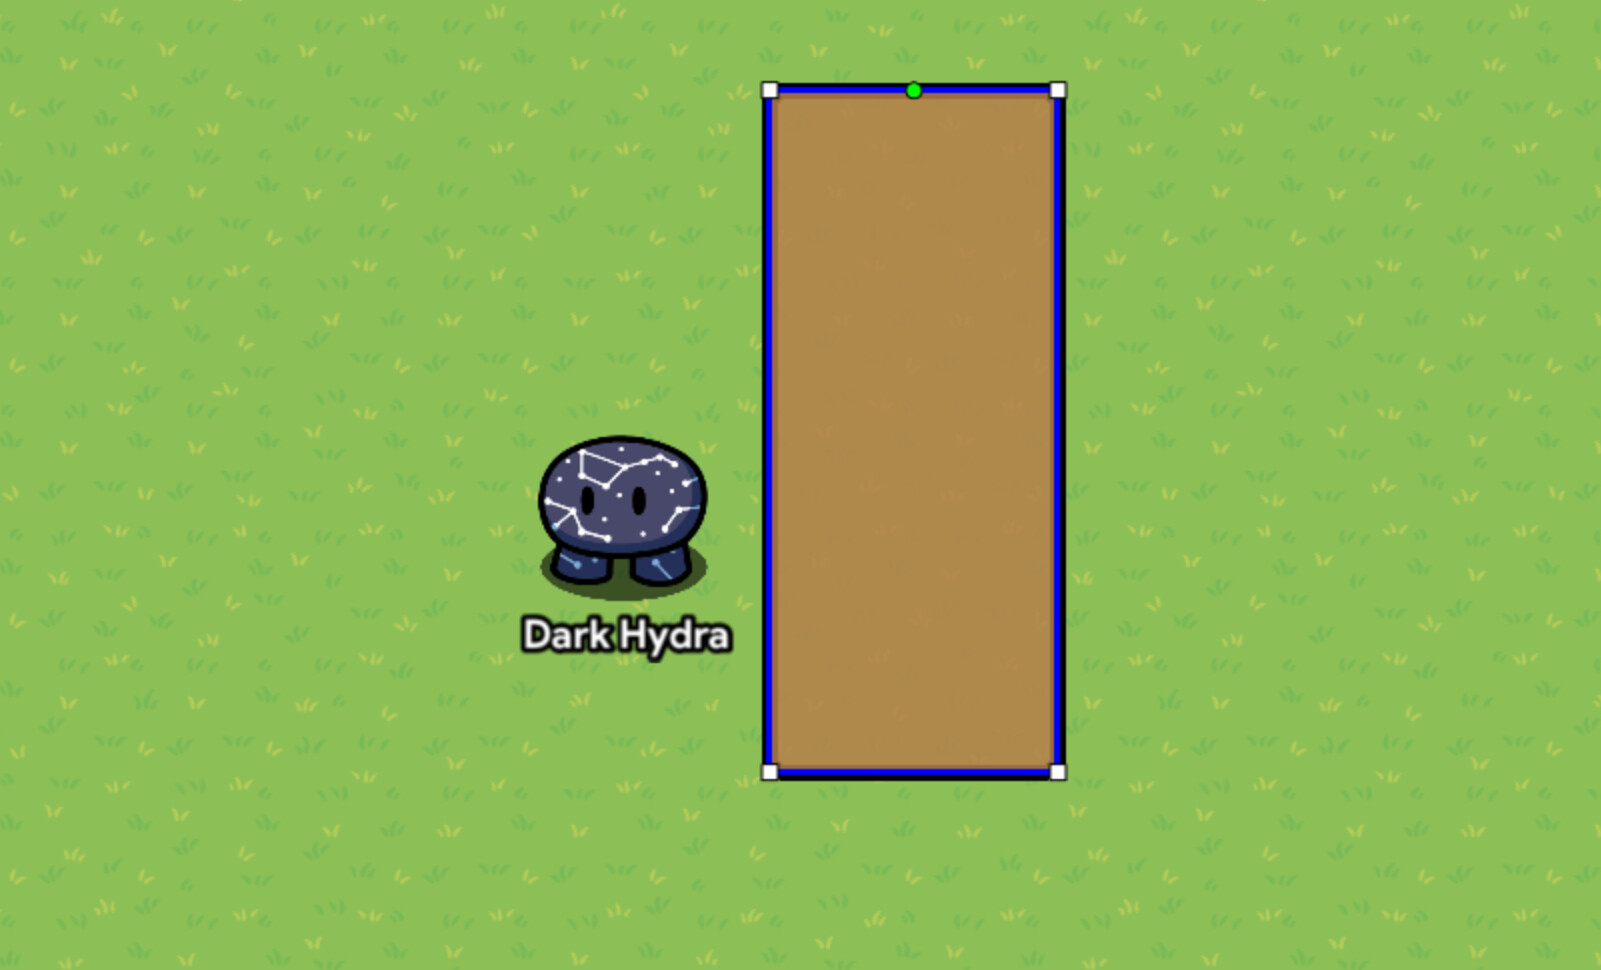
Then, turn it red.
Add a cone and turn it red(you can hide the base if you want)
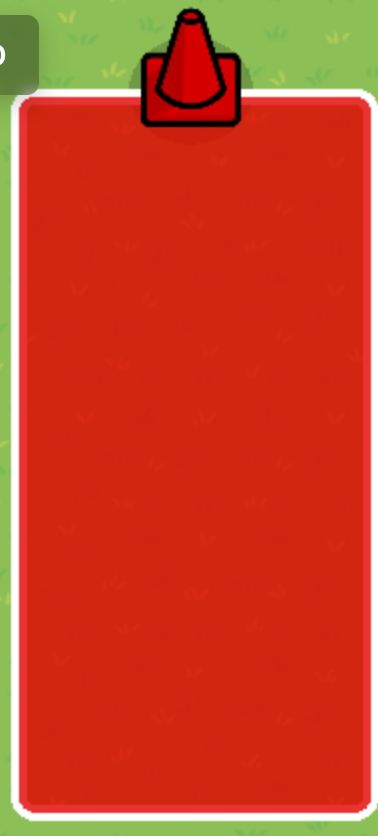
Finally, add text and write ketchup or something having to do with it.(optianal)
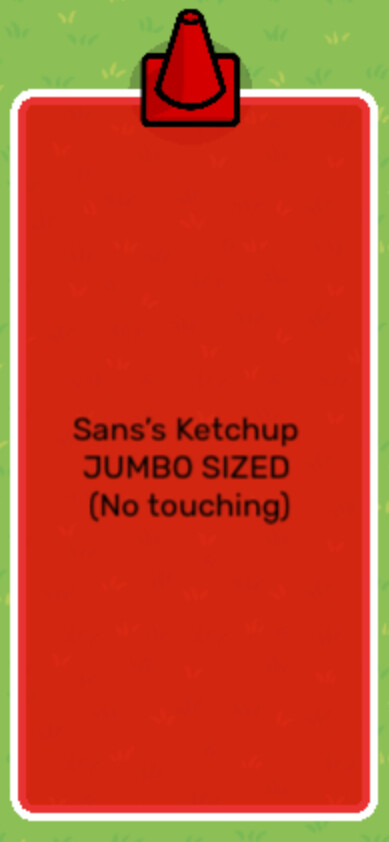
And you’re done! Now drink it or prank Frisk with it! (By @Dark_Hydra)
Muffet (In-Battle. Only Reference, no Tutorial)
I do not have a tutorial, sorry, but, here ya go:
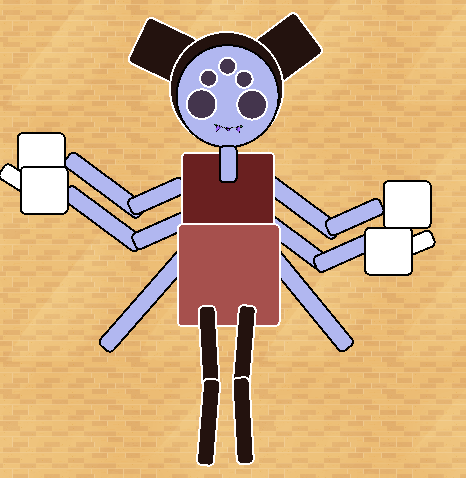
(if only there was an “ellipse” barrier…)
Tips: Colors, colors, colors. Part of Muffet’s charm is her color palette. Try to replicate it the best you can. I used rotated and flipped arena flags for the mouth, remember she has fangs.
Thanks for looking! -@th3_ca1tsune
Wiki Editing Rules
- Please do not edit if:
- The checkbox is checked
- Your name is not in the credits
- You have not asked in replies
- When you edit please:
- Keep it clean, we can see what you add!
- Add your name to credits (if it is not there already)
- Add what you did in the update log!
- Only edit your section, if you would like to work on a different section please ask!
- Don’t edit other work!
- When you are done editing:
- Either add warning signs (if it is a wip) or remove emojis (if it is done)
- Add what section you are working on in the credits!
If this is checked that means someone is editing! Do not edit when this is checked, that includes checking and unchecking the box!
📝 Update Log
- 9/26/24: Original post released, including sections: Undertale Enemies wip!
- 9/29/24: - Asriel Dreemur 1st Form Sprite Art by NotYoyo
- 9/30/24 - Ketchup Art by Dark_Hydra
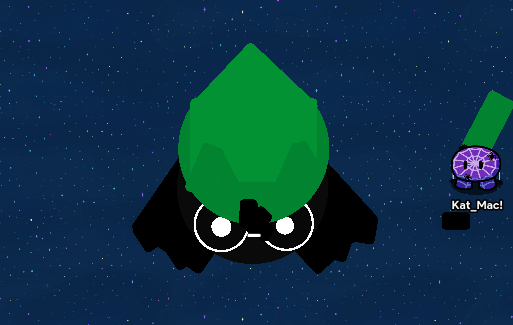
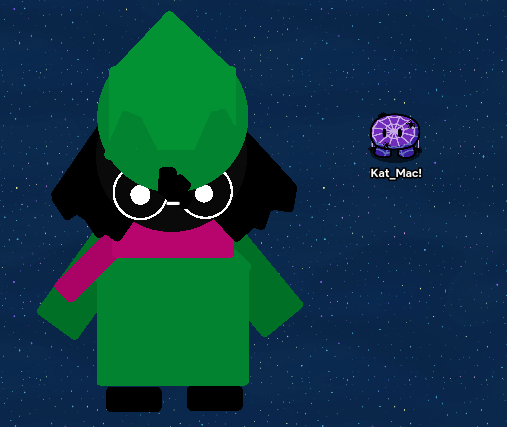
- 9/30/24- Ralsei sprite art by Kat_aronii (Kat_Mac)
- 10/7/24- Ruins Art by PhoenixWander
- 10/10/24 - Mini-update; added “Damaging Player”
- 11/5/24 - @Fleet Started work on Deltarune Turn based encounter
- 11/6/24 - Almost finished the Turn Based Encounter Guide for Deltarune (Fleet)
- 11/7/24 - Had to separate Undertale and Deltarune ._.
Credits
@harharharhar83 - Undertale Enemies Section
@Kat_aronii - Requested to do Sprite Art!
@NotYoyo - Sprite Art
@Dark_Hydra ketchup section.
@PhoenixWander - Ruins Art Section
@th3_ca1tsune - Sprite and Environmental Art (soon)
@Fleet Deltarune Turn based encounter
@Epi320 - Outro
Outro: WIP V
Well, that was one great guide.
metal crusher suddenly starts playing
Thanks for reading everyone! This was one HUGE project, and we couldn’t have done it without all of y’alls support! And, its not finished yet! There are still so many sections to fill, and we need YOU to help us! Undertale is an AMAZING game, (and deltarune!) so seeing it being recreated, is honestly
SO FREAKING AWESOME
asgore song plays
Anyways, thanks for reading, helping, liking, providing moral support and more!
Remember, stay
DETERMINED ![]()