This is a WIP ![]() made by @xlr8. Credit to other creators on the mechanics I’ll cover. If anything doesn’t work, feel free to ask.
made by @xlr8. Credit to other creators on the mechanics I’ll cover. If anything doesn’t work, feel free to ask.
Infection system
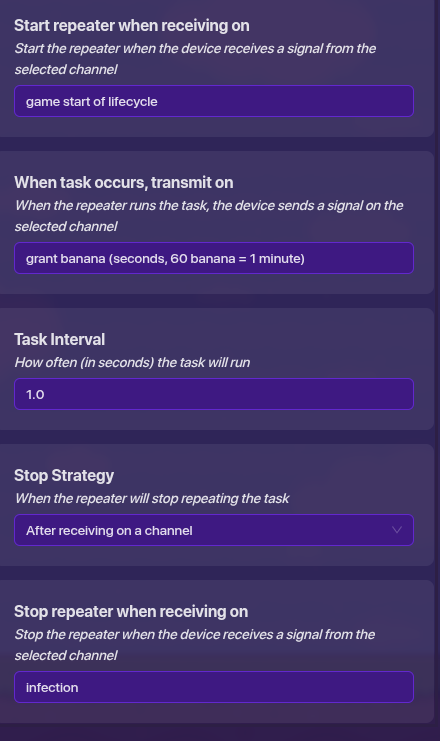
Step 1, Get a lifecycle, a game start, and a relay that goes to a random player and message infection. Get a team switcher that switches that player on receiving infection. Step 2, get a lifecycle, and on player is knocked out, transmit infection. When infection goes off, for the team switcher, make it switch player to the configured team, give it a specific team. In map settings, turn opposing teams are marked red on. When relay chooses player, use an item granter to give player a snowball launcher. Use a damage boost on 1.00 to give the player a pulsing effect, and do not turn on needing shards. Sorry for the text wall.
Map
Add snow in a 30x30 area set to floor, scatter trees set to wall, Igloos and ice blocks to make a path, you can add ice borders to help the infected, (Optional, add teleporters in the igloo to make a secret hut with a med pack that respawns in a long duration and also use a camera to zoom in, idk how to use it hehe) add fences at the snow borders to prevent escape, and add snow everywhere you can see. (IMPORTANT. it is recommended to make the grass snow in settings instead of using snow set to floor) You’re done!
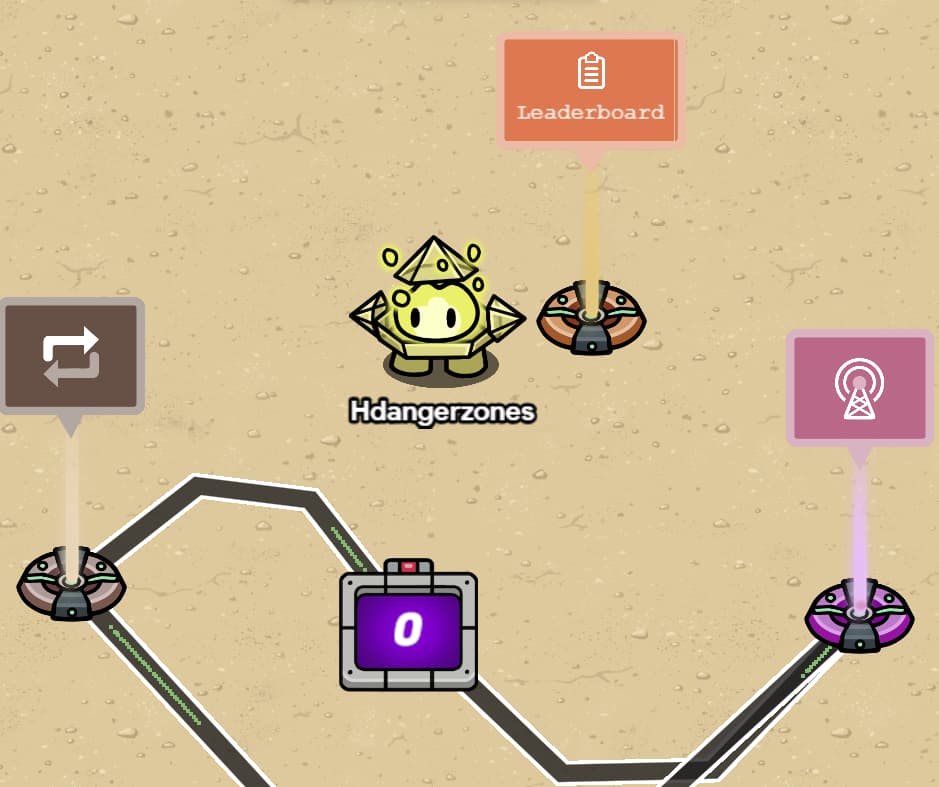
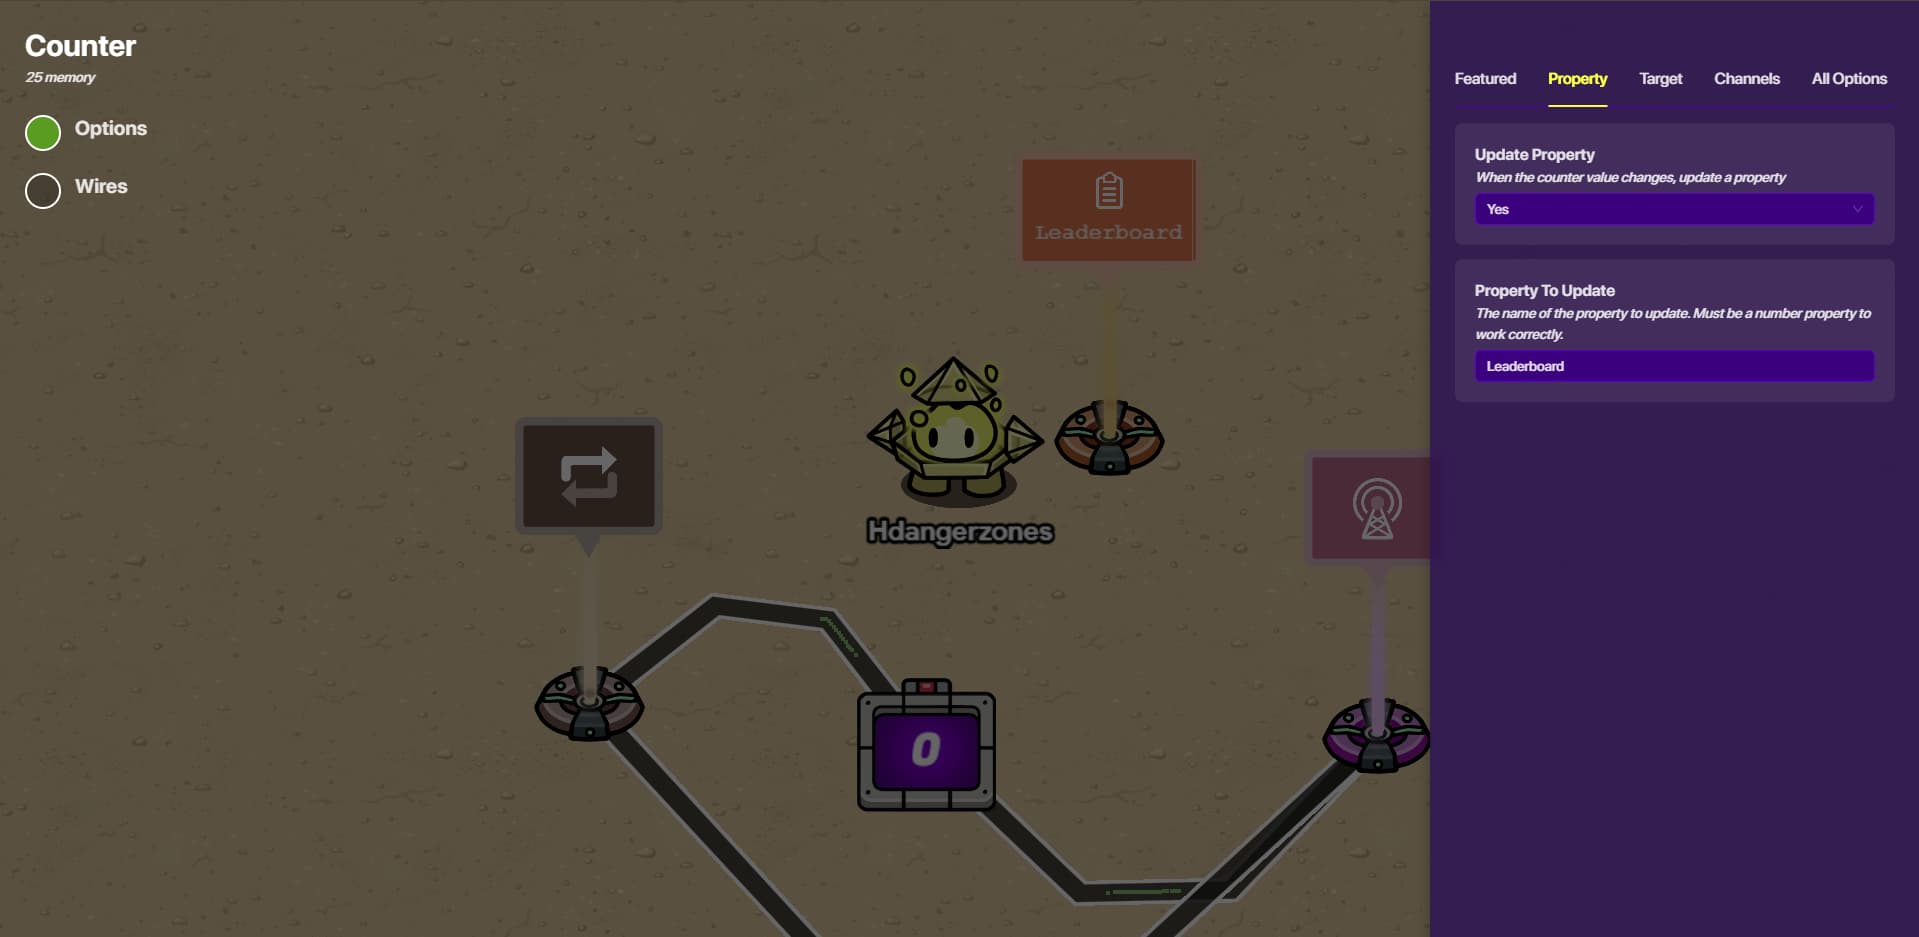
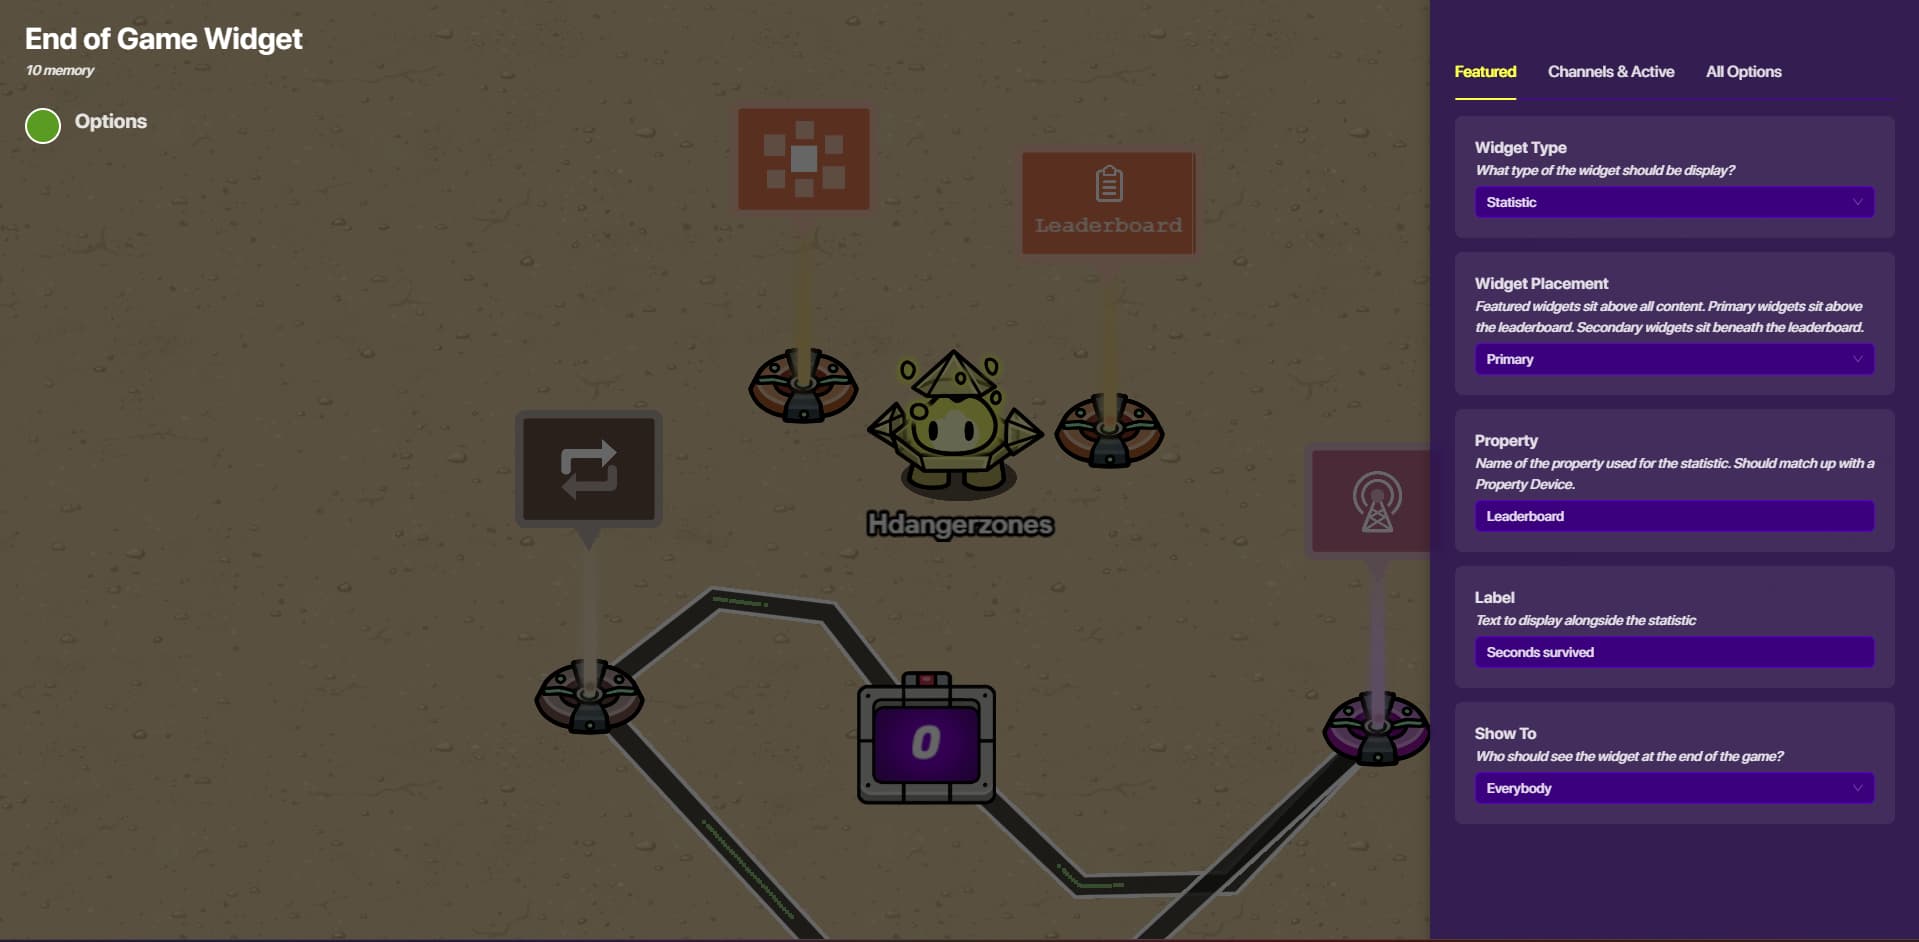
Timer for survival
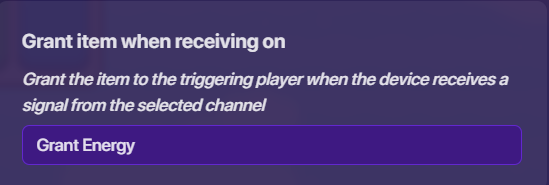
do not grant bananas. lifecycle with game start starting repeater, make sure you can’t drop items. use the settings in the image, you can rename the channels freely though :>.
Get that repeater and wire it to a new counter that increments every interval. Have it update “leaderboard” get a player scope property that is “leaderboard.” get an end of game widget that’s featured and matches “leaderboard.” Label it time survived.
Energy System by Twiceonce. Make sure that the edu system starts with a game start lifecycle
Step 1: Devices
- Movement Meter
- Starting Inventory
- 2 Game Overlays
- Questioner
- Item Granter
Step 2: Set Starting Inventory's Settings
Set the “Item to Grant” to, well, the item you want when you start the game, i.e. energy. Set the granted amount to anything you want, I would recommend anything around 1000. Keep “Equip When Granted” as no, or yes, it doesn’t matter.

Step 3: Set Movement Meter's Settings
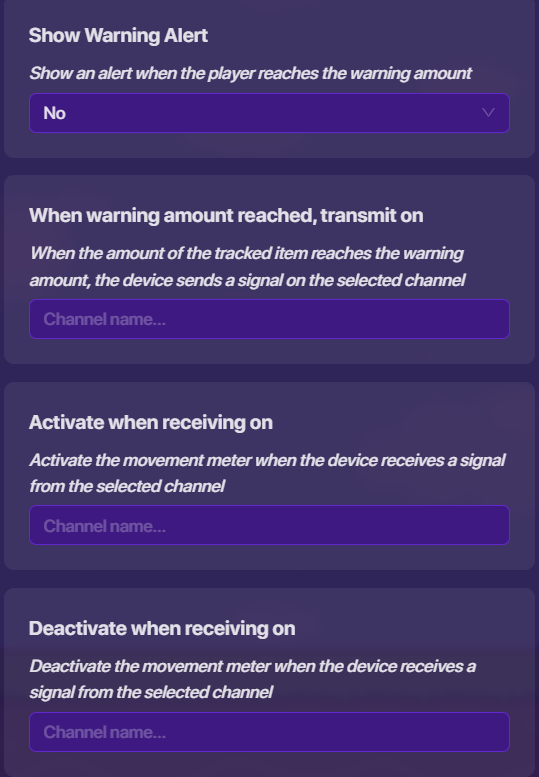
Set the tracked item as the item you put in the Starting Inventory device. Set the item drain per tick and drain interval as anything you want, I recommend you put it at 10 items drain per tick and every .25 seconds drain interval. Set if you want to put an out of item alert, if yes, set the title and content. If you want your players to slow down instead of fully stop, set the player speed to anything, if not, leave it alone. (.25 is 1/4 of normal speed, .5 is half, .75 is 3/4) If you want to put a warning amount message, then again, set the warning amount, set show warning alert as yes and fill out the fields.


Step 4: Set Game Overlays' Settings
Pick 1 of the overlays as the questioner overlay and the energy tracker overlay.
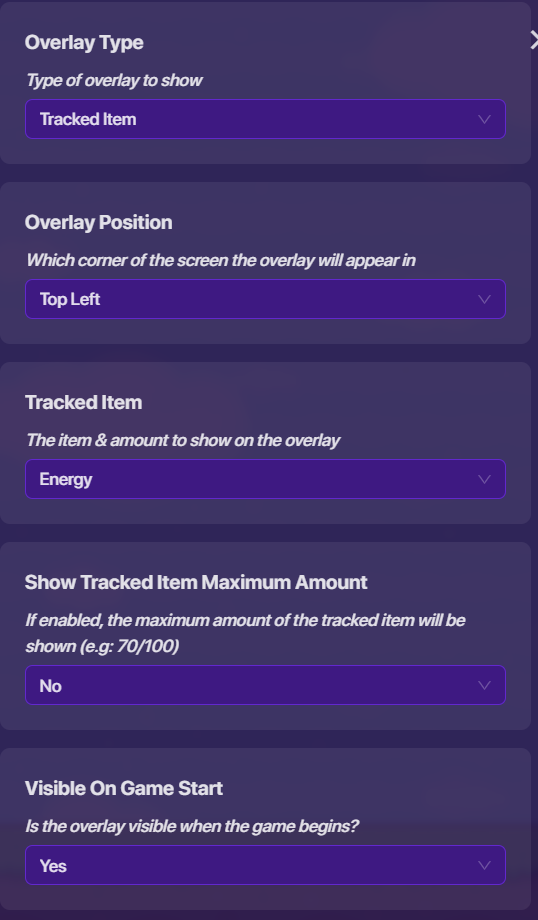
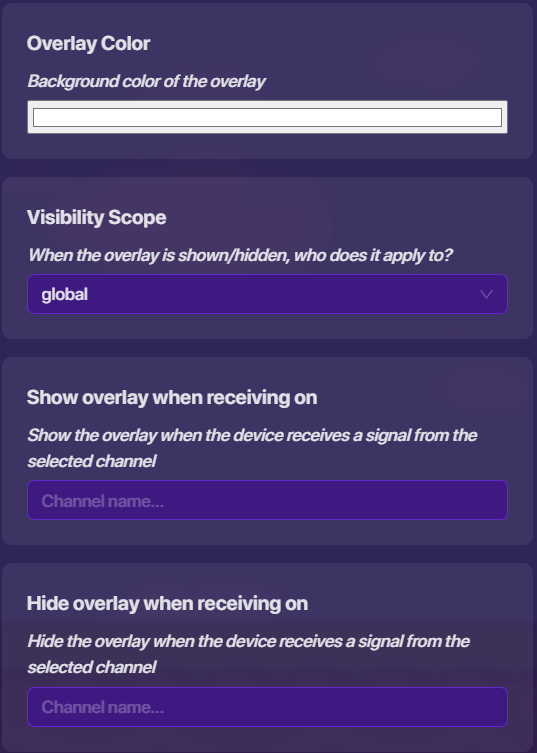
For the energy tracker overlay, set the overlay type as tracked item, set the overlay position, then set the tracked item as the same thing in your starting inventory. Set the overlay color if you want another color.
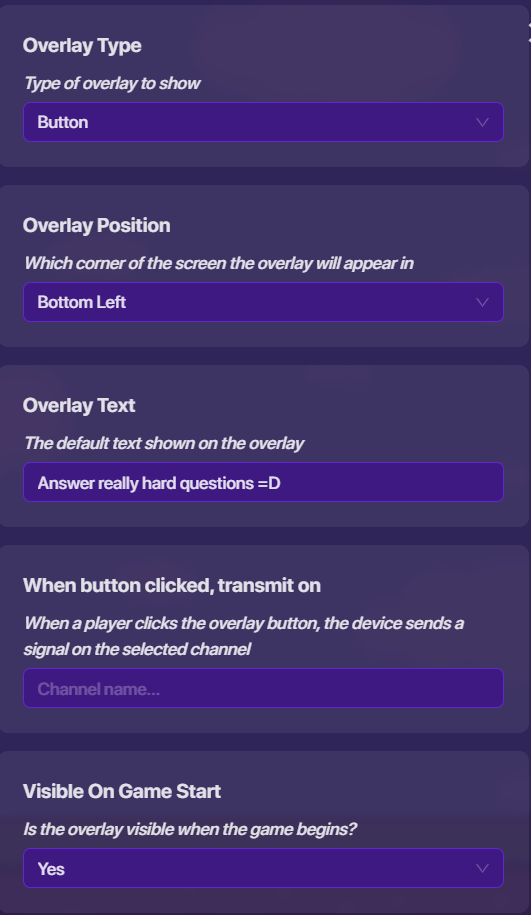
For the questioner overlay, set the overlay type as button, select the overlay position, set the overlay text, then keep everything else as is.

Step 5: Set Item Granter's Settings
You’re wondering why I skipped the questioner’s settings, unless you have a specific kit or want the default or no sound when answering questions, it’s all set. For the item granter set the item to grant as the thing in your starting inventory device, set the amount to grant as anything you want, I recommend 250 if you did the same options as I did in the movement meter’s settings.

Step 6: Channels
Open the questioner overlay and go to channels, “When button clicked, transmit on,” set that to something like Open Questions.

Then go to the questioner settings then go to channels, “Open answering screen…” and set that to the same channel name.

Different channel, stay on the questioner’s channel settings and set “When question answered correctly…” to something like grant energy/item.

Then go to the item granter’s settings and link “grant item…” to the same channel.
(Side note from xlr8, when receiving infect, wire the relay in the infection system to an item granter that gives 99999999 energy)
We’re done with the energy system! Test it out in your game, make sure both overlays appear, you can click the answer question overlay and it opens the question answering screen, and when answering the question correctly you get the item(s). Don’t hide anything yet, it makes it easier in the later wire process which is going to be an absolute mess, or I’m just bad at organizing.
If you do want to make the players lose energy/items when they answer the question wrong, continue on to the next step.
Optional Step 6.1: Losing Energy When Answering Questions Wrong
Copy the existing item granter and go into its settings, set the amount to grant as minus (-) anything, I recommend -100 if you did put amount to grant as 250 on the previous item granter.

Stay in the settings and set “grant item…” as something like lose energy/item.

Then go to the questioner settings and go to channels, “when question answered incorrectly…” to the same channel name.

Test it out by answering the question wrong and making sure you lose energy/items.
Summary
If you go down I shall sneeze
Summary
achoo
Thanks for reading. According to tradition, ![]() if you’ve eaten penguins and
if you’ve eaten penguins and Make sure to pwease spell out this:
Summary
Headings! you can make this using a hashtag and a space (# exampleText) there are SIX different sizes of heading! # exampleText (# exampleText) ## exampleText (## exampleText) ### exampleText (### exampleText) #### exampleText (#### exampleText) ##### exampleText (##### exampleText) ###### exampleText (###### exampleText) you can also make this using h1-h6 wrapped in the left and right arrows! # exampleTxt <h1>exampleTxt</h1> however, it seems like if you put text under headings using html formatting (that ^) then all formatting for that text just doesnt work ###### heading6 bold bold <h6>heading6</h6> **bold** **bold** //why does this one work? [2] ###### heading6 bold <h6>heading6</h6> **bold** //?????? — # Dividers! you can make these using three asterisks in an empty row! (***) examples above this and directly below this sentence — # Footnotes! i used to refer to these as tooltips but it turns out theyre actually named footnotes you can make these using one caret (^), one left bracket, whatever you want inside, and one right bracket! ^[] [3] also images can go into the tooltips [4] — # Images! you probably know how to put these in but you can actually change the sizes to a number outside of 100, 75 or 50! simply go to the text version of the image  find where the size is typed in; 690x431, 50%] /* aka width x height, size of image] */ and change the percentage!  you can also crop them via the size (they wont stretch)  — # Strikethrough! you can make these by using two tildes (~) on both sides of your text! ~~exampleTxt~~ exampleTxt [5] theres multiple ways of doings this, though markdown uses less characters [s]exampleTxt[/s] bbcode; <s>exampleTxt</s> html; ~~exampleTxt~~ markdown the rest of these will just be extra things you can make using markdown (and maybe bbcode or html) # More Formatting Options! ### Superscript and Subscript! [6] Normal text for comparison<sup>exampleTxtSuper</sup> Normal text for comparisonexampleTxtSuper Normal text for comparison<sub>exampleTxtSub</sub> Normal text for comparisonexampleTxtSub ### Small Text! jk apparently “< small >” but with no spaces is blocked ### Big Text! <big>exampleTxt</big> exampleTxt ### Marked Text! <mark>exampleTxt</mark> exampleTxt ### Deleted Text! <del>exampleTxt</del> exampleTxt [7] ### Inserted Text! <ins>exampleTxt</ins> exampleTxt ### Keys! <kbd>exampleTxt</kbd> exampleTxt

Credits
Me, Hdangerzones for the leaderboard