The Ultimate Guide to making Mario Art 0/10

Are you editing? Only one at a time, don’t press for fun!
There are many Super Mario Games/characters and in this guide you’ll be learning how to make some of them.

Mario pixel art


Terrain I used:
Plastic (blue)
Plastic (red)
Sand
Marble Stone (dark)
Dirt

Boo pixel art


Terrain I used:
Snow
Marble Stone (Dark)
Plastic (red)

Castle

Screenshot 2024-04-07 16.46.52
Use Stone (Brown) for the main part, and dark scraps for the black, and add a flag.

Mario

image
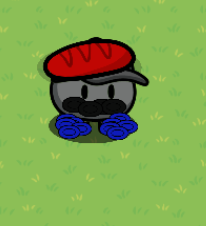
First, place down a vortex AGENT sentry like this:
image
Then, add a overlarge, red bread on top of the vortex agent’s hat like this:
image
Next, add smallened four black ceramic plates underneath the vortex agent’s eyes like this:
image
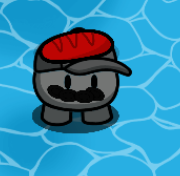
Finally, add blue ceramic plates on the vortex agent’s legs like this:
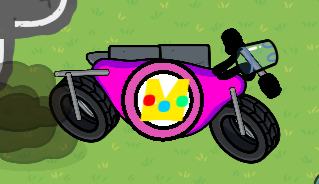
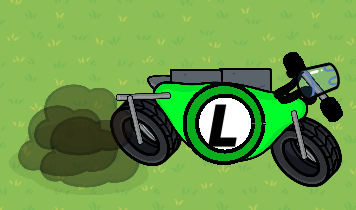
image

Mario Kart Bike

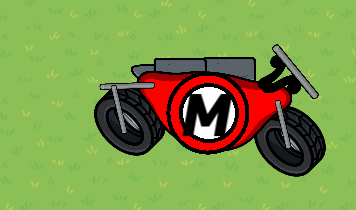
The finished product should look like this:
Screenshot 2024-03-01 12.41.09 PM

Anyway, we are going to need the following things for this build:

  • Metal Briefcase x2
  • Barrel x2
  • Glass Cup
  • Large Snow Pile
  • Anvil x2
  • Tire x2
  • Metal Pole (the small and stubby one) x4
  • Ailien Plant
  • Text
  • Barrier (the device one) x2
  • Dry Bush (Small) x4

The Steps:

Step 1

Grab your briefcases and tires and arrange them with the tire in front of the case.

Step 2

With the poles, put them on top, like this:
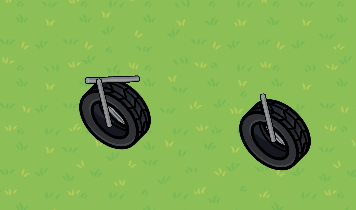
Screenshot 2024-03-01 12.40.36 PM

Step 3

Now that you have that done, put your snow pile and turn it red, like this:
Screenshot 2024-03-01 12.40.42 PM

Step 4

Put two anvils side by side underneath the snow for the seat, like this:
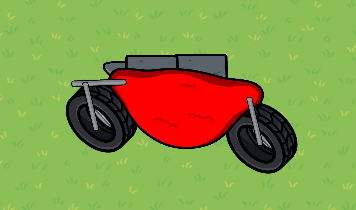
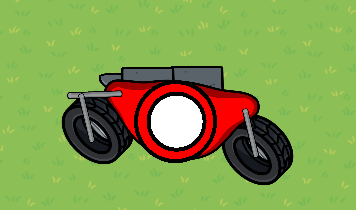
Screenshot 2024-03-01 12.40.46 PM

Step 5

Now that you have the seat done, lets move on to the logo. Put two barriers, (one red and the other one white) as a circle, and 1.00 transparency. Put the white one smaller than the red one.
Screenshot 2024-03-01 12.40.51 PM

Step 6

Put a text down. In the text, put a capital M, turn it to 60 size, and turn it to Fugaz one font.

Step 7

Put an Ailien Plant and turn it black. On top of that one, put a metal pole, like this :
Screenshot 2024-03-01 12.41.00 PM

Step 8

Put a barrel on each side, turn it tiny and black. Put a glass cup in-between, like this:
Screenshot 2024-03-01 12.41.04 PM

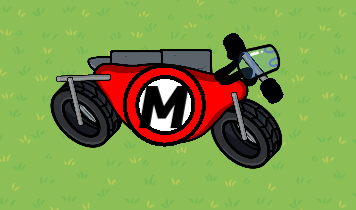
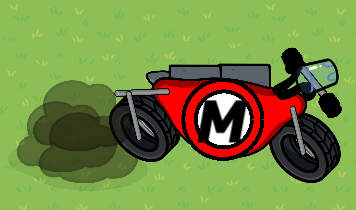
Step 9 The Final Step

Put a 4 dry bushes at 0.40 transparency at the back of the bike, like this:
Screenshot 2024-03-01 12.41.09 PM

And there you have it! A Mario Kart bike for any of your Gimkitting needs!

Alternate versions

Screenshot 2024-03-01 1.40.37 PM

Screenshot 2024-03-01 12.41.16 PM

Contributors
9 Likes

this is very creative!

2 Likes

Thanks

2 Likes

Nice guide! Maybe add more art, or turn this into a wiki, on smt, but otherwise this is AWESOME!

3 Likes

Thanks, but depends on if I should turn this into a wiki. It has been said that users make wikis for likes.

Should this be a wiki
  • Yes
  • No
0 voters
2 Likes

Also, you didnt mention that you used Boardwalk on the Mario art.

1 Like

that usually happens when a user makes it for someone else

1 Like

Oh okie that makes sense.

2 Likes

Alright, this is a wiki now.

2 Likes

yeah just sometimes the og poster doesn’t add anything
if you make most of it it’s not going to be a problem

1 Like

sorry I don’t fully understand; what’s a wiki?

1 Like

Where other people can edit the guide/post

2 Likes

post anyone can edit
can only be made by tl3

1 Like

oh ok
I’m only tl2 :frowning:

1 Like

?
Wasn’t @SilentPrincess_33 saying that they were trust lvl 2?

2 Likes

sorry have too many tabs open wrong one

1 Like

Screenshot 2024-04-07 6.33.39 PM
Beep-0!
x8 Barriers
x9 Text
Seems simple enough that I don’t have to explain it.

Beep-0

4 Likes

Oh ok nice… robot I think?

3 Likes

(gasp) from Mario X Rabbids!


My goomba

3 Likes

Noice, looks good

3 Likes