Hello everyone, this is my first tug guide or ultimate guide and I hope you all enjoy it. This is for foot racing, not cars or vehicles for anyone who thought that. Let’s get started!
Countdown/Start Timer
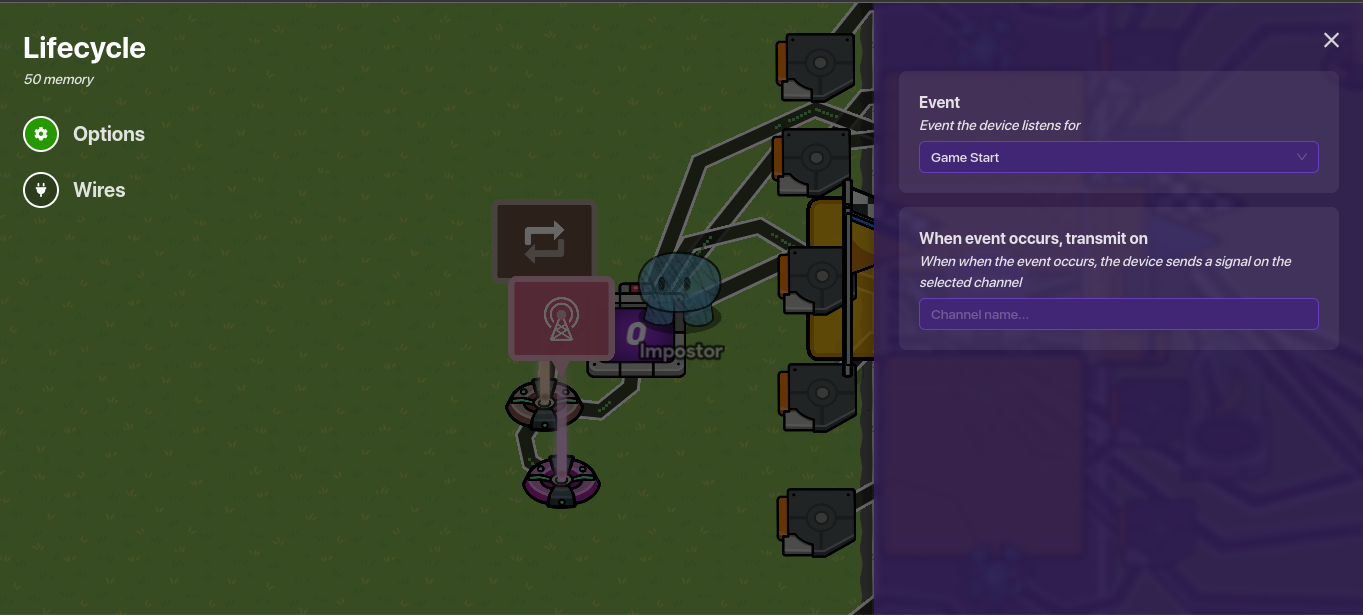
Step 1: Place down a lifecycle and make the event on game start
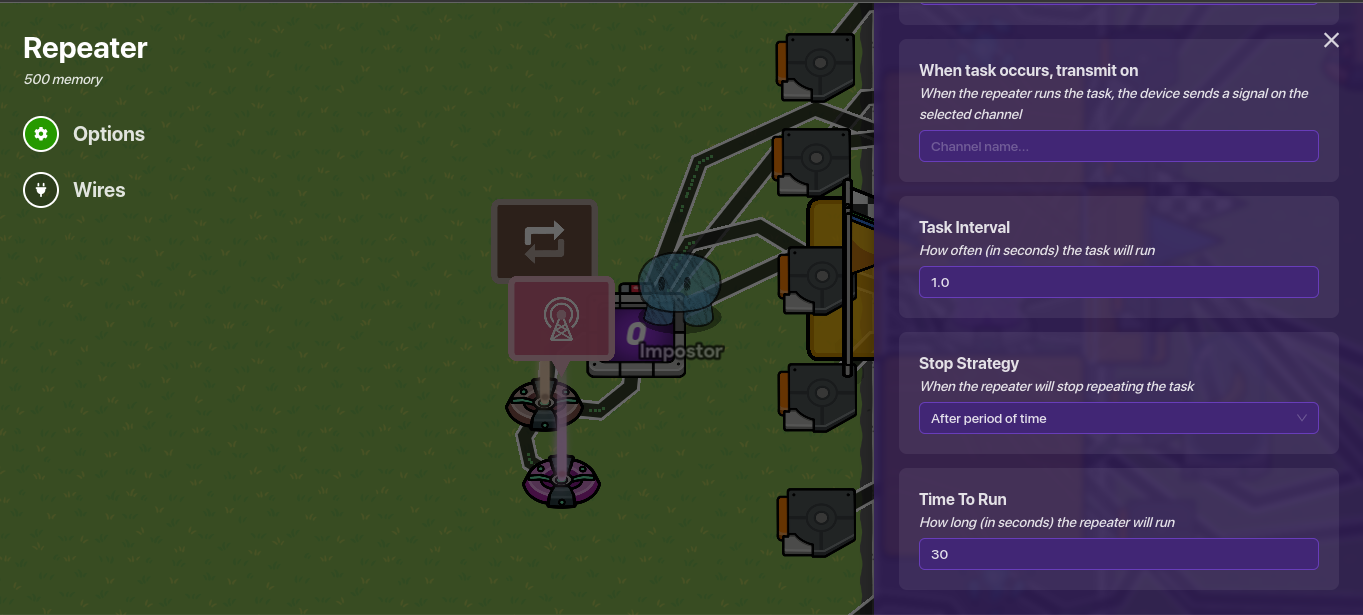
Step 2: Place down a repeater with the interval of 1.00 and run time of 30
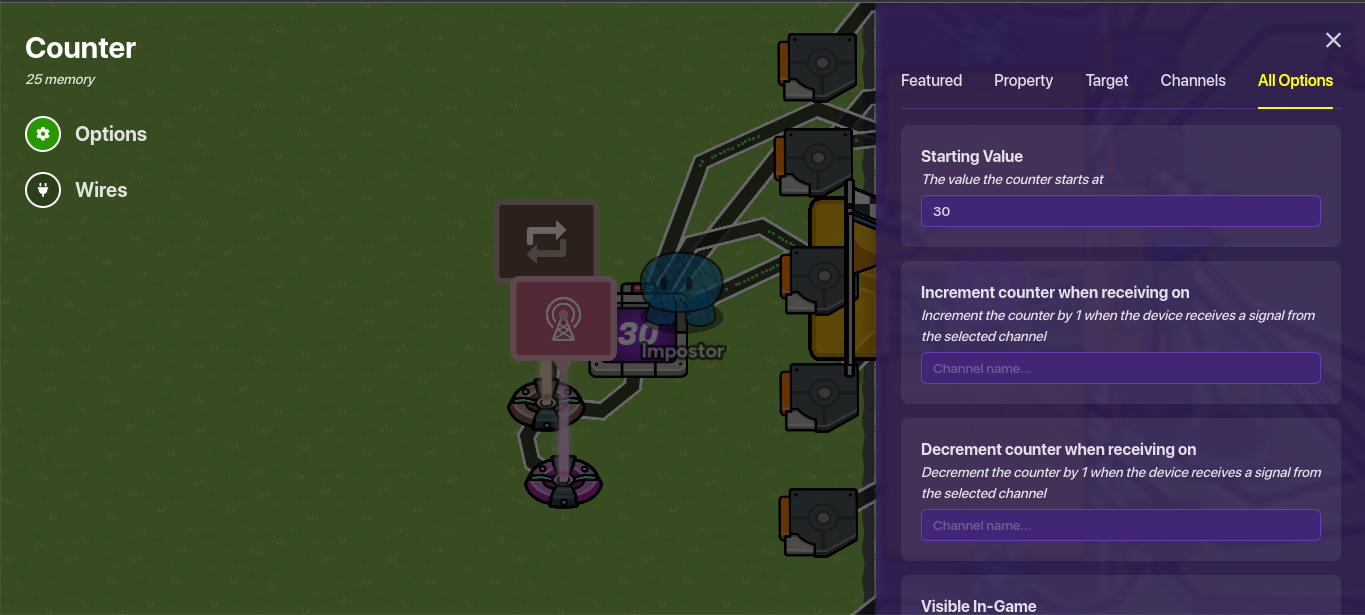
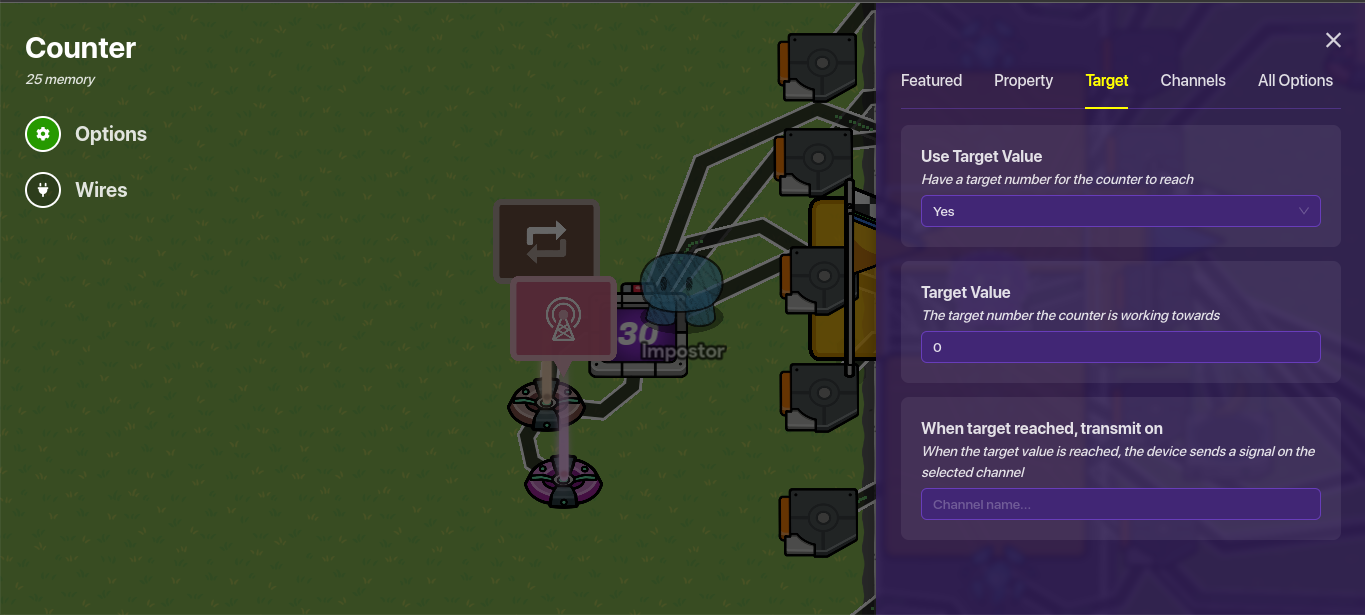
Step 3: Place down a counter with a starting value of 30 and target value of 0
Step 4: Place down 4 barriers around your spwan or where the race will start like this:
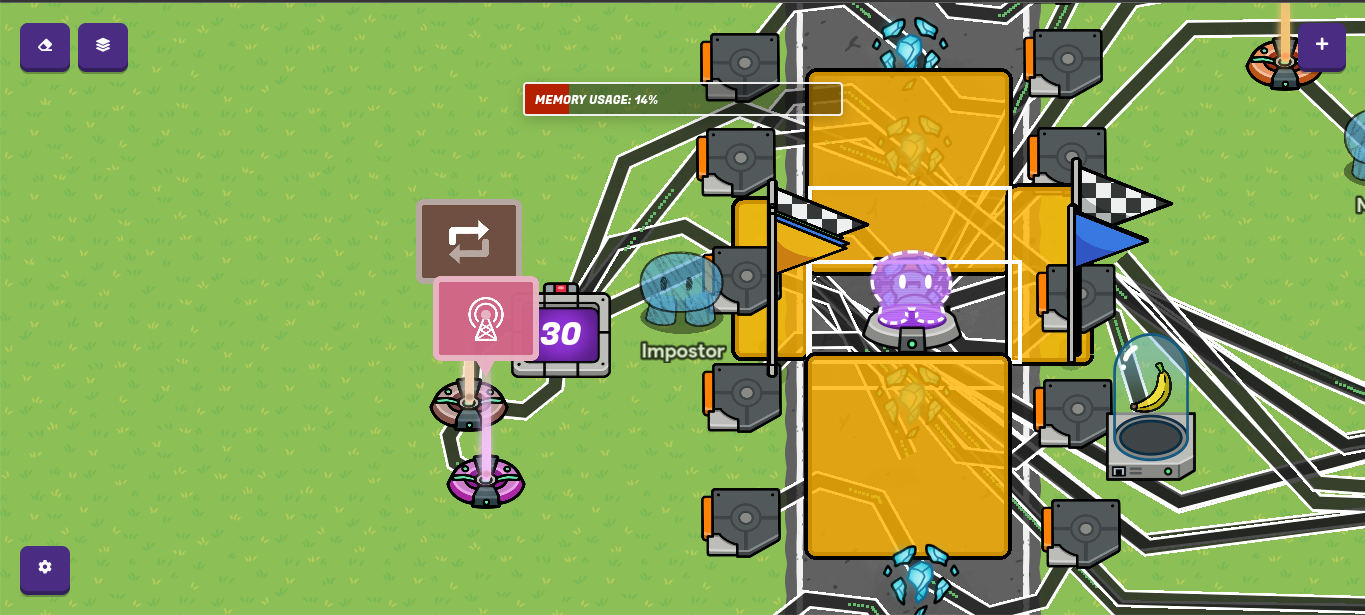
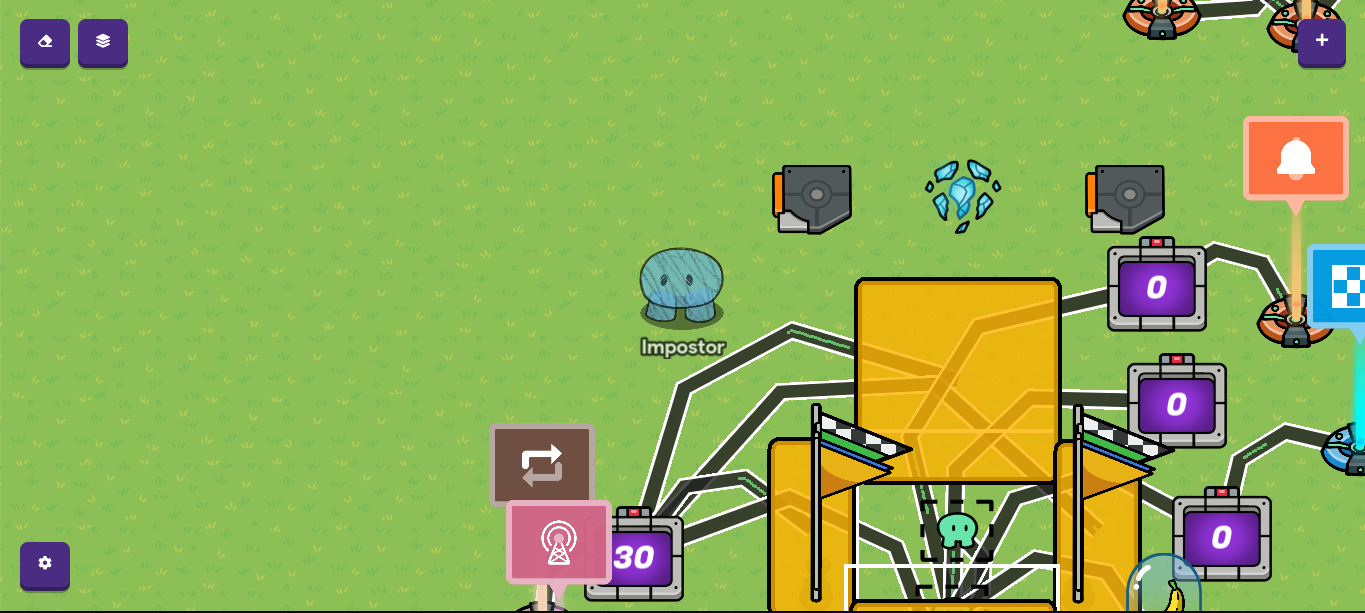
Step 5: Now wire all your things together starting from the lifecycle to repeater Event Occurs >>> Start Repeater
Step 6: Wire the repeater to the counter, Repeater Runs Task >>> Decrement Counter
Step 7: Wire the counter to the 4 barriers with each wire like this, Target Value Reached >>> Deactivate Barrier
That’s all for the timer! You can test it out in your game if you want. Here is the finished product:

Laps and Winning
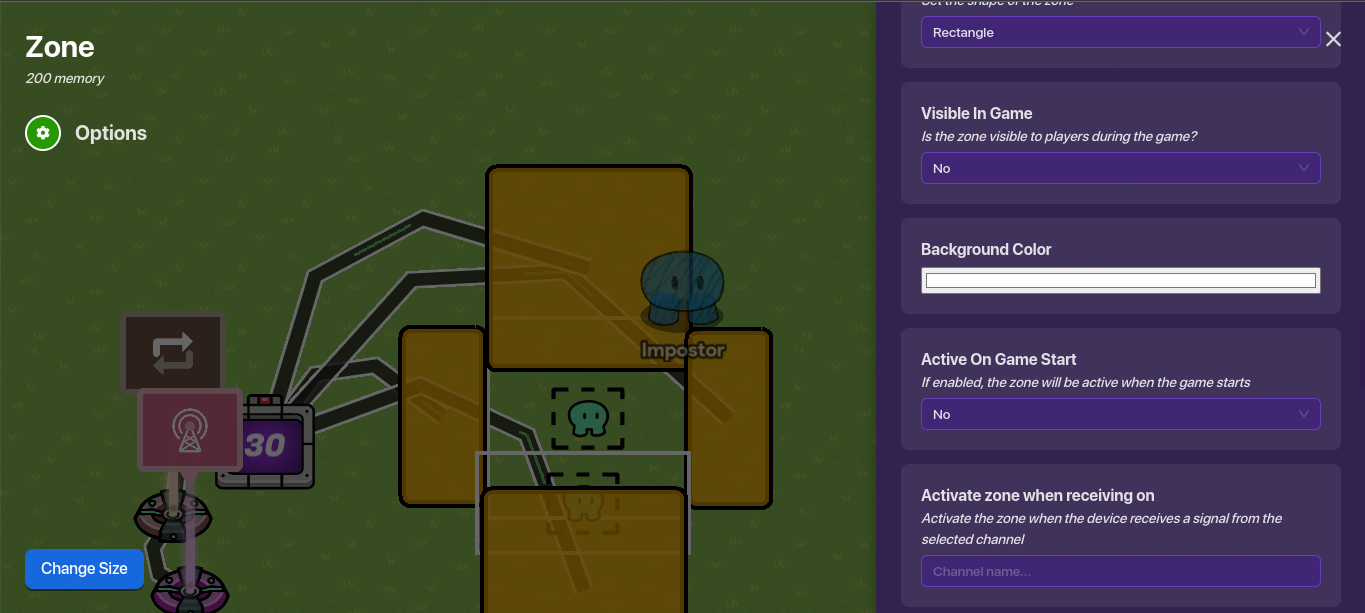
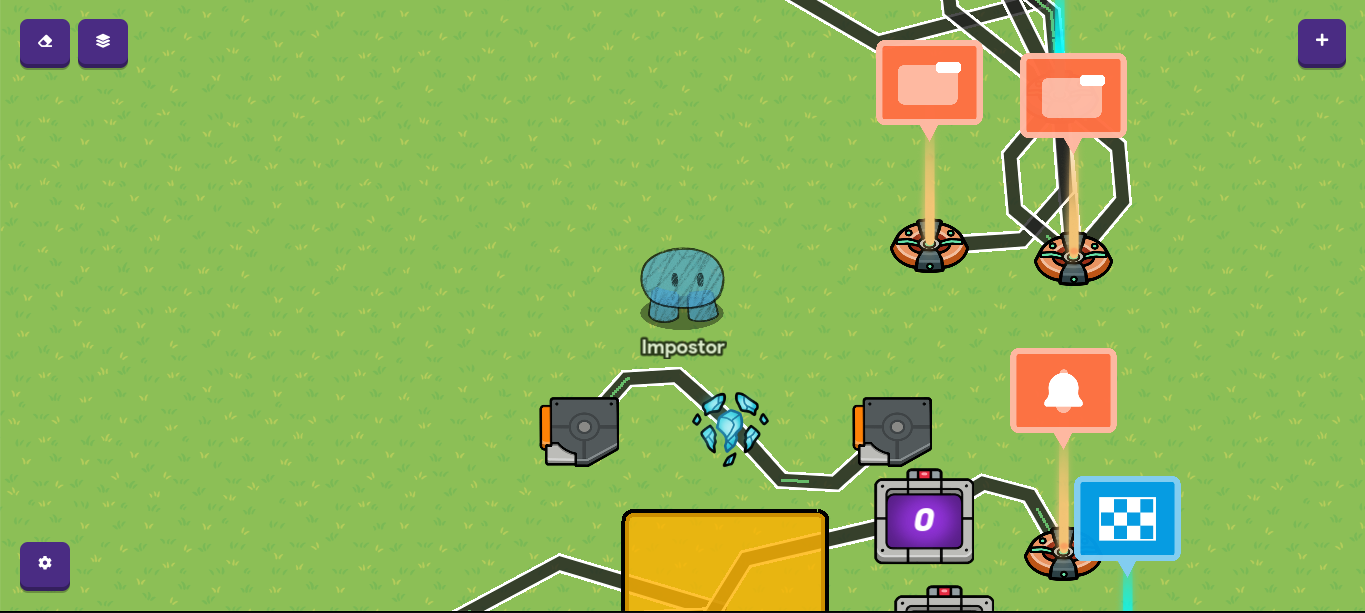
Step 1: Place down a zone in between the 4 barriers and make it active on game start

Step 2: Place down another zone right under the first one but make it smaller
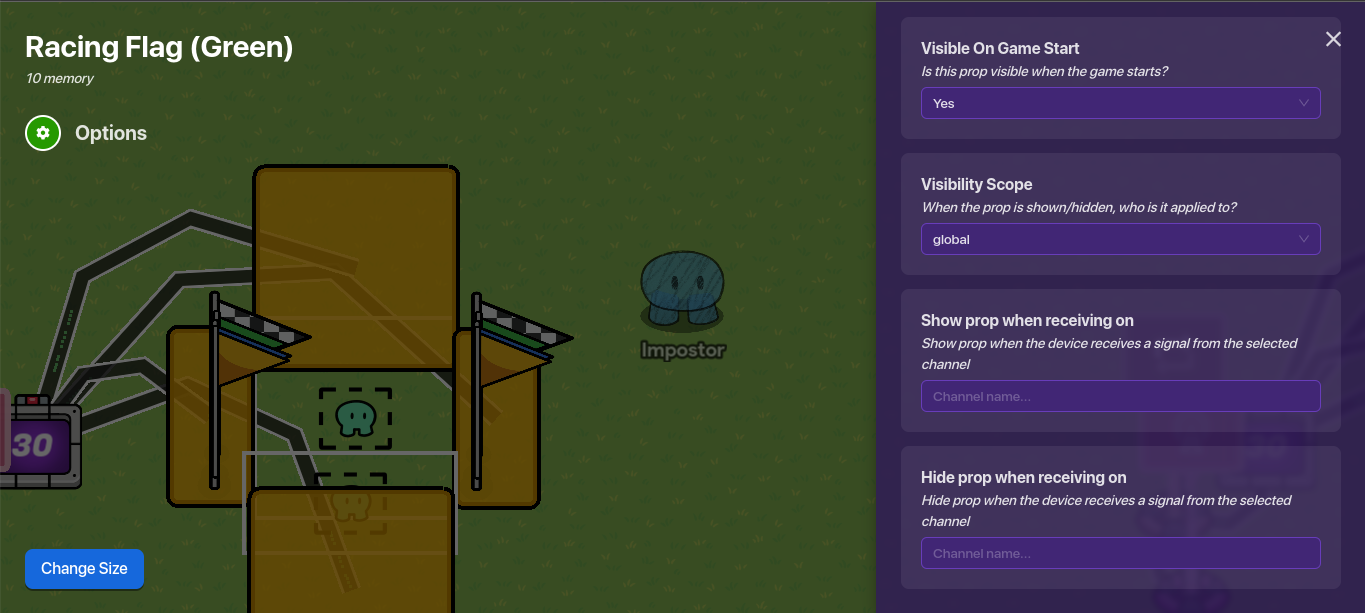
Step 3: Place down four flags starting with a green one and only make the green one available on game start
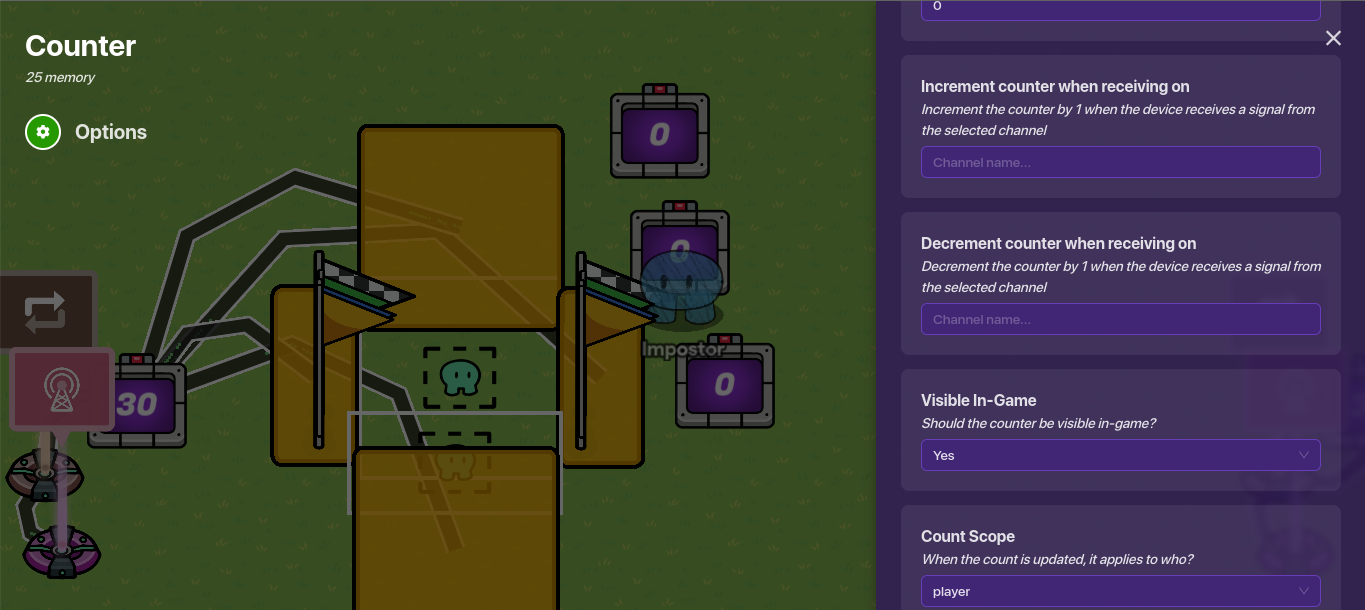
Step 4: Place down 3 counters and make 1 of them have a target value of 1, the other with 2, and the final one with 3 and make only the final one visible in game, also make all of their scopes player
Step 5: Place down a notification with player scope and end game device
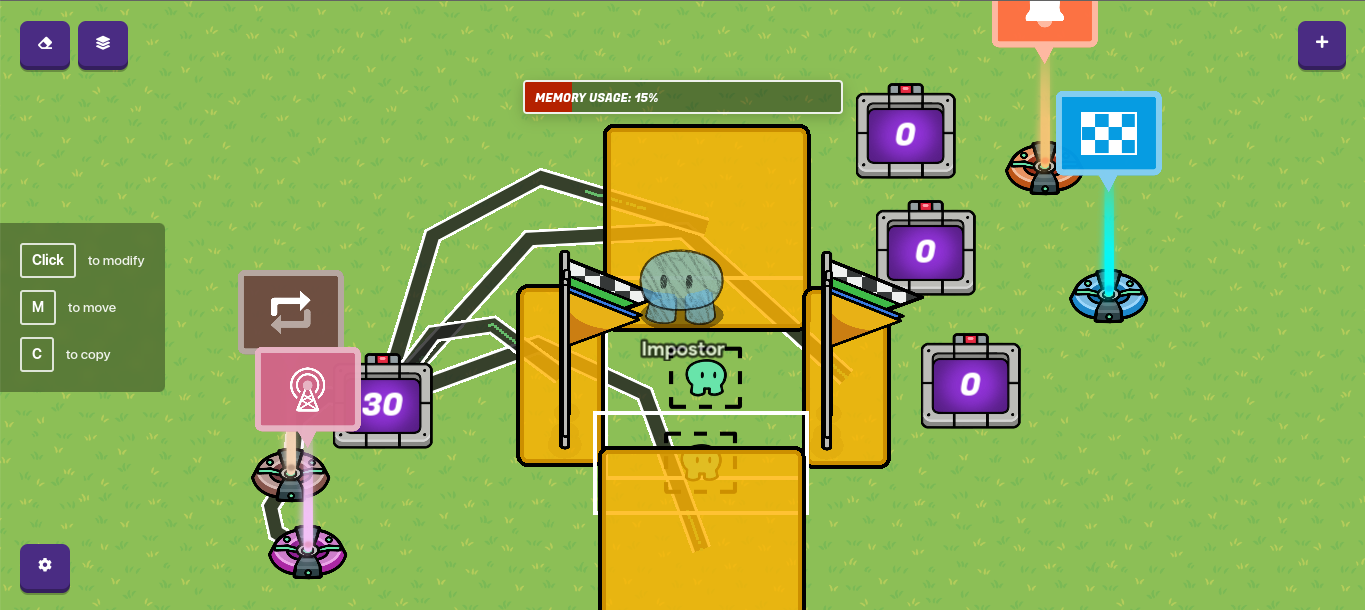
Step 6: Make the notification say “Last Lap!”
Step 7: Now connect the active zone to the non active one with wires that say Player Leaves Zone >>> Activate Zone
Step 8: Place down an item granter and make the item a banana (We will use this as the score)
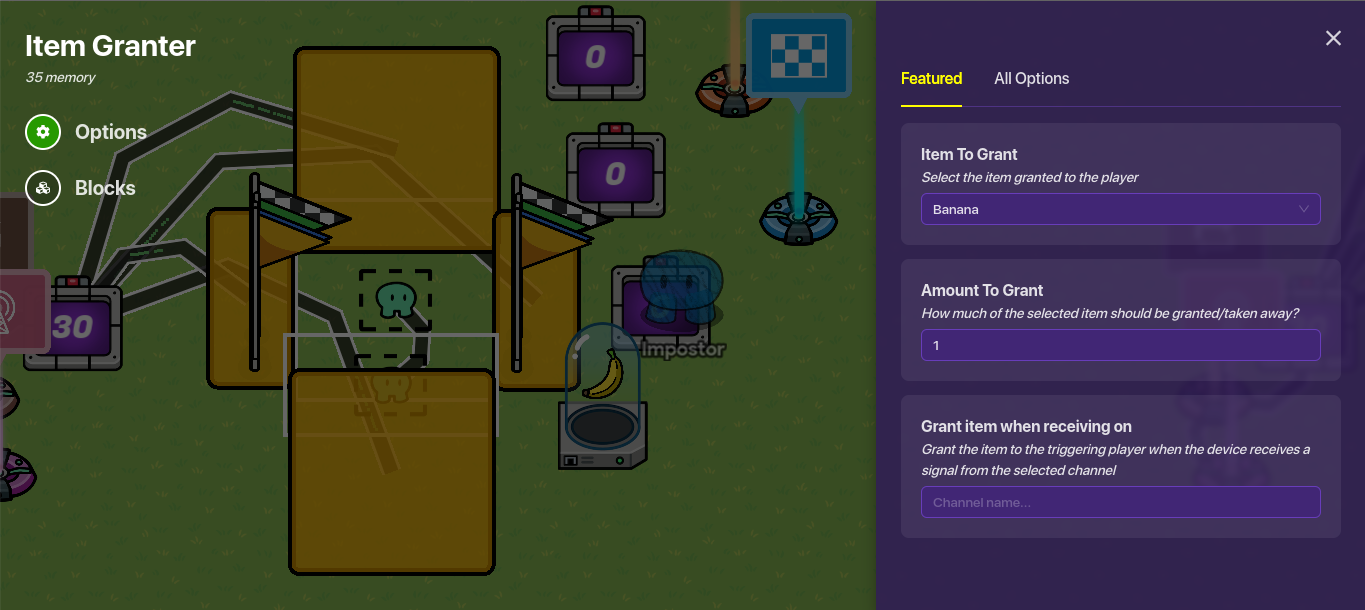
Step 9: Wire the non-active barrier to the item granter, Player Enters Zone >>> Grant Item
Step 10: Now remember the flags and counters? We will wire them now
Step 11: Wire the counter with a target value of one to your active green flag and non-active second flag, (1st Counter) Target value Reached >>> Hide Prop (Green Flag) x2, (1st Counter) Target Value Reached >>> Show Prop (Second Flag) x2
Step 11: Now wire the 2nd counter to the second flag and third flag with (2nd Counter) Target Value Reached >>> Hide Prop (Second Flag x2, (2nd Counter) Target Value Reached >>> Show Prop (Third Flag) x2
Step 12: Wire the 2nd counter to the notification saying Target Value Reached >>> Send Notification
Step 13: Wire the 3rd Counter, or the visible one to the final checkered flag and hide the second flag, (3rd Counter) Target Value Reached >>> Hide Prop (Third Flag) x2, (3rd Counter) Target Value Reached >>> Show Prop (Checkered Flag) x2
Step 14: Now wire the non-active barrier to all three counters with Player Enters Zone >>> Increment Counter
Step 15: Connect the 3rd counter to an end game device, Target Value Reached >>> End Game
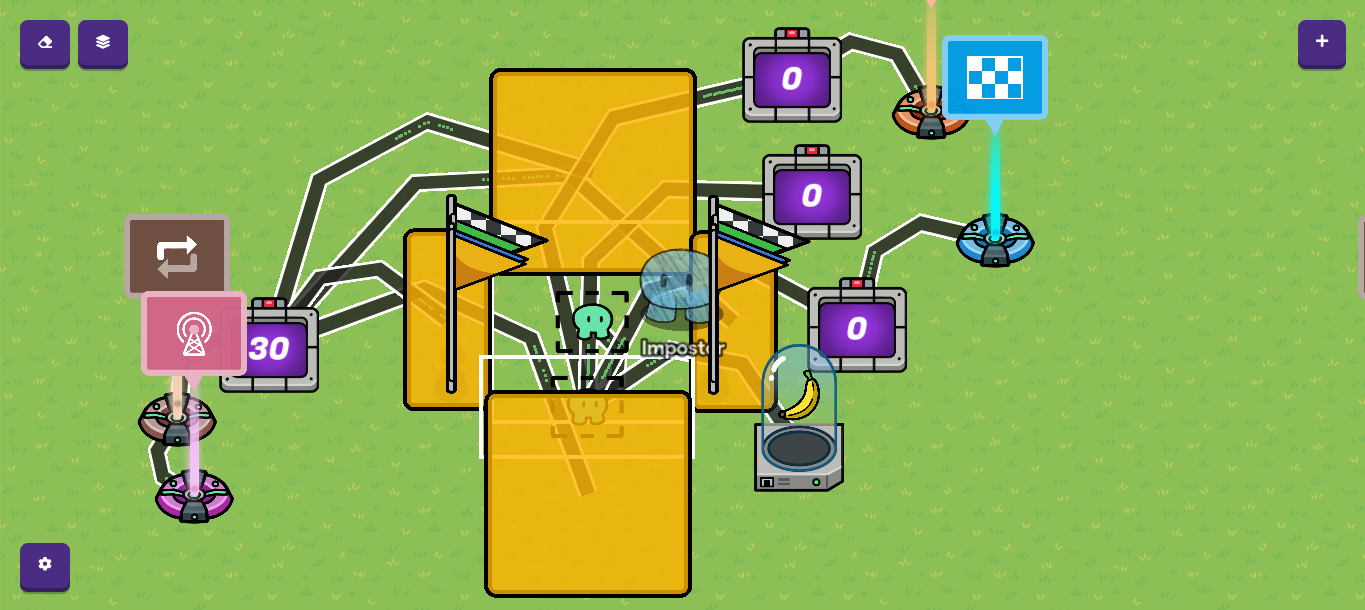
That’s all for laps and winning. If you’ve done it correctly, it should look like this:
How to Make Outs
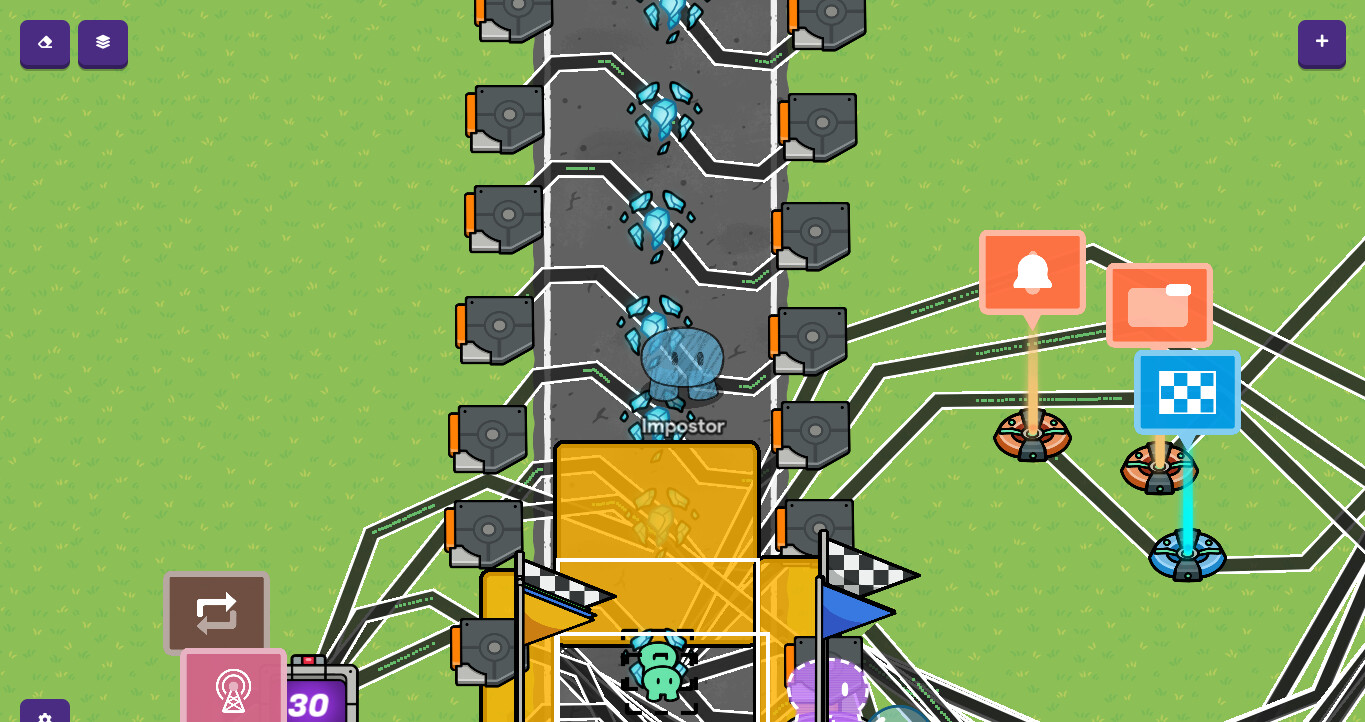
Step 1: Place down a trigger and make it not visible in game
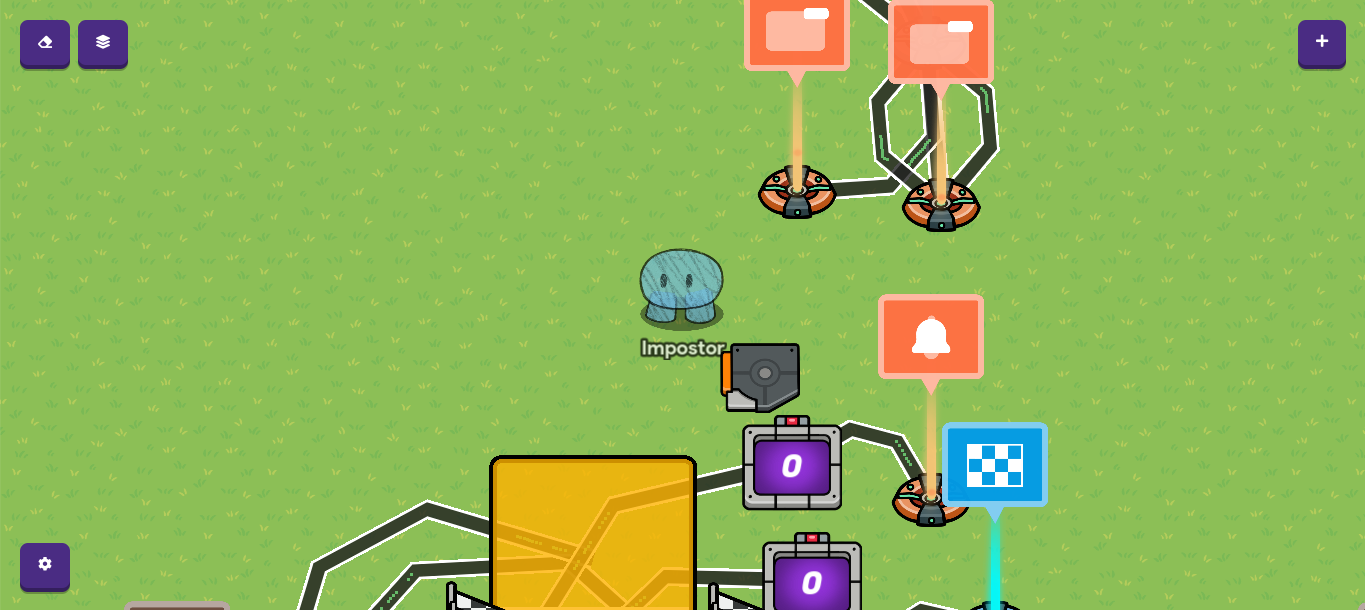
Step 2: Copy and paste the trigger to the other side

Step 3: Place down a teleporter in between the two triggers
Step 4: Now wire both of the triggers to the teleporter, Triggered >>> Teleport Player Here
Now just copy and paste this everywhere on your track and when you’re done it should look like this:
How to Make The Score
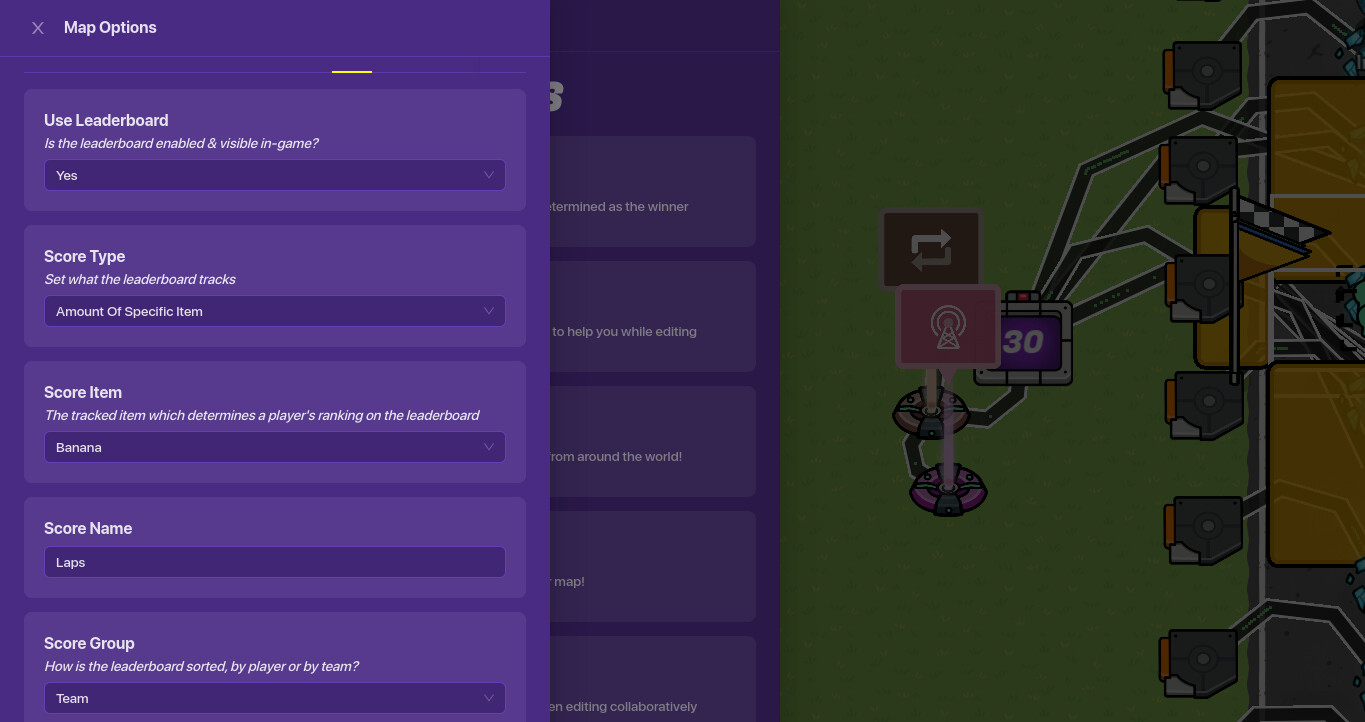
Step 1: Open the map options menu and change the score type to tracked item
Step 2: Make the tracked item a banana
Step 3: Make the score name “Laps”
Now you’re done and it should look like this:
Sprinting and Energy
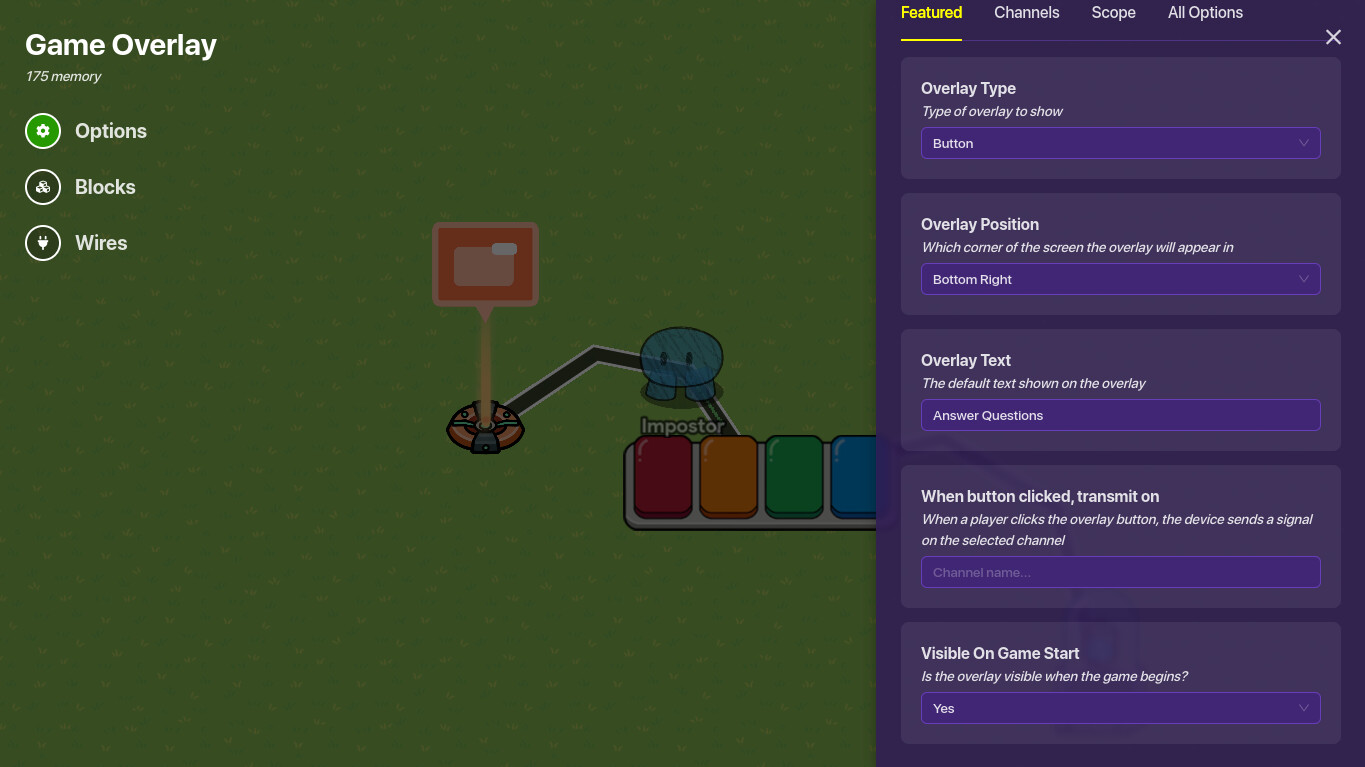
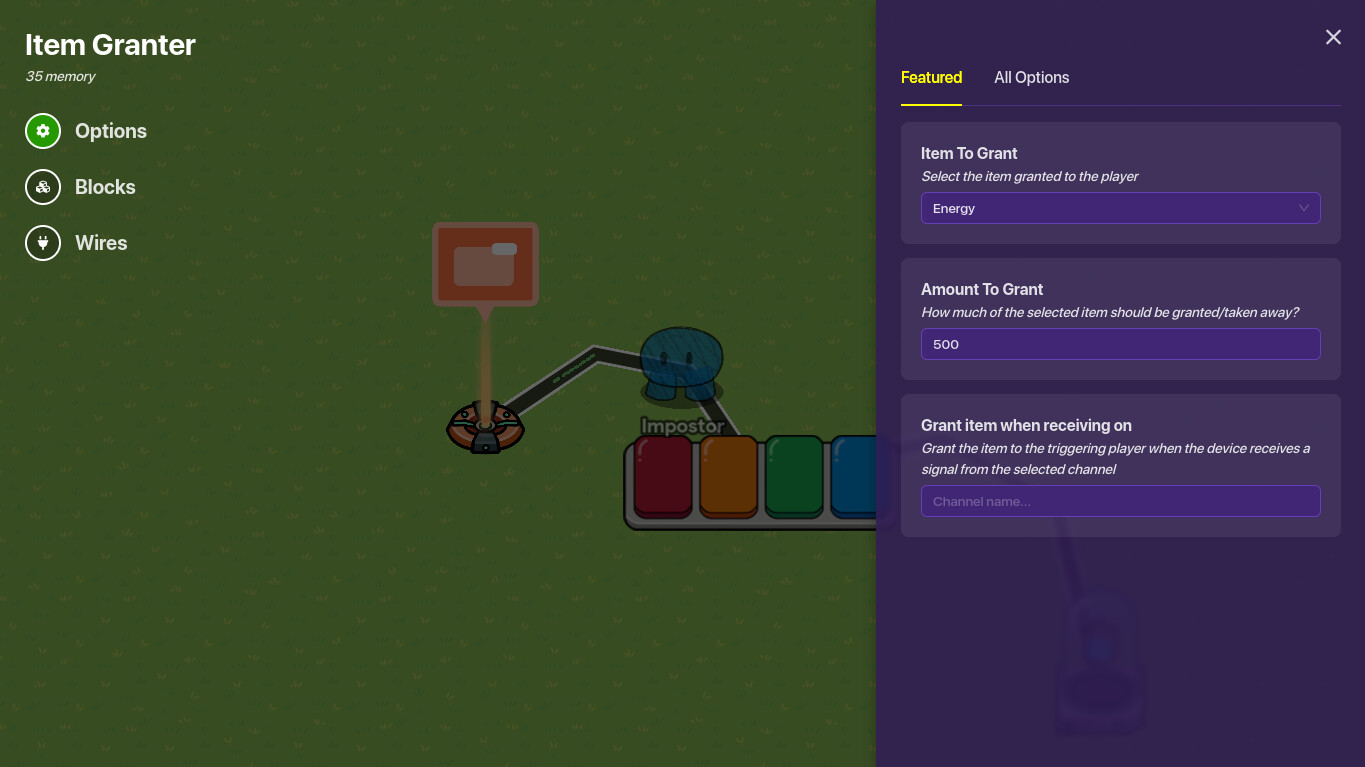
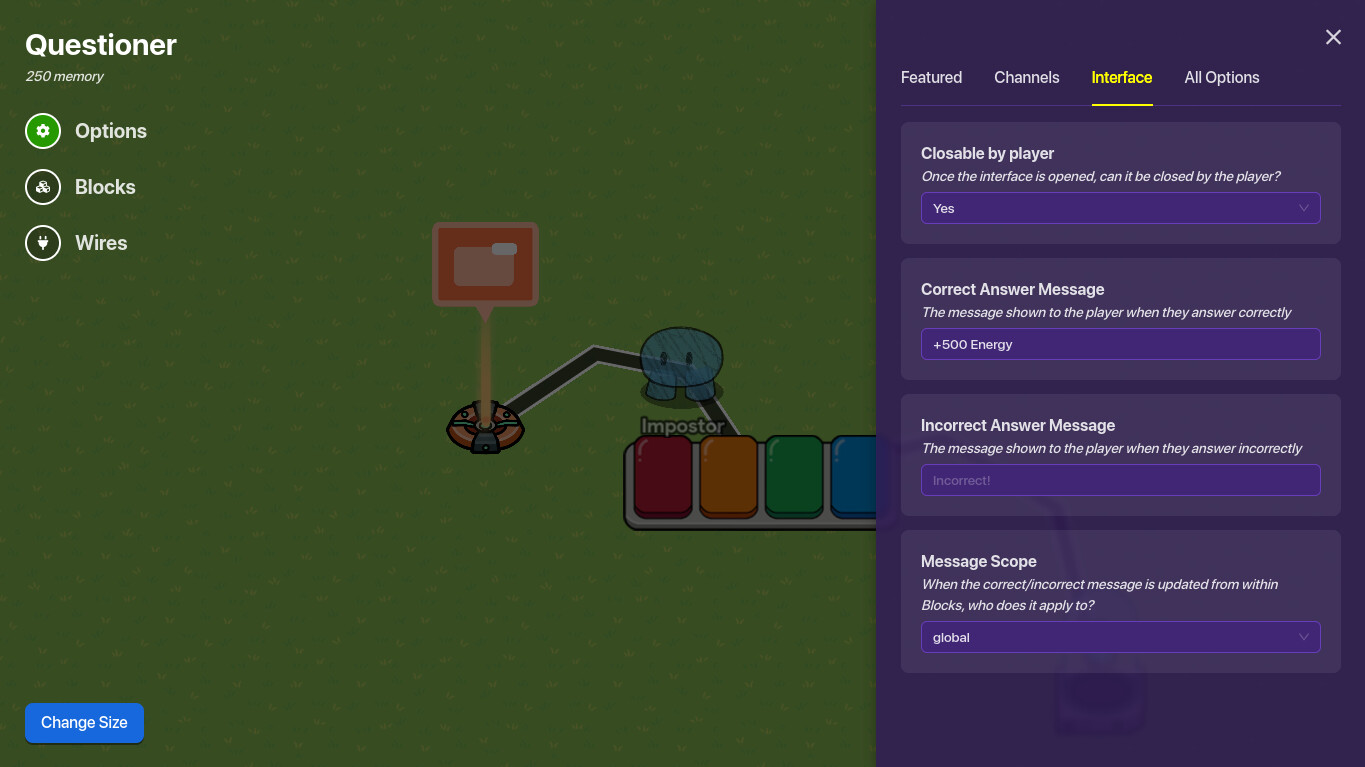
Step 1: Place down an overlay, a questioner, and an item granter with energy far away

Step 2: Make the overlay a button and make it say “Answer Questions” (Place it on the bottom right)
Step 3: Now make the item granter grant Energy ≤ 500
Step 4: Make the correct message for the questioner +500 Energy or however much energy you’re granting
Step 5: Now wire all of them together from Overlay > Questioner > Item Granter
Step 6: Set the overlay scope to player
Step 7: Place down another overlay, but make it a text that tracks energy and put it in the top right

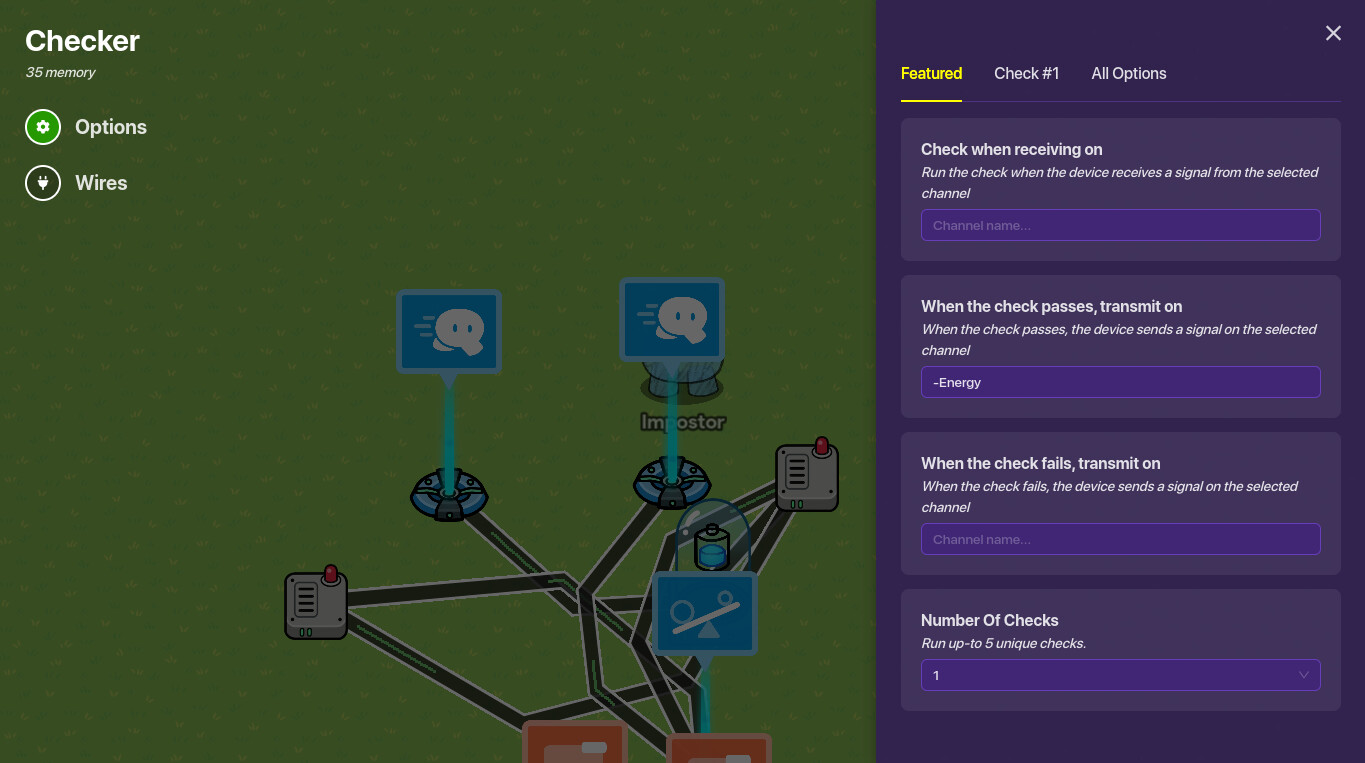
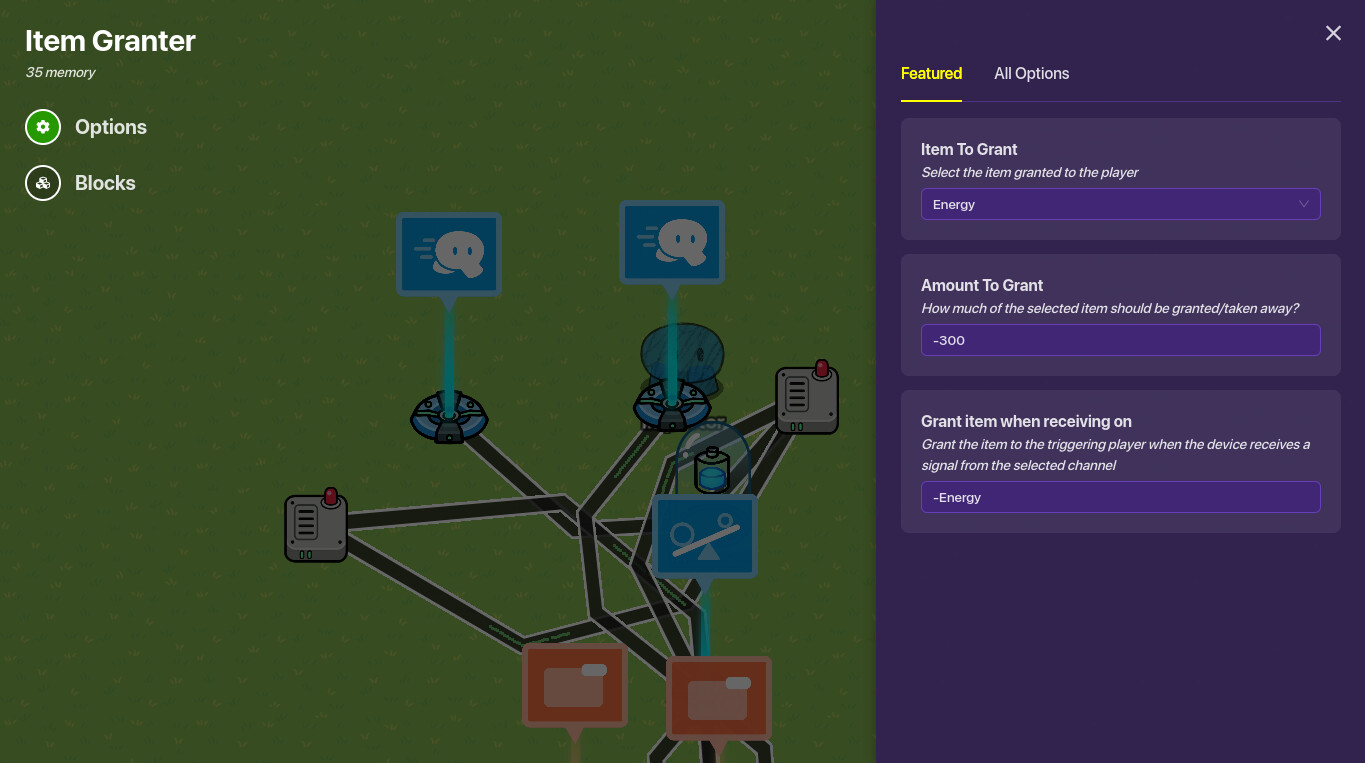
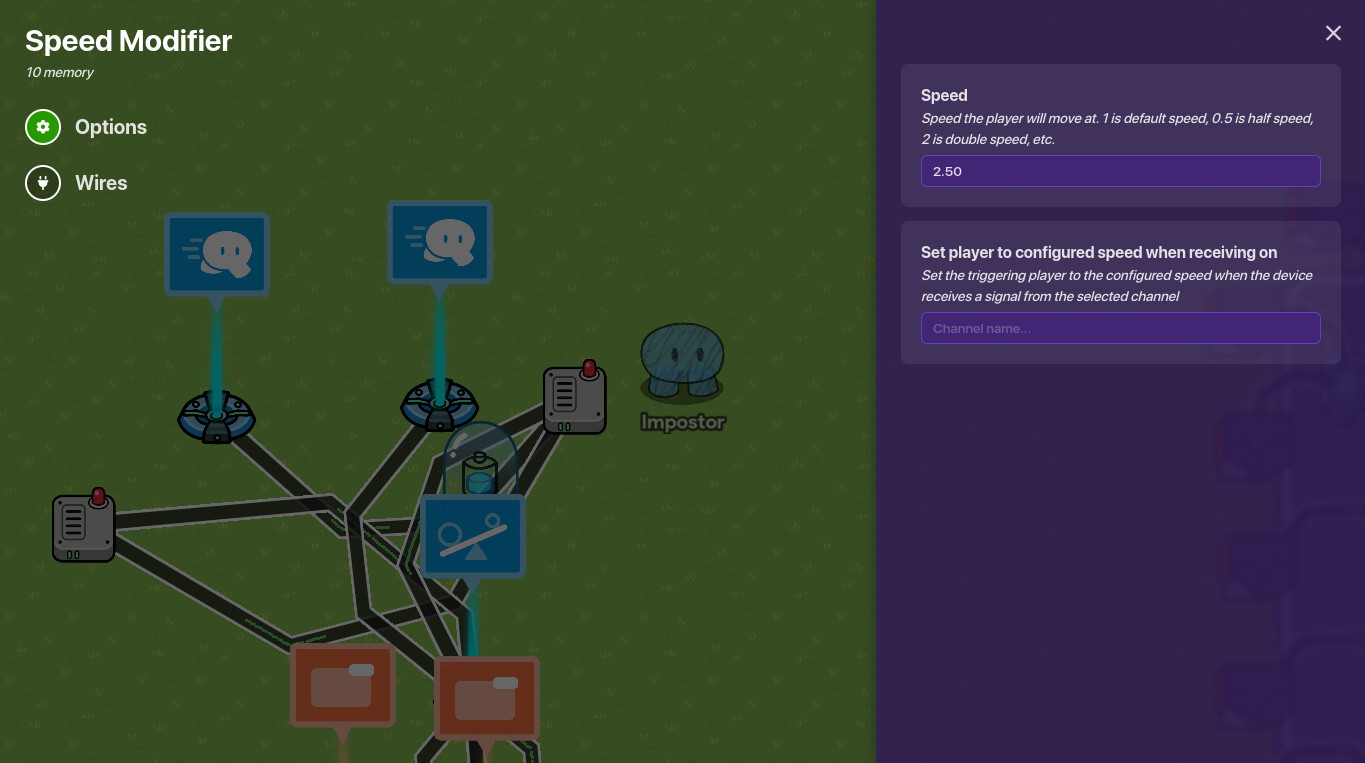
Step 8: Place down 2 overlays, 2 wire repeaters, 2 speed modifiers, a checker, and an item granter

Step 9: Edit one of the overlays to a button on the bottom left and make it say “Sprint (3 secs)” or something similar
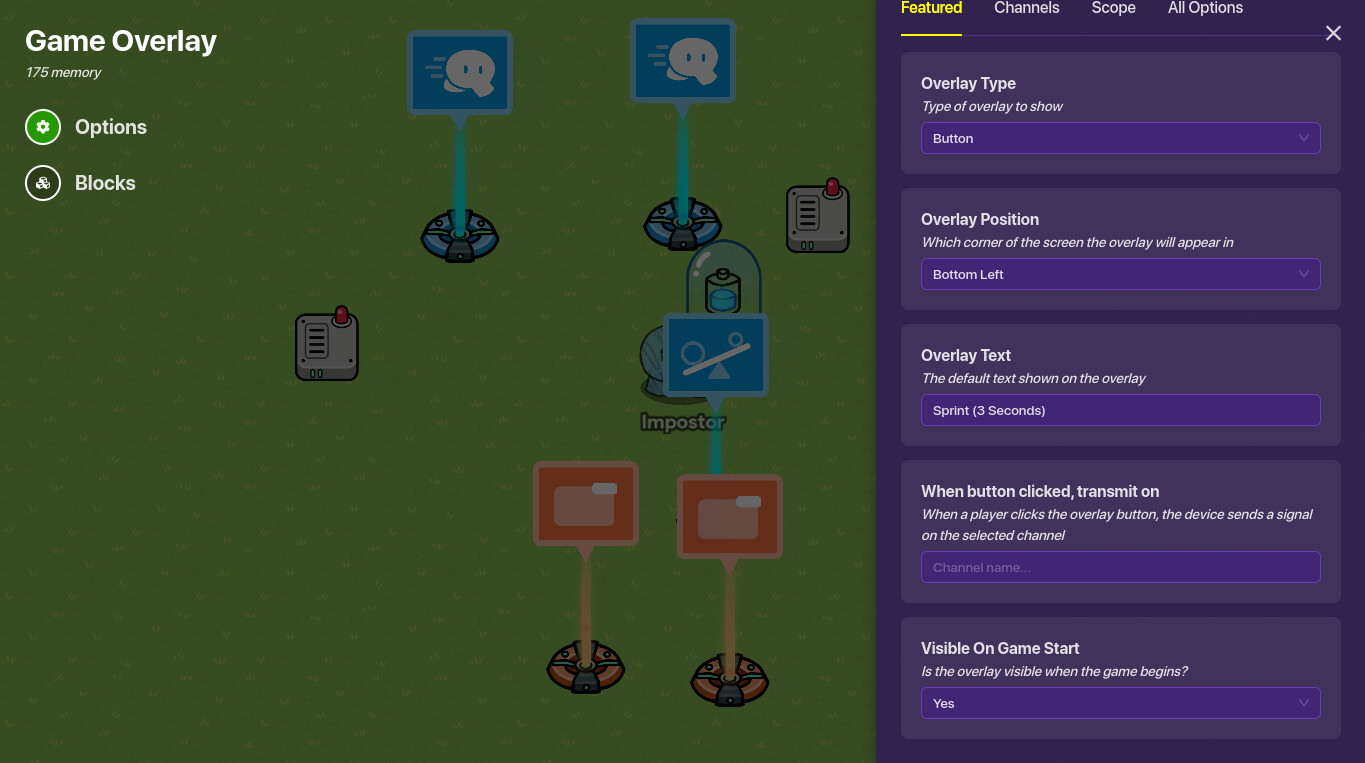
Step 10: For the next overlay, make it a text on the bottom left and make it say “10s Cooldown”(Make this one not active on game start)
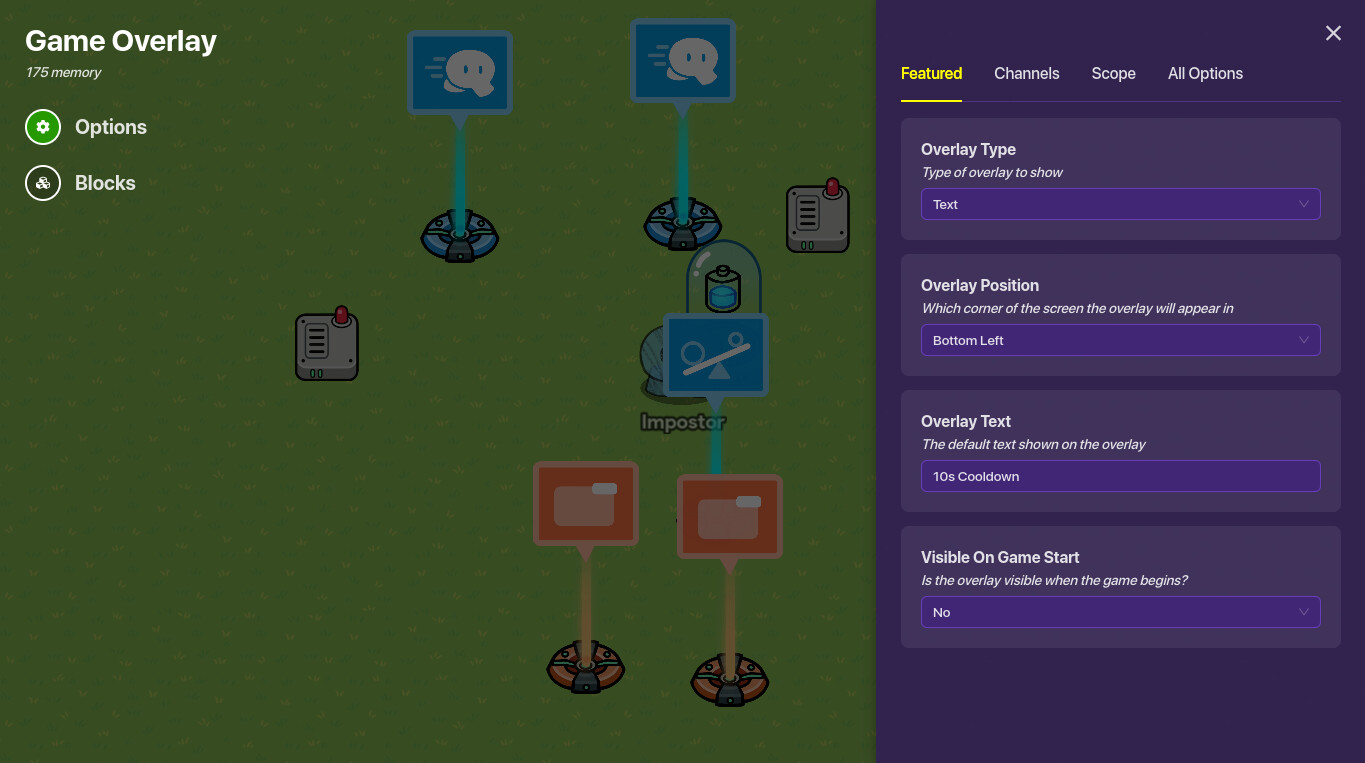
Step 11: Set the scope for both all of your overlays to player
Step 12: Make the check for energy and make it greater than 299

Step 13: Now make it so that if the check passes transmit on channel -Energy
Step 14: Make the item granter grant -300 Energy when receiving on -Energy
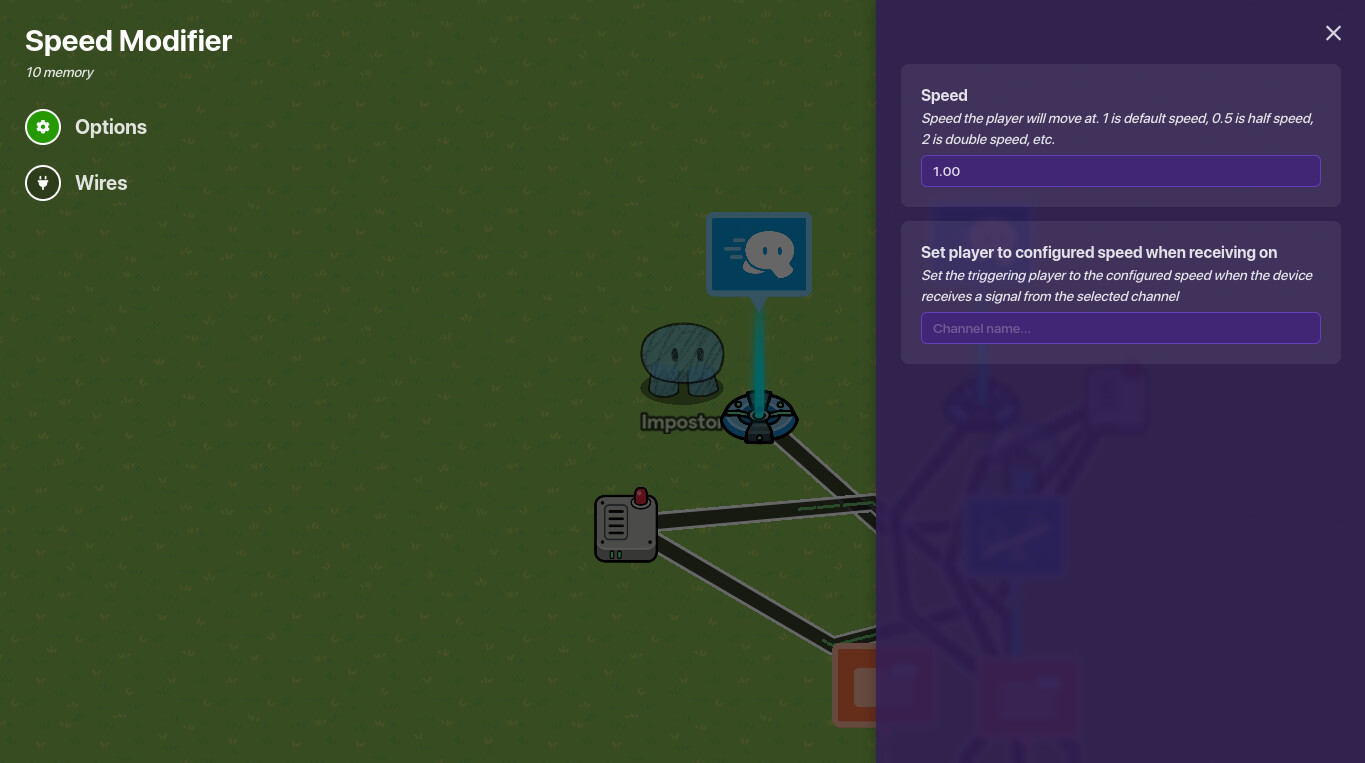
Step 15: Set one of the speed mods to 2.50
Step 16: Set the other’s to 1.00
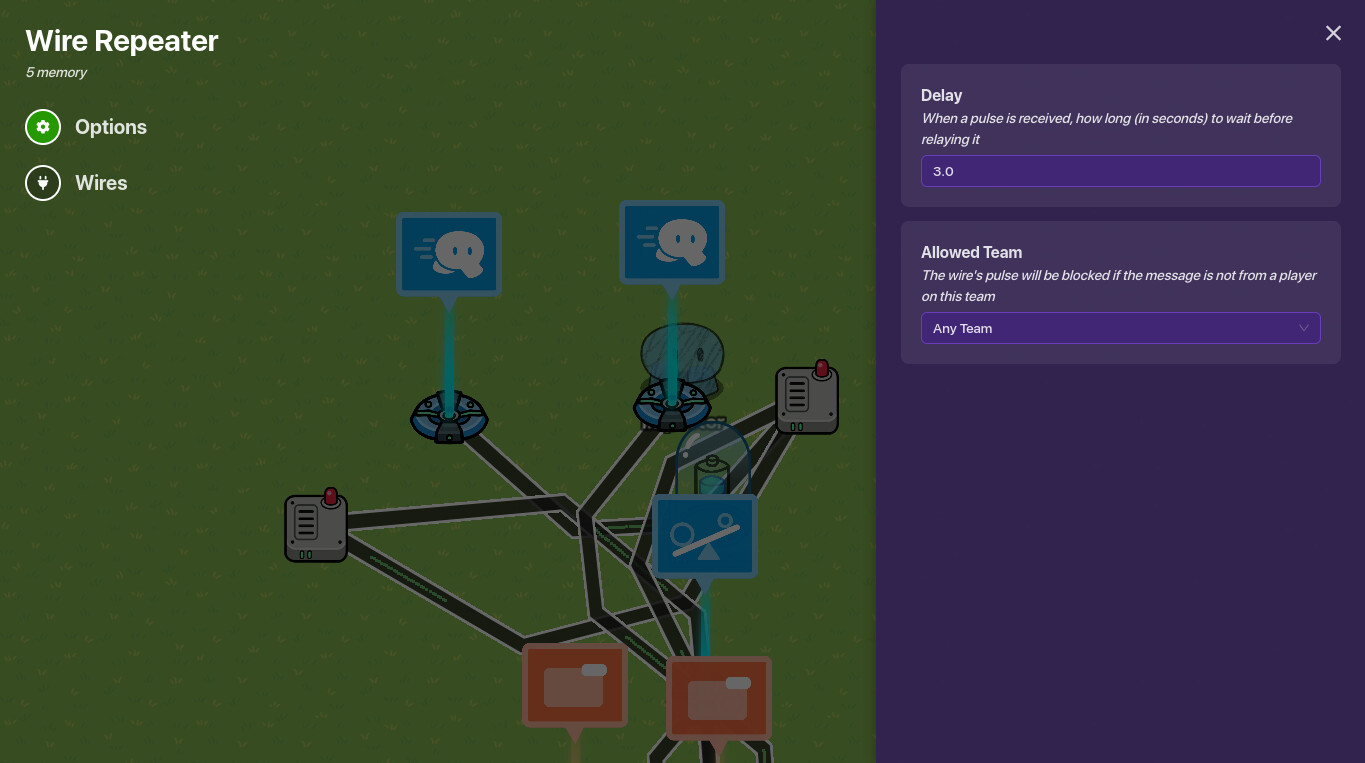
Step 17: Edit one of the wire repeater’s delays to 3
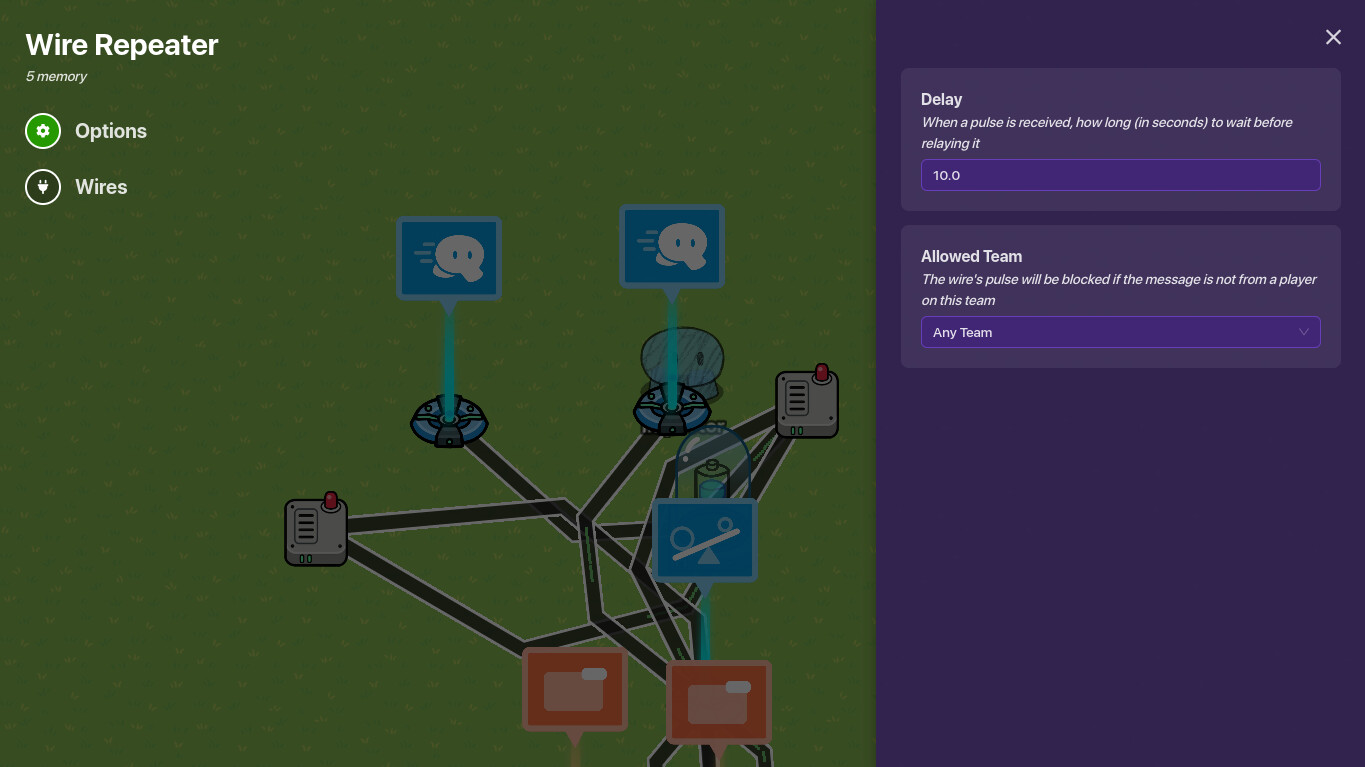
Step 18: Set the other one to 10
Step 19: for the first wire, wire the Sprint button to the checker with Button Pressed >>> Run Check
Step 20: Wire the check to the button, Check Passes >>> Hide Overlay
Step 21: Wire the check to the other overlay, Check Passes >>> Show Overlay
Step 22: Wire the check to the wire repeater with a delay of 3 seconds, Check Passes >>> Relay Pulse
Step 23: Wire the check to the speed mod with a speed of 2.50, Check Passes >>> Set Player To Configured Speed
Step 24: Wire the wire repeater with a delay of 3 to the speed mod with a speed of 1, Pulse Received >>> Set Player To Configured Speed
Step 25: Wire the wire repeater with a delay of 3 to the wire repeater with a delay of 10: Pulse Received >>> Relay Pulse
Step 26: Now wire the wire repeater with a delay of 10 to the original sprint button: Pulse Received >>> Show Overlay
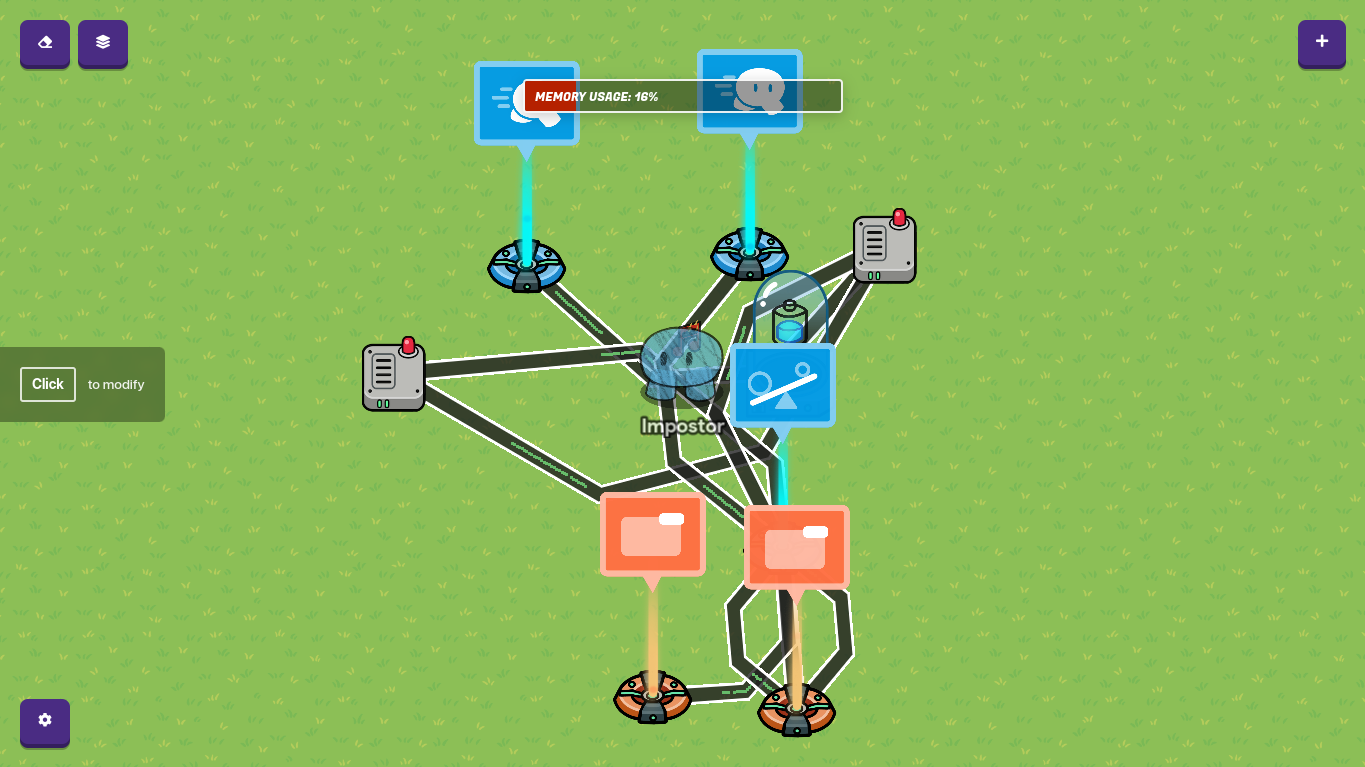
If you’ve followed all these steps correctly, your setup should look somewhat similar to this
If you’ve done everything correctly, your track should look something like this:
Thanks for following the guide, hope you have a good day!
How Easy Is This Guide?
- 1-2

- 2-4

- 5-6

- 7-8

- 9-10

- 11
