Intro
Speed hacks are pretty explanatory: exploits used to make your character faster than the game’s max speed. Out of all the basic exploits and whatnot, speed hack are one of the most annoying; you can’t see a player long enough to know who to ban, or how to combat their exploits.
This is a guide on how to build a working speed hack detector, which you can use in your map!
Note: the speed hack detection (SHD) system shown in this guide is NOT 100% foolproof; GKC does have limits, after all.
Materials
- Property x4
- Player Coordinates x1
- Lifecycle x1
- Relay x1
- Trigger x1
- Popup x1 (OPTIONAL)
- Waypoint x1 (OPTIONAL)
Total memory: ~4.4% (4,375)
The Main Guide
The main part of speed hack detection (which I’m going to call SHD) is detecting what speed the player moves at. Based on my test, the player can move about 6.5 tiles per second, when at normal speed. Theoretically, the player would move about 26 tiles per second at max speed (400%). Going by this logic, a player is speed hacking when they are moving above 27 tiles per second.
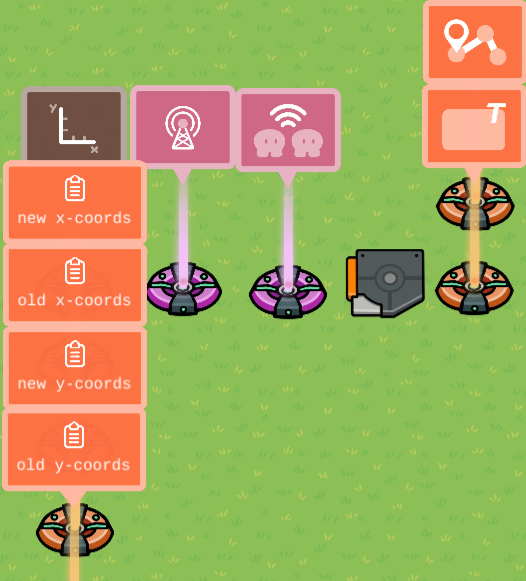
First, we need to make FOUR properties. This may sound difficult, but trust me, it’s not that hard. Each property must be a NUMBER property, and have a PLAYER scope. Name each property the following:
- new x-coordinates
- new y-coordinates
- old x-coordinates
- old y-coordinates
Below is the settings you should set for each property, the only difference being their names.
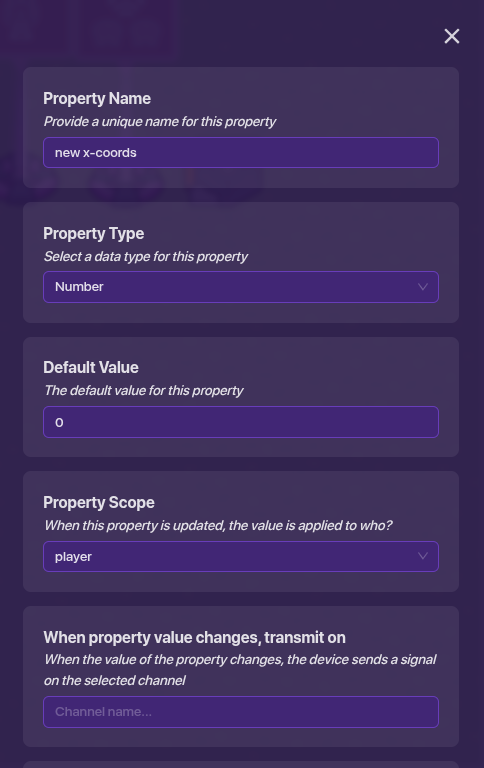
As you could probably tell, the properties are going to be tied to the player’s coordinates. The ones labeled “new” are going to be linked up with the Players Coordinate device, while the ones labeled “old” will be used to determine how far the player has traveled from their old position.
Set the property values of the old coordinates to the spawn coordinates. Otherwise, it may mistake a normal player for some using a speed hack.
Now, we can grab our Player Coordinates device. Go into the device settings, and change the Update Property option to Yes. Link both properties new x-coordinates and new y-coordinates to the device, so that they update based on the player’s position.

Now we’ve got the coordinate parts out of the way. Grab our lifecycle, relay, and trigger. We’ve got four steps to link these devices together;
- Set the lifecycle to send a message on channel “Speed Relay.”
- Set the relay to receive on “Speed Relay” and send on “Speed Trigger”
- Set the trigger to send and receive on “Speed Trigger.”
- Give the trigger a delay of 1 second.
Once the game starts, this trigger will constantly go off for each player every second. However, we are not done yet; now for the block code.
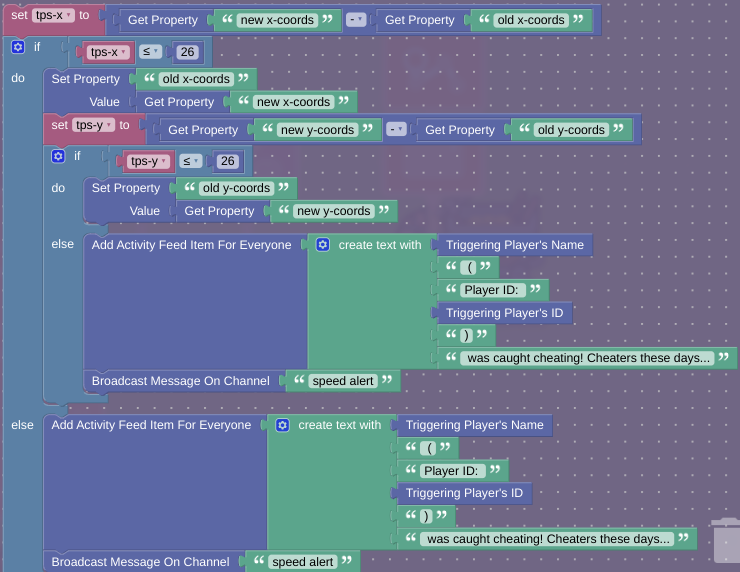
Make a new block inside the trigger, and replicate the block code shown below:

Explanation
The variables “tps-x” and “tps-y” track the player’s speed in tiles per second (hence the abbreviation TPS). This is done by subtracting the player’s old coordinates from the player’s “new,” or current coordinates. It then updates the old coordinates to your current coordinates. The main “detection” part is when it checks to see if your TPS rate is more than 26 (the max TPS rate). If it is under or equal to 26, the player is not using any exploits, and the code updates your old coordinates to temporarily match your new ones. If it is above 26, the code detects that the player is in fact exploiting, and points out both their username and Player ID. You can also lower the max TPS rate depending on the maximum amount of speed in your map (e.g. 150% = 9.75).
OPTIONAL: Softlock System!
First comes detection. Then comes action; now that we’ve found our exploiter, it’s time to take action. For this, we need to tweak the block code to send a message on a channel if a player is suspected of exploiting.
Grab your popup, and head into the device settings. Make the popup UNCLOSABLE, so that the popup becomes a softlock.
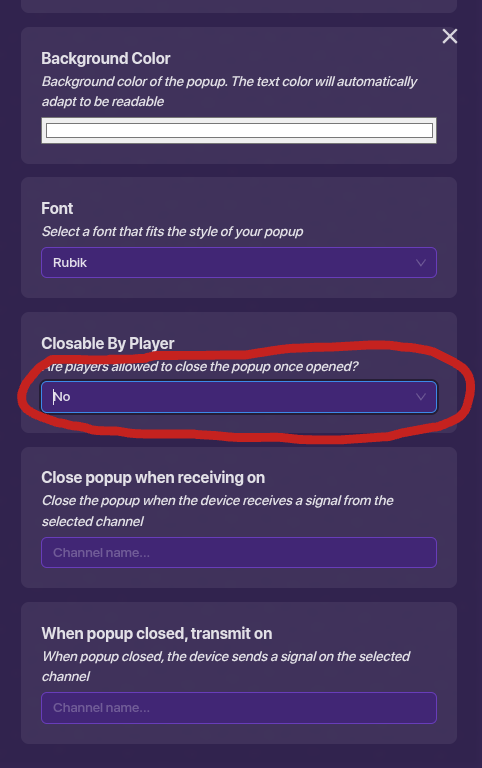
Once that’s done, put a message in the popup’s Header and Context section, kinda like scolding, or a troll message. Don’t forget to have the popup open from channel “speed alert,” so that it opens once someone is caught exploiting.
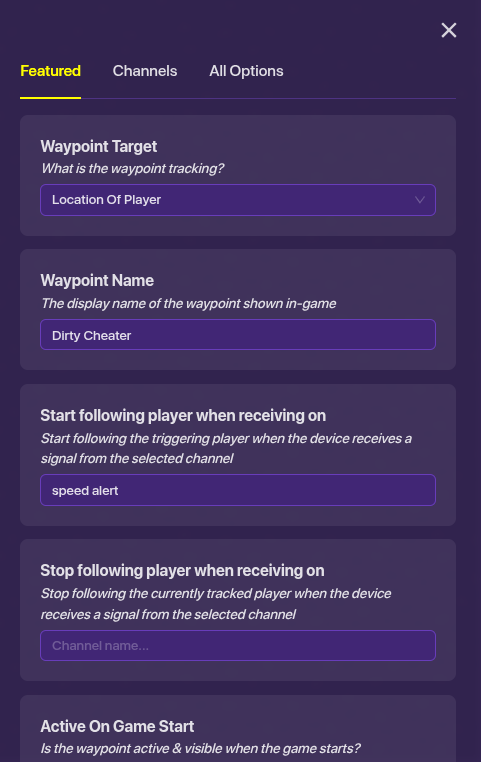
Lastly, Grab a waypoint, and enter its settings. Set the waypoint location to Location of Player, have it trigger from the “speed alert” channel, and give the waypoint label a funny name. Make sure the waypoint is not active at the start of the game!
And now, this SHD system is officially complete!
- 1/10 [
 ]
] - 2/10 [
 ]
] - 3/10 []
- 4/10 [
 ]
] - 5/10 []
- 6/10 [
 ]
] - 7/10 [
 ]
] - 8/10 []
- 9/10 []
- 10/10 [
 ]
] - 11/10 [
 ]
]