Welcome, welcome, one and all, to another amazing guide by me, bakedpotato!
Today, we’ll be covering one of my favorite topics: barrier art!
What is barrier art, you ask?
Why, it’s only one of the most magnificent discoveries made in Creative: the ability to manipulate the barrier device into different artistic structures!
In this guide, I’ll be showing you my way to make custom gims using this method!
Ready?
Let’s jump right in!
The Basics
When you look at a gim, what’s the first thing you notice?
I myself am usually drawn to its odd shape: an oval-like head attached to two little stubby legs.
Let’s start with building that!
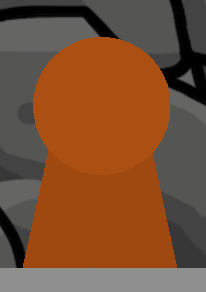
Place down a circular barrier, and adjust its size so it’ll match the size of the gim you’re making. Color it however you like. Next, you’ll need two rectangular barriers, colored slightly darker than the circle. Tilt them slightly in two different directions, and fit them to the sides of the circle. Make sure they blend together, with no space in between them.[1]
This is what your gim should look like so far:
Text Time: Be Expressive
So, we’ve got the basic shape down. Now what?
We’ll need eyes!
Use a text device to make these. Tint the text the darkest shade of whatever color you’re using for your gim.
Try using these text decals:
> and < for closed eyes
The ⬮ symbol for open eyes
_ for an exasperated expression
\ and / can be used for eyebrows or squinting
And, of course, there’s always the custom shape device!
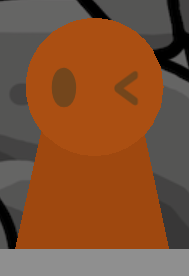
Try experimenting with the different emotions you can express with your gim!
Here’s how mine turned out:
The Final Step: Adding Detail
Body? [![]() ]
]
Eyes? [![]() ]
]
Sounds like we’re pretty much done!
But wait–
The gim looks like a monopod![2]
To fix this, place down three text devices, each with the | symbol. Repeat that symbol however many times you need, hitting “enter” for each one, according to how tall your gim is. Color it the same as your gim’s head.
The text should look something like this:
![]()
Put one between the gim’s legs, and use the other two to frame each leg.
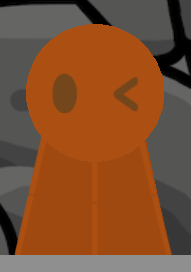
Ta-dah![3]
The Final Step: The Sequel
Hm?
You’re still here?
Oh, you must want to hear about decoration!
Well, I don’t really have an example for this, so I’ll just give you some ideas.
It’s your custom gim, after all!
You could try adding:
Vines, a halo, a devil’s tail and horns, fur, hair, a hat, feathers, or ears![4]
Wings, cracks, glasses, stars, tassels, or tears!
There’re many things you can try, so have a good time!
Wait… sorry, did I make that rhyme?
The Gallery
Hey, you!
Yeah, you, the one reading this!
(Who else would I be talking to?)
Did you make a custom gim using this guide?
Put it in the replies with a review or an improvement tip, and if I still have editing time left, I’ll add it in here!
Just make sure to keep it on-topic!
NOTHING IN HERE YET!
Thanks for reading!
Ciao!
The two barriers will always fit together oddly at their ends, so I recommend covering the bottom of the gim with terrain or another barrier. It’ll look like the gim is standing on the floor. ↩︎
Yes, I had to look this word up: it’s like a tripod, but with one leg instead of three. ↩︎
To get rid of the small space in between the two | characters, simply place another text device with one character over the gap. ↩︎
No, not human ones, ew. I mean, like, cat or rabbit ears. ↩︎