Hello non-official silly billys! It’s been a while… but I’m back with a neat lil’ guide for you guys!
And it’s spooky season ![]()
![]() so I got my ghost gim on hehe…
so I got my ghost gim on hehe…
“But Luke… it’s not always going to be Halloween so when people in the future use this guid-”
“SHUSHHH all that matters is that it’s spooky season right now let me have my spooky season, okay? okay.”
Luke’s Guide to NPCs
NPCs can play a huge role in many games. From open world games to adventure, NPCs make the experience unique. But many games have NPCs that are… “basic”. So I’m gonna tell you how I make my NPCs unique and fun to interact with. (Note that the NPCs that I’ll be showing you how to make are primarily dialogue and chatting NPCs.)
Basic needs and skill level
- This requires using the… block coding!!! dun dun DUUNNN!! But don’t worry, it’ll be pretty simple.
- It is a bit of a process
- It leaves a lot of room for you to make your own adjustments to it
- You need the season pass!! (but I’m making a version that doesn’t require it)
- It will get a little… “messy” so make sure you have plenty of room!
- DEVICES:
- 1x Character Device
- At least 3x Dialogue Devices (although you will probably use ~8)
- 1x Trigger
Let's Begin!!
Set Up
First, take the character device from the menu. Then, open the settings and choose your NPC character. I chose the default one, Niblet, for simplicity reasons.
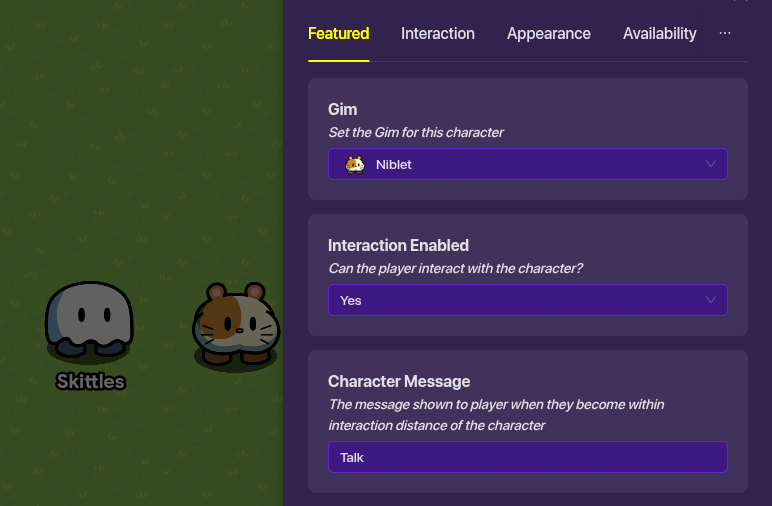
Once you have that done let’s set up the interaction. We’re gonna change the character message in the settings. This is the text that will display when giving you the option to interact with the NPC. You don’t need to change this, but changing it from ‘talk’ to ‘talk to [character name]’ can be a nice touch ![]()
Ok next thing, we’re gonna take the dialogue device. This will launch the “conversation” with our NPC.
- We have to change the settings to make it so it looks like we’re chatting with our gim that we chose, so open the dialogue device and go to gim and change it to the gim that you chose for your NPC.
- Then change the Message (the first one) to an opening message that your NPC will say to the player interacting with it. For a cheery NPC, this might be something like “Hello!!! I’m so glad you want to talk to me!”.
- (Note that you do not want to do something like “nice to meet you” as this NPC will be talked to repeatedly so then they won’t be talking for the first time and it doesn’t make sense.)
Now to connect the NPC to the dialogue connect them using a wire (z).
Once you connect them add the following settings to the wire as so:
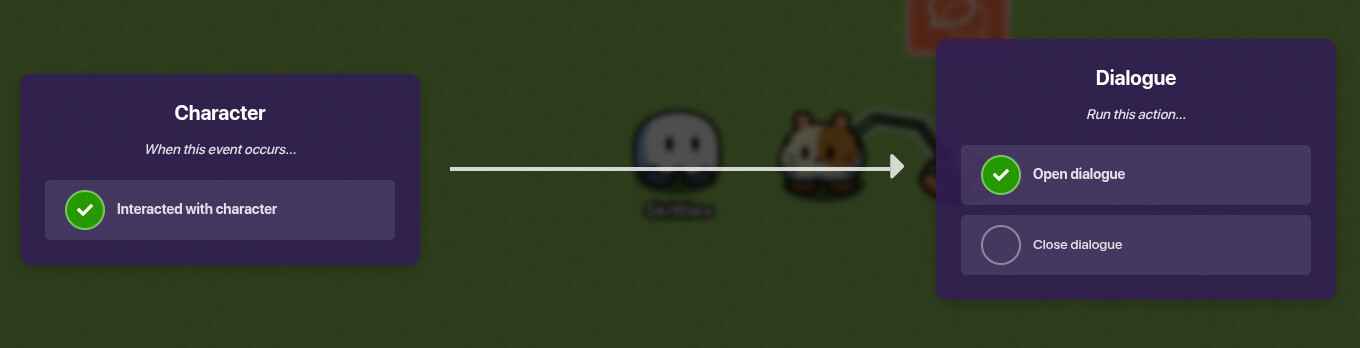
(Note: Don’t click on the dialogue device first otherwise you will not get the right settings, click the character and then the dialogue)
Menu
Ok now lets make the fun part! We’ll make the menu and the responses!
To make these we’ll need to set the Actions.
- On the dialogue settings, go to Action #1. This is the first button to respond with. I’m going to set mine to “Tell me something”
- Below the action #1 is a channel input, for the sake of this being a guide and how hard it is to do channels in a guide we will ignore the channel options. We will use mainly wires because it is much easier to show.
- (Note that the action inputs are what the player is saying to the NPC, not the other way around)
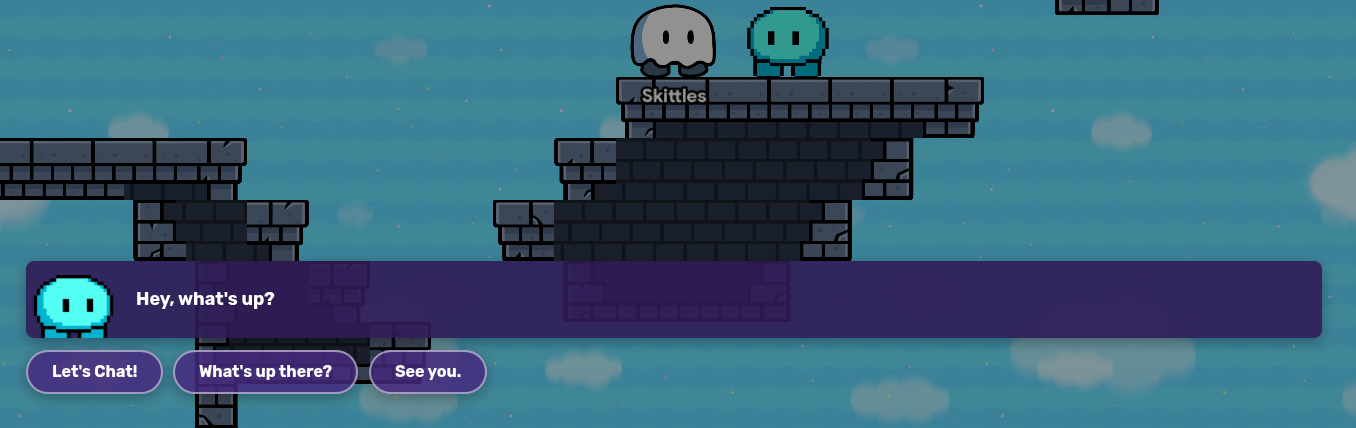
Now think about the purpose of this NPC. The NPC in the image above is a basic town-dweller. The first action, “Let’s Chat!”, is the main thing where you can, well, chat. The second action, “What’s up there?”, is for the lore of the game where there’s something in the mountains. I added the second action is for the lore. If you want the NPC to have that kind of thing then plan out the different actions. For the guide, I will be showing you how to make a chat one.
Now to make the NPC responses to chatting, we need more dialogue devices. Each dialogue device will be one response to the player asking to chat with the NPC.
- (Note that when making the additional dialogue devices to set the gim talking to the NPC on each one and if you copied the device from the initial one to delete the Action #1 input)

In the image above I have six additional dialogue devices, so the NPC can respond with six different sayings.
Coding
Now for the difficult part of the fun part… the coding.
-
Take a trigger device and place it near the initial dialogue device. Then wire them together with these settings:
-
Go onto the trigger’s settings and on the left-hand side find “blocks”. Once there click “When triggered…” . This should bring up the coding menu.
-
On the left side of the menu, click on the section “Variables”. Click on Create Variable and name your variable something unique for the character such as Chat[character name]. this will help if you are planning on making multiple NPCs.

Now that you have made a variable blocks should show up in pink. Choose the first one which should say “Set [Variable Name] to” and drag it onto the grid.
- Then go onto the section Math. Take the block that says “random integer from _ to _” and connect it to the variable block.
- Go back to the math section and take the first block, which is the number block, and plug it into the first slot in the integer block. Set the 0 to 1,
- Take another number block and plug it into the second slot and set it to how many additional dialogue devices you have. (For instance, I have 6 additional ones as stated previously, so I would set the block to 6).
This is what your code should look like so far:

Now go off of the coding back to the additional devices.
- Open the first additional device. On the settings add what you want the NPC to say. These can be simple things like a story that NPC had, or maybe a fun fact about itself. For my first one I did the NPC’s favorite food. “I love potatoes! They are very delicious and you can have them in so many ways!”.
- Then go to the Open when receiving on setting and enter a channel name such as “[Character Name]Chat1”. Do this for each of your dialogue devices except for the initial one. (Note that for each one change the channel name slightly. Example: for the second one do [Character Name]Chat2).
Once you have all of them done go back onto the trigger’s coding.
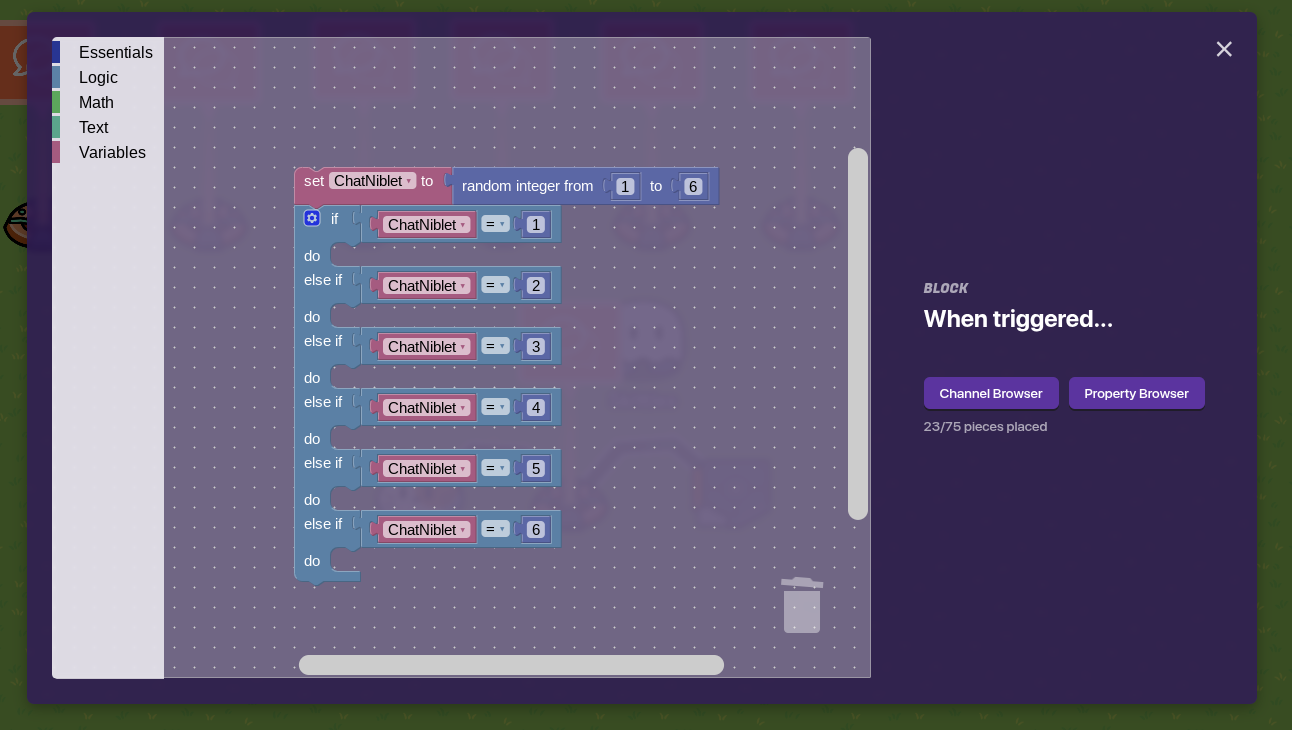
- Go onto the Logic section and take an if, do block. Connect it under the variable block.
- Click on the settings button on the block. Drag additional else if blocks onto it to add up to how many additional dialogues. (For instance, I have six additional dialogue devices so I would add five else if blocks onto it so it adds up to six if points)
This is how your code should look so far (with needed alterations):

Now go to the Logic section and take the ‘_ =_’ block, called the equal-to block.
- Connect it to the first if, do. Go to the variable and take the character variable, just the plain variable, should be the last one. Plug it into the first slot of the ‘equal-to’ block.
- Then take a number block from the Math section and plug it into the second slot and set it to ‘1’. Do this for each of the if slots and change the number by one every time.
Here’s how your code should be looking so far (with needed alterations):
Now go to the Essentials section and take the first block, Broadcast on channel
- Drag it into the do part of the first if,do block.
- When you place it it will come up with a menu giving you the different channels you have. Choose the first additional dialogue channel.
- Plug it into the broadcast block and then do the same for the next one but with the second additional dialogue channel and so on.
Your code should look like this (with needed alterations):

Now when you interact with the NPC it will give you a random dialogue!
Finishing Touches
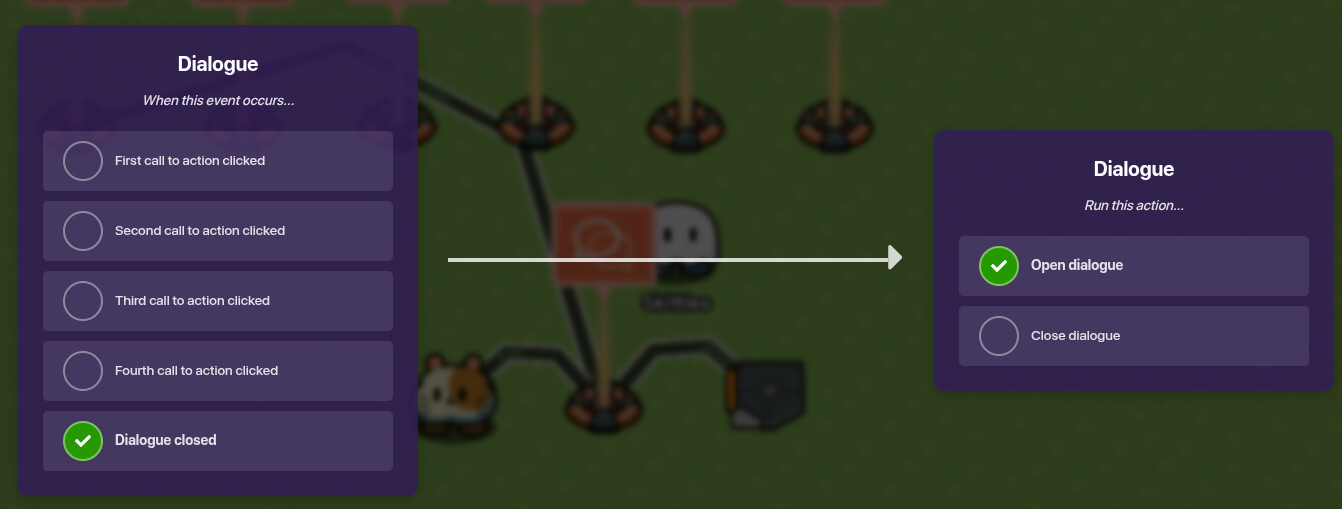
Now that you’ve done the main big part, let’s finish up. Go back to the additional dialogue devices and make a wire. Connect the wire from one of the dialogue devices to the initial dialogue device. Change the wire settings like so:
Do this to each of the additional dialogue devices.
On the initial dialogue device, go to the actions tab.
- Go to the next empty action and set it to an end dialogue saying such as “Goodbye” or “See 'ya!”.
- Do the channel for that action and make it something similar to Chat[character name]close
- Then go to the Channels tab and set Close when receiving on and set it to the action channel from before.
Thank you for reading! Please comment with suggestions or corrections that you have! I’ll update soon with more dialogue options and for non-season pass owners.