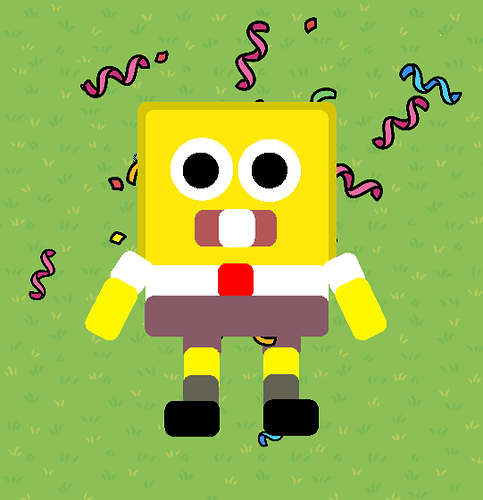
Hi! Today I’ll be showing you how to make Spongebob Squarepants (my best friend) in Gimkit! Lets get started! ![]()
Note!
This guide will only have 1 photo, as new users are limited to one photo per guide.
Color Codes.
Color code 1: 253, 232, 8
Color code 2: 213, 196, 7
Color code 3: 255, 255, 255
Color code 4: 0, 0, 0
Color code 5: 178, 87, 87
Color code 6: 135, 90, 103
Color code 7: 98, 98, 85
Step 1: Head.
Welcome to the first step, the head!
The first thing you will need is a barrier. Change the barrier color to Color code 1, and the transparency to 1. And no border. Remember to keep it as a square.
The next part of the head you need to make is the outline. This part is simple. Hover your mouse over the main head, (what we just did) and click C. Then, change the color to Color code 2. Size it up a little bit, and make it outline Spongebobs head.
Good job! We are now moving on to the eyes! First, add a barrier. Make the shape a circle, and make it smaller to a size that 2 of the circles would fit into Spongebobs head. Change the color to Color code 3, and remove the boarder. Copy that, like I told you how to earlier, and put it on the other side of the head. Then, copy the eye, center it into the white barrier, and make it smaller with the Color code being Color code 4. Repeat that in the other white barrier, and now, you have the eyes!
Now is the last part of the head. The mouth! You can’t have Spongebob without his mouth! For this, copy the main head barrier, and make it more of a smaller rectangle shape. Be sure to change the color code to Color code 5. Now, copy the mouth, and change it to Color code 3. Make it a small square, and center it into Spongebobs mouth. You now have Spongebobs head!
Step 2: Body.
Congrats on finishing the head! We will now be moving on to that scrunchy body we all know and love!
To create Spongebobs body, you must copy the main head barrier, and make it shorter, and set it to Color code 3. Then, copy the shirt (what we just did), and put it under the shirt, and set its color code to Color code 6. Now, copy the tooth, and put it under the pants to make it the short. Remember to change the color to Color code 6. Now, copy the tooth again, and rotate/move the tooth to where you want the sleeve to be. Copy the sleeve, change it to Color code 1, and make it longer. This will be the arm. Now, copy the arm and put it on the other side of Spongebob. Remember to rotate/move it to your liking. Final part until we have our Spongebob! Copy the shorts. (Not the main pants part.) Move the copied shorts barrier under the actual shorts, and make it Color code 1. Do the same steps we just did, but change the color to Color code 7. Finally, do the same steps we’ve done twice, and make the width longer, also change it to Color code 4. Lastly, Copy the whole leg. Move it over to where you think the other leg would be, and move the shoe. You now finished your Spongebob!
I hope to see somebody use this in their game, and have a good day! See you in Bikini Bottom!
