Welcome back to another guide, today, we’ll be recreating the game Battleship! ![]()
![]() Let’s get into the guide!
Let’s get into the guide!
Making the Board
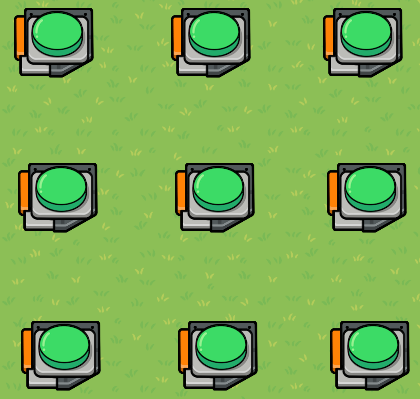
The first thing we need is the board, where you set up your ships! For this, if you’ve played the game before, you know it’s a letter to number grid, like A1, B7, 10J, stuff like that. For now, for your sake, we’ll make a 3 by 3 grid, A to C, and 1 to 3. Add the buttons accordingly.
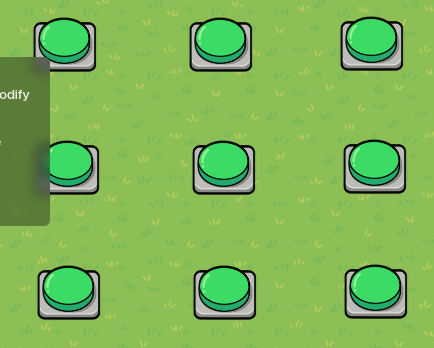
Then, you’ll want to make a trigger below each button.
Then, make a barrier (grey, no collision, 1 transparency, not visible on start), then wire each trigger to the barrier
Triggered -> Activate Barrier
What this does is when you run over the trigger it activates the barrier, as if you’re setting down your ship.
Then make another barrier (red, no collision, 1 transparency, not visible on start). Now, this barrier appears on a channel. For example, on button A1, it’s barrier will appear on A1wasHit, B2 button, their barrier appears on B2wasHit and so on. For the button, have their display value be their position, meaning A1 buttons display will be A1. Wire each of the buttons to a different trigger.
Button clicked -> trigger
I’ll explain the block code sooner on, since there’re two options to choose from.
Then make a notification that appears when it’s respective button is pressed. For example, an A1 buttons, when clicked, while send a notification saying ‘A1 was chosen to be attacked’. Understand? Then make another barrier (white, no collision, 1 transparency, not visible on start), these are the miss barriers. You know how a battleship has two sides, one side is for your ships and the other is the sonar board, where you put your pieces? Yeah! Put the white barrier in that section. Like this!
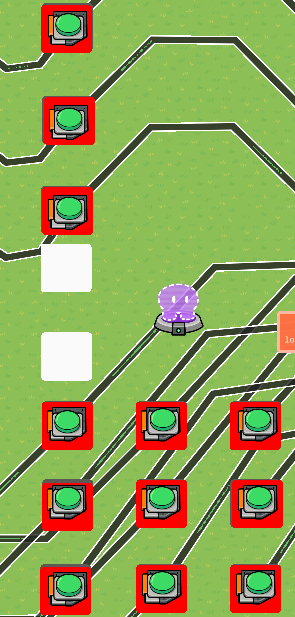
Once again, the barriers appear on a broadcast, in this case, for your barriers, A1wasAMiss, and for the enemy, A1EnemywasAMiss. Keep the barrier that activates on A1wasAMiss on the enemies side and A1EnemywasAMiss on your side, we do this because your tracking the other player’s board, if that makes sense. Also, you have to copy the red barriers also onto the white barrier, and once again, the enemies barriers on your side, and your barriers on the enemies side, confusing?
Great! Now copy the entire thing, since battleship is a two layer game. So far, the only change you’ll have to make is that for the enemies barrier, have it appear on A1EnemywasHit. So far, that’s all you need to know about this section!
Calling Hits and Misses
Remember earlier how I said that I would explain the block code of a trigger later? I’m going to offer you two options on how to call hits and misses.
Manual
Oh! so you choose Manual! Looks like your against the robot revolution! Anyways for this, those triggers I talked about? First, make a property called locationOnBoard, make sure it’s text and don’t give it a default value. Also, remember those triggers that were wired with the button? Yes! Now, in the code, for each respective trigger, write this,
set property: locationOnBoard
set value: text 'A1'
I said respective because you’ll need to change the value for each trigger. For example, this block of code was for a trigger that connected with the A1 button, however, a trigger connecting to B5, they will update the property as ‘B5’. Now for the code! Since this is manual, we have to create something that the player needs to click for the system to work, we could make a chat system, or just buttons, triggers, whatever you wish. I don’t care. But for one of them, they needed to broadcast on ‘hit’ and the other on ‘miss’. Then make a pop-up that sends on ‘hit’, make a blockcode that triggers on ‘hit’ and add this code.

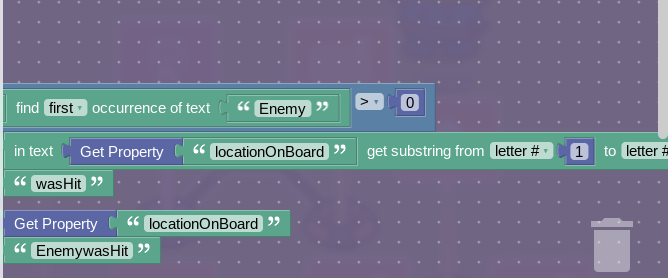
![]()
What this does is that it first of all, sends a notification saying it’s a hit. Now, for the if statement, I honestly got confused about this, because earlier I ran a debug on this and I got 3 for the number of occurrences of ‘Enemy’ in the property, even though I clicked the ‘Enemy’ button once. However, 3 was the number of buttons I had on ‘Enemy’ side, so it somehow identifies that, and the reason we WANT it to is that we want to broadcast on a channel respectively. I’ll explain in deeper concept later. Anyways, when it checks about the Enemy occurrence, if it’s greater than 0, then it identifies it as the ‘Enemy’ board, so it concatenates the first 2 letters of the property, for example, A1Enemy and then mushes it together with the ‘wasHit’ to get A1wasHit, huh? Just like our barrier from earlier! Also, if there was no occurrence, meaning that the attack was issued from the other side and not the ‘Enemy’ side, then they do the same thing, except mush it with EnemywasHit, also the same for their barrier! Now, just a warning, collecting the first 2 letters of the occurrence will mean that in original Battleship games, the number extends all the way to 10, but along with a letter, that would make 3 letters. A fix for this which I discovered much later was to have set the property as A01. With a 0 before the single digits, then change the sub string to 1 TO 3, then you can add the 10. Do the same thing except change the code to work on ‘miss’. And now you can manually make a hit and miss just by pressing a button!
Automatic
Oh! So you decided to go automatic eh? Great! For this, make sure you don’t have a locationOnBoard property, but instead, make individual properties for each of the buttons. For your side, name them like A1 Piece Of Ship, and for the enemies side, name them A1Enemy Piece Of Ship. Remember those triggers that displayed pieces of the ship? Well, in the code, have them update their property to their value, for example, the A1 Trigger will update the A1 Piece Of Ship to A1, and for the enemy it would be A1Enemy for their property. Now, you know the triggers that are triggered by the button? Well put this in the code!
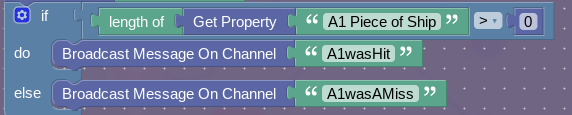
What this does is that it checks the length of the property, and if it’s greater than 0, that means a ship was put down there and then broadcasts A1’s hit barrier, which shows it’s hit, but if it’s = to 0, meaning that a ship was never put down, it would boradcast on A1wasAMiss, making the white barrier appears, showing it was a miss.
Problems with this
The only thing is that it just might be a pain to personally change each of the properties in each of the triggers, but it still works! But I think that’s it, if there’s a bug or something I missed let me know! Logging off Friends Of Berk!
Also, I think I just beat ClicClac at making battlehship.
- Yes
- No