This is a working version of a build a while back for a working railgun or beam gun. The cool part about this is that you the player can customize how much damage it can do. NOTE: It is not a gun that can move and aim alongside the player. This will not be the most informational tutorial because since I am new I can only add one embedded file which is at the end that should explain everything and how it’s set up and all that.
What you’ll need:
Props
*1 Light Grey Space Container (on)
*1 Metal pole (this can be any thickness you want)
*2 3d Printers
*1 Dark Grey Stone Barrier (Vertical)
Devices
*1 Laser beam
*1 button or Trigger (both should work)
*1 Repeater
Building the gun:
Construction of the gun
Once you have the materials needed, take the 3d Printers and put them next to the activated space container like in the image below:
Now, add the Wall below the body of the raygun. Then add the barrel by rotating it 180 degrees and then placing it behind the end of the 3d printers at the end.
Now for the laser settings: go to the settings for the laser and change the damage dealt to whatever damage you want, for the tutorial, I am doing 10,000 damage. Next, disable the Active on game start setting so that the laser is not active before you “fire” the raygun. Then go to all options and deselect the following settings: Show Path, Show Endpoint. This will leave you with a laser without a path when deactivated and no end point for it making it look like a laser.
Once that is done, add the laser to the end of the barrel, and now it’s time to move on to wiring!
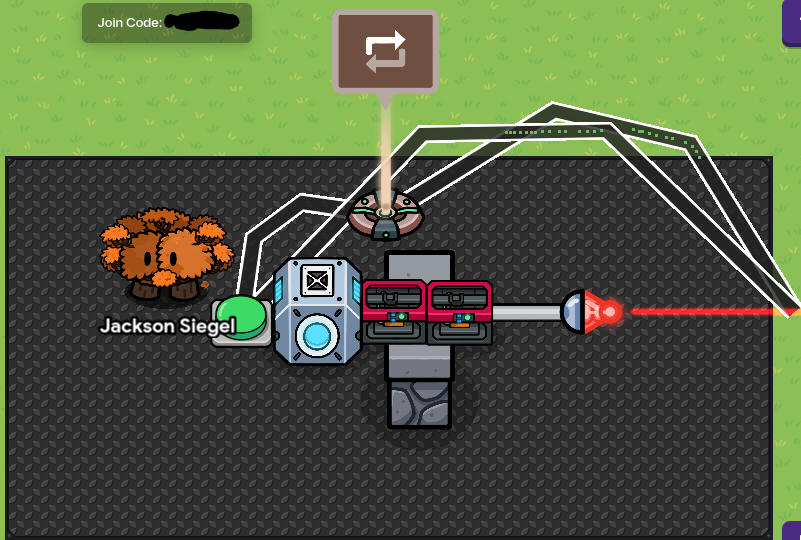
Wiring
After you are done with the railgun body, its time for the wiring. The wiring is fairly straightforward. All you have to do is set the repeater for 1.0 seconds and set the stop strategy for ‘After number of repetitions’ to 2, looking something like this:
Next, add the button to the firing mechanism. This is straightforward and you just need to change the name of it to “Firing Railgun” and make sure it is not visible in the game. Now have the following wires connected to the components as shown below:
Button pressed => Start Repeater
Button Pressed => Activate Laser
Repeater runs task => Deactivate laser
Now all that’s left to do is to test it and at this point, it is done! This is what you should have as the finished product.
Once you have finished that, the Railgun/beam gun should be working and you can use it for stuff like a science fiction map, laboratory map, etc.
Have Fun!
