Today we will be making a map!
Materials needed
1x Map[(Prop) You can also make your own map using barriers, but for the sake of simplicity, I’m just going to use the map prop.
1x Camera point
1x Camera View
An ‘x’ amount of text (how many places you want to have)
A Button, Trigger Overlay, or Zone
Optional-Unlockable Areas
An ‘x’ amount of Text
Another Button, Trigger, Overlay, or Zone
1x trigger
*Optional-Tracking Players
An ‘x’ amount of more ‘text’
1x Trigger PER AREA ON MAP
2x Item Granter PER AREA ON MAP
1x Checker PER AREA ON MAP
1x Counter PER AREA ON MAP
1x Zone PER AREA ON MAP
1x Property PER AREA ON MAP
Optional
1x Item Manager PER AREA ON MAP
Basic Map
Step One
Create your own map(with barriers or props) or use the preset map prop.

Step Two
Add a Camera point and Camera View In the middle of the map
Make sure to size the Camera View accordingly!

Step Three
Add a Button, Overlay, or Zone(I used a button)
Connect the Button, Trigger, Overlay, or Zone to the Camera Point
Button, Overlay, or Zone and make it show the point

Then, connect another Connect the Button, Trigger, Overlay, or Zone to the Camera Point, and make it stop showing point

Step Four
Add Text to your location and set the text layer to ‘Above’
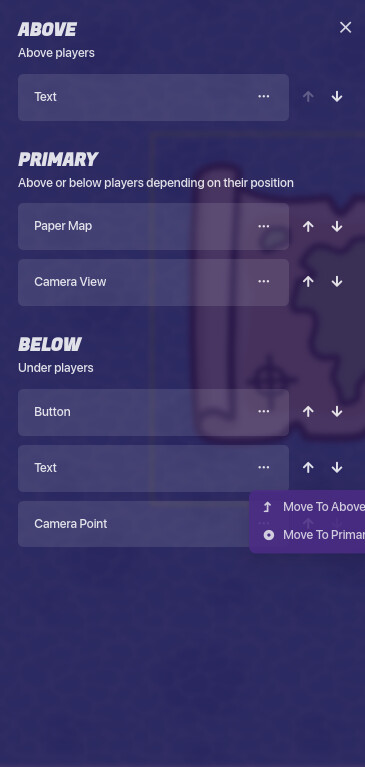
Your map should look like this!

Bonus
You can put a black barrier behind it to hide the ‘background’

Optional-Unlockable Areas
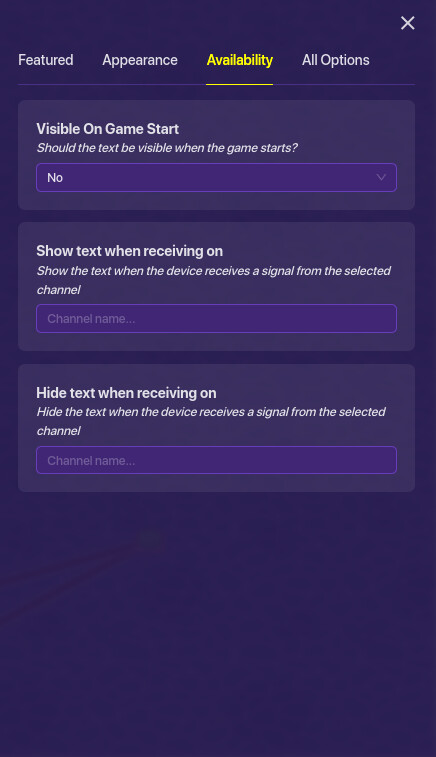
Get another ‘Text’ set it to hide on start
Step Two
Connect it to a Trigger, Button, Overlay, or Zone, and make it visible when triggered


Optional-Tracking Teammates
Step One
Put down zones in your “areas”
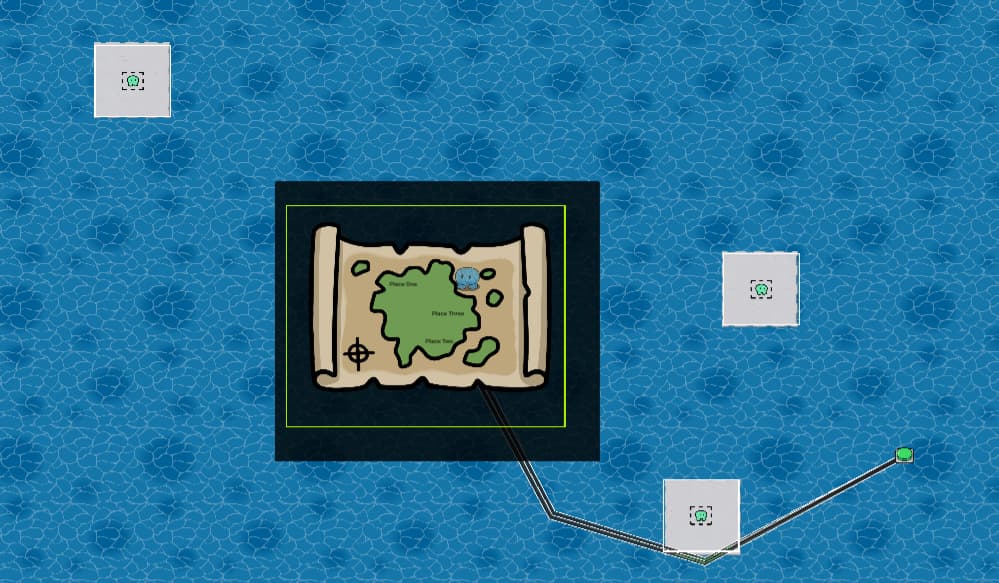
I used tiny little “islands” as an example
Then, set the ‘When the Player Enters The Zone Transmit On…’ to 1
and set the "When the Player Leave The Zone Transmit On…’ to -1
Step Two
Add as many ‘Text’ as there will be players in each place(in my example, this only game only has a max of 2 people)

and make all the text boxes empty(with a space)
(I didn’t to more easily show the ‘Text’)
Step Three
Create one counter, one checkers, one trigger, and two item granters for each location
Step Four
Set the Two Item Granters to two items you do not need.
(I used Bait)
Then, set the channels to your ‘1’ and ‘-1’
Set the amount for the one in which it transmits a signal when entered(for me, it would be 1) to grant one, and set the other one to negative 1.


Step Five
Counter!
Set the counter to start at 0, and increment on channel ‘1’, and decrement on channel ‘-1’

Then, Set the property to order1

Last, get the property device and set it “order1” to number
Grab your checker, and make it check for the channel ‘1’

Then, make it check when the player leaves the zone. (for me, it would be -1)
Step Seven
Trigger time
First, link the checker to the Trigger
(when check passes)
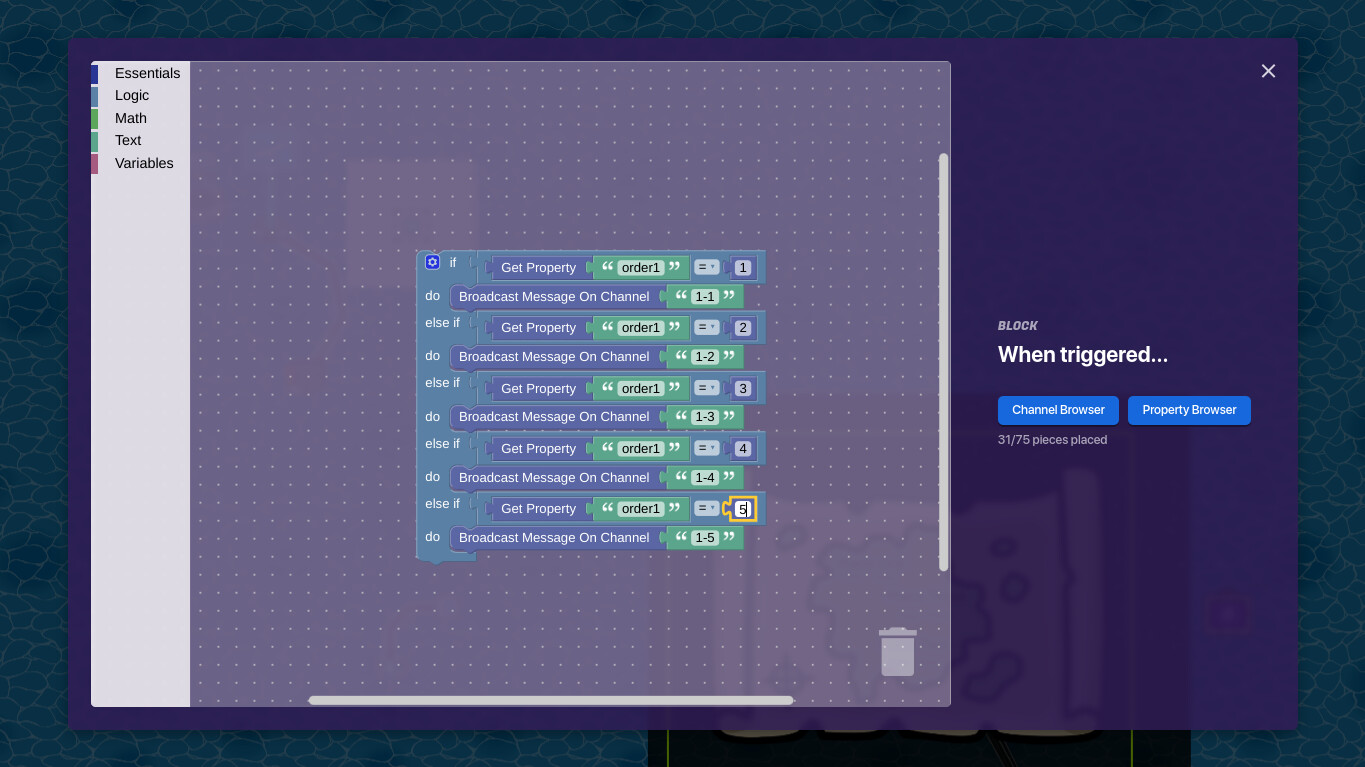
Then, go into blocks and put in this code.
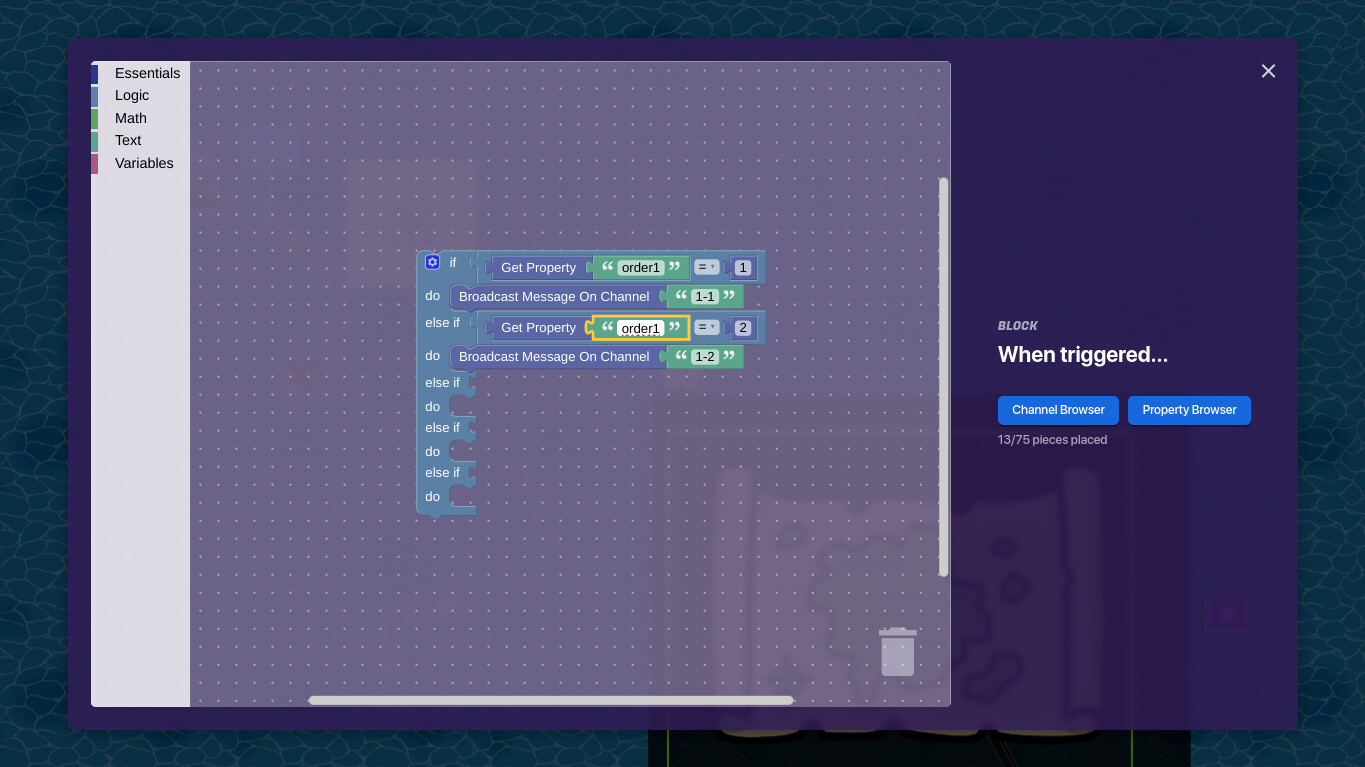
You keep on adding the same thing until it reaches how many people your game can have.
Ex. If my game could have 5 people max, this would be my code
Step Eight
Go into the text on the map(in Step Two of this section)
Add as many ‘Text’ as there will be players in each place(in my example, this only game only has a max of 2 people)
Then, click when receiving a channel, and put in 1-1
Last, put in this code

Step Nine
Repeat this process for every other location, except replace all the 1s with [whatever location number it is] in the channels. (excluding the second number in the Trigger)
Need help on this Step?
Follow this for your second one
Stuck?
Step One
Add as many ‘Text’ as there will be players in each place(in my example, this only game only has a max of 2 people)
and make all the text boxes empty(with a space)
(I didn’t to more easily show the ‘Text’)
Step Two
Set the Two Item Granters to two items you do not need.
(I used Bait)
Then, set the channels to your ‘2’ and ‘-2’
Set the amount for the one in which it transmits a signal when entered(for me, it would be 1) to grant one, and set the other one to negative 1.
Step Three
Counter!
Set the counter to start at 1, and increment on channel ‘2’, and decrement on channel ‘-2’
Then, Set the property to order2
Step Four
Grab your checker, and make it check for the channel ‘-2’
Then, make it check when the player leaves the zone. (for me, it would be -1)
Last, get the property device and set it “order2” to number
Step Five
Trigger time
First, link the checker to the Trigger
(when check passes)
Then, go into blocks and put in this code.
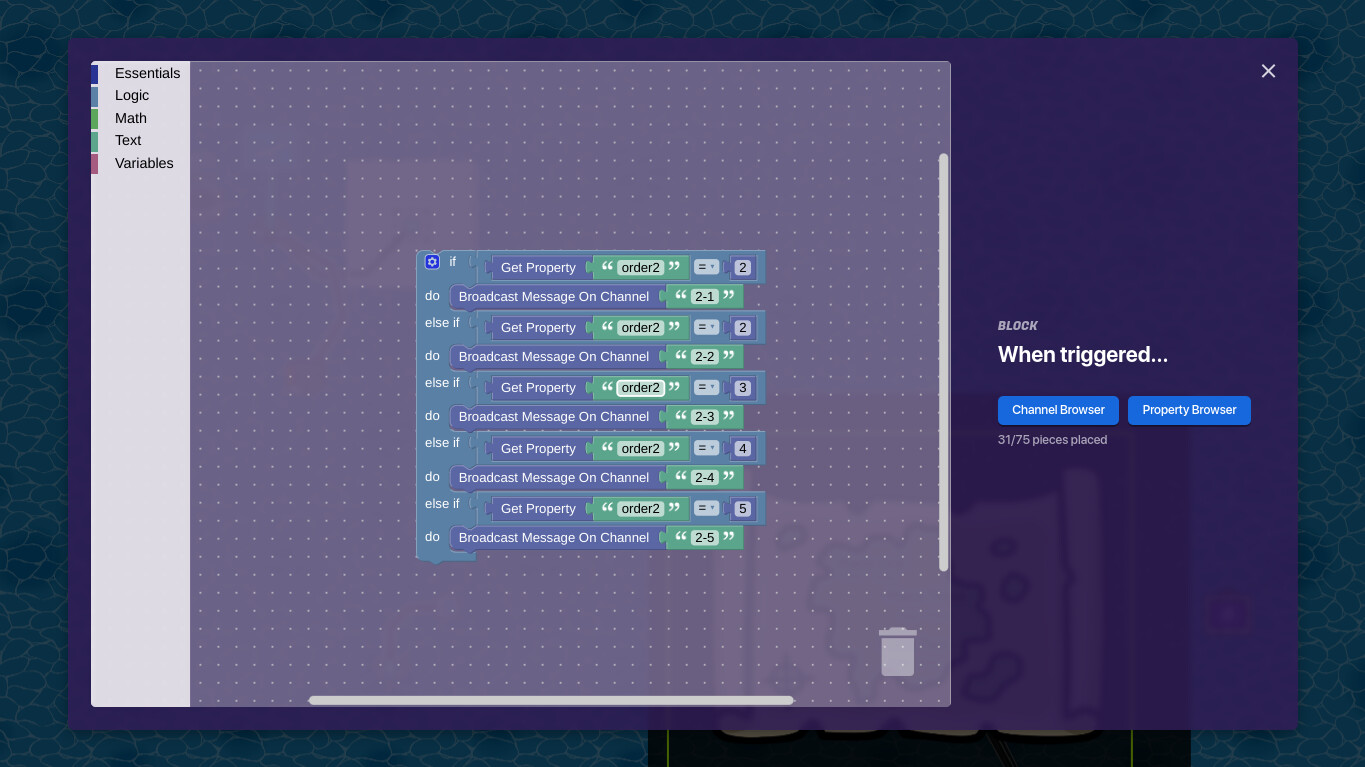
You keep on adding the same thing until it reaches how many people your game can have.
Ex. If my game could have 5 people max, this would be my code
Step Six
Go into the text on the map(in Step One of this section)
Add as many ‘Text’ as there will be players in each place(in my example, this only game only has a max of 2 people)
Then, click when receiving a channel, and put in 1-1
Last, put in this code
Step Seven
Repeat this process for every other location, except replace all the 2s with [whatever location number it is] in the channels. (excluding the second number in the Trigger)
Common Problems
Sometimes for the Tracking teammates, it does not update. (Sometimes it does, sometimes it doesn’t)
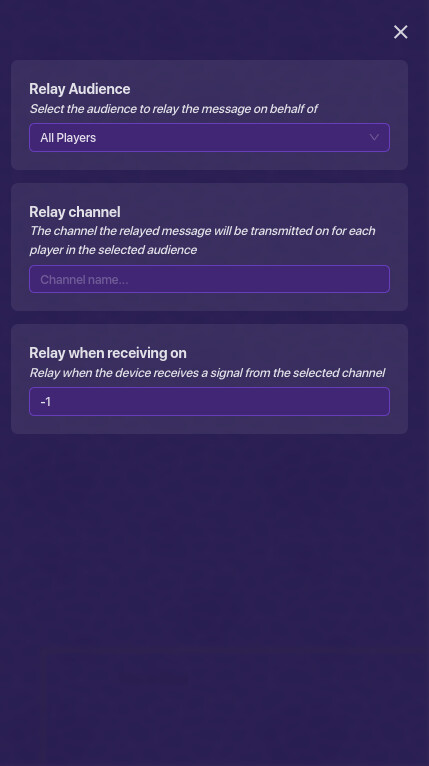
To fix this, add a relay with the ‘when player left’ channel, and wire it back to the checker

Bonus
You can add an Inventory Manager to stop the alerts every time you go into a new area.
ANNNDDDD You’re done!
- 1
- 2
- 3
- 4
- 5
- 6
- 7
- 8
- 9
- 10
- 1
- 2
- 3
- 4
- 5
- 6
- 7
- 8
- 9
- 10
- 1
- 2
- 3
- 4
- 5
- 6
- 7
- 8
- 9
- 10