Hello everyone!
Today I will tell you all how to make a realistic Humvee in gimkit.
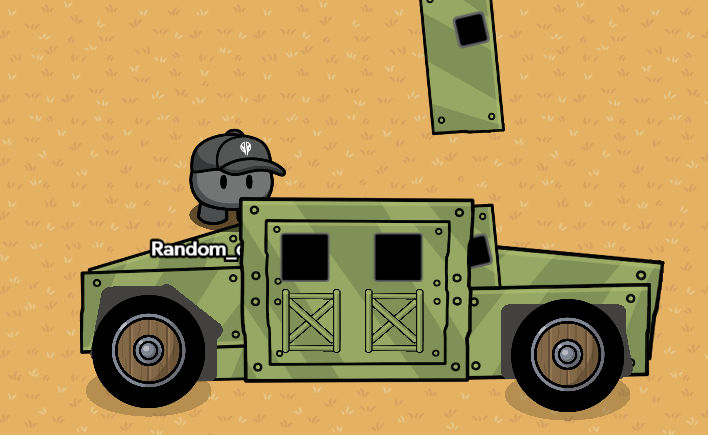
Here’s the recipe. (For guide, please scroll down for guide)
(THIS GUIDE WILL COST AROUND 460 MEMORY)
Ingredients
- 7 Metal plates
- 12 Metal poles
- 5 barriers
- 2 More barriers if including wheels
- And 2 Text boxes.
Colors. (Important!)
Olive: R=184, G=202, B=119
Black: R=0, G=0, B=0
Dark Grey: R=46, G=46, B=46
Now for the moment y’all are waiting for…
Guide time!
Steps
Okay Steps are bellow be warned it is very long.
Step 1
First get a barrier and turn the color to black.
Then also get 1 Circular Shield and put it next to it.

Step 2
Put the Shield over the barrier like in the photo. It’s your decision if you want to have shadows or not, I recommend not to but for the sake of the guide I’m just going to show you what it looks like with shadows on.

Step 3
Now you’re going to duplicate the tire into a reasonable length away from each other, Make sure both tires are lined up.

Step 4
Place two metal signs down and make one slightly smaller than the bigger one. Make sure to make the signs are lined up like in the photo.

Step 5
You’re now going to make both of those metal signs a Green olive color Using the color 184, 202, and 119.

Step 6
Now this is a tricky step, if you’re stuck you can try and ask me in the replies to help you. First, you’re going to want to make this many metal signs with the olive color, and adjusted to the size in the photo. (Why my gim built like that ![]() )
)

Step 7
Now you are going to want to place the metal signs you just made into these positions, it may look ugly now but trust the process…

Step 8
Now make a barrier with the color 66, 65, 61. and try and make it look like my photo, if You don’t want to make it look exactly like my guide, You don’t have to (Here’s an example of mine.)

Step 9
Now add 6 Metal poles colored Olive Rotated and duplicated like this.

Step 10 (We’re here already?)
Duplicate the iron poles twice placed like this in the photo, make sure to line it up properly (Fun fact! If you hold Shift, then highlight over a set of objects you can then duplicate all highlighted objects!)

Step 11
Now make a text box with this pasted into the text ![]()
![]() , also add another text on the side rotated a bit sideways.
, also add another text on the side rotated a bit sideways.

Almost done! (Last step.)
Finaly You’re going to add one last olive colored metal sign placed with the window on the side
And cut!
I have made some extra ideas in bellow to add some additional things onto the Humvee! (Turret, Antenna different coloring ex.)
Great guide huh?
Here’s some additional objects/features added for the guide.


If anyone has recommendations/Ideas/ratings for this guide feel free to reply! (Also please don’t be off topic.)


