For some strange reason there is a lot of backroom stuff on the help page. So, I put everything I have into this guide, I probably will make a part 2 though. We will make 3 Levels from the backrooms. YAY!
- Level 0
- The Pool Rooms
- Level Fun!
If I make a part 2, I will include this guide at the bottom, but here we go!
Terrain
Here’s the terrain you should use for the levels!
Level 0 Terrain
Floor: Dry Grass
Wall: Stone (Brown)
.
Pool Rooms Terrain
Floor: Light Scraps
Water: Water
Wall: Concrete
.
Level Fun! Terrain
Floor Area Red: Plastic Red
Floor Area Blue: Plastic Blue
Floor Area Green: Plastic Green
Starting Area: Dry Grass
Wall: Plastic Purple
Elevator (BlastBall Court)
.
Level FUN!
How to Make Level Fun!
For Level I will take the mechanic of the VR game Noclip: Vr’s level Fun.
.
For this level you need a key to unlock the door in 3 different colored areas, red, blue, and green. In the locked room you will get a item to help fix the elevator so you can escape. But be careful, there’s PartyGoers everywhere! Don’t let them see you!
.
How to Make the Colored Areas
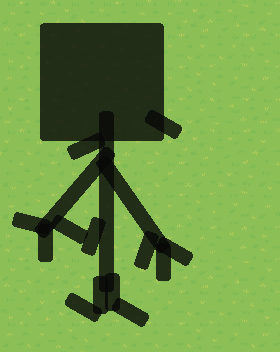
So you want the starting area to be dry grass, (GO CHECK OUT THE TERRAIN TEXT ABOVE!) and the wall is going to be plastic purple. Make the elevator (Starting Area) As shown below.

The Balloons are just emojis and the metal rods are for the elevator. The tables there for looks.
.
Make The Level a Maze
We need to make it a Maze because players can go and wander off and try to find the 3 colored rooms keys and doors to escape. You need to make it be harder, I made a example of barriers down below.

Making a Maze takes some time, so don’t give up on doing this. Again, this is an example, Add the red and green areas too, and DON"T forget about the doors!
That’s it for this part, if you want more in this, just reply to this post.
.
PartyGoers
Ok, we will be viewing some different ways and mechanics to make the PartyGoers.
** SENTRY WAY **
So for the Sentry way, you need to find a sentry that closest looks like a partygoer. Here’s a picture of one.

YOU CAN MAKE IT HOSTILE OR NON HOSTILE, IT’S UP TO YOU
BARRIER WAY
You use barriers to make the PartyGoers, it’s pretty simple.
EXAMPLE
Obviously I’m bad at barrier art so you should try to make it better and smaller so it doesn’t take up Room.
Add-On
So this is a cool add on, so if you didn’t know if you get seen by the partygoer they chase you, but we can’t do that so I decided to put cool add-on to this.
Add a Zone surrounding the Partygoer
add a Team Switcher
NOT NEEDED Get a Popup
Make the team switcher switch you to Spectator’s (Or if you’re making it cool and multiplayer, switch them to a different team to stop the players!)
Wire the zone to the Team switcher, Player Enters Zone - Switch to Team
NOT NEEDED Wire the Zone to the Popup Player Enters Zone - Open Popup
You can make the popup say “You OOFED” or something
Door, Key, And Coding
YOU READY FOR SOME CODING!
Door
Add a PROP barrier and make it brown by using the color thing-a-majig.
Add a Button and a Checker
Make sure to HAVE THE CHECKER HAVE THE SAME COLOR KEY AS THE COLORED ROOM YOU’RE IN!
Wire the button to the checker Button Pressed - Run Check
Wire the Checker to the Barrier Check Passed - Hide Prop
Key
Add a Item Image on a Table and Make it the key that matches the color of your area.
Add a button.
Add a Item Granter.
Wire Repeater
Wire the button to the item image. Button Pressed - Hide Image
Wire the button to the item granter Button Pressed - Grant Item
Wire the button to the wire Repeater Button Pressed - Repeat the Wire Pulse
Wire the Wire Repeater to the Button Wire Pulse Repeated - Deactivate Button
Elevator
To begin, let’s make the item collected overlay.
Get 3 Game Overlays.
Make it so it doesn’t show up in the beginning of the game (If Level Fun isn’t the first level.)
Make one say “Rods collected 1” and “Rods collected 2” and “All Rods Collected!”
We’ll get back to this later, for now let’s make the checkers and yes, there’s a ‘s’.
Checkers
You need to have 10 Checkers
3 for each key and 1 for the elevator.
There’s going to be 3 rods. And hey are going to be Plastic Bottles for the item.
For the keys you need this
Checker 1

Checker 2
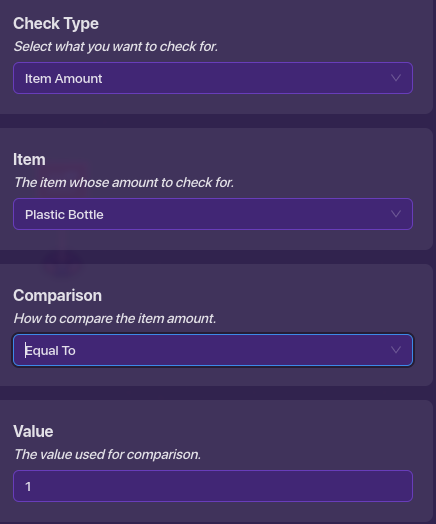
Checker 3
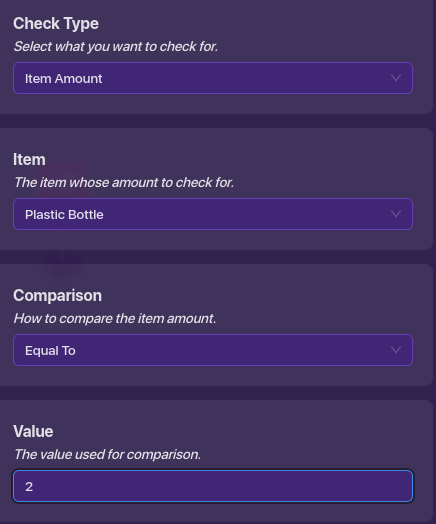
Have it if Checker 1 passes have the overlay to “Rods Collected 1”
Have it if Checker 2 passes have the overlay to “Rods Collected 2”
Have it if Checker 3 passes have the overlay to “All Rods Collected!”
MAKE THIS FOR ALL 3 RODS IN THE DOORS. MAKE SURE THERE IN THE DOOR!!!
ALSO WHEN YOU GET THE ROD MAKE SURE YOU PRESS A BUTTON THEN YOU GET IT AND WHEN YOU DO, GET A WIRE REPEATER, “BUTTON PRESSED, REPEAT THE WIRE PULSE!, WIRE PULSE REPEATED, DEACTIVATE BUTTON.”
Go to the elevator. Get another checker. This time it’ll be

Then you go to the NEXT LEVEL!
Well, that was a lot, what’s the next level I have to write? The Pool rooms? YES!
.
Pool Rooms!
How to Make The Pool Rooms
I should be lucky! The Pool Rooms doesn’t have any monsters! (That we know of…) Just Water and Slides! Ready to make this awesome experience? Let’s go! NOTE I DO NOT REALLY KNOW HOW THIS WORKS, sorry…
So I’m just pitching some ideas…
Areas of the PoolRooms
The PoolRooms are weird. There’s no order to them, maybe a slide will be your exit! OR YOUR DEMISE… Anyways the pool rooms don’t have a order so it’s up to YOU! to have a order. But I do have some ideas of getting around ![]()
SLIDES!
Slides are one of the only things in the pool rooms, use a slide to get to other areas! OR TO OOF!
EXAMPLE!

You can use slides to get to areas you otherwise could never get too! And don’t forget the water! MAKE SURE THERE IS LOTS OF WATER IN THE POOL ROOMS…
But what I’m trying to say is
MAKE IT A, M A Z E or MAZE!
There’s a lot of secrets Which can be used for LORE
Exit?
Well, it’s up to you. Only have one exit, or none at all. MAKE THE PLAYERS SUFFER! Spend the whole time in the Pool Rooms maze, just to go crazy to get to the next level. The rage quit, then come back for more… IT’S AMAZING!
MAKE IT BIG or small It’s up to you!
.
Level 0…
How to Make Level 0
Level 0, the most recognizable and the star of the backrooms. It makes other levels like Cough Cough Level 3… Look bad (Which I’m thankful for… Mostly for Level 3, it’s a mistake in the Backrooms.)
Design or Area
Just like the Pool Rooms, level 0 is a Maze. Level 0 is infinite too, but you don’t have to worry about that, or you’re insane and will make your whole map Level 0 to make them suffer. If you do do that, good for you.
So like I stated, Level 0 is a Maze. If you have never learned anything in your life, a Maze is a Maze. I’ not copy and pastings Google’s definition of a maze, that’s not a good thing to do. So, here’s a EXAMPLE!
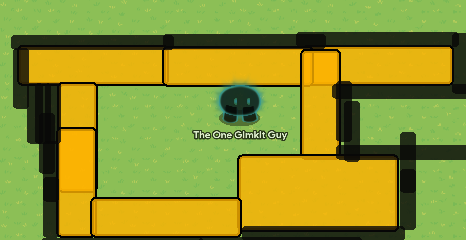
If your wondering, the black stuff is just the walls and outlines. I was sick making this part so I DON’T REALLY CARE IF IT LOOKS BAD!
REMEMBER use dry grass as the floor.
How to ESCAPE
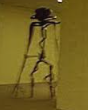
I have a idea. (THIS IDEA POPPED INTO MY HEAD, I DO NOT KNOW IF THIS HAS ALREADY BEEN TAKEN.) We can use generators to power up a door to escape. The generator prop will be a 3D Printer, and if you can’t see it or find it, here’s a picture!

Just again, use generators to power up a door to escape.
Coding 101 and Monster Stuff
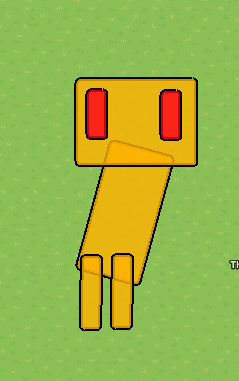
THE MONSTER
We all now the monster to Level 0 is…
MY GRANDMA!
She makes lovable cookies, and her secret ingredient is YOU! Don’t let her get you!
Enough enough with the joking, how do we make this Monste- I mean my Grandma in Gimkit. Our best bet… sadly, it’s barrier art. I’m terrible at barrier art so you try. I made one but it is bad. Here you go though.
I don’t know how your supposed to code it though so go to my Level Fun one and check out the monsters there and see.
CODING 101
Ok LET’S. START. CODING!!!
Door
Ok so you’ll need,
1 Checker
1 Barrier
(How many Generators you have +1) Game Overlays
GAME OVERLAYS
Make 1 Say “No Generators Powered”
The Other Ones depend on how many generators you have (FOR THIS EXAMPLE WE’LL JUST USE 3!) make them say
1 “1 Generator Powered”
2 “Generator Powered”
3 “All Generators Powered!”
If you want coding for this go check out My evel fun coding for them, or if you already know how don’t.
CHECKER AND BARRIER
For the checker, use a item for the generators, like a rod or something and do this, How many Generators you have is what you need to enter the door. Now code this to the barrier. “Check Passes - Hide Prop” Then your done.
Generators
Simple.
1 Button
1 Item Grant
1 Wire Repeater
Button will say, Get Power Energy! or something and the item granter can be anything you want, maybe a rod though.
Wire the Button to the Item Granter Button Pressed - Grant Item
Wire the button to the wire Repeater Button Pressed - Repeat the Wire Pulse
Wire the Wire Repeater to the Button Wire Pulse Repeated - Deactivate Button
.
AND THAT’S IT!!!
Thank you for looking at this guide, I really thank you a lot!
This took me ALMOST 10 DAYS TO MAKE! (Because I was procrastinating and sick)
Goodbye and wait for part 2! Maybe.

