Oh…
I don’t know for sure, though. I haven’t ever tried doing that.
It has been added (with credit in the description)!
Chapter 6 should be Chapter 5…
Also add concacenation and recursion and functions! (along with mathematics and text stuff)
Probably, although you can do more advanced things with properties.
No like you skipped chapter 5…
Definitely being added in later versions
You should also probably add that each time the block starts running, all the variables start off blank.
I feel like more can be added but here is what I was able to make;
Chapter 5 - How properties work (Created By @VALUEX)
In the previous chapter we learned how variables work, and we also learned a bit about properties. One thing though, if you decided to send an activity feed at the end of the example I had made for the variables chapter, you probably didn’t get anything…why? Well, it was because the property wasn’t actually made yet. What do I mean wasn’t actually made yet? What I mean is that just like variables we need to make properties, but instead with a device called the…Property.
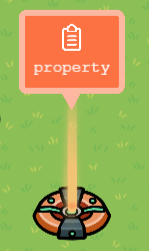
There it’s, but doesn’t it seem a bit plain? Well if you go inside we can set the name!
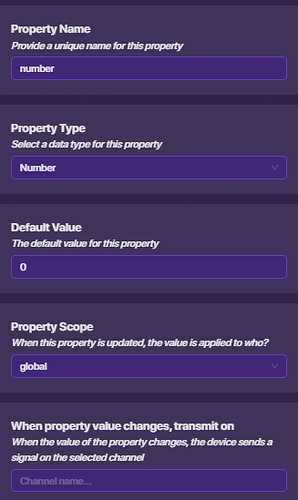
Above are the settings for my property.
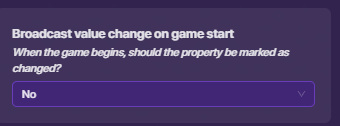
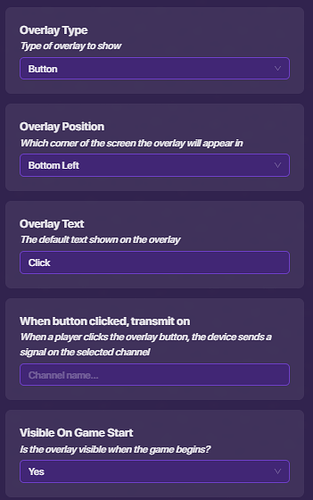
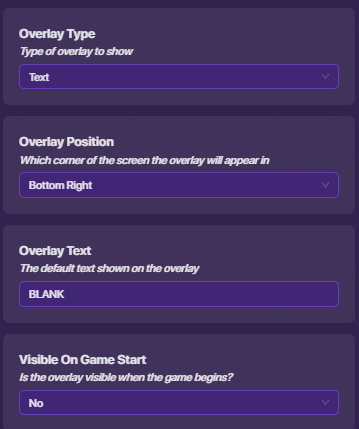
The settings above is only used in certain things and as you can see in its description it’s for when you want to send a message on a channel and consider the first value of the property as a change. Head on over to the device tab and add a game overlay! Set it to these settings(make sure the lifecycle is wired to it!):
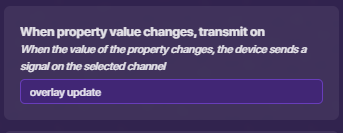
Now head on over to the property and change the last option in its settings to “Yes” and add this:
Then, go to the overlay and add a block that is “When recieving on channel…” and set the channel to “overlay update” and add these blocks:

Now you’re probably like “Whoa! Valuex what is going on here??!!” And it’s ok, afterall, this is to learn and no to throw you into a firepit to work on this all without an explanation. First, we set the variable num to the property number. Afterwards, we set the variable num to a random number between 1 and 10 and lastly, we set the text of the game overlay to "Points: " + the random number.
🌟 - New Block Discovered - Random integer from number to number
This block enables us to set different variables, properties and other things, to a random number between the given numbers!
🌟 - New Block Discovered - Create text with
This block combines different types of things and creates a text with it, that is a straight line, so the given example would give the output as: Points: [insert random number]!
When we combine different types of values using the Create text with block is called: concacenation. Which is ideal to most games that use block code. Now that was cool and all, but this is about properties not this random and concacenation stuff. Well, that’s what we’re about to do! Sure the overlay shows a random number, but it doen’t really show us true point values, instead it is just random. So let’s get points! Add another overlay, but with these settings:
And add a counter with these settings:

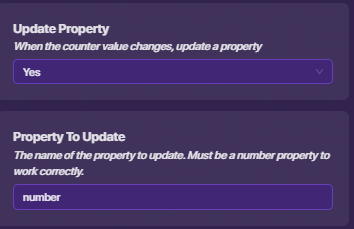
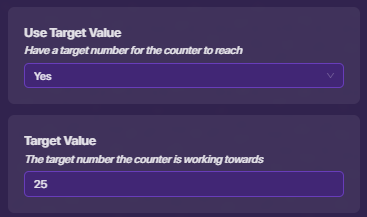
Wire the overlay to the counter like so: Button pressed —> Increment counter. Now, run it and see what happens! You pressed the button and…the same old thing happened. Why? Well in our block code for the point overlay is updating with a random number, and not by the true value of the property. Remove the random block along with that entire thing there and leave this:

And there you go it works! You may have noticed that the target value we put for the counter isn’t doing anything, why? Well we forgot that we need it to do something through a wire or a channel, so let’s do that! Wire the counter to the overlay like so: Target reached —> Hide overlay. Then, add a end game device and wire the counter to it like so: Target reached —> End game. Cool, we have a simple game that works! Try messing around with the values and stuff and see what you can make! Oh and for next time I will show you how to make a special adition to this game, so make sure to not delete it! (Unless you feel like rebuilding it all over again…)
End of Chapter 4
Wait… isn’t setting the variable num to the property number redundant?
GRAMMAR/SPELLING POLICE!
Misspelled previous.
I am here.
It has been added! Thanks so much for the help on this btw, I probably would have left it unfinished for a while.
Thanks, I’m glad you like it!
Chapter 6 - If statements +(Part 1) (Create by @VALUEX)
Previously, you learned how properties work, and even made a small game with block code! Now, we will add even more updates to that small game! How? If statements! Yes, the kings of logic they’re indeed. In Chapter 3, you learned the basics of If-Statements, but now we will go in depth of what they can really do.
Go ahead and add a new overlay and add these settings:
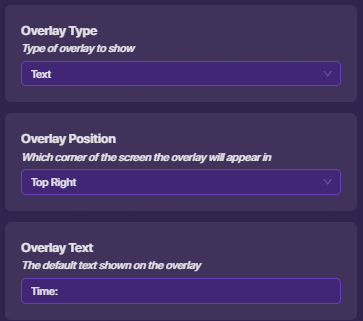
Then add a new counter with these settings:
Afterwards, add a repeater with these settings(make sure to wire the lifecycle to it):
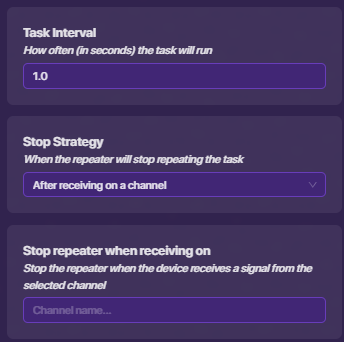
When something is repeated constantly, neverendlessly, it is called a infinite loop.
Nice! If you press play the same thing happens, right? Well, we need to add some block code!
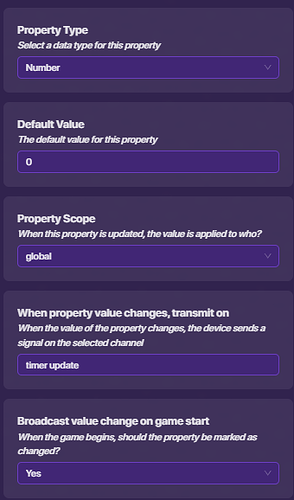
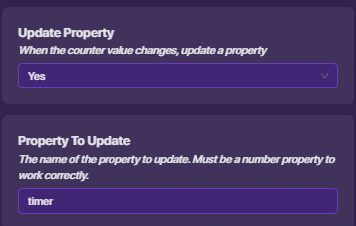
Add a property called timer, with these settings:
Now, add a block of code for the new overlay and make it the same channel we used for the property. Next, add this code to the overlay:
And run the game! You see the overlay updating! That’s great! You may notice if the time surpasses 60s it just keep going up and up and up, but that isn’t how time works, right? So add these blocks:
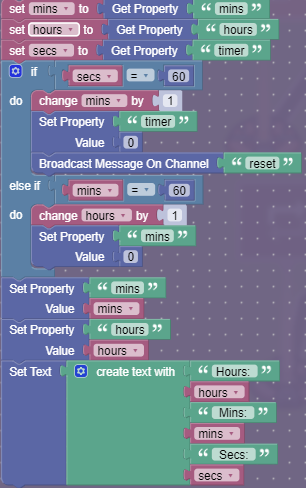
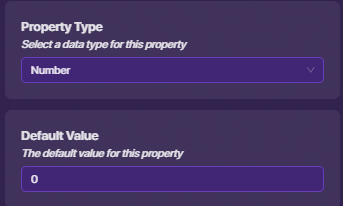
There you have it! A fully functional system for converting time and showing it! There is a lot to take in here, so let me explain it all, one step at a time! All that is happening is that it is converting the number of seconds to minutes, once it surpasses 60 seconds, and if the minutes surpass 60, then the hours increase by 1. This is a timer, but advanced, and you can edit it if you want! Make sure to have added the two properties minutes, and hours, with these settings:
You may also notice that in the logic gate(if statement) it has something conected called the
else if block. In order to add it, click on the gear button next to “if” in the if statement and it should show up this: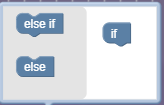
Drag the else if block onto the if statement and done! You can see that there is a block called
else which we will get to in the next part of this chapter.
We start off by declaring our variables(most programmers do so) then we add our logic gate(if statement). If you remeber Chapter 3 - Intro to If-Statements, we learned how if statements work, but not how else if works, so let me explain it. An else if statement is a very important part of logic gates, why? It allows us to add more if statements, without using another if statement block. This shortens code, but does the same thing as an if statement. So in reality the code where it says: else if (mins == 60) do: chage mins by 1, set property "timer" to 0, broadcast message on channel "reset" it really is just saying: if (mins == 60) do: change mins by 1, set property "timer" to 0, broadcast message on channel "reset"
🌟 - New Block Discovered - else if
**The else if block is just a if statement, but inside of the if statement. When multiple ones are threaded with the same check for a certain value of something, it will go checking down one by one, until it finds the one that does pass the check. It can also save space! In order to use it tap on the gear button next to the if block! **
That’s great! We learned something new and our small game is coming together! In part 2 of this chapter I will show you how to use the else block and work with more math blocks!
End of Chapter 6
I messed up when I was writing the draft…so don’t use that it’s a WIP.
Alright, message whenever it’s ready!
